Tantillus Upgade
Posted by cfellows
|
Tantillus Upgade August 30, 2013 10:16PM |
Registered: 10 years ago Posts: 28 |
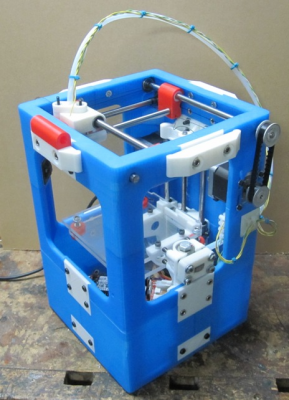
I recently acquired a Tantillus from a local enthusiast. It needed some work but the price I paid for it reflected that.
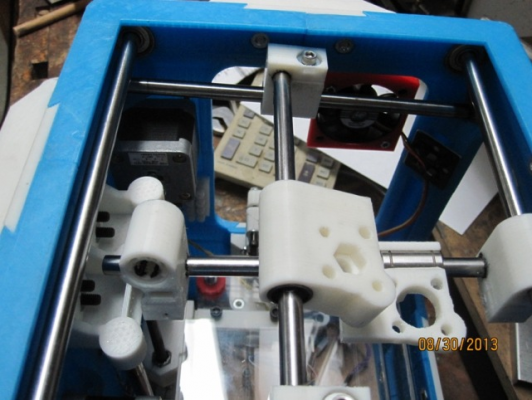
I purchased some 8mm hardened shaft from McMaster Carr to replace the middle x-y rods, probably made from unhardened drill rod and pretty rough from from the action of the linear bearings. Also, the printed plastic bushings on the outside x-y rails had quite a bit of slop, so I machined some UHMW bushings on my metal lathe.
I think these will wear better than the printed versions and they are lighter (and cheaper) than bronze bushings.
I'm also making some upgrades. I'm replacing the plastic gears with timing pulleys and belts. I think these will be quite a bit quieter than the gears.
I'm also making my own hot-end.
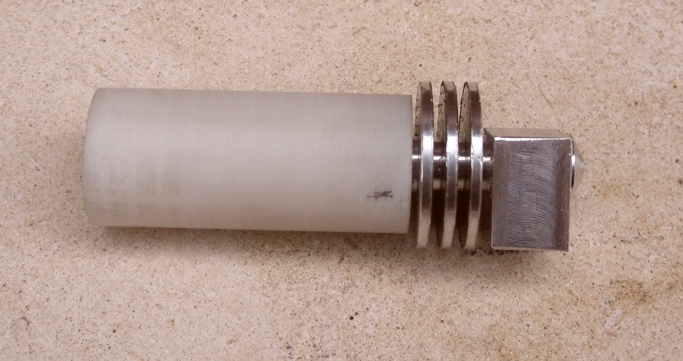
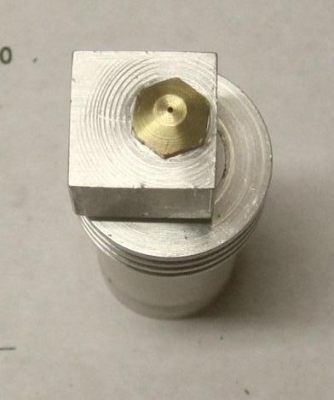
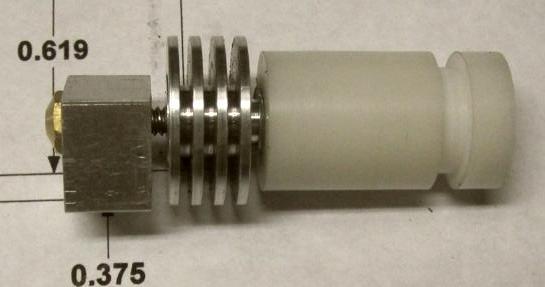
Although copied from the J-Head, I'm adding a finned section between the plastic barrel and the heater block. I'm going to try Corian for the plastic barrel and am hoping the finned section will sink enough of the heat to keep the Corian from melting.
I've been a hobbyist machinist for many years, but this is my first foray into 3D printers. I'm pretty excited about it and certainly welcome any ideas, suggestions, and criticisms from any and all.
Chuck
|
Re: Tantillus Upgade August 30, 2013 11:53PM |
Registered: 14 years ago Posts: 47 |
|
Re: Tantillus Upgade August 31, 2013 04:24PM |
Registered: 10 years ago Posts: 28 |
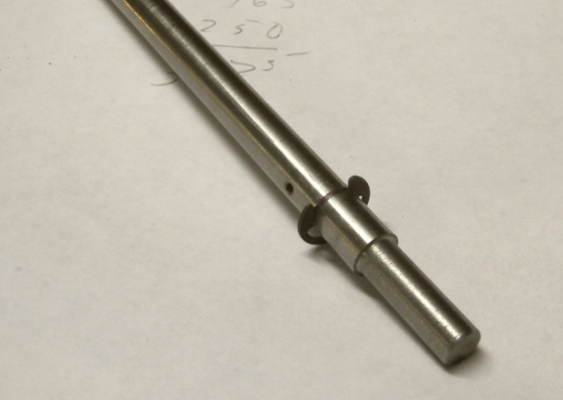
I wasn't real comfortable with the fact that the outside x-y rods were only held in place by the gears and tension on the fishing line. Since there's not enough room for a collar, I decided to install e-clips.
Cutting the grooves is pretty easy with a dremel cutoff blade.
Of course, having a lathe to mount everything in makes it easier, but I expect a fixture to hold the bar and rotate it against a dremel cutoff blade could be done without too much work.
Chuck
Edited 1 time(s). Last edit at 08/31/2013 04:25PM by cfellows.
|
Re: Tantillus Upgade August 31, 2013 05:47PM |
Registered: 12 years ago Posts: 195 |
|
Re: Tantillus Upgade September 01, 2013 04:04AM |
Registered: 11 years ago Posts: 111 |
Nice mod on the e-clips, my solution was loctite wicking grade, but now I am fearing the day I have to take things apart.
Watch out with Corain I think the glass transition temp is 100oC. I wanted to try Macor for mine, but so far the PEEK thermal break has been running fine up to head temps of 240oC, so I have not bothered yet.
Watch out with Corain I think the glass transition temp is 100oC. I wanted to try Macor for mine, but so far the PEEK thermal break has been running fine up to head temps of 240oC, so I have not bothered yet.
|
Re: Tantillus Upgade September 01, 2013 02:15PM |
Registered: 10 years ago Posts: 28 |
I'm still thinking through the hot end assembly. Part of me wonders if I'm not spending a little too much effort trying to circumvent the use of PEEK for the body. It does seem like the ideal solution.
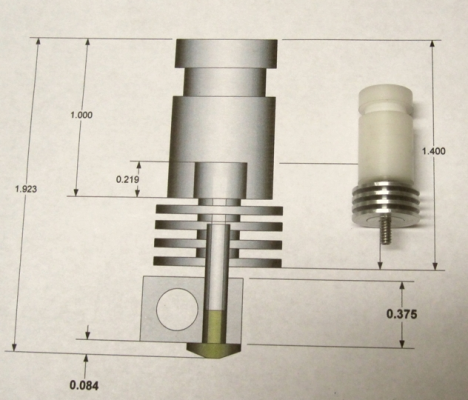
Not giving in yet. Here's my latest design...
Trying to keep as much heat away from the PLA carriage as possible. Same with the Corian body. So, closest to the heater block is a 6-32 stainless screw. Next is a finned, aluminum heat sink, then the Corian. I would probably be more confident of this design if I had a fan mounted on the carriage blowing across the aluminum fins, but space inside the Tantillus is at a premium.
A 2mm hole is drilled through the whole assembly. I'm also concered about a smooth passageway for the filament to pass through and so many junctions makes it dubious that I've achieved the best possible result.
Chuck
|
Re: Tantillus Upgade September 01, 2013 07:57PM |
Registered: 10 years ago Posts: 28 |
Got the J-Head pretty well finished. Only thing left is to mount the resistor and the thermistor and try it out!
The filament slides all the way in with no catching or binding.
Chuck
The filament slides all the way in with no catching or binding.
Chuck
|
Re: Tantillus Upgade September 04, 2013 10:34PM |
Registered: 10 years ago Posts: 28 |
Started restringing the Tantillus tonight. Not a job for the impatient or faint of heart! I did find that a dental pick, one of a set I bought at Harbor Freight, made the job a lot easier. There's one pick in particular, with a triple angled pick on each end, that really helped, especially with my stiff sausage fingers. Gotta say, replacing the fishing line with timing belts is looking mighty attractive right now. One axis done, one to go...
Chuck
Chuck
|
Re: Tantillus Upgade September 05, 2013 07:57AM |
Registered: 11 years ago Posts: 23 |
The clips on the rods are a great addition, but no lathe in my small workshop makes it difficult to implement.
I have been running Tantillus on HTD 3mm belts with great results and and low noise. But every few hours of print I need to push the outer rods back into their place as they shift around 1-2 mm.
I have been running Tantillus on HTD 3mm belts with great results and and low noise. But every few hours of print I need to push the outer rods back into their place as they shift around 1-2 mm.
|
Re: Tantillus Upgade September 13, 2013 08:02PM |
Registered: 13 years ago Posts: 2,947 |
Looks good. Very nice upgrades. The cables on the printed case are a little bit of a pain in the neck (not so much on the laser cut machine).
| FFF Settings Calculator | Gcode post processors | Geometric Object Deposition Tool Blog |
| Tantillus.org | Mini Printable Lathe | How NOT to install a Pololu driver |
|
Re: Tantillus Upgade September 27, 2013 12:04AM |
Registered: 10 years ago Posts: 28 |
Haven't posted for a while. I was having a problem with an intermittent error with the thermistor (which I had disabled) while trying to get the motor movements working and in the right direction. I finally discovered that the wires connected to the thermistor input were shorting out through some melted insulation. I replaced the wire and am getting close to my firstprint. Only thing left is to hook up the hot end.
Chuck
Chuck
|
Re: Tantillus Upgade September 27, 2013 01:45PM |
Registered: 14 years ago Posts: 47 |
Split shaft collars might be usable in place of clips, but I don't know that there's room in the machine to install them.
mfeherpataky Wrote:
-------------------------------------------------------
> The clips on the rods are a great addition, but no
> lathe in my small workshop makes it difficult to
> implement.
>
> I have been running Tantillus on HTD 3mm belts
> with great results and and low noise. But every
> few hours of print I need to push the outer rods
> back into their place as they shift around 1-2 mm.
|
Re: Tantillus Upgade September 27, 2013 09:38PM |
Registered: 10 years ago Posts: 28 |
I've decided to take my Tantillus upgrade a big step further. I'm going to convert it to Goopyplastics variant. I ordered the 2020 beam from Misumi today and will start printing the plastic parts tomorrow. I also plan to replace the spectra cabling with belts. I plan to mount the pulleys and belts on the outside of the case.
Chuck
Chuck
|
Re: Tantillus Upgade September 28, 2013 01:22AM |
Registered: 10 years ago Posts: 28 |
|
Re: Tantillus Upgade September 29, 2013 11:27PM |
Registered: 10 years ago Posts: 28 |
The Tantillus original is mechanically and electrically ready to print.
Only thing left is to remount the fans and figure out how to hook them up to the Sanguinololu board. I will be using the Tantillus to print the parts needed for the variant that I'm also building.
Chuck
Only thing left is to remount the fans and figure out how to hook them up to the Sanguinololu board. I will be using the Tantillus to print the parts needed for the variant that I'm also building.
Chuck
|
Re: Tantillus Upgade September 30, 2013 12:00PM |
Registered: 12 years ago Posts: 195 |
If you don't plan on a heated bed, you can repurpose the HBP FET to run the fan.
What I did was to pull out the AVR, bend pin 18 (HOTBED) out a bit, then reinsert it so that pin sits outside the socket. Then solder a wire on the back of the board between AVR pin 5 (PB4-PWM) and AVR pin 18. Run your fan(s) directly to the HBP connector between the + and - pins.
Then configure Marlin to board type 65, Azteeg X1, which is identical to Sanguinololu 1.3a software-wise with the exception of the fan drive.
|
Re: Tantillus Upgade September 30, 2013 04:30PM |
Registered: 10 years ago Posts: 28 |
Thanks, Pokey, that's a good tip. I was wondering how I could use the heated bed connection on the Sanguinololu.
Here's a video of my first print (sans cooling fans).
TantillusFirstPrint
Chuck
Here's a video of my first print (sans cooling fans).
TantillusFirstPrint
Chuck
|
Re: Tantillus Upgade September 30, 2013 11:22PM |
Registered: 10 years ago Posts: 28 |
pokey9000 Wrote:
-------------------------------------------------------
> If you don't plan on a heated bed, you can
> repurpose the HBP FET to run the fan.
>
> What I did was to pull out the AVR, bend pin 18
> (HOTBED) out a bit, then reinsert it so that pin
> sits outside the socket. Then solder a wire on
> the back of the board between AVR pin 5 (PB4-PWM)
> and AVR pin 18. Run your fan(s) directly to the
> HBP connector between the + and - pins.
>
> Then configure Marlin to board type 65, Azteeg X1,
> which is identical to Sanguinololu 1.3a
> software-wise with the exception of the fan drive.
Can you explain to me how this works? I actually have 2 fans, each with 3 wires.
Thx...
Chuck
|
Re: Tantillus Upgade September 30, 2013 11:48PM |
Registered: 10 years ago Posts: 28 |
|
Re: Tantillus Upgade October 01, 2013 10:41AM |
Registered: 12 years ago Posts: 195 |
Using the mod I posted above, the HBP FET can be driven with a PWM output which chops power to the fans with a variable duty cycle allowing you to control the speed. Without the mod, the AVR can only switch the fan off and on (unless you use software PWM, which you don't want to). The M106 Sxx and M107 commands can be used to control the speed. Most slicers can adjust the fan speed as they go for extra cooling on fast layers.
You can gang the fans in parallel. The HBP and hotend connectors have four pins, with two tied together to the +12V rail and the other two tied together to the associated FET. You can run one fan's + and - to one pair of pins, and the other's + and - to the other. The fans you have also have a tachometer output that you can leave unconnected (yellow I think?).
I had it wired up with jumper leads and electrical tape because I was lazy, but now that I think of it, it would be much cleaner to get EARCH:MAIN_RSLT_PG" target="_blank" rel="nofollow">one of these from Fry's and alter it. Since it's a Molex KK you can pull the red and black pins out of the 3 pin socket and put them in a 4 pin if you have any spares. Alternatively you can trim one of the ears off, cut the yellow tach wire, and straddle the + and - across the center of the HBP connector.
Sorry, only registered users may post in this forum.
