Wingnut's build
Posted by wingnut
|
Re: Wingnut's build November 04, 2013 10:16PM |
Registered: 10 years ago Posts: 80 |
Poking around the gcode has been enlightening. The 'good' file is using feed 0.2 and head 5.0 for perimeters. The 'bad' file is using feed 0.2 and head 15.0. For Loop, the difference is 0.6/15.0 vrs 0.2/15.0. Some big differences. I see were the head speeds are set in Kisslicer but I still can't find a setting for feed speed.
For the sake of brevity, I'm just pasting the part under "Actual Slicing Settings". I'm assuming that this is the important part.
Working file:
; *** Actual Slicing Settings As Used ***
;
; layer_thickness_mm = 0.25
; extrusion_width = 0.4
; num_ISOs = 3
; wall_thickness = 0.8
; infill_style = 5
; support_style = 0
; support_angle = 44.9
; destring_min_mm = 1
; stacked_infill_layers = 1
; raft_style = 0
; extra_raft_depth = 0.25
; oversample_res_mm = 0.125
; crowning_threshold_mm = 1
; loops_insideout = 0
; solid_loop_overlap_fraction = 0.5
; inflate_raft_mm = 0
; inflate_support_mm = 0
; model_support_gap_mm = 0.5
; infill_st_oct_rnd = 1
; support_Z_max_mm = 1e+020
; sheathe_Z_max_mm = 0
; inset_surface_xy_mm = 0
; seam_jitter_degrees = 0
; seam_depth_scaler = 1
; Speed vs Quality = 1.00
; Perimeter Speed = 5.00
; Solid Speed = 15.00
; Sparse Speed = 30.00
Non working file:
; *** Actual Slicing Settings As Used ***
;
; layer_thickness_mm = 0.2
; extrusion_width = 0.4
; num_ISOs = 2
; wall_thickness = 1
; infill_style = 4
; support_style = 0
; support_angle = 44.9
; destring_min_mm = 1
; stacked_infill_layers = 1
; raft_style = 1
; extra_raft_depth = 0.5
; oversample_res_mm = 0.125
; crowning_threshold_mm = 1
; loops_insideout = 0
; solid_loop_overlap_fraction = 0.5
; inflate_raft_mm = 2
; inflate_support_mm = 0
; model_support_gap_mm = 0.5
; infill_st_oct_rnd = 1
; support_Z_max_mm = 1e+020
; sheathe_Z_max_mm = 0
; inset_surface_xy_mm = 0
; seam_jitter_degrees = 0
; seam_depth_scaler = 1
; Speed vs Quality = 1.00
; Perimeter Speed = 15.00
; Solid Speed = 15.00
; Sparse Speed = 20.00
;
|
Re: Wingnut's build November 04, 2013 10:36PM |
Registered: 13 years ago Posts: 2,947 |
It looks to me like it is not using the correct profiles. There are no profiles in the Tantillus profiles that have an extrusion width of 0.4mm. You are using these profiles [www.tantillus.org] from this page [www.tantillus.org] .
What OS are you using? I know there was a bug where if a windows user tried to use a profile generated on Linux it would not use the current settings but rather revert to the default values for the slice and never tell you. I know I have fixed that issue but maybe Windows 8 or the the new Mac OS have a new similar issue.
At the beginning of the gcode file look through the settings for these:
; printer_name = Tantillus
; material_name = PLA
; style_name = 0.5 Coarse or which ever profile you had selected
; support_name = None
Also I would expect to see these speeds when printing normally. ( if you have the speed slider in the middle )
; Speed vs Quality = 0.50
; Perimeter Speed = 45.00
; Solid Speed = 37.50
; Sparse Speed = 50.00
| FFF Settings Calculator | Gcode post processors | Geometric Object Deposition Tool Blog |
| Tantillus.org | Mini Printable Lathe | How NOT to install a Pololu driver |
|
Re: Wingnut's build November 04, 2013 10:51PM |
Registered: 10 years ago Posts: 80 |
I changed the extrusion width to match my hot end.
I think I found the culprit though. I moved the downloaded configuration files out of the way which causes Kisslicer to generate defaults. I then compared the defaults to the tantillus version and I believe I spotted the culprit. The default min flow rate (flow_min_mm3_per_s) is 0.5, the Tantilus version is 0.01. I don't understand why this makes the difference though. The wording in the description of 'minimum' flow fate suggests that the slicer is supposed to compute some target flow rate based on the desired head speed. If the desired head speed is too low then the Kisslicer would increase the feed rate *and* the head speed to maintain the same ratio. But it appears that this is not what it's doing. OK. So at least I now have a knob to turn. Thanks for the help.
I think I found the culprit though. I moved the downloaded configuration files out of the way which causes Kisslicer to generate defaults. I then compared the defaults to the tantillus version and I believe I spotted the culprit. The default min flow rate (flow_min_mm3_per_s) is 0.5, the Tantilus version is 0.01. I don't understand why this makes the difference though. The wording in the description of 'minimum' flow fate suggests that the slicer is supposed to compute some target flow rate based on the desired head speed. If the desired head speed is too low then the Kisslicer would increase the feed rate *and* the head speed to maintain the same ratio. But it appears that this is not what it's doing. OK. So at least I now have a knob to turn. Thanks for the help.
|
Re: Wingnut's build November 04, 2013 10:57PM |
Registered: 13 years ago Posts: 2,947 |
Ok the extrusion width should be much wider for a 0.2mm layers and a 0.4mm nozzle. You can use the calculator in my signature get the correct settings.
The calculator gives a width of 0.48mm for 0.2mm layer height
The speeds should be around:
Perimeter speed = 55 mm/s
Solid infill speed = 50 mm/s
Sparse infill speed = 60 mm/s
The temperature for PLA should be about 202c
If you keep having trouble I would remove Kisslicer entirely and start from scratch. Note: Kisslicer also creates a save file in your hidden user directory to save stuff like pro user settings and interface settings.
| FFF Settings Calculator | Gcode post processors | Geometric Object Deposition Tool Blog |
| Tantillus.org | Mini Printable Lathe | How NOT to install a Pololu driver |
|
Re: Wingnut's build November 04, 2013 10:58PM |
Registered: 10 years ago Posts: 80 |
Oh.. and a note about 64bit Windows and configuration files. I figure out the cause of my earlier confusion regarding the placement of config files. It appears that, if you start Kisslicer with no config files, the defaults that are generated are put in $(LOCALAPPDATA)\VirtualStore. Once this happens, copying new files to the the location of kisslicer.exe has no effect because windows has redirected Kisslicer to the other path. However, if you delete the generated files, Windows resets this setting allowing Kisslicer to load the correct files. This is a security feature of 64bit windows..
|
Re: Wingnut's build November 04, 2013 11:01PM |
Registered: 13 years ago Posts: 2,947 |
Quote
wingnut
Oh.. and a note about 64bit Windows and configuration files. I figure out the cause of my earlier confusion regarding the placement of config files. It appears that, if you start Kisslicer with no config files, the defaults that are generated are put in $(LOCALAPPDATA)\VirtualStore. Once this happens, copying new files to the the location of kisslicer.exe has no effect because windows has redirected Kisslicer to the other path. However, if you delete the generated files, Windows resets this setting allowing Kisslicer to load the correct files. This is a security feature of 64bit windows..
Good to know. This will probably help others.
| FFF Settings Calculator | Gcode post processors | Geometric Object Deposition Tool Blog |
| Tantillus.org | Mini Printable Lathe | How NOT to install a Pololu driver |
|
Re: Wingnut's build November 04, 2013 11:19PM |
Registered: 10 years ago Posts: 80 |
|
Re: Wingnut's build November 04, 2013 11:29PM |
Registered: 13 years ago Posts: 2,947 |
Quote
wingnut
Oh.. So Extrusion Width is the parameter that drives the filament feed rate? Good to know.
Yeah basically. With RepRap we have the extruder as an axis and we know the diameter of the filament. So for any given volume we only have to request the extruder move the filament a certain distance and we get the correct volume of plastic. So height times width times length of the extruded segment = volume to request as a length of filament which gets pushed through the extruder.
| FFF Settings Calculator | Gcode post processors | Geometric Object Deposition Tool Blog |
| Tantillus.org | Mini Printable Lathe | How NOT to install a Pololu driver |
|
Re: Wingnut's build November 05, 2013 09:25AM |
Registered: 10 years ago Posts: 80 |
Still having problems. I tried cranking the extrusion width as high as 80 and the gcode still has flow levels well below the original numbers. It didn't occur to me until this morning to wonder if the filament diameter is somehow being ignored. Will experiment some more tonight. I'm curious what kind of feed rate numbers are others getting for the test cube?
|
Re: Wingnut's build November 05, 2013 12:53PM |
Registered: 13 years ago Posts: 2,947 |
This is what they say but I have no idea what they mean and would personally ignore them as the first portion (0.7, 0.6) mean absolutely nothing as far as what the settings are set to. Maybe it is the multiplier of the max speed set in Kisslicer? But either way ignore that number and just look at the actual speeds.
; 'Perimeter', 0.7 [feed mm/s], 45.0 [head mm/s]
; 'Loop', 0.6 [feed mm/s], 37.5 [head mm/s]
; 'Solid', 0.6 [feed mm/s], 37.5 [head mm/s]
; 'Stacked Sparse Infill', 0.8 [feed mm/s], 50.0 [head mm/s]
Are you sure Kisslicer is still set to Relative 5D extrusion?
Look for this line to see what size filament was set.
; fiber_dia_mm = 3
Are you sure the correct filament is assigned to the extruder in the printer/extruders tab. Maybe you created a correct material profile for the 1.75 but you are not using it because the old one is assigned to the extruder.
Maybe zip up all your profiles and attach them so I can look through them.
| FFF Settings Calculator | Gcode post processors | Geometric Object Deposition Tool Blog |
| Tantillus.org | Mini Printable Lathe | How NOT to install a Pololu driver |
|
Re: Wingnut's build November 06, 2013 01:09AM |
Registered: 10 years ago Posts: 80 |
Quote
Sublime
Are you sure the correct filament is assigned to the extruder in the printer/extruders tab. Maybe you created a correct material profile for the 1.75 but you are not using it because the old one is assigned to the extruder.
.
doh! that was it. Didn't know that had to be assigned.
|
Re: Wingnut's build November 06, 2013 01:23AM |
Registered: 13 years ago Posts: 2,947 |
Glad we figured it out because I was running out of ideas. Let us know how it goes from this point. 
| FFF Settings Calculator | Gcode post processors | Geometric Object Deposition Tool Blog |
| Tantillus.org | Mini Printable Lathe | How NOT to install a Pololu driver |
|
Re: Wingnut's build November 06, 2013 12:36PM |
Registered: 10 years ago Posts: 80 |
I'm working now on replacing the bowden tube now. I did not have access to PTFE locally so I went with some polyethylene tubing from the local hardware store as a stop gap. It took so much force to push the filament through the tube that it blew out of the clamp at the extruder. It's pretty easy to hand feed plastic through the hot end so I don't think it's a temperature issue (to be verified). In any case, the PTFE bowden tube arrived in the mail yesterday so the timing is perfect. The first hurdle is that the O.D. on the PTFE tube is too small to use the original keeper nut so I have to find an alternative. I own a lathe so I'll probably just turn an aluminum disk that is the appropriate diameter and tap a small hole in it. I'm hoping that, with this fix, I'll be able to crank up the print speed. I was getting lots of slip with the previous setup at anything beyond the lowest setting.
Thanks for all the help Sublime. I feel kinda guilty now for not buying the printed parts from you...
Thanks for all the help Sublime. I feel kinda guilty now for not buying the printed parts from you...
|
Re: Wingnut's build November 07, 2013 01:15PM |
Registered: 10 years ago Posts: 80 |
Got the new bowden tube installed and it did indeed fix my feed speed problems. I haven't tried exploring the limits yet but it doesn't seem to have any problems keeping up with the speeds recommended by the Tantillus calculator so I'm happy.
I wanted to try out the work flow of creating things from scratch so I tried creating and printing a 40x40x20 open box with 2mm walls using Sketchup. The results are mixed. The quality of the print seems OK but sill not nearly as nice as some of the stuff I've seen here. Here's a pic. It's printed with the 'Fine' print settings from the Tantillus configuration (0.10 layers).
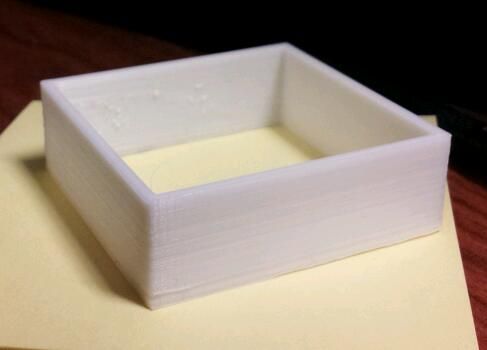
Apparently there was a problem with the export because the print came out with a 2mm gap between the bottom and the walls so the bottom wasn't attached except for a thin first layer. I guess there are some gotchas to learn about when it comes to generating printable parts from sketchup.
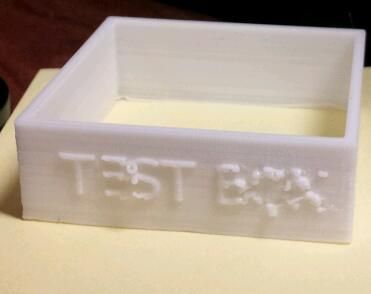
The other thing I attempted was to emboss one side of the box with lettering. This too had mixed results but at this point, I'm not sure if it's a sketchup issue or a problem with printer.
I wanted to try out the work flow of creating things from scratch so I tried creating and printing a 40x40x20 open box with 2mm walls using Sketchup. The results are mixed. The quality of the print seems OK but sill not nearly as nice as some of the stuff I've seen here. Here's a pic. It's printed with the 'Fine' print settings from the Tantillus configuration (0.10 layers).

Apparently there was a problem with the export because the print came out with a 2mm gap between the bottom and the walls so the bottom wasn't attached except for a thin first layer. I guess there are some gotchas to learn about when it comes to generating printable parts from sketchup.
The other thing I attempted was to emboss one side of the box with lettering. This too had mixed results but at this point, I'm not sure if it's a sketchup issue or a problem with printer.

|
Re: Wingnut's build November 07, 2013 01:38PM |
Registered: 13 years ago Posts: 2,947 |
The prints look pretty good for this early in the printing process.
By the look of it the issues you are having are Sketchup issues. When we create a model we want it to be one single continuous shell. But the issue with your first test having the bottom disconnected sounds like your model is actually two parts intersecting. A square for the base and a box with a thin wall on top or intersecting the bottom. In a real modelling program you would Boolean together the parts to get one piece. I have no idea how or if you can boolean together parts in Sketchup. The second issue with the text could be the same issue or possibly just that the text is smaller then the resolution of Kisslicer. Does kisslicer show errors with the models?
One thing you will want to do is tighten the cables after a day or two of printing as they can become slack after a little while as the wraps around the rods settle.
| FFF Settings Calculator | Gcode post processors | Geometric Object Deposition Tool Blog |
| Tantillus.org | Mini Printable Lathe | How NOT to install a Pololu driver |
|
Re: Wingnut's build November 08, 2013 12:28PM |
Registered: 10 years ago Posts: 80 |
Played around some more last night.
Trying to get a handle on what I need to tweak to improve accuracy. The cables are definitely due for some tightening. I also noticed some flexing in the acrylic last night. I can see gap in the seam between the sides that grows and shrinks with movement of the carriage. Tonight I plan on chemically bonding all the seams. How does the stiffness of the printed case compare to the acrylic? Worth switching?
Been wondering also about what it would take to replace the gears in the extruder with belt drive. I would like to do this mainly to reduce the noise level. As it is now, the extruder is by far the noisiest thing on the printer. I like to work while the printer is running and if there are allot of retractions, it starts drilling into my head :-)
Edited 1 time(s). Last edit at 11/08/2013 12:37PM by wingnut.
|
Re: Wingnut's build November 08, 2013 01:47PM |
Registered: 13 years ago Posts: 2,947 |
That print looks good. Considering how small that is you are really advancing fast and should be finished tuning soon.
The printed case may be a little stiffer but is really hard to get the cables on compared the acrylic case due to it being 20mm smaller on the outside but the exact same inside. I have a wood case machine with the corners glued and it is really strong. The gaps in the seams of the case are normal and are a result of the laser cutter removing a small amount of material from the cut.
I have thought about this and it should work well. But that would require finding a belt and pulleys (or printing pulleys) which I am to impatient for. You could try a set of herringbone gears which have far less backlash. Just remember the teeth are smaller which makes them harder to print and don't last as long. You can get my original herringbone gears form the github repo if you go back through the commits to before I removed them. Or you could try these ones [www.thingiverse.com]
You can play with the "min jump" and "trigger" values in the material tab which define when a retraction occurs based on the travel afterwards. Also if you have a pro license for Kisslicer you could increase the crowning threshold (adaptive extrusion width threshold) to 5mm or longer so it does not do all those short extrusions which cause the retractions.
Edited 1 time(s). Last edit at 11/08/2013 01:49PM by Sublime.
Quote
wingnut
Trying to get a handle on what I need to tweak to improve accuracy. The cables are definitely due for some tightening. I also noticed some flexing in the acrylic last night. I can see gap in the seam between the sides that grows and shrinks with movement of the carriage. Tonight I plan on chemically bonding all the seams. How does the stiffness of the printed case compare to the acrylic? Worth switching?
The printed case may be a little stiffer but is really hard to get the cables on compared the acrylic case due to it being 20mm smaller on the outside but the exact same inside. I have a wood case machine with the corners glued and it is really strong. The gaps in the seams of the case are normal and are a result of the laser cutter removing a small amount of material from the cut.
Quote
wingnut
Been wondering also about what it would take to replace the gears in the extruder with belt drive. I would like to do this mainly to reduce the noise level. As it is now, the extruder is by far the noisiest thing on the printer. I like to work while the printer is running and if there are allot of retractions, it starts drilling into my head :-)
I have thought about this and it should work well. But that would require finding a belt and pulleys (or printing pulleys) which I am to impatient for. You could try a set of herringbone gears which have far less backlash. Just remember the teeth are smaller which makes them harder to print and don't last as long. You can get my original herringbone gears form the github repo if you go back through the commits to before I removed them. Or you could try these ones [www.thingiverse.com]
You can play with the "min jump" and "trigger" values in the material tab which define when a retraction occurs based on the travel afterwards. Also if you have a pro license for Kisslicer you could increase the crowning threshold (adaptive extrusion width threshold) to 5mm or longer so it does not do all those short extrusions which cause the retractions.
Edited 1 time(s). Last edit at 11/08/2013 01:49PM by Sublime.
| FFF Settings Calculator | Gcode post processors | Geometric Object Deposition Tool Blog |
| Tantillus.org | Mini Printable Lathe | How NOT to install a Pololu driver |
|
Re: Wingnut's build November 08, 2013 03:34PM |
Registered: 10 years ago Posts: 80 |
Funny thing about belts is that it took me a three tries to find belts that I liked (this one's too long, that one's too skinny, etc). The last set I ordered came from China (read, cheap and slow shipping) so I ordered ten :-). I will be the guinea pig then and try to come up with a belt driven extruder.
|
Re: Wingnut's build November 08, 2013 03:54PM |
Registered: 13 years ago Posts: 2,947 |
Quote
wingnut
Funny thing about belts is that it took me a three tries to find belts that I liked (this one's too long, that one's too skinny, etc). The last set I ordered came from China (read, cheap and slow shipping) so I ordered ten :-). I will be the guinea pig then and try to come up with a belt driven extruder.
You could try the belts I used for the gear replacements on X and Y. The part number is in the readme on github.
| FFF Settings Calculator | Gcode post processors | Geometric Object Deposition Tool Blog |
| Tantillus.org | Mini Printable Lathe | How NOT to install a Pololu driver |
|
Re: Wingnut's build November 08, 2013 04:09PM |
Registered: 10 years ago Posts: 80 |

Sorry, only registered users may post in this forum.