Zungman's Build
Posted by zungmann
|
Zungman's Build October 20, 2013 05:27AM |
Registered: 11 years ago Posts: 290 |
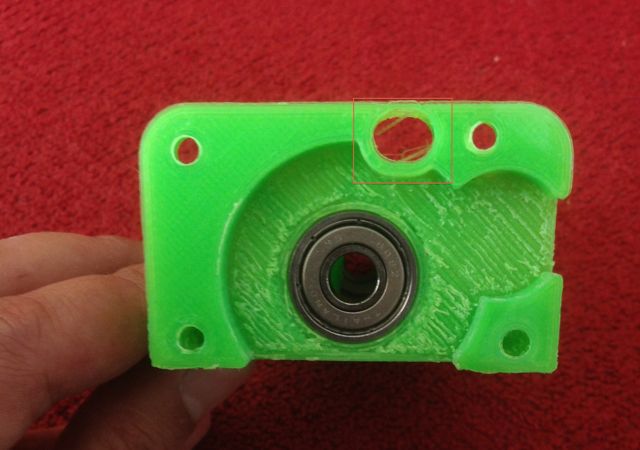
I think better start a new thread rather than hijacking others to post my build. I am building a metric varian, and now have printed all the plastic parts. Most of the plastic parts are perfect. Just found an issue: On the extruder body, at the bottom part I find the extruder gear hit a wall for a hole which should not be there I think, see attached. So then I cut it.
Another minor one is the hole for motor shaft of the extruder motor is just bit too small and the slots for the two nuts just too big.
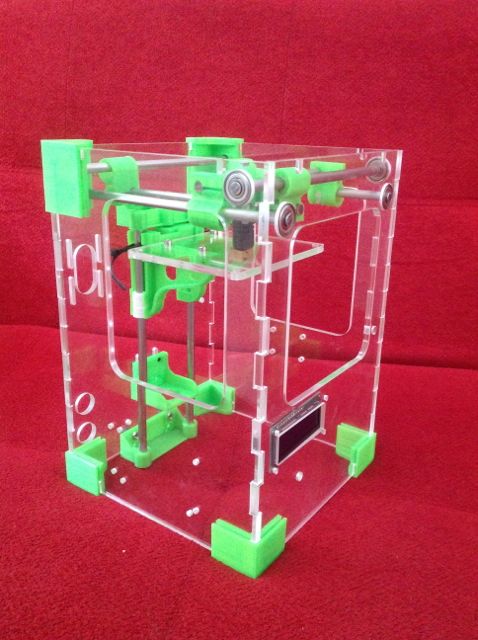
Attach my latest stage of the build. XY has not been installed, still finding out the LM8SUU bearing. And next big challenges are drilling the driver rods and getting or making the hobbed bolt. I am thinking to not drill the rods.
I plan to use old/used Sanyo Denki for the extruder motor, just found a local seller selling a cheap one. But the model 103-594-05XD02 seem too old, I could not find the datasheet for it. It says that 0.9 deg/step. Do you think 0.9deg/step will bring an issue for the extruder?
Another minor one is the hole for motor shaft of the extruder motor is just bit too small and the slots for the two nuts just too big.
Attach my latest stage of the build. XY has not been installed, still finding out the LM8SUU bearing. And next big challenges are drilling the driver rods and getting or making the hobbed bolt. I am thinking to not drill the rods.
I plan to use old/used Sanyo Denki for the extruder motor, just found a local seller selling a cheap one. But the model 103-594-05XD02 seem too old, I could not find the datasheet for it. It says that 0.9 deg/step. Do you think 0.9deg/step will bring an issue for the extruder?
|
Re: Zungman's Build October 20, 2013 06:39AM |
Registered: 10 years ago Posts: 36 |
You need to break the interfering support plastic away as shown in the build guide:
HERE
Section 1, last photo. I remember that on the imperial version that this piece is thinned at each end to make it easier to break off with pliers. You may need to cut each end with knife or mini-saw.
Greg
HERE
Section 1, last photo. I remember that on the imperial version that this piece is thinned at each end to make it easier to break off with pliers. You may need to cut each end with knife or mini-saw.
Greg
|
Re: Zungman's Build February 26, 2014 09:25AM |
Registered: 11 years ago Posts: 290 |
Well, after a long pause and small progress along the time. Now time to complete the build. Assembly more or less completed. I just got the electronic and now wiring and testing the movement. X and Y doing ok but the Z seems to wobble a lot.
Another thing is no Pronterface, if I hit Y or Z Home move the Z, but not really homing. I read a post saying it is a bug in the Marlin version, is it? Not sure what was status now. I downloaded from Github; [github.com]
Is it fixed? If so then it must be something else….
Another thing is no Pronterface, if I hit Y or Z Home move the Z, but not really homing. I read a post saying it is a bug in the Marlin version, is it? Not sure what was status now. I downloaded from Github; [github.com]
Is it fixed? If so then it must be something else….
|
Re: Zungman's Build February 26, 2014 11:46AM |
Registered: 13 years ago Posts: 2,947 |
Quote
zungmann
Well, after a long pause and small progress along the time. Now time to complete the build. Assembly more or less completed. I just got the electronic and now wiring and testing the movement. X and Y doing ok but the Z seems to wobble a lot.
Another thing is no Pronterface, if I hit Y or Z Home move the Z, but not really homing. I read a post saying it is a bug in the Marlin version, is it? Not sure what was status now. I downloaded from Github; [github.com]
Is it fixed? If so then it must be something else….
X and Y home should not home X and Y because it does not have X and Y homing switches. THe Z should home when you press the home button. If you try and move the Z does it only move in one direction? If yes this means the endstop is already triggered which could be the switch is not connected to the correct location on the board or it is wired inverted. If it is wired inverted you can open the firmware config and find
const bool Z_ENDSTOPS_INVERTING = false; // set to true to invert the logic of the endstops.and change it to true
To fix the Z wobble be sure the Z lift bracket can move side to side in the arms to absorb the wobble of the lead screw. Also be sure to use a printed coupler not an aluminium one as they are known to wobble. And of course try and use a straight lead screw.
| FFF Settings Calculator | Gcode post processors | Geometric Object Deposition Tool Blog |
| Tantillus.org | Mini Printable Lathe | How NOT to install a Pololu driver |
|
Re: Zungman's Build February 27, 2014 06:08AM |
Registered: 11 years ago Posts: 290 |
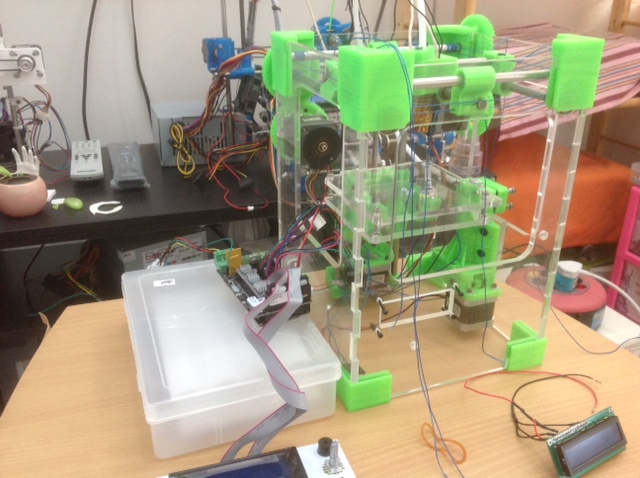
You are right Sublime, Z move in one direction only. I need to invert the logic to make the endstop work. The other thing is rewire the endstop cable. My switch somehow need to connect to (-) and (S) pins in the RAMPS. Now, all the axis move OK. Just need to calibrate. I will be working first on the Z wobble.
Attached pictures of my current state of build.
Attached pictures of my current state of build.
|
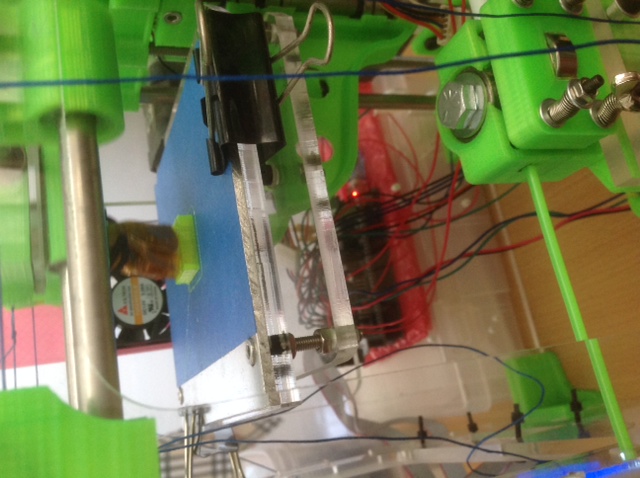
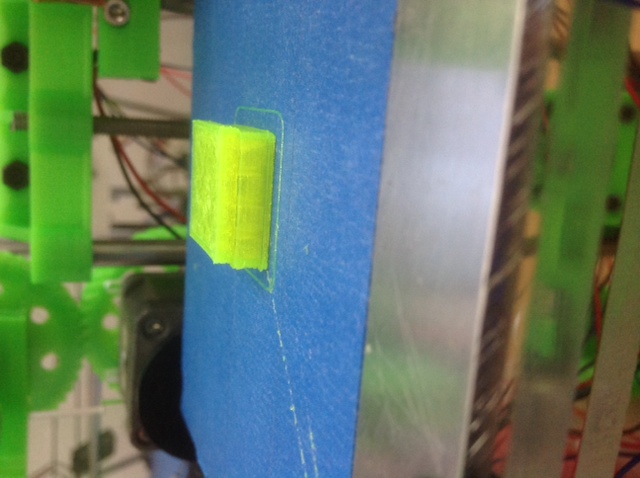
Re: Zungman's Build March 25, 2014 10:10AM |
Registered: 11 years ago Posts: 290 |
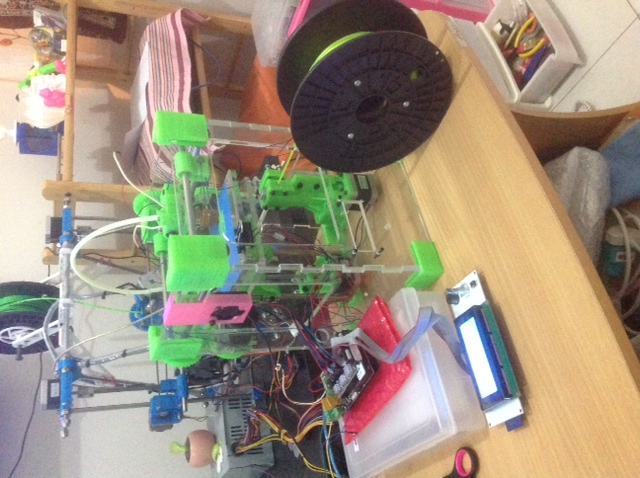
Update on my built. Now its built and wired. I have not placed the electronic inside because still testing it. Today just made the very first print. Its the famous calibration box 20mm. The problem seems to be that my X Y motors can not keep up the travel speed. 150 mm/s (I am using the KS profile supplied). So the next layers displaced far away from previous ones.
|
Re: Zungman's Build March 26, 2014 12:23AM |
Registered: 10 years ago Posts: 22 |
Looks like the X/Y gears are slipping on the shaft, probably motor shaft. If you haven't already you may want to file some flats on the X/Y motor shafts, also check the hub on the X/Y motor gears they are famous for breaking. I've gone through 3 sets.If they have cracked or broken around the nuts, re-print them with at least 70% infill, %100 if you can find a machine that can do it. Could be the cables if you did not drill the rods (not neccessary if properly tensioned) and they are not tensioned really tight they'll slip like that. They should make a high pitch note when you pluck them, what sublime calls "musically tight". Also the stock profiles and firmware are for a 15 volt power supply, if you have a 12 volt supply, you'll have to slow the machine down a bit.
|
Re: Zungman's Build March 26, 2014 10:40AM |
Registered: 13 years ago Posts: 2,947 |
CNS's answer should cover most of it. There is also a chance that the bushings are just a little too tight right now and you need to break them in a little more. If you search the Tantillus Forum you will find a file called breakin.gcode attached to a thread that you can run and it will help break in the bushings. You can also try slowing down the travel speed to 120 and see if that helps. The last thing is if the hotend is too close to the bed or you are over extruding it may just be that the nozzle is catching on the previous layer.
| FFF Settings Calculator | Gcode post processors | Geometric Object Deposition Tool Blog |
| Tantillus.org | Mini Printable Lathe | How NOT to install a Pololu driver |
|
Re: Zungman's Build March 27, 2014 05:00AM |
Registered: 11 years ago Posts: 290 |
OK, here what I found and did based on the feedbacks:
1. My motor shafts are not flat right now. Its not going to be easy now to make them flat, so will be my next to do, and lucky me they are not slipping. I watch them just stand still and the motor buzzing.
2. I tried various speed and so far the max speed it can keep up is 130mm/s. So I am lowering it to 120 to be safe. My motors are 0.9 deg/step, will figure it out later on the max setting of the pot on the driver. Somehow my driver pot able to turn continuously so I am not sure which is min and which is max
3. Tensioning the belt as tight as I can, though I can not make the music yet,, I think tight enough
4. Lube the rod using vaseline and run the breakin.gcode twice. First run speed up till 150% till finish. Second run speed up till 290% (145mm/s) and still good then finish. After this I tried moving at 150mm/s and surprisingly made it well
Will try again the calibration cube. Oh, I think you also right Sublime, my nozzle a bit too low
1. My motor shafts are not flat right now. Its not going to be easy now to make them flat, so will be my next to do, and lucky me they are not slipping. I watch them just stand still and the motor buzzing.
2. I tried various speed and so far the max speed it can keep up is 130mm/s. So I am lowering it to 120 to be safe. My motors are 0.9 deg/step, will figure it out later on the max setting of the pot on the driver. Somehow my driver pot able to turn continuously so I am not sure which is min and which is max
3. Tensioning the belt as tight as I can, though I can not make the music yet,
, I think tight enough4. Lube the rod using vaseline and run the breakin.gcode twice. First run speed up till 150% till finish. Second run speed up till 290% (145mm/s) and still good then finish. After this I tried moving at 150mm/s and surprisingly made it well
Will try again the calibration cube. Oh, I think you also right Sublime, my nozzle a bit too low
|
Re: Zungman's Build March 27, 2014 07:52PM |
Registered: 10 years ago Posts: 22 |
You need to make sure you have set the jumpers for your motor drivers to 1/8th stepping for those motors. The processor can't handle generating that many steps per rotation to keep up with the stock profiles. Also your holding torque per micro-step should be theoretically higher which may help keep the motors from skipping. Unfortunately if they are set to 16th stepping you will have to redo the entire machine calibration.
The only thing I can think of left to check is the carriage. The piece of plexiglass used to retain the hot-end could be either too thick or too thin which will cause the X/Y rods to deflect resulting in a binding carriage. Or you may not have removed the excess plastic that most slicers generate when slicing the top and bottom of the carriage. When properly assembled the sides of the bearings should be touching the piece of plexiglass used to retain the hot-end. Please measure the thickness of the plexiglass used to retain the hot-end, and perhaps attach a close up pic of the side of the carriage where one of the X/Y rods go into the bearing that will help us determine if the carriage is the culprit.
The only thing I can think of left to check is the carriage. The piece of plexiglass used to retain the hot-end could be either too thick or too thin which will cause the X/Y rods to deflect resulting in a binding carriage. Or you may not have removed the excess plastic that most slicers generate when slicing the top and bottom of the carriage. When properly assembled the sides of the bearings should be touching the piece of plexiglass used to retain the hot-end. Please measure the thickness of the plexiglass used to retain the hot-end, and perhaps attach a close up pic of the side of the carriage where one of the X/Y rods go into the bearing that will help us determine if the carriage is the culprit.
|
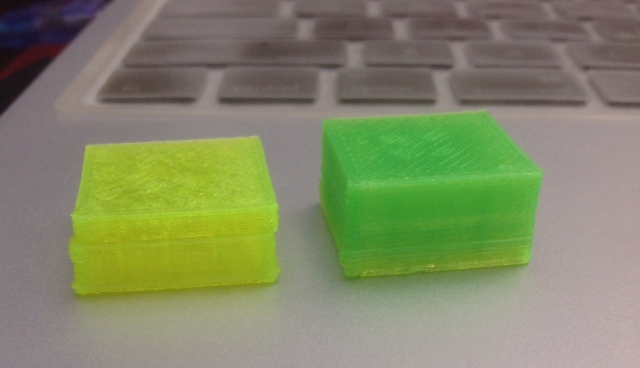
Re: Zungman's Build March 28, 2014 03:32AM |
Registered: 11 years ago Posts: 290 |
Another update: second and third print. I set the travel speed to 140 mm/s, my stepper set to be 1/16 micro step. I know I am pushing my printer right now, see if she can handle it
On second print, there was big shift on XY, so I turned up the pot (clockwise) a bit. Also the result was not 10mm tall but 7.64mm so I recalibrated the Z.
On third print, there were some small shifts on first several layers, I turned up the pot a little bit more. Also noticed the flow is too much so reduce it from 450 to 420. So I am getting more consistent of remaining layers. Z height is close to perfect 10mm. At least now getting better, yea!
While printing, my short linear bearing went off from its place, so noticed also the nozzle a bit loose. I guess its why layers somehow deflected. Now its fixed.
Running another tests….
On second print, there was big shift on XY, so I turned up the pot (clockwise) a bit. Also the result was not 10mm tall but 7.64mm so I recalibrated the Z.
On third print, there were some small shifts on first several layers, I turned up the pot a little bit more. Also noticed the flow is too much so reduce it from 450 to 420. So I am getting more consistent of remaining layers. Z height is close to perfect 10mm. At least now getting better, yea!
While printing, my short linear bearing went off from its place
, so noticed also the nozzle a bit loose. I guess its why layers somehow deflected. Now its fixed.Running another tests….
|
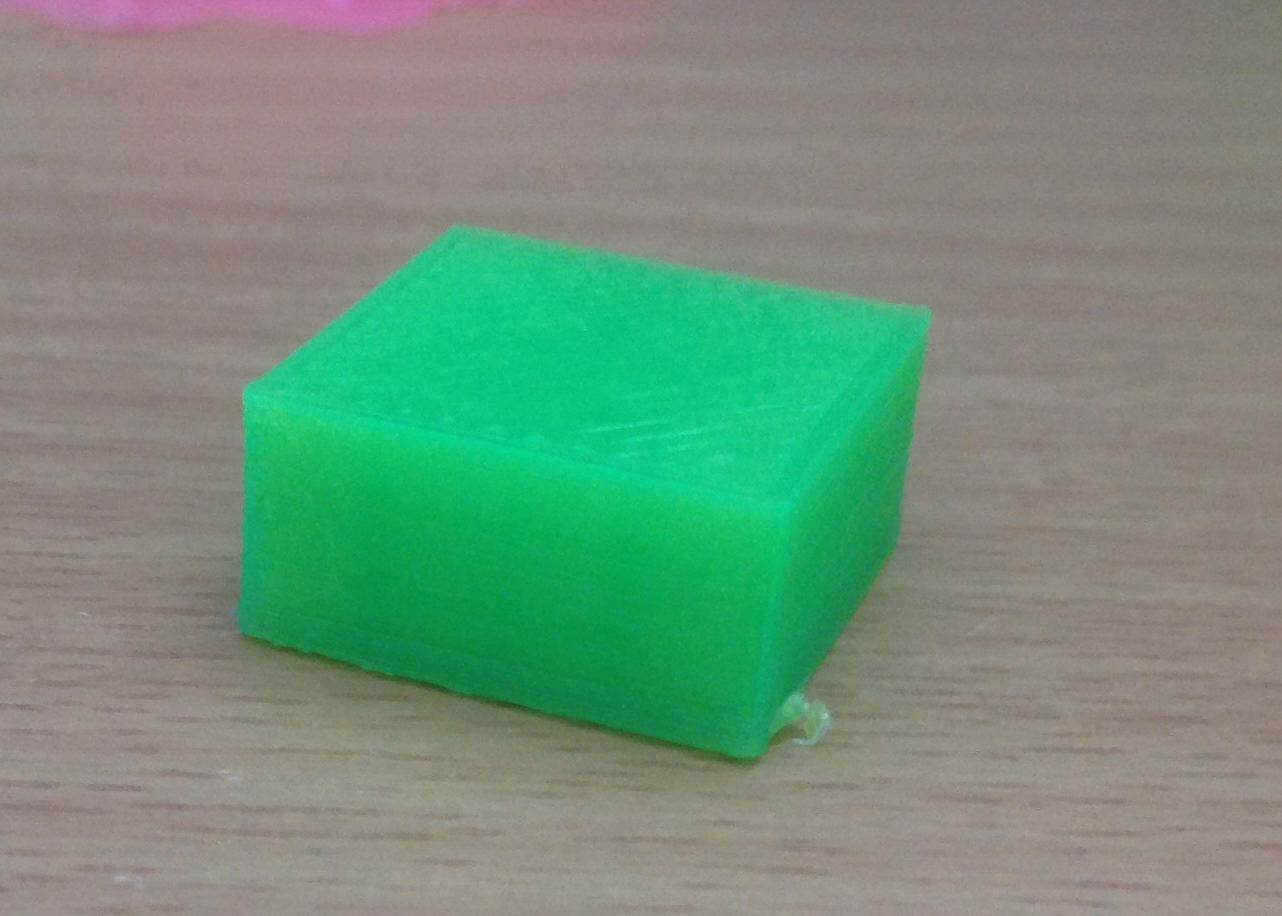
Re: Zungman's Build March 31, 2014 04:02AM |
Registered: 11 years ago Posts: 290 |
Other calibration prints.
Print 4
Set travel speed to 130 mm/s. I got two XY layer shifts, a bigger one at below. I turned up the XY pot drivers a bit more and made the heatshink very hot
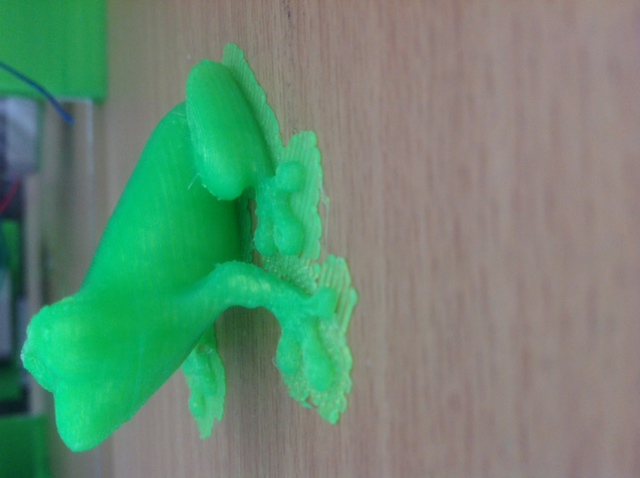
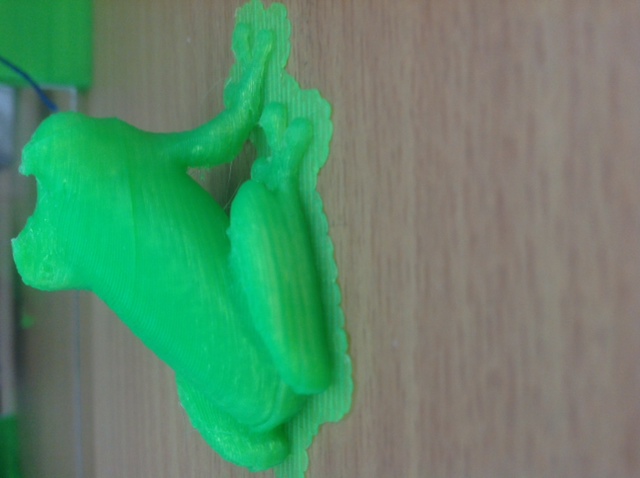
Print 5
Lower the travel speed to 125 mm/s and add fan to the controller. This time looks good. Then I tempted to print the Frog. Overall looks OK other than two layer shifts: the bigger one on X at below and the other on Y on upper part as seen in the photos.
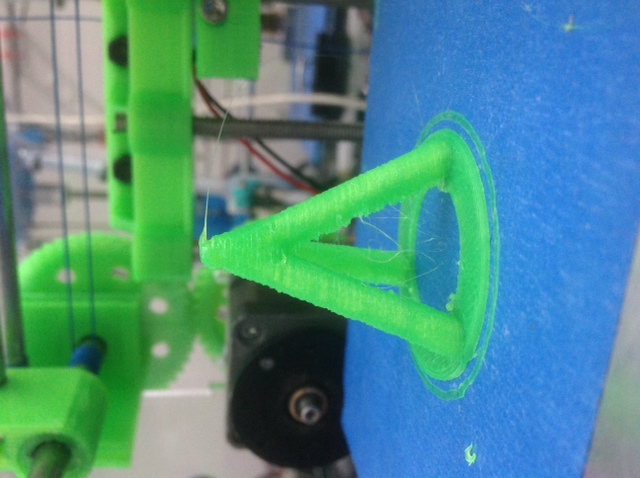
Print 6
This is the retract calibration. My Vmax E is at 47. I noticed material build up on the right post. It seems flow is too much to me, cmiiw. The top is the worst part, printed very slow and don't know why my fan was not turning.
Feedbacks are very much welcomed.
Print 4
Set travel speed to 130 mm/s. I got two XY layer shifts, a bigger one at below. I turned up the XY pot drivers a bit more and made the heatshink very hot
Print 5
Lower the travel speed to 125 mm/s and add fan to the controller. This time looks good. Then I tempted to print the Frog. Overall looks OK other than two layer shifts: the bigger one on X at below and the other on Y on upper part as seen in the photos.
Print 6
This is the retract calibration. My Vmax E is at 47. I noticed material build up on the right post. It seems flow is too much to me, cmiiw. The top is the worst part, printed very slow and don't know why my fan was not turning.
Feedbacks are very much welcomed.
|
Re: Zungman's Build March 31, 2014 11:16AM |
Registered: 13 years ago Posts: 2,947 |
Have you lubricated the rods? If not try applying some Vaseline or grease on the turning rods and see if that helps. Also 120mm/s may be the fastest you can run with the 0.9 degree motors and should be fine.
| FFF Settings Calculator | Gcode post processors | Geometric Object Deposition Tool Blog |
| Tantillus.org | Mini Printable Lathe | How NOT to install a Pololu driver |
|
Re: Zungman's Build March 31, 2014 05:16PM |
Registered: 10 years ago Posts: 22 |
The heat sinks in my opinion do run quite hot, I would go by motor temp as well, it's OK if the motors get warm especially after a long print just make sure they don't get hot. If the heat sinks are hot, but the motors are cool to the touch on a long print then it is likely that the motors can handle more current, which may solve your layer shift problem. Check out this link, nophead has a great trick to dial in the drivers using a voltmeter, which will take all of the guess work out of it for you.
Fine tuning steppers
Fine tuning steppers
|
Re: Zungman's Build April 23, 2014 02:01AM |
Registered: 11 years ago Posts: 290 |
Hi All, been off quite a while. I ran into several different issues. The X back cable getting loose so its harder to move along X direction. I tried to push it by running more current but then the motor shaft slipping. Z axis also seems still have a lot of wobble after earlier fix to make the Z lift have some play. So I decided to dissemble the things and make all more proper
Started with disabling z axis, this needed too to tighten the cable, since I feel it difficult to tighten the cable with z axis installed.
My spring on z lift seem to tight and make it harder for the rod to spin. Make it a bit loose and easier to turn the rod. Also file more the z lift to allow more play on XY.
Now, I need to flatten the motor shafts. Unlucky to just find a workshop to do some small works so decided to buy a cheap rotary tool. It will be handy too in the future. Now all my motor shafts made flat and also the XY drive rods. As cns1 mentioned, the gear hub famous for breaking and its true on my case. I put super glue on the small crack and wrap it with wire. Also applied this on the extruder small gear.
Next tightening the cables….Without Z and motors it was far more easier. A little problem raised, XY end crack when loosening and tightening the cables. So I put a washer inside before tightening the bolt. This helps for now, still keeping the XY cross rods tight in place.
For now, I just going to move the XY several times without installing the Z axis to ensure first they reliable.
Yes, lubricating the rods does help. I think so, 120 mm/s shall be fine.
The heat sinks are hot but motors just a little warm. Thanks for the link. I think my motors can actually handle more currents, but limitation now on the stepper drivers, just too hot and then start skipping. Next need to install a fan blow into them.
Started with disabling z axis, this needed too to tighten the cable, since I feel it difficult to tighten the cable with z axis installed.
My spring on z lift seem to tight and make it harder for the rod to spin. Make it a bit loose and easier to turn the rod. Also file more the z lift to allow more play on XY.
Now, I need to flatten the motor shafts. Unlucky to just find a workshop to do some small works so decided to buy a cheap rotary tool. It will be handy too in the future. Now all my motor shafts made flat and also the XY drive rods. As cns1 mentioned, the gear hub famous for breaking and its true on my case. I put super glue on the small crack and wrap it with wire. Also applied this on the extruder small gear.
Next tightening the cables….Without Z and motors it was far more easier. A little problem raised, XY end crack when loosening and tightening the cables. So I put a washer inside before tightening the bolt. This helps for now, still keeping the XY cross rods tight in place.
For now, I just going to move the XY several times without installing the Z axis to ensure first they reliable.
Quote
Sublime
Have you lubricated the rods? If not try applying some Vaseline or grease on the turning rods and see if that helps. Also 120mm/s may be the fastest you can run with the 0.9 degree motors and should be fine.
Yes, lubricating the rods does help. I think so, 120 mm/s shall be fine.
Quote
cns1
The heat sinks in my opinion do run quite hot, I would go by motor temp as well, it's OK if the motors get warm especially after a long print just make sure they don't get hot. If the heat sinks are hot, but the motors are cool to the touch on a long print then it is likely that the motors can handle more current, which may solve your layer shift problem. Check out this link, nophead has a great trick to dial in the drivers using a voltmeter, which will take all of the guess work out of it for you.
Fine tuning steppers
The heat sinks are hot but motors just a little warm. Thanks for the link. I think my motors can actually handle more currents, but limitation now on the stepper drivers, just too hot and then start skipping. Next need to install a fan blow into them.
Sorry, only registered users may post in this forum.