Fixing a broken down Tantillus at my local hackspace
Posted by ashleywebster
|
Fixing a broken down Tantillus at my local hackspace April 02, 2014 03:18AM |
Registered: 10 years ago Posts: 22 |
Hi everyone.
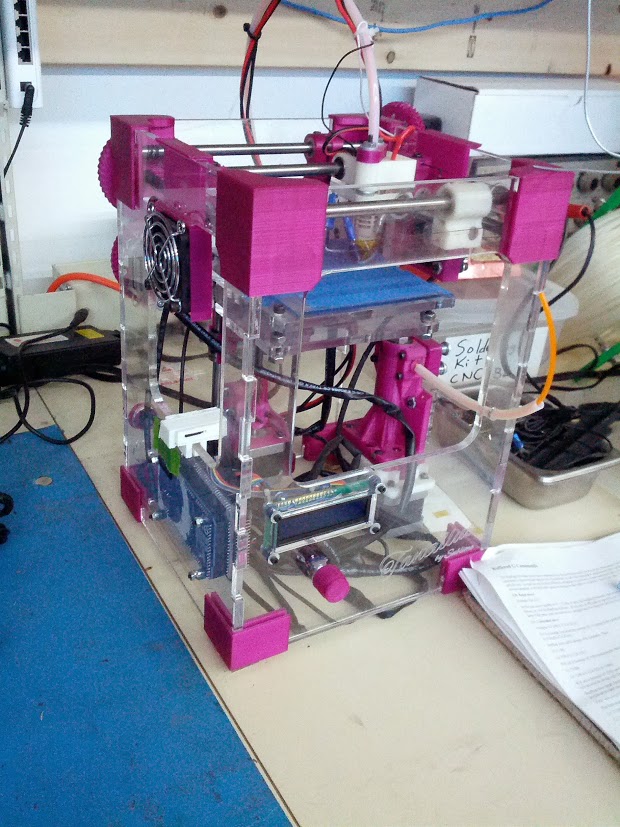
I'm relatively new to 3D printing but studying hard. I joined the Vancouver Hackspace after learning they have a Tantillus which has apparently not worked in a year. The axis ends were all broken along the tensioner, so I printed new ones. The thermistor had fallen out and the hotend was jammed, so we tore it down, cleaned it, and wrapped the nozzle back up with silicon tape. Hopefully that will avoid future meltdowns. One of the stepper drivers was toast but luckily there was a box of them at the hackspace so an easy fix, and I learned to tune the pots properly. Tonight I got it all put back together, jogged the axes around, and extruded a few mm of plastic into the air. Now I just need to get the tool-chain set up on one of the computers and it should be operational again.
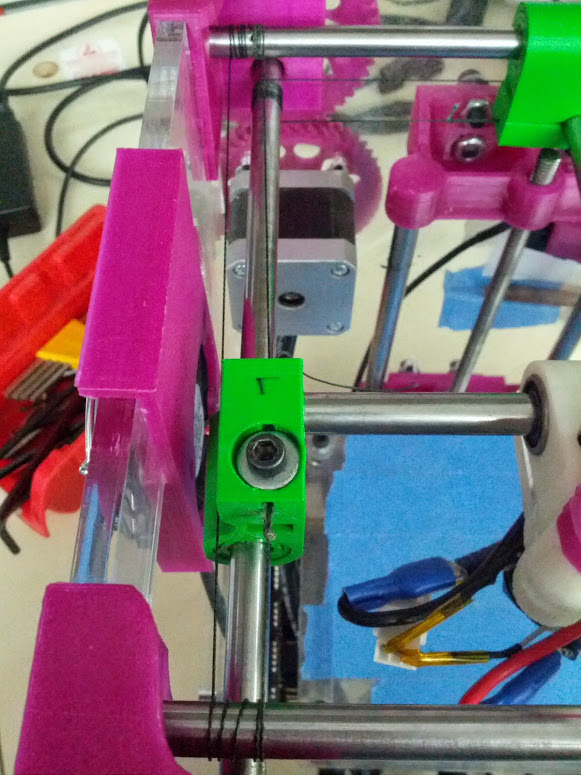
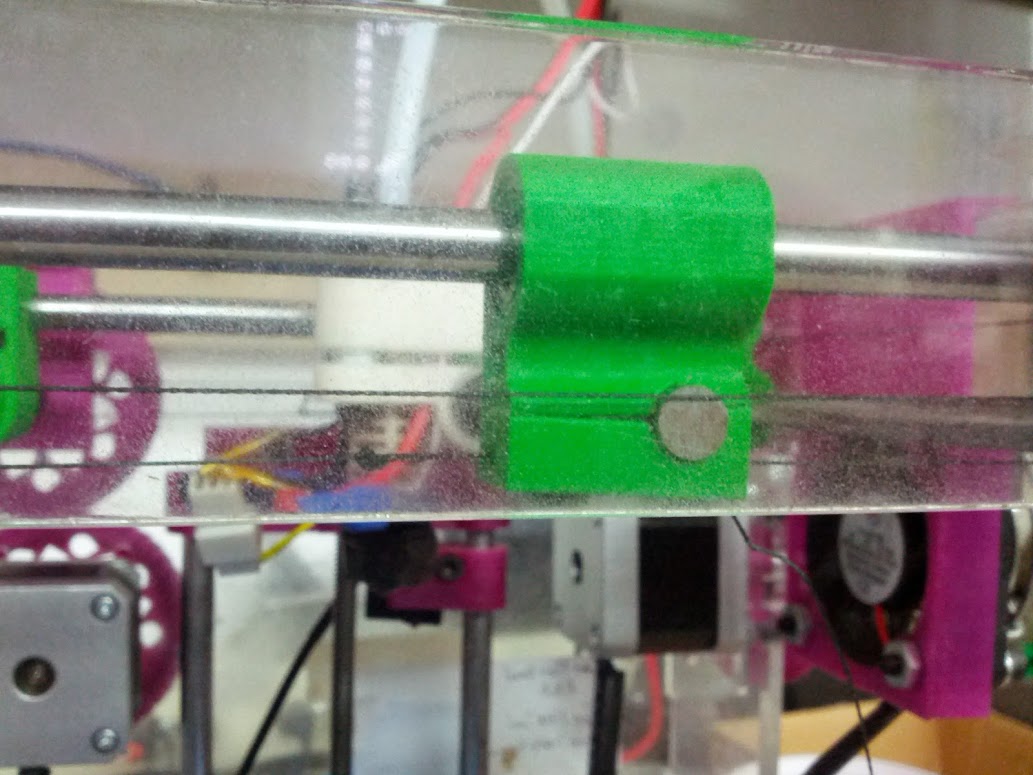
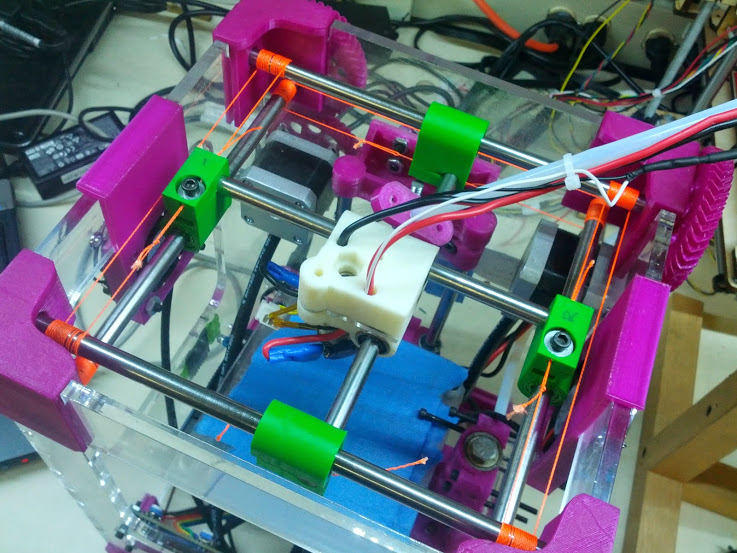
I have a few concerns about how the cable is running. Generally speaking, the whole drive train does not seem to line up. Picture 1 shows how the cable is not running parallel to the rod. I have tried pushing the loops over so they are in line with the hole in the axis ends, but they just get pulled back again. The problem, as far as I can tell, is that the hole in the rod is too far to the left so the cable is always being pulled away from the line that runs parallel to the axis ends. Pictures 2-5 show how the cables running outside of the gantry do not sit in that nice smooth curve but rub on the axes end or the edge of the rod, which is sure to cause trouble eventually.
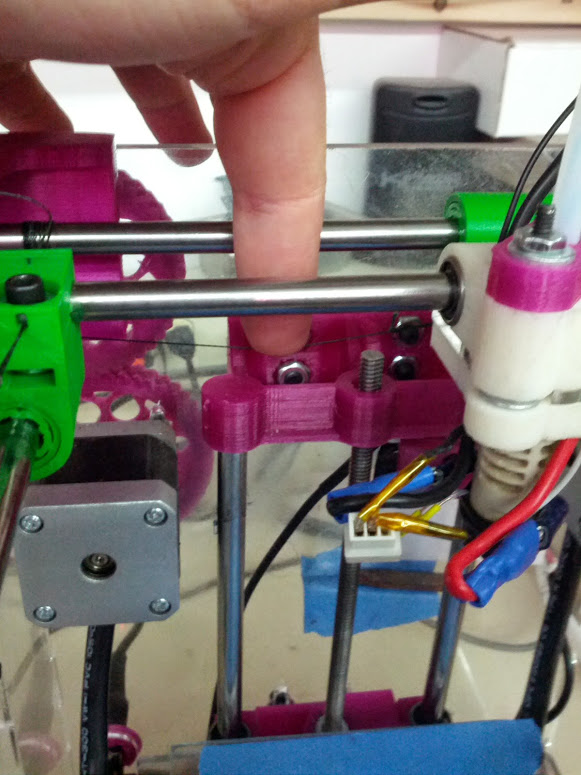
On a different note, I am having difficulty tensioning the cables. The first cable on each axis is easy to get the knot where you want it because you can spin the rods freely to reposition everything. But when you string up the other side, it's a very tedious process to reposition the cable so that the knot doesn't run over the rod (i.e as close to the axis end as possible without having the loop pull past the cable trap). After much wrestling, I think I've got them all in the right spot, but I find that, on two cables, no matter how hard I pull, I can't take up any more slack even though there is tons (picture 6).
Your input is much appreciated.
ashley
I'm relatively new to 3D printing but studying hard. I joined the Vancouver Hackspace after learning they have a Tantillus which has apparently not worked in a year. The axis ends were all broken along the tensioner, so I printed new ones. The thermistor had fallen out and the hotend was jammed, so we tore it down, cleaned it, and wrapped the nozzle back up with silicon tape. Hopefully that will avoid future meltdowns. One of the stepper drivers was toast but luckily there was a box of them at the hackspace so an easy fix, and I learned to tune the pots properly. Tonight I got it all put back together, jogged the axes around, and extruded a few mm of plastic into the air. Now I just need to get the tool-chain set up on one of the computers and it should be operational again.
I have a few concerns about how the cable is running. Generally speaking, the whole drive train does not seem to line up. Picture 1 shows how the cable is not running parallel to the rod. I have tried pushing the loops over so they are in line with the hole in the axis ends, but they just get pulled back again. The problem, as far as I can tell, is that the hole in the rod is too far to the left so the cable is always being pulled away from the line that runs parallel to the axis ends. Pictures 2-5 show how the cables running outside of the gantry do not sit in that nice smooth curve but rub on the axes end or the edge of the rod, which is sure to cause trouble eventually.
On a different note, I am having difficulty tensioning the cables. The first cable on each axis is easy to get the knot where you want it because you can spin the rods freely to reposition everything. But when you string up the other side, it's a very tedious process to reposition the cable so that the knot doesn't run over the rod (i.e as close to the axis end as possible without having the loop pull past the cable trap). After much wrestling, I think I've got them all in the right spot, but I find that, on two cables, no matter how hard I pull, I can't take up any more slack even though there is tons (picture 6).
Your input is much appreciated.
ashley
|
Re: Fixing a broken down Tantillus at my local hackspace April 02, 2014 12:21PM |
Registered: 13 years ago Posts: 2,947 |
For picture one I do not think it will be a problem. When the axis is pushed to other end and more cable is wrapped around the rod it should line up better and they never line up when the axis is at the opposite end because of the cable unwrapping. If you do want it even better or if it does not line up when the axis at the other end you can always add more wraps around the rod until it does line up.
For the cables hitting the ends of the cross bars you will need to do something. You can get the cross bars out without having to remove the cables by removing the carriage and then loosening the cable clamp bolts on the X/Y ends and then sliding the bar to one side and then the other to remove it. At that point you could cut the rods shorter or bevel the ends so they are not sharp. The other option is again add more wraps around the rod to make the cable run further away from them.
For the tensioning it is important that you tighten the back one first because of how hard it is to tighten above the Z axis brackets. To get the second cable tight you need to do the wraps around the drive rod (one with the hole) and then give the cable a pull after each wrap around the idler rod to keep the cable taught. There will always be a little slack in the cable between the rods on the second side but as long as the cable between the rods and the X/Y end is musically tight then you will not have any backlash since the first cable will drive the idler rod and the cable between the rods and X/Y ends is actually what moves the X/Y end.
If you can get everything else fixed and you are still having issues getting the cables tight I may be able to meet up with you some where and give you a hand tensioning the cables. I am way out in Mission and do not have transportation so it would have to be out this direction rather than Vancouver.
Last thing to note is not all emergency tape is made the same. I purchased two different rolls form Canadian tire and one was not Silicone and the one that was could not handle 200c+. I just brought in two rolls that are rated to 260c that I have yet to try.
| FFF Settings Calculator | Gcode post processors | Geometric Object Deposition Tool Blog |
| Tantillus.org | Mini Printable Lathe | How NOT to install a Pololu driver |
|
Re: Fixing a broken down Tantillus at my local hackspace April 02, 2014 07:14PM |
Registered: 10 years ago Posts: 22 |
Good to know that some deflection is ok, even if it does offend my sense of orderliness. It sounds like the best solution in this case is to get cable long enough that I can create more clearance, which will also make things straighter. I was thinking about replacing the cables anyway because they're a bit frayed and kinked - so perfect solution all around. Where do you recommend buying cable from?
So the second cable on each axis is there to guide that side and prevent binding, but the axis is being driven by the cable closest to the motor, and that's what needs to be musically tight. I'll have to redo the cables then because the one pictures is the drive cable on the y axis. I'll reread your instructions next time I'm at the hackspace and I'm pretty sure I'll be able to get it tightened up. Or I may just wait until new cable arrives. I think it's probably even good enough now to attempt a print. People are excited to see it in action again.
Nice to know you are a fellow BC'er. I am happily discovering that we have a great local 3D printing community.
The hackspace is loosing the Mendel Max that it has had the use of, which will leave just the Tantillus. I would like to organize a build of an Ingentis, or more likely the belt driven version. I think the key criteria for a new printer for the hackspace are: i) Sturdy and easy to maintain, ii) large build volume, and iii) can print a wide range of materials. In other words, make it tough, keep it running, and make it accessible to a wide range of projects. If you are interested, I will surely call upon your expertise. Not sure how fast it will actually happen, but I'm starting the conversation with members one on one. I'll post here and on G+ if it progresses.
I think I'm ok on the tape. It's this stuff, rated to 260. I heated the nozzle up to 200 or so when I first put it on, and nothing seemed out of the ordinary. It appears to be the same stuff that my Mendel90 kit came with, except black instead of red.
Thank you for your help.
|
Re: Fixing a broken down Tantillus at my local hackspace April 02, 2014 09:23PM |
Registered: 13 years ago Posts: 2,947 |
The cable is available at stores that sell fishing supplies. There are two major brands used in RepRap, Power pro which is what I use and dyneema. There are other brands as well you just want to get braided spectra fishing line in 65lb + rating.
Both sets of cables do move the mechanism but only the first one makes the idler rod turn in sync with the drive rod. The sections of cable between the X/Y end and the rods on the second side still have to be musically tight but the section that goes between the two rods (the one you show being slack) does not need to be musically tight.
A communal printer at a hackerspace seems to be a problem for most machines for whatever reason. It seems most of the problems arise from filament jams and pushing the machine too hard due to the lack of time people have with the machine. I am happy to see the progress and adoption of Ingentis and it should be at least as reliable as most mature machines out there even though it is fairly young.
If you do need help just let me know and I will see what I can do.
| FFF Settings Calculator | Gcode post processors | Geometric Object Deposition Tool Blog |
| Tantillus.org | Mini Printable Lathe | How NOT to install a Pololu driver |
|
Re: Fixing a broken down Tantillus at my local hackspace April 03, 2014 01:49AM |
Registered: 10 years ago Posts: 22 |
Yes, I agree about printers and hackspaces. We'll also run workshops, make it like the laser cutter which requires training, and put together a manual. Apparently 3D604 has been considering moving their meetings to Vancouver and emailed the VHS to see if they could host there, so hopefully we can just generate more know-how among members. I was also considering something like Octopi so that people could leave a print job but still check in on it over the web.
At any rate, we digress. Thank you very much for you help. I will post again if I have more questions or just with pictures when we get a new first print out of it
At any rate, we digress. Thank you very much for you help. I will post again if I have more questions or just with pictures when we get a new first print out of it
|
Re: Fixing a broken down Tantillus at my local hackspace May 23, 2014 12:45AM |
Registered: 10 years ago Posts: 22 |
Quick update. I finally received the cable after waiting nearly a month for it to come from ebay. I strung it up this week and am very happy with it now. Everything is straight and tight and the motion is very smooth.
Fix one problem, though, and you uncover the next. The filament drive worked well enough loading but it just ground away when it hit the hot end. It took a while to figure out but on closer inspection is was apparent that the hobbed bolt was worn down. You can see the profile change as it turns. I think this is the last though. I could buy a new bolt, and probably will, but a few of us at the hack space are also interested in learning to make them. So we'll give that a shot.
I'll get a print out of it soon.
|
Re: Fixing a broken down Tantillus at my local hackspace May 24, 2014 12:07PM |
Registered: 13 years ago Posts: 2,947 |
Looks good. To make the hobbed bolt I recommend using a #8 imperial tap. It has the coarsest teeth in the diameter we want.
| FFF Settings Calculator | Gcode post processors | Geometric Object Deposition Tool Blog |
| Tantillus.org | Mini Printable Lathe | How NOT to install a Pololu driver |
Sorry, only registered users may post in this forum.