Calibration contest
Posted by DeuxVis
|
Calibration contest October 10, 2012 03:52AM |
Admin Registered: 12 years ago Posts: 2,569 |
Let's try a different contest. Here the focus will be fine tuning the output dimensions of a printed part.
I'll be happy to buy the winner a 100m roll of his choice of filament in fabberdashery webshop, shipping included - subject to conditions, see later.
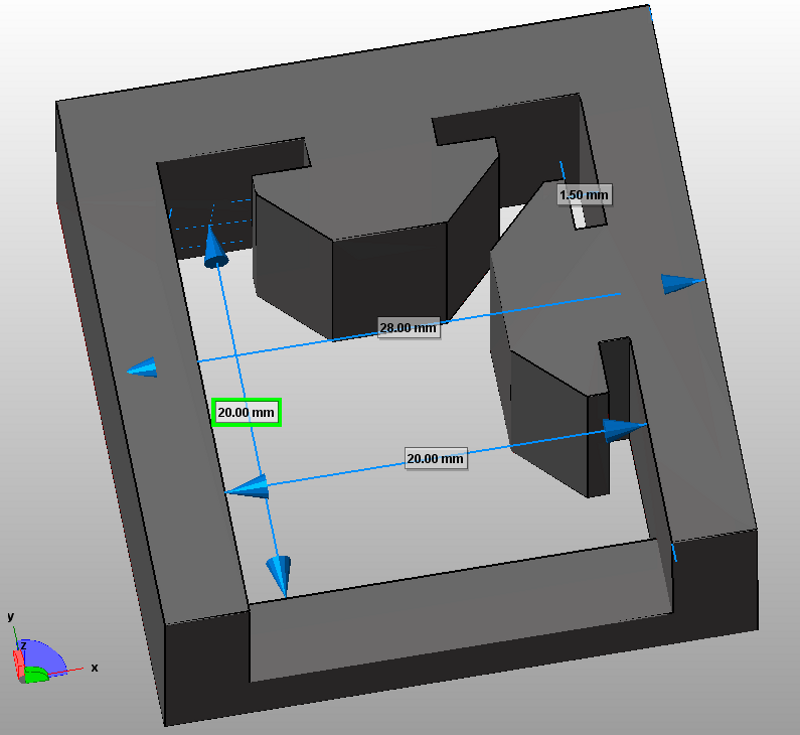
So the goal is to print the attached stl, and have the dimensions noted in the following picture as close to theory as possible. An incremental process - print, change settings, print again - will probably be needed.
As a rule, no dimensional modification of the file to print is allowed (rotation is ok). You must improve your output by tweaking your settings, not the stl.
There must be some infill, print the stl as if you would be going to use it as a structural part of a reprap.
You obviously will need a digital caliper or any tool able to measure as little as 0.01 mm.
If you want to participate in the competition for the price, you'll have to :
1) Post here describing your process and the changes you made to improve your accuracy. Pictures are welcome.
2) Send me your best part for verification (send me a PM to get my postal address).
3) Use a reprap derivative, fused deposition, no resin or powder printer, or industrial expensive machinery. Please post your machine specs, a picture would be nice too.
If you have access to and want to use such a non-reprap printer, feel free to give it a try, would be nice for comparison, but understand that you can't enter the competition then.
The most important dimensions for me are the 2 inner 20 mm, as the goal is to fit a given extruded aluminium profile. It is also better to be a little under 20mm than above (to keep some grip).
The second most important dimension is the 1.5 mm gap.
External dimensions accuracy and best looking parts will get bonus points in case of a tie.
If there are too many perfect or nearly perfect prints to decide, I'll pick a random part among the pool to choose the winner.
You can post your participation here until the 15th of november. I must have received your best part before the end of november (2012 of course).
Note : this contest also have an hidden agenda, my goal is to have more people ready to help Emmanuel in his crowd-printing experiment, see [forums.reprap.org]
I'll post a sample of what I expect as a submission post after the weekend.
Edited 2 time(s). Last edit at 10/11/2012 05:05AM by DeuxVis.
Most of my technical comments should be correct, but is THIS one ?
Anyway, as a rule of thumb, always double check what people write.
I'll be happy to buy the winner a 100m roll of his choice of filament in fabberdashery webshop, shipping included - subject to conditions, see later.
So the goal is to print the attached stl, and have the dimensions noted in the following picture as close to theory as possible. An incremental process - print, change settings, print again - will probably be needed.
As a rule, no dimensional modification of the file to print is allowed (rotation is ok). You must improve your output by tweaking your settings, not the stl.
There must be some infill, print the stl as if you would be going to use it as a structural part of a reprap.
You obviously will need a digital caliper or any tool able to measure as little as 0.01 mm.
If you want to participate in the competition for the price, you'll have to :
1) Post here describing your process and the changes you made to improve your accuracy. Pictures are welcome.
2) Send me your best part for verification (send me a PM to get my postal address).
3) Use a reprap derivative, fused deposition, no resin or powder printer, or industrial expensive machinery. Please post your machine specs, a picture would be nice too.
If you have access to and want to use such a non-reprap printer, feel free to give it a try, would be nice for comparison, but understand that you can't enter the competition then.
The most important dimensions for me are the 2 inner 20 mm, as the goal is to fit a given extruded aluminium profile. It is also better to be a little under 20mm than above (to keep some grip).
The second most important dimension is the 1.5 mm gap.
External dimensions accuracy and best looking parts will get bonus points in case of a tie.
If there are too many perfect or nearly perfect prints to decide, I'll pick a random part among the pool to choose the winner.
You can post your participation here until the 15th of november. I must have received your best part before the end of november (2012 of course).
Note : this contest also have an hidden agenda, my goal is to have more people ready to help Emmanuel in his crowd-printing experiment, see [forums.reprap.org]
I'll post a sample of what I expect as a submission post after the weekend.

Edited 2 time(s). Last edit at 10/11/2012 05:05AM by DeuxVis.
Most of my technical comments should be correct, but is THIS one ?
Anyway, as a rule of thumb, always double check what people write.
|
Re: Calibration contest October 10, 2012 06:32AM |
Registered: 12 years ago Posts: 9 |
|
Re: Calibration contest October 10, 2012 10:11AM |
Registered: 11 years ago Posts: 98 |
|
Re: Calibration contest October 10, 2012 12:34PM |
Registered: 11 years ago Posts: 482 |
How about a B9Creations style machine? Shoudn't they print 50 micron resolution (0.005 mm) in theory crushing anything a FDM printer would do? Would the parts be function or too brittle? They seemed sturdy when I held them, but I wouldn't trust them to hold up to long term exposure to the elements or vibration...
|
Re: Calibration contest October 10, 2012 02:31PM |
Admin Registered: 12 years ago Posts: 2,569 |
You're right Simba, I should have mentioned that the part must be printed on a reprap derivative, not a "professional" powder/resin/whatever printer. Editing the rules.
Most of my technical comments should be correct, but is THIS one ?
Anyway, as a rule of thumb, always double check what people write.
Most of my technical comments should be correct, but is THIS one ?
Anyway, as a rule of thumb, always double check what people write.
|
Re: Calibration contest October 10, 2012 02:59PM |
Registered: 11 years ago Posts: 482 |
|
Re: Calibration contest October 10, 2012 05:20PM |
Registered: 13 years ago Posts: 818 |
I Just quickly printed one on it's own, with my normal settings for RepRap parts - I think it came out perfectly, or at least exactly as I expected for PLA -
25% infill
1 perimeters (+extra when needed)
3 solid layers
0.3mm layers
Maybe you should also add a printing time element - this sample print was 9mins 21 seconds - it could be printed a lot faster.
0.2mm layer height would make it look a tiny bit nicer, but at longer print time, what's the most important factor after size?
It slides onto a KJN 20mm section tightly and can be moved up and down with some force applied (2 fingers+thumb), it feels like a very nice fit, so the.STL is very well dimensioned I would say.
The photos are about 15 minutes after printing, straight off the printer - (printed in Faberdashery Cherry blossom pink)
My dimensions read as 19.97, 19.98 and 1.51, (1.52 and 1.53 measured on the other gaps)
Mendelmax 1.5 (Slicer 0.9.1) - Jhead nozzle 0.5mm (3mm filament)
First layer speed is always 30%
; layer_height = 0.3
; perimeters = 1
; solid_layers = 3
; fill_density = 0.25
; perimeter_speed = 65
; infill_speed = 75
; travel_speed = 290
; scale = 1
; nozzle_diameter = 0.42
; filament_diameter = 2.86
; extrusion_multiplier = 1
; single wall width = 0.47mm
; first layer single wall width = 0.80mm
[richrap.blogspot.com]
25% infill
1 perimeters (+extra when needed)
3 solid layers
0.3mm layers
Maybe you should also add a printing time element - this sample print was 9mins 21 seconds - it could be printed a lot faster.
0.2mm layer height would make it look a tiny bit nicer, but at longer print time, what's the most important factor after size?
It slides onto a KJN 20mm section tightly and can be moved up and down with some force applied (2 fingers+thumb), it feels like a very nice fit, so the.STL is very well dimensioned I would say.
The photos are about 15 minutes after printing, straight off the printer - (printed in Faberdashery Cherry blossom pink)


My dimensions read as 19.97, 19.98 and 1.51, (1.52 and 1.53 measured on the other gaps)
Mendelmax 1.5 (Slicer 0.9.1) - Jhead nozzle 0.5mm (3mm filament)
First layer speed is always 30%
; layer_height = 0.3
; perimeters = 1
; solid_layers = 3
; fill_density = 0.25
; perimeter_speed = 65
; infill_speed = 75
; travel_speed = 290
; scale = 1
; nozzle_diameter = 0.42
; filament_diameter = 2.86
; extrusion_multiplier = 1
; single wall width = 0.47mm
; first layer single wall width = 0.80mm
[richrap.blogspot.com]
|
Re: Calibration contest October 10, 2012 06:45PM |
Registered: 13 years ago Posts: 615 |

|
Re: Calibration contest October 10, 2012 11:42PM |
Admin Registered: 15 years ago Posts: 1,470 |
Simba Wrote:
-------------------------------------------------------
> Is your
> reason for cutting these technologies out the
> general availability of them to you (having less
> expensive printers in your shop)
More likely because this is a forum for RepRaps...
-------------------------------------------------------
> Is your
> reason for cutting these technologies out the
> general availability of them to you (having less
> expensive printers in your shop)
More likely because this is a forum for RepRaps...
|
Help improve the RepRap wiki!
Just click "Edit" in the top-right corner of the page and start typing. Anyone can edit the wiki! |
|
Re: Calibration contest October 11, 2012 01:16AM |
Registered: 11 years ago Posts: 482 |
|
Re: Calibration contest October 11, 2012 05:00AM |
Admin Registered: 12 years ago Posts: 2,569 |
Simba, the reason I ask for fdm repraps only is for fairness regarding the competition. And the fact my goal is to have a lot of people work on improving their reprap calibration, and give feedback about the process.
Also someone with a resin machine would likely not have a use for some filament.
But as I said, if you have access to such a machine, feel free to participate for fun only - just don't expect to get the prize even if you print is perfect.
Richrap, nice print, you put the bar quite high for a first submission. I haven't expected people already having a nearly perfect calibration. I should have expected it from you
The speed constraint idea, well I'm afraid it would give an advantage to people who have recent design machines (mendelmax and other very rigid structures). I want people with old huxleys, prusa etc to participate too, so I'll probably do a random pick up among the best prints instead, if the need arise.
Most of my technical comments should be correct, but is THIS one ?
Anyway, as a rule of thumb, always double check what people write.
|
Re: Calibration contest October 11, 2012 06:15AM |
Registered: 13 years ago Posts: 7,616 |
Quote
My dimensions read as 19.97, 19.98 and 1.51, (1.52 and 1.53 measured on the other gaps)
With or without the blobs at the corners?

| Generation 7 Electronics | Teacup Firmware | RepRap DIY |
|
Re: Calibration contest October 11, 2012 06:49AM |
Registered: 12 years ago Posts: 122 |
My first attempt, also in pink PLA (we're obviously quite secure and comfortable with our masculinity).
; generated by Slic3r 0.9.3 on 2012-10-11 at 07:10:46
; layer_height = 0.2
; perimeters = 2
; solid_layers = 4
; fill_density = 0.5
; perimeter_speed = 30
; infill_speed = 50
; travel_speed = 100
; scale = 1
; nozzle_diameter = 0.3
; filament_diameter = 1.75
; extrusion_multiplier = 0.85
; single wall width = 0.30mm
I had to drop the feed rate to 50% because the infill started breaking up again. As soon as I slowed down it gradually recovered and returned to normal. The much thinner filament from the 0.3 mm nozzle obviously doesn't cope well with linear infill at 50 mm/s.
My readings are:
27.81 x 27.68 external
19.76 x 19.57 internal
1.41 x 1.43 gap
That's consistent with never managing to make a set of planetary gears that worked.
; generated by Slic3r 0.9.3 on 2012-10-11 at 07:10:46
; layer_height = 0.2
; perimeters = 2
; solid_layers = 4
; fill_density = 0.5
; perimeter_speed = 30
; infill_speed = 50
; travel_speed = 100
; scale = 1
; nozzle_diameter = 0.3
; filament_diameter = 1.75
; extrusion_multiplier = 0.85
; single wall width = 0.30mm

I had to drop the feed rate to 50% because the infill started breaking up again. As soon as I slowed down it gradually recovered and returned to normal. The much thinner filament from the 0.3 mm nozzle obviously doesn't cope well with linear infill at 50 mm/s.
My readings are:
27.81 x 27.68 external
19.76 x 19.57 internal
1.41 x 1.43 gap
That's consistent with never managing to make a set of planetary gears that worked.
|
Re: Calibration contest October 11, 2012 09:06AM |
Registered: 13 years ago Posts: 818 |
Traumflug Wrote:
-------------------------------------------------------
> My dimensions read as 19.97, 19.98 and 1.51, (1.52
> and 1.53 measured on the other gaps)
>
> With or without the blobs at the corners?
Warts & all ! - I have never been all that interested in ultimate high quality, more reasonable accuracy and print time.
Buy it does fit quite well.
[richrap.blogspot.com]
|
Re: Calibration contest October 11, 2012 09:18AM |
Registered: 13 years ago Posts: 818 |
DeuxVis Wrote:
-------------------------------------------------------
> Richrap, nice print, you put the bar quite high
> for a first submission. I haven't expected people
> already having a nearly perfect calibration. I
> should have expected it from you
> The speed constraint idea, well I'm afraid it
> would give an advantage to people who have recent
> design machines (mendelmax and other very rigid
> structures). I want people with old huxleys, prusa
> etc to participate too, so I'll probably do a
> random pick up among the best prints instead, if
> the need arise.
I'm not interested in winning this one, but I'm very very interested in the experiment of lots of people printing and measuring the same part from an identical model.
It would be really great to be able to start a 3d printing design guide document with sizes for things that 'should' fit standard mechanical parts.
Maybe we will get enough information from this experiment to make better models more people can use.
I still think speed is a valid factor regardless of machine type - but I do understand your point for this competition.
We should ask as many people as possible to print this out and measure it.
Don't print it with Slic3r 0.8.4!
[richrap.blogspot.com]
|
Re: Calibration contest October 12, 2012 03:10AM |
Registered: 11 years ago Posts: 525 |
I've had three goes so far and while they are improving I am unsure where to get any more accuracy.
My readings are:
28.45 and 28.25 external
19.45 x 19.40 internal
1.28 x 1.19 gap
So the extrusion is too thick. I have measured the filament again and it is still close to 2.87mm.
Mendel Prusa V2 linear with z-stabilisers and ss M8 leadscrews, XL belt and pulleys. Printrboard electronics and Slicer 0.9.1 - I used all of Richraps Slicer settings for the last print and it did improve it slightly. Could not find the setting for single wall thickness however.
Edited 1 time(s). Last edit at 10/12/2012 03:11AM by Wired1.
_________________________________________________________________________________________
Richmond, New Zealand
Thingiverse ~ YouTube
My readings are:
28.45 and 28.25 external
19.45 x 19.40 internal
1.28 x 1.19 gap
So the extrusion is too thick. I have measured the filament again and it is still close to 2.87mm.

Mendel Prusa V2 linear with z-stabilisers and ss M8 leadscrews, XL belt and pulleys. Printrboard electronics and Slicer 0.9.1 - I used all of Richraps Slicer settings for the last print and it did improve it slightly. Could not find the setting for single wall thickness however.

Edited 1 time(s). Last edit at 10/12/2012 03:11AM by Wired1.
_________________________________________________________________________________________
Richmond, New Zealand
Thingiverse ~ YouTube
|
Re: Calibration contest October 12, 2012 04:06AM |
Registered: 12 years ago Posts: 122 |
@Wired1 - Looks to me like you're over-extruding.
On both my Huxley and my Mendel90, for reasons I don't yet understand, feeding precise values for filament diameter and E steps/mm into my software and firmware respectively, does not give me good prints. I have to set the Multiplier to between 85 - 90% to reduce my flow rates, otherwise the prints end up looking like yours.
Don't always trust the numbers; watch the print and ideally use a software host / firmware combination (I use Repetier with Marlin) that allows you to tweak the flow rate on the fly.
Just my two-pennyworth.
richgain
P.S. single wall thickness is in Advanced at the bottom of the printing tab in Slic3r.
Edited 1 time(s). Last edit at 10/12/2012 04:28AM by richgain.
|
Re: Calibration contest October 12, 2012 04:23AM |
Registered: 11 years ago Posts: 525 |
I just remembered I changed my gear ratio on the extruder and I haven't adjusted Marlin yet so I will correct that - thanks for the mental jolt.
_________________________________________________________________________________________
Richmond, New Zealand
Thingiverse ~ YouTube
_________________________________________________________________________________________
Richmond, New Zealand
Thingiverse ~ YouTube
|
Re: Calibration contest October 12, 2012 05:17AM |
Registered: 13 years ago Posts: 818 |
richgain Wrote:
-------------------------------------------------------
> @Wired1 - Looks to me like you're over-extruding.
> On both my Huxley and my Mendel90, for reasons I
> don't yet understand, feeding precise values for
> filament diameter and E steps/mm into my software
> and firmware respectively, does not give me good
> prints. I have to set the Multiplier to between 85
> - 90% to reduce my flow rates, otherwise the
> prints end up looking like yours.
> Don't always trust the numbers; watch the print
> and ideally use a software host / firmware
> combination (I use Repetier with Marlin) that
> allows you to tweak the flow rate on the fly.
> Just my two-pennyworth.
> richgain
> P.S. single wall thickness is in Advanced at the
> bottom of the printing tab in Slic3r.
@richgain - That's a very nice looking print, I have not yet tried a 0.3mm nozzle, I do have one for the Huxley, but not had a chance to try it yet.
@richgain - Along with usually increasing the esteps a little above the actual calculated values I found adjusting the nozzle size a little can really help to get a good looking and accurate print. Slic3r does a good job of Height/width calculations, but the nozzle size is worth tweaking to get a good looking infill and refining a slightly over/under-stuffed part. - that's especially true with J-heads - where the nozzle 'size' of 0.5mm is not actually the hole size drilled!
You can usually go -20% below calculated esteps and +30% above before it starts to be a big problem (3mm feedstock) - for some single walled (hollow) objects I have used +20% for a better part - but that's highly dependent on the nozzle size and layer height, if you need to do that.
@Wired1 - Same as the above, and the material, colour and temperature can all make a difference to the look and accuracy. Tune your machine with Natural PLA if possible, then you can see what difference colours and temperatures make.
I never mess with the filament diameter, that should be as accurate as you can measure - and try to stick to a manufacturer with good tolerances in their range.
[richrap.blogspot.com]
|
Re: Calibration contest October 12, 2012 11:04AM |
Registered: 12 years ago Posts: 122 |
@richrap - thanks for the great advice! I decided to reprint keeping everything the same (including the filament colour) and changing just one variable.
I have arbitrarily chosen 0.25, instead of 0.3 mm, as the nozzle diameter in the Printer tab of Slic3r (which is about a 17% reduction).
Overall a good improvement, especially in the gaps.
New readings are:
27.81 x 27.68 external
19.82 x 19.57 internal
1.49 x 1.51 and 1.50 x 1.48 gap
3.99 x 4.01 wall thickness
First attempt
Second attempt
Side by side - first on the left, second on the right
richgain
|
Re: Calibration contest October 12, 2012 01:58PM |
Registered: 13 years ago Posts: 818 |
@richgain - No problem, glad it helped. That's looking really great!
Do you have the original cast X/Y pulleys on the Huxley? or metal ones?
Have you also printed it on the Mendel90 to compare?
[richrap.blogspot.com]
Do you have the original cast X/Y pulleys on the Huxley? or metal ones?
Have you also printed it on the Mendel90 to compare?
[richrap.blogspot.com]
|
Re: Calibration contest October 12, 2012 02:24PM |
Registered: 13 years ago Posts: 301 |
So I printed this and got within 0.05mm for all dimensions if I want to talk best delusional case and 0.1mm worst realistic case. I think that we're within the error range of measuring with digital calipers due to how easy it is to cherry pick as well as deform plastic such minuscule amounts.
|
Re: Calibration contest October 12, 2012 05:09PM |
Admin Registered: 12 years ago Posts: 2,569 |
|
Re: Calibration contest October 12, 2012 06:12PM |
Registered: 13 years ago Posts: 301 |
|
Re: Calibration contest October 12, 2012 08:48PM |
Registered: 11 years ago Posts: 525 |
Few more iterations and it's pretty close now.
Measures 28.29/19.85 on one side and 27.88/19.61 on the other and internals are 1.4/1.51/1.35/1.48
Last print was in yellow which prints neater than the white plus I changed the nozzle to 0.3mm and applied an 85% extrusion multiplier.
Thanks the the contest idea Deux, it has made me get my printer a lot more accurate and will help the quality of my prints.
_________________________________________________________________________________________
Richmond, New Zealand
Thingiverse ~ YouTube
Measures 28.29/19.85 on one side and 27.88/19.61 on the other and internals are 1.4/1.51/1.35/1.48
Last print was in yellow which prints neater than the white plus I changed the nozzle to 0.3mm and applied an 85% extrusion multiplier.
Thanks the the contest idea Deux, it has made me get my printer a lot more accurate and will help the quality of my prints.

_________________________________________________________________________________________
Richmond, New Zealand
Thingiverse ~ YouTube
|
Re: Calibration contest October 13, 2012 01:58AM |
Registered: 12 years ago Posts: 122 |
richrap Wrote:
-------------------------------------------------------
> @richgain - No problem, glad it helped. That's
> looking really great!
>
> Do you have the original cast X/Y pulleys on the
> Huxley? or metal ones?
>
> Have you also printed it on the Mendel90 to
> compare?
@richrap - Yes, still using the original resin-cast pulleys on X and Y on the Huxley. What's your experience of them?
No, I'm planning to try on the Mendel90 some time today. Will update when it's ready.
For quality and tolerance, I've always found the Huxley more accurate, probably because of the finer nozzle and lightweight Bowden-fed printhead.
This should be an interesting test.
|
Re: Calibration contest October 13, 2012 08:51AM |
Registered: 11 years ago Posts: 60 |
richgain Wrote:
-------------------------------------------------------
> My first attempt, also in pink PLA (we're
> obviously quite secure and comfortable with our
> masculinity).
>
> ; generated by Slic3r 0.9.3 on 2012-10-11 at
> 07:10:46
>
> ; layer_height = 0.2
> ; perimeters = 2
> ; solid_layers = 4
> ; fill_density = 0.5
> ; perimeter_speed = 30
> ; infill_speed = 50
> ; travel_speed = 100
> ; scale = 1
> ; nozzle_diameter = 0.3
> ; filament_diameter = 1.75
> ; extrusion_multiplier = 0.85
> ; single wall width = 0.30mm
Hi Richgain, do any of these settings you posted, contribute to your very nice top layer, its full fill and even, I tend to end with spacing between the extrusions on top, any other pointers you could offer?
Also, this looks like fun, I'll give a print a try tomorrow
|
Re: Calibration contest October 13, 2012 01:06PM |
Registered: 12 years ago Posts: 122 |
@jaramaniac - Yes, several do.
When you tell slic3r what layer height and wall thickness you want, it will try its best to achieve those settings by controlling the speed of the nozzle across the build platform (feed-rate) and the rate of extrusion (flow-rate).
However, it bases its calculations on a formula that takes into account the input filament diameter, the nozzle diameter and the extrusion multiplier.
Originally, I concentrated all my attention on finding the best extrusion multiplier for any given print (which is affected by all the above parameters, and probably also other things like material type/brand and nozzle temperature).
If there are gaps in your top layer, increase the extrusion multiplier by 1 or 2 %.
If the top fill layer starts to lift above the set height, and especially if the non-printing movement of the head leaves a trail as it drags through excess plastic, decrease the multiplier a little. (I had lots of problems like this when I started printing a year ago as this early print demonstrates.)
I used to have to set this value in Gcode, do a test print, change the value again, iterate many times, until I found a value (or range of values) that worked well. Now, as I said before, I can greatly speed up the process by tweaking the flow-rate on the fly. I usually specify 4 solid layers at the bottom of the print, which gives me plenty of time to watch how the solid fill is progressing and increase or decrease the flow-rate as required.
I'm just learning how to change the nozzle diameter instead of the extrusion multiplier, as recommended by Richrap, which should give me even better control over print accuracy.
|
Re: Calibration contest October 13, 2012 01:33PM |
Registered: 12 years ago Posts: 122 |
Two prints on the Mendel90 using ABS to begin with.
First print: - measurements 27.8/19.68 in X, 27.8/19.82 in Y, walls 4.00/4.06, gaps 1.46/1.46/1.46/1.47
; layer_height = 0.25
; perimeters = 1
; solid_layers = 4
; fill_density = 0.5
; perimeter_speed = 30
; infill_speed = 30
; travel_speed = 150
; scale = 1
; nozzle_diameter = 0.45
; filament_diameter = 2.8
; extrusion_multiplier = 0.85
; single wall width = 0.49mm
Second attempt: - measurements 28.05/19.80 in X, 28.07/19.76 in Y, walls 4.09/4.05, gaps 1.46/1.50/1.45/1.50
; layer_height = 0.2
; perimeters = 2
; solid_layers = 4
; fill_density = 0.5
; perimeter_speed = 30
; infill_speed = 30
; travel_speed = 150
; scale = 1
; nozzle_diameter = 0.4
; filament_diameter = 2.8
; extrusion_multiplier = 0.85
; single wall width = 0.30mm
That'll do for today.
First print: - measurements 27.8/19.68 in X, 27.8/19.82 in Y, walls 4.00/4.06, gaps 1.46/1.46/1.46/1.47
; layer_height = 0.25
; perimeters = 1
; solid_layers = 4
; fill_density = 0.5
; perimeter_speed = 30
; infill_speed = 30
; travel_speed = 150
; scale = 1
; nozzle_diameter = 0.45
; filament_diameter = 2.8
; extrusion_multiplier = 0.85
; single wall width = 0.49mm

Second attempt: - measurements 28.05/19.80 in X, 28.07/19.76 in Y, walls 4.09/4.05, gaps 1.46/1.50/1.45/1.50
; layer_height = 0.2
; perimeters = 2
; solid_layers = 4
; fill_density = 0.5
; perimeter_speed = 30
; infill_speed = 30
; travel_speed = 150
; scale = 1
; nozzle_diameter = 0.4
; filament_diameter = 2.8
; extrusion_multiplier = 0.85
; single wall width = 0.30mm

That'll do for today.
|
Re: Calibration contest October 13, 2012 05:15PM |
Registered: 13 years ago Posts: 2,947 |
richgain Wrote:
-------------------------------------------------------
> I'm just learning how to change the nozzle
> diameter instead of the extrusion multiplier, as
> recommended by Richrap, which should give me even
> better control over print accuracy.
This is not actually the case. I am the one that came up with this method of improving prints but you will still have to adjust the extrusion multiplier to get the flow correct. Telling it you have a smaller nozzle makes slic3r produce a narrower path but it also reduces the flow to match so it will have no effect on actual flow vs feed. This improves prints and makes them more accurate by printing closer to the actual nozzle diameter. When you print as wide as Slic3r wants to with the correct nozzle diameter entered you get holes that turn out WAY to small, blobs on the corners and really round corners instead of sharp ones.
For a J-head I have found you want to print NO WIDER than 0.2mm wider than the advertised nozzle diameter. and for really low layers 0.15 and less you want to print the same width as the advertised nozzle diameter and as much as 0.2mm less then advertised nozzle diameter for 0.1mm layers.
For non J-head hotends add 0.3 to my numbers above.
| FFF Settings Calculator | Gcode post processors | Geometric Object Deposition Tool Blog |
| Tantillus.org | Mini Printable Lathe | How NOT to install a Pololu driver |

Sorry, only registered users may post in this forum.