OOPS I crashed at ZMAX
Posted by andrea.rimo
|
OOPS I crashed at ZMAX August 26, 2013 09:33AM |
Registered: 10 years ago Posts: 28 |
Ok, I do not know what happened but I crashed the whole X assembly on the barclamp at Z_max. I thought I was homing but I may have given a G1 Z200 (without being homed) so the axis went all the way up and pushed against the barclamp. Inituially it seemed that no damage was done, but now prints come out with some banding that have a pattern of 1mm. also this pattern seems more obvious al lower Z and seems to disappear as soon as the X-axis gets away from the motor.
I think that when the X motor bracket hit the bar clamp the force bent the Zscrew so now, when it spins, it draws little circles in the air. probably, close to the motr the extra constraint on the Z axis is enough to move a little bit of wabbling. as soon as the distance fromthe coupling is enough to releave the constraint the problem disappears...
tomorrow I will be out buing an extra meter of M6 threaded rod. do you think this is the only problem or there should be something else to verify/Check?
|
Re: OOPS I crashed at ZMAX August 26, 2013 11:52AM |
Admin Registered: 17 years ago Posts: 7,879 |
It might have disturbed the alignment of Z coupling assembly rather than bending the screw. If the wobbling is worst near the bottom the screw would either have to be bent very close to the bottom, or more likely the coupling is not holding it concentrically.
I am currently experimenting with different z coupling designs. The current one can be eccentric due to the motor shaft having flat on it. That must be pointing at the seam. Also I found PVC tubing does not have very consistent wall thickness so even when the outside is perfectly centred the inside can be out.
[www.hydraraptor.blogspot.com]
|
Re: OOPS I crashed at ZMAX August 27, 2013 01:42AM |
Registered: 10 years ago Posts: 28 |
Ok, you were right, he screw is almost straight, possibly like it has always been. The problem is the alignment of the motor shaft and the hex trap in the x motor bracket.
Basically, when I remove the belt everything is fine, but as soon as I put the tension back into the belt the x motor bracket and the x idler are pulled towards eachother and the screw is pulled towards the z rod.
Does it make sense? Or do you think there is something else that's not right?
Basically, when I remove the belt everything is fine, but as soon as I put the tension back into the belt the x motor bracket and the x idler are pulled towards eachother and the screw is pulled towards the z rod.
Does it make sense? Or do you think there is something else that's not right?
|
Re: OOPS I crashed at ZMAX August 27, 2013 03:03AM |
Admin Registered: 17 years ago Posts: 7,879 |
I don't see how the belt tension makes the x ends closer together. The clamps on the x bars should hold them but also the Z bars should hold them apart. The worst that happens when the clamps are loose is they rotate a little.
The x end clamps need to be tight enough to stop them slipping but not too tight or they will break.
[www.hydraraptor.blogspot.com]
The x end clamps need to be tight enough to stop them slipping but not too tight or they will break.
[www.hydraraptor.blogspot.com]
|
Re: OOPS I crashed at ZMAX August 27, 2013 04:03AM |
Registered: 10 years ago Posts: 28 |
the belt tension bends the z rods pulling the x brackets close together. that tension is needed so that the belt does not skip teeth*. during the tensioning you can see the rods slipping into the clamps and the 2 z rods beld sligltly. this is more evident if the belt is tensioned while Z=100.
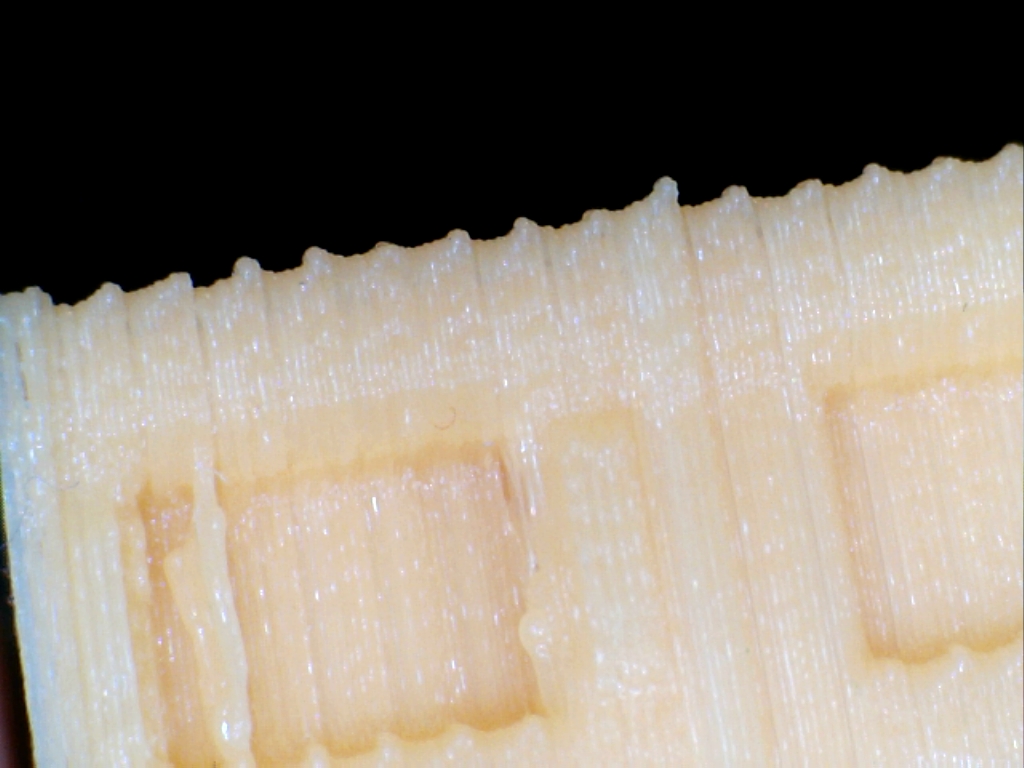
This morning I took a closeup of the wabbling. it's here attached. any comments would be greatly appreciated!
Thanks
A.
* when I first put together the machine I did not tension the belt enough, with the result that occasionaly, during fast (120mm/s) translations the slack side of the belt would be slacky enough for one tooth to climb up the tooth on the pulley, , make the half turn and then fall into the next valley of the pulley effectively skipping 1 tooth. You can see this effect clarly when moving the printhead (or the bed) back and forth. at some point you can feel it getting stiffer and the next thing that happen sis the tooth is skipped.
|
Re: OOPS I crashed at ZMAX August 27, 2013 06:44AM |
Admin Registered: 17 years ago Posts: 7,879 |
Well the x bar clamps have to be tight enough to resist the belt tension. The machine won't work properly if they slip, but I am not sure it would have much effect on z wobble. The picture looks like a very extreme case.
Maybe the z-coupling is too tight. It should be flexible to allow the lead screw to wobble without disturbing the X axis.
Do the ridges stick out all the way round, which would indicate non-linear z-motion, or do they go in on one side and out on the other, which would indicate the x-axis is being displaced by the lead screw.
[www.hydraraptor.blogspot.com]
|
Re: OOPS I crashed at ZMAX August 27, 2013 07:04AM |
Registered: 10 years ago Posts: 28 |
very interesting comment... I did clamp the z coupling very tight, maybe this is the problem...
when I disassembled the z couplings yesterday, the plastic tube had taken the shaper of the clamp, with some plastic actally squeezed intothe gap between the 2 clamps. now I start to think this should not happen....
the wabbling does stick out all around but it's difficult to tell if the ridges on one side correspond to the valleys on the other. one thing is for sure, I printend the "paris building" found on thingiverse (from MakerBot) at a small scale and all the 4 corners exibit the wabbling.
I did some testing on the xbar clamps and, after cleaning with degreaser + acetone, the bar clamp is still not able to keep the bar if i push it thruogh with my hand. it's hard to move, but the bet tension is more. I also found that the rear clamp on the x motor bracket is cracked by overtighttening.
I need to change that as well but it will take a little more as I have do desolder the motor and limit switch.
I'm also going to try to sand the ends of the rods in the intent of making them a rougher surface to clamp on.
thanks for all your help!!!
|
Re: OOPS I crashed at ZMAX August 27, 2013 09:21AM |
Admin Registered: 17 years ago Posts: 7,879 |
A few people seem to be having problems getting the belt tight enough without breaking the clamps. I received some belt back from a customer and build it up into a brand new machine. I was able to tighten the belt enough, so I don't know if anything has changed or not.
Going forward I am using much more flexible belt and I have re-designed the X-ends to have much stronger clamps that don't break when fully closed because the plastic is only under compression. I am also experimenting with different Z couplings. Also the motor is no longer enclosed so only the limit switch wires pass through the bracket.
I hope to release these mods this week. I can't understand why, after more than 300 kits I am having to change the design now though.
[www.hydraraptor.blogspot.com]
|
Re: OOPS I crashed at ZMAX August 27, 2013 02:08PM |
Registered: 10 years ago Posts: 28 |
I was disassembling and I inspected the threaded rods. Interestingly enough both were fairly straight, better than what I expected. One thing hit my eye, though... The 2threads did not mesh at all. Matching the first couple of threads, side by side, after 30-40mm it is already obvious to the naked eye the difference of pitch. I don't think this has anything to do whith my problem but I thought it was interesting enough to note.
The tolerance on the pitch of a standard threaded rod is probably very broad.
Tomorrow I will get a new threaded rod and cut the 2 pieces from it, so to be sure the pitch is the same.
Another thing worth mentioning, the idea to sand the ends has failed as apparently I do not have anything harder than the rods... Tomorrow I'll have them tested for hardness and report here. To my experience I would guess it's around 50HRC or even 60!
|
Re: OOPS I crashed at ZMAX August 27, 2013 02:54PM |
Admin Registered: 17 years ago Posts: 7,879 |
Interesting. I have tried a few side by side and they matched exactly so I assumed they were all made by the same machine so all would be accurate. Also all the threaded rod I have used in my own machines has had accurate pitch. It could explain a few problems people have had with the x ends being different heights at the top when the axis was level at the bottom.
My experience with 1m lengths was at least 30% were too bent to use. With 300mm I only reject about 5% and don't have to cut them myself, chamfer the ends and remake the thread.
The rods should be 60-64Hrc, although that doesn't mean much to me.
[www.hydraraptor.blogspot.com]
My experience with 1m lengths was at least 30% were too bent to use. With 300mm I only reject about 5% and don't have to cut them myself, chamfer the ends and remake the thread.
The rods should be 60-64Hrc, although that doesn't mean much to me.
[www.hydraraptor.blogspot.com]
|
Re: OOPS I crashed at ZMAX August 28, 2013 05:33AM |
Registered: 10 years ago Posts: 28 |
ok, the hardness of the rods is 62, so it is within specification and it cannot be scratched with anything softer, that means you need a diamond or some tungsted carbide machine tool to scratch it. even HSS is of comparable hardness and cannot be used...
in any case, you have it working just by cleaning the rods and tightening without breacking the clamps, so I just have to find the right equilibrium.
there are 2 variables that I need to master:
1- clamping force
2- belt tightening
1- Yesterday I have changed both brackets with new ones, and did some testing with the rods in my hands. I found that if I clamp the rod to just before the clamps breaks (i left 1mm of gap between the clamps), I can push the rod in and out with my hands. its not free to move, it take a bit of force, I estimat it to be 8-10kg. does this happen to you? or are your rods clamped so that you cannot move them with your hands?
2- I tighten the belt to the point where i move back anf forth the x carriage and there is no tooth skipping because of the slack on the belt. this seems to me a little more that what is needed to "emit a bass note when plucked". in my previuos assembly, this tension was enough to male the rod slip in the clamp.
looking forward to your comment
Thanks
P.S.
I am planning to build a deltabot, and I need to sopurce some smooth rods dia.6mm. where do you source yours? how much do you pay for it? I found just 1 supplier and the cost seems outrageous to me, 26euro+VAT for 957mm, I would need 3 of them....
|
Re: OOPS I crashed at ZMAX August 28, 2013 11:56AM |
Admin Registered: 17 years ago Posts: 7,879 |
I tested one here and it took 8kg to move it initially, but after that 6kg, so yes I can move a single rod easily by hand.
I tightened it some more and got 9kg dropping to 7kg after the first slip. Then I ran it up and down the rod a few times and tightened it more, getting 13kg. The clamp was fully closed at the top at this point. So it seems that each time it slips it makes the bore smoother and a bigger contact area then gives more grip. Initially the inside is quite rough because of the staircase effect.
I actually tightened it fully and it did not break, but at this point I had probably worn off a few high spots and it looks like a few cracks might be just starting to appear. I got 14kg at that point.
I don't know how this compares to the force needed to pull the belt tight. I bought a strain gauge to measure it but haven't had time to set up a jig.
I get the rods from here: [www.worldofcnc.com]
You can see 6mm rod is twice as expensive as 8mm and deltas use a lot more so it will be expensive. You could actually go up to 15mm rods and still be cheaper than 6mm, which is 6 times more material and 39 times stiffer, crazy!
Also 8mm bearings and NEMA17 stepper motors are the cheapest sizes, which means if I make a Huxley90 it will probably be more expensive for a smaller build area. The only parts that get a bit cheaper when smaller are the Dibond, fasteners and belt.
[www.hydraraptor.blogspot.com]
|
Re: OOPS I crashed at ZMAX August 28, 2013 05:28PM |
Registered: 10 years ago Posts: 28 |
Ok, I reassembled the whole machine, changed the threaded bars with a new pair cut from a single 1m bar but the wabbling was still there....
after some troubleshooting I found that you were right again!!! the tube on the shaft was off centre. I removed it, turned it around and clamped it with less force. it's still not perfectly in centre, but it's much better now.
One question, why did you choose to print the coupler instead of using a flex coupler (like these: [www.ebay.it]?)
|
Re: OOPS I crashed at ZMAX August 28, 2013 09:38PM |
Registered: 15 years ago Posts: 81 |
nophead Wrote:
-------------------------------------------------------
> Going forward I am using much more flexible belt
> and I have re-designed the X-ends to have much
> stronger clamps that don't break when fully closed
> because the plastic is only under compression. I
> am also experimenting with different Z couplings.
> Also the motor is no longer enclosed so only the
> limit switch wires pass through the bracket.
>
> I hope to release these mods this week. I can't
> understand why, after more than 300 kits I am
> having to change the design now though.
Good to hear you are still looking at incorporating improvements, things can always be made better :-). A couple of things I have noted while putting together a Mendel90 (as a successor to my Sells Mendel):
* The X motor bracket is quite difficult to print (I'm thinking mainly in terms of being very prone to warping). It sounds like you may have addressed that.
* I found that the X carriage fan duct had a tendency for the innermost ring to pop off the bed before it had a chance to join with the rest of the duct. I ended up modifying the scad to make a few sacrificial one layer high connections between the inner and outer rings primarily to increase the contact area but also to hold it in position if it did end up lifting. I can send a pull request for that if you want.
* After years of using the greg accessible wade block, I am having a hard time with the way the current mendel90 extruder block completely encloses the path to the hobbed bolt, making it impossible to visually inspect whether the hobbing is getting clogged (for minor cases it's possible to get in with a pick to clean it out without having to even remove the filament or interrupt a print, let alone remove the filament and idler and/or bolt). I am going to try to make a modification that will improve the accessibility but still keep the bearings enclosed, since I don't see any downside.
The first two make the replication of the Mendel90 a little more forgiving, and the last makes the operation of the printer itself a little more forgiving.
Cheers,
Len.
|
Re: OOPS I crashed at ZMAX August 29, 2013 05:47AM |
Admin Registered: 17 years ago Posts: 7,879 |
andrea.rimo Wrote:
-------------------------------------------------------
> One question, why did you choose to print the
> coupler instead of using a flex coupler (like
> these:
> [www.ebay.it]
> ng-5-to-6-35mm-Flex-Coupler-/370724511280?pt=LH_De
> faultDomain_0&hash=item5650e71e30?)
Several reasons:
I figured they would act like springs so the axis would see-saw and possibly have backlash.
They don't have the correct bore for threaded rods unless they are specially made.
They are not designed to support loads or provide centring, they are intended to be used between bearings. (You might think it is easy to add a bearing but they don't work well on studding because they are the wrong size and nuts do not hold it perfectly orthogonal to the bearing.)
They cost hundreds of times more than the printed ones and add another relatively exotic vitamin.
I have built several machines with the printed ones and didn't get any z-banding. However I made one recently that did have it and you are the second customer that has reported it, which is why I am experimenting with a new design. It is another issue that has only surfaced after hundreds of kits. Again, I don't know what has changed.
A weakness of the existing design is it needs to be fully closed to grip the studding but not fully closed over the tubing. I should have adjusted the diameters so it was correct when both ends were fully closed.
The flat on the motor shaft is not ideal. At the time I designed them the motors didn't come with flats but they do now. Also they had to grip enough to support the weight of the x-axis hanging from the top on the Prusa. Now they simply have to grip enough to convey the rotation. However when one is levelling the bed you need to be able to overcome the torque of the motor.
One thing I have realised is that the PVC tubing doesn't always have the hole well centred. Rubber tubing seems better but from a small sample but I don't know how much that varies. I have tried four alternative designs so far but not totally happy with any of them for various reasons.
The new x-ends have the nut at the top which reduces the wobble dramatically when the axis is at the bottom.
[www.hydraraptor.blogspot.com]
|
Re: OOPS I crashed at ZMAX August 29, 2013 06:16AM |
Admin Registered: 17 years ago Posts: 7,879 |
Lenbok Wrote:
-------------------------------------------------------
> Good to hear you are still looking at
> incorporating improvements, things can always be
> made better :-).
The problem is that while I am shipping kits I have absolutely no time to change the design. I have had to stop shipping for a couple of weeks to make these changes and now have a queue again.
>A couple of things I have noted
> while putting together a Mendel90 (as a successor
> to my Sells Mendel):
>
> * The X motor bracket is quite difficult to print
> (I'm thinking mainly in terms of being very prone
> to warping). It sounds like you may have addressed
> that.
Yes it is now an easy print.
> * I found that the X carriage fan duct had a
> tendency for the innermost ring to pop off the bed
> before it had a chance to join with the rest of
> the duct. I ended up modifying the scad to make a
> few sacrificial one layer high connections between
> the inner and outer rings primarily to increase
> the contact area but also to hold it in position
> if it did end up lifting. I can send a pull
> request for that if you want.
The source and manual have to match the kits I produce and changing things takes time and effort so I don't accept pull requests unless they have some advantage to the kits I produce. I can print those two at a time reliably without them lifting, whereas I did have about a 10% reject rate on the x-motor bracket.
> * After years of using the greg accessible wade
> block, I am having a hard time with the way the
> current mendel90 extruder block completely
> encloses the path to the hobbed bolt, making it
> impossible to visually inspect whether the hobbing
> is getting clogged (for minor cases it's possible
> to get in with a pick to clean it out without
> having to even remove the filament or interrupt a
> print, let alone remove the filament and idler
> and/or bolt). I am going to try to make a
> modification that will improve the accessibility
> but still keep the bearings enclosed, since I
> don't see any downside.
I never need to inspect or clean the hobbed bolt unless I have a disaster like a filament tangle or a blocked nozzle. In which case it is easy to remove the bolt and clean it with a steel wire brush. This is why I never saw the point of the accessible version and don't want to do anything that makes it weaker or larger. Greg's version is both I think. I tried a hinged version long before Greg but could never get it strong enough to last very long. The Wade's block and the idler block have the shortest lives after the gears on my production machines.
[www.hydraraptor.blogspot.com]
|
Re: OOPS I crashed at ZMAX August 29, 2013 08:28PM |
Registered: 15 years ago Posts: 81 |
nophead Wrote:
-------------------------------------------------------
> The source and manual have to match the kits I
> produce and changing things takes time and effort
> so I don't accept pull requests unless they have
> some advantage to the kits I produce. I can print
> those two at a time reliably without them lifting,
> whereas I did have about a 10% reject rate on the
> x-motor bracket.
I can understand that, particularly with your time pressures. I may still submit a pull request anyway so that at least it is attached to the repository for other people if they want it, and if you find you do another round of mods you can reassess things.
I do think that it's nice to aim for an easier to reproduce model outside of the world of nophead-provided-kits (there are quite a few design decisions that only really make sense for your kits where you are buying in bulk, but for people doing a one-off the number of different vitamins makes things difficult. E.g. I can only locally source the square aluminium tube for the base in 5m lengths, and small-diameter pan screws and hex head screws aren't readily available).
> I never need to inspect or clean the hobbed bolt
> unless I have a disaster like a filament tangle or
> a blocked nozzle. In which case it is easy to
> remove the bolt and clean it with a steel wire
> brush. This is why I never saw the point of the
> accessible version and don't want to do anything
> that makes it weaker or larger. Greg's version is
> both I think. I tried a hinged version long before
> Greg but could never get it strong enough to last
> very long. The Wade's block and the idler block
> have the shortest lives after the gears on my
> production machines.
You are not a typical user ;-). It's easy when experimenting with different nozzles, plastics, temperatures, flow rates, reversal rates etc to start to exceed the limit of the hobbing (and this can vary depending on the quality of the hobbed bolt too), where a visual inspection can give much earlier feedback. (I must say, I quite like the new method of holding groove-mount style hot ends in the Wade's block, very nifty). Out of interest, how do you wear out a Wade's block?
Cheers,
Len.
|
Re: OOPS I crashed at ZMAX August 30, 2013 04:36AM |
Admin Registered: 17 years ago Posts: 7,879 |
Lenbok Wrote:
-------------------------------------------------------
> I can understand that, particularly with your time
> pressures. I may still submit a pull request
> anyway so that at least it is attached to the
> repository for other people if they want it, and
> if you find you do another round of mods you can
> reassess things.
Yes nothing to stop you adding a pull request. You will find some there already,
>
> I do think that it's nice to aim for an easier to
> reproduce model outside of the world of
> nophead-provided-kits (there are quite a few
> design decisions that only really make sense for
> your kits where you are buying in bulk, but for
> people doing a one-off the number of different
> vitamins makes things difficult. E.g. I can only
> locally source the square aluminium tube for the
> base in 5m lengths, and small-diameter pan screws
> and hex head screws aren't readily available).
I buy the AL tubes in 2.5m lengths but I can get them from the local DIY shop in 1m lengths.
I don't know what to say about the small screws. They have to be small to go into the motors, limit switches and load resistors. I have no problem buying them in the UK, even in small quantities, The new X-ends don't use hex screws so that only leaves 3 M3 hex screws for the extruder motor. You can use pan or cap but hex allow the motor to be adjusted with the gears in place.
I believe in using the correct screws for the job and I can buy 1 screw at the same price as 100 so it doesn't make sense for me to compromise. If you want to use different fasteners fork the design and change them to what ever you want.
>Out of interest,how do you wear out a Wade's block?
They develop stress fractures eventually, especially in enclosed machines where they run too hot to touch. I think heat makes the ABS brittle and the constant reversals of several kg force fatigues them. They tend to outlive the hot end so I start with a new one if I replace that so I haven't had one fail for a long time.
[www.hydraraptor.blogspot.com]
|
Re: OOPS I crashed at ZMAX August 31, 2013 08:42AM |
Registered: 10 years ago Posts: 28 |
|
Re: OOPS I crashed at ZMAX August 31, 2013 02:17PM |
Admin Registered: 17 years ago Posts: 7,879 |
It's a bug in the design but it never happens to me because a build never ends at x = +100. In the few cases when I have driven it to +100 and homed it didn't do any damage, it just stalled the motor.
To fix it I would have to turn round the Z bar clamp and find somewhere else to fasten the limit switch.
Edited 1 time(s). Last edit at 08/31/2013 02:18PM by nophead.
[www.hydraraptor.blogspot.com]
To fix it I would have to turn round the Z bar clamp and find somewhere else to fasten the limit switch.
Edited 1 time(s). Last edit at 08/31/2013 02:18PM by nophead.
[www.hydraraptor.blogspot.com]
|
Re: OOPS I crashed at ZMAX September 01, 2013 03:22AM |
Registered: 10 years ago Posts: 13 |
Please ignore if this is a stupid noob suggestion, but I am going to offer it up anyway.
If there is a potential to do some damage in this way, and a re-design of the Z bar clamp and mounting holes etc. is not a simple task, then why not fix it in the Firmware?
Presumably it wouldn't take too much code to make sure that the motor cannot get into the position where it hits the Z clamp?
Just a suggestion...
Sorry, only registered users may post in this forum.