Illuminate printing area
Posted by muelli
|
Illuminate printing area November 03, 2013 02:01PM |
Registered: 10 years ago Posts: 143 |
My M90 is standing in a quite dark area. Instead of using the flashlight to control the print, I thought about illuminating the area around the nozzle and the printing bed.
The printing bed can be illuminated by placing LEDs around the vertical dibond "arc", no problem.
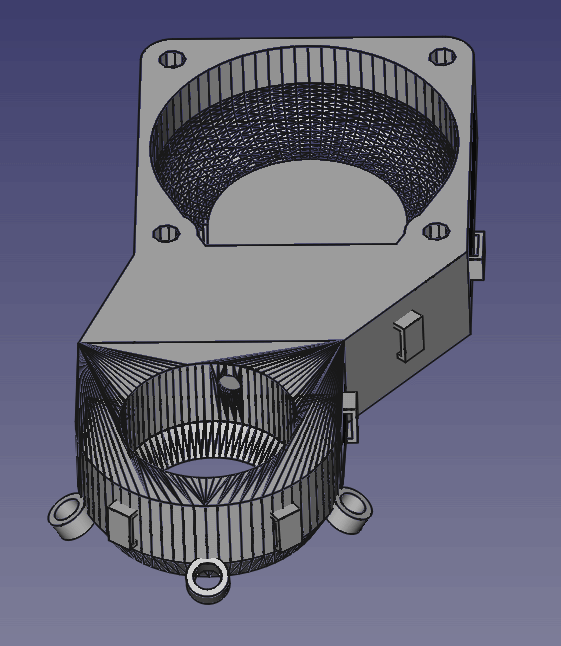
But the nozzle.... I thought about reprinting the fan duct and plaing slots for 5mm LEDs around it. But I have not yet tried to print ABS and still have minor problems with some PLA prints.
Does someone have an idea?
And which of the 12V on the X carriage can be safely used for powering the LEDs? As far as I have read, I should use the spare wire in the ribbon cable to get a "clean" ground signal to the carriage...
The printing bed can be illuminated by placing LEDs around the vertical dibond "arc", no problem.
But the nozzle.... I thought about reprinting the fan duct and plaing slots for 5mm LEDs around it. But I have not yet tried to print ABS and still have minor problems with some PLA prints.
Does someone have an idea?
And which of the 12V on the X carriage can be safely used for powering the LEDs? As far as I have read, I should use the spare wire in the ribbon cable to get a "clean" ground signal to the carriage...
|
Re: Illuminate printing area November 03, 2013 03:44PM |
Registered: 11 years ago Posts: 369 |
If you're not using the fan then you can just re-use the fan feed for LEDs? If you use plain LEDs then don't forget to fit in-line current-limiting resistors or they won't last very long.
Alternatively get those self-adhesive LED strips - they're essentially chains of 3 SMT LEDs with the right resistor fitted in-line for 12V use so you can cut them in any multiple of 3 and stick there wherever you have power. These are what I use around the dibond gantry - I find that they give plenty of illumination (my printer is also in a dark room).
Alternatively get those self-adhesive LED strips - they're essentially chains of 3 SMT LEDs with the right resistor fitted in-line for 12V use so you can cut them in any multiple of 3 and stick there wherever you have power. These are what I use around the dibond gantry - I find that they give plenty of illumination (my printer is also in a dark room).
|
Re: Illuminate printing area November 03, 2013 04:00PM |
Registered: 10 years ago Posts: 143 |
|
Re: Illuminate printing area November 03, 2013 04:26PM |
Registered: 11 years ago Posts: 369 |
I have 6 LEDs on either side of my gantry and they throw out a lot of light. In fact, they're too bright for the web cam that I have pointed at my print bed. 3 on each side and across the top would probably work better. I do use a mirror tile from IKEA for my glass though so maybe I get extra light reflected upwards.
|
Re: Illuminate printing area November 05, 2013 05:19AM |
Registered: 10 years ago Posts: 143 |
|
Re: Illuminate printing area November 13, 2013 09:04AM |
Registered: 10 years ago Posts: 143 |
aside from the 12v question I continued with the project.
I created some clips to fit on the mendel dibond arc that are equiped with rings for 5mm LEDs.
Left and right clips hold the LED in a 45° angle, top clip at 90°
You can find them at thingiverse:
[www.thingiverse.com]
I created some clips to fit on the mendel dibond arc that are equiped with rings for 5mm LEDs.
Left and right clips hold the LED in a 45° angle, top clip at 90°
You can find them at thingiverse:
[www.thingiverse.com]
|
Re: Illuminate printing area November 13, 2013 09:12AM |
Registered: 10 years ago Posts: 155 |

|
Re: Illuminate printing area November 13, 2013 05:59PM |
Registered: 10 years ago Posts: 363 |
|
Re: Illuminate printing area November 14, 2013 01:33PM |
Registered: 10 years ago Posts: 143 |
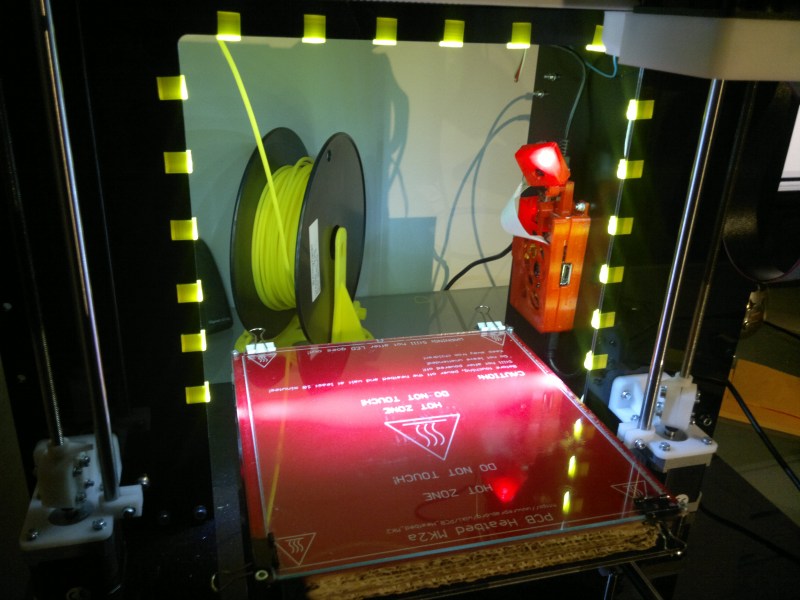
Ladies and Gentlemen, I present:
the illuminated Mendel90 printbed!
That completes phase 1.
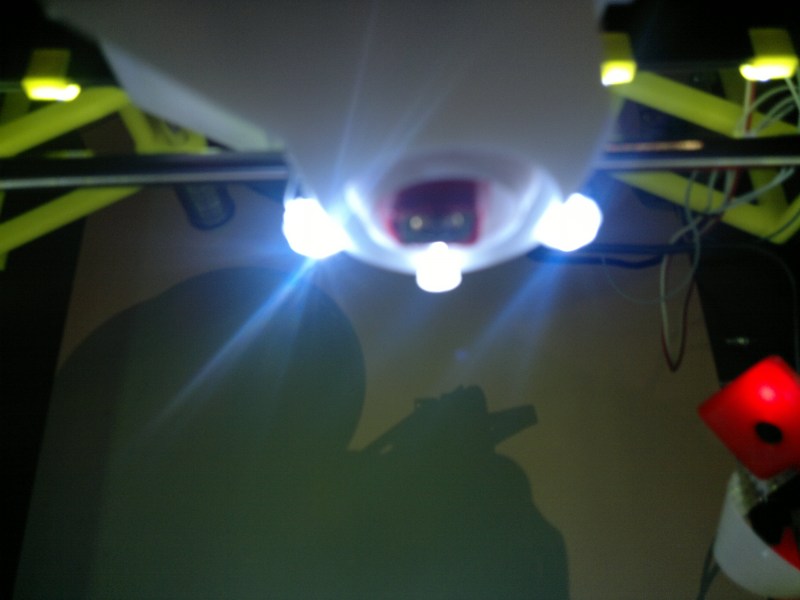
Phase 2 will begin as soon as I get my white ABS to print the X carriage fan duct with fittings for three 5mm LEDs to shed even more light to what actually happens on the printbed.
PS: Of course the light can be controlled via gcode. Check out this thread for details: [forums.reprap.org]
Edited 1 time(s). Last edit at 11/14/2013 01:43PM by muelli.
the illuminated Mendel90 printbed!
That completes phase 1.
Phase 2 will begin as soon as I get my white ABS to print the X carriage fan duct with fittings for three 5mm LEDs to shed even more light to what actually happens on the printbed.
PS: Of course the light can be controlled via gcode. Check out this thread for details: [forums.reprap.org]
Edited 1 time(s). Last edit at 11/14/2013 01:43PM by muelli.
|
Re: Illuminate printing area November 14, 2013 03:02PM |
Registered: 10 years ago Posts: 155 |
|
Re: Illuminate printing area November 15, 2013 04:08AM |
Registered: 10 years ago Posts: 143 |
|
Re: Illuminate printing area November 15, 2013 04:42AM |
Registered: 11 years ago Posts: 369 |
My camera is only slightly higher than yours but I get a good enough view to monitor my prints remotely, so you might not have to move it far:
Having said that, my wife is complaining that it points out from my man-cave though so I'll probably move it to the front left corner (facing backwards) once I get a new webcam - this is just a spare Microsoft Lifecam that I had lying around.
My buddy Chargenut has designed a mount for his Logitech C270 HD webcam that he uploaded to another thread - I'll probably do the same.
|
Re: Illuminate printing area November 15, 2013 06:08AM |
Registered: 10 years ago Posts: 143 |
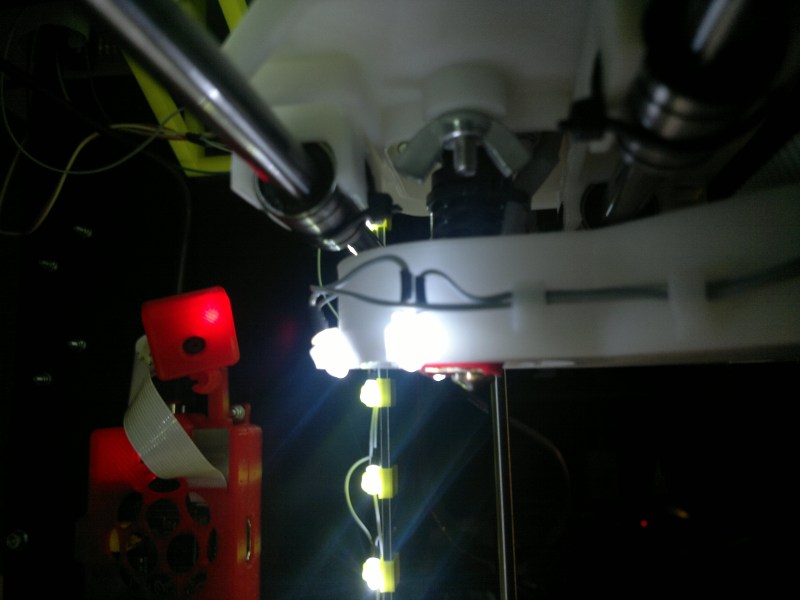
I am limited by the length of the flex cable and do no want to buy a new one (cheapskate *g*).
attached is the prototype of the fan duct with led and cable clips.
ABS should arrive today, as soon as I know how to print ABS the tests will start
attached is the prototype of the fan duct with led and cable clips.
ABS should arrive today, as soon as I know how to print ABS the tests will start
|
Re: Illuminate printing area November 17, 2013 02:19AM |
Registered: 10 years ago Posts: 363 |
|
Re: Illuminate printing area November 17, 2013 05:56AM |
Registered: 10 years ago Posts: 143 |
|
Re: Illuminate printing area November 17, 2013 01:46PM |
Registered: 10 years ago Posts: 363 |
|
Re: Illuminate printing area November 17, 2013 03:50PM |
Registered: 11 years ago Posts: 369 |
Hi Garry, yes it is SÖRLI, stuck down with Kapton along all four edges (only needs about 2-3" of tape per side). They come in packs of four, so I have one covered with PET tape (4x 50mm wide strips), one with ABS slurry, one with dilute PVA and one just clean glass. That gives me the choice of four printing surfaces at the same thickness so I don't need to re-calibrate when switching materials. They're a tiny bit smaller than the kit glass so I would have to be very careful positioning the glass on the bed if I ever wanted to print a 200x200 object but so far I have not needed to.
Chris (Nophead) actually says that mirror tiles are often coated with something that makes them harder to print on, so maybe IKEA not having them in Canada is a good thing - I had a spate of problems with first layer adhesion that I never got to the bottom of, but I narrowed it down to either the glass or a bad batch of ABS.
Chris (Nophead) actually says that mirror tiles are often coated with something that makes them harder to print on, so maybe IKEA not having them in Canada is a good thing - I had a spate of problems with first layer adhesion that I never got to the bottom of, but I narrowed it down to either the glass or a bad batch of ABS.
|
Re: Illuminate printing area November 17, 2013 03:58PM |
Registered: 10 years ago Posts: 143 |
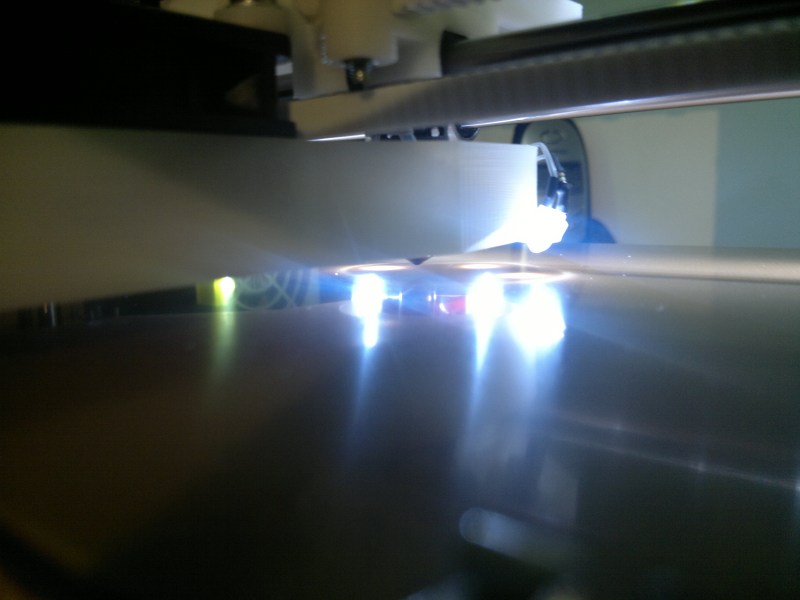
Phase 2 finished, project complete. Now everything on the printbed and around the nozzle is in bright light!
I had to change the fan duct a little to be able to print it without support: I printed two, one sliced with KISSlicer and one with skeinforge50plus.
Kisslicer came out better, that was a surprise. However, I had to clean them both up a little, the bridging is quite extreme on this object.
See attached STL file and pictures.
|
Re: Illuminate printing area November 17, 2013 07:22PM |
Registered: 10 years ago Posts: 363 |
@QuackingPlums
Thank you. That's good information. I will go to a local Michael's craft store and see about getting 214mm square mirror glass or other glass and see if they can clip the corners at a 45 degree angle for the screws. Mirror glass might be good because it would be easy to see smudges or any grime on the surface? It would also let you see the print in the reflection? And bounce light?
If you ever need wider PET I found some here: Wide PET
|
Re: Illuminate printing area November 17, 2013 07:38PM |
Registered: 10 years ago Posts: 363 |
|
Re: Illuminate printing area November 17, 2013 07:55PM |
Admin Registered: 17 years ago Posts: 7,879 |
To print the fan duct with Skeinforge I use 0.35mm layers and set the infill direction to 90 degrees so that the first bridge layer spans directly across the gap.
[www.hydraraptor.blogspot.com]
[www.hydraraptor.blogspot.com]
|
Re: Illuminate printing area November 18, 2013 02:51AM |
Registered: 10 years ago Posts: 143 |
yes it was quite a challenge! I am printing the ABS with no cabin or cover whatsoever.
But since saturday I got the printplate from MTplus and it is incredible how good the ABS is sticking to it while hot.
nophead: thanks for the hint, that might be the reason why my bridge looks not so good Using 45 infill direction it tries to span the bridge diagonally and most if the first strings are not holding....
But since saturday I got the printplate from MTplus and it is incredible how good the ABS is sticking to it while hot.
nophead: thanks for the hint, that might be the reason why my bridge looks not so good
Using 45 infill direction it tries to span the bridge diagonally and most if the first strings are not holding....
|
Re: Illuminate printing area November 18, 2013 03:32AM |
Registered: 11 years ago Posts: 369 |
@Garry:
Thanks for the link - I have actually tried 100mm PET tape but found it too time consuming trying to lay it down without bubbles. Since I'm equally annoyed by bubbles and tape lines on the underside of my prints I figured that it was a good compromise to have more lines/fewer bubbles if it meant I could re-surface my glass quicker.
Most of my prints actually fit within the 50mm width of a single piece of tape so I just make sure I position the object in between the tramlines before slicing - as can be seen in the photo above. Most larger prints are still under 100mm wide so they will only have one line on them, and larger prints still suffer a little from lifting in the corners anyway so lines are the least of my worries!
You may have more patience than I do - I did meet a guy at a show who was very adept at laying down 200mm Kapton across his entire bed, despite having to squeeze the roll through the side window which wasn't even wide enough for the roll!
|
Re: Illuminate printing area November 18, 2013 03:55AM |
Registered: 11 years ago Posts: 369 |
@muelli:
Very interested in that MTplus plate - is it the "permanent pressure" plate they advertise on their site? It looks very similar in the photos to that Garolite stuff that Taulman recommends for printing nylon - is it? Do you just put it down instead of the glass or have you got the carbon fibre heated bed too? How does it perform w.r.t. warping? Please give us the juicy details!
Very interested in that MTplus plate - is it the "permanent pressure" plate they advertise on their site? It looks very similar in the photos to that Garolite stuff that Taulman recommends for printing nylon - is it? Do you just put it down instead of the glass or have you got the carbon fibre heated bed too? How does it perform w.r.t. warping? Please give us the juicy details!
|
Re: Illuminate printing area November 18, 2013 08:53AM |
Registered: 10 years ago Posts: 143 |
first a hint on kapton tape:
use a drop if diswasher cleaner in some water to wet the glas plate. then lay the kapton striped on the wet glas. you then can easily move the tape over the glas, push bubbles out, move the layers together etc.
if done, push the water out using a credit card etc.
heat up the printbed to some 30°C and let it dry. you then should hava a perfectly flat kapton bed.
about the printplate:
hm, i do not know the english product name for this. it is on this page:
[www.mtplus.de]
and is called "Dauerdruckplatte", looks (and possible is *g*) like a PCB without photo/copper side. Just below the carbon heatbed.
you do not need the carbon heatbed. I use it with heatbed MK2a on a sheet of plain glas and it works. I printed the ABS fanduct at room temp without a cabin!
however, I am struggeling with a very small part that needs to be ABS and the edges lift. The use of aceton to clean the dauerdruckplatte should make it even more sticky! at least that is what the manual says
|
Re: Illuminate printing area November 18, 2013 09:18AM |
Registered: 11 years ago Posts: 369 |
|
Re: Illuminate printing area November 18, 2013 10:01AM |
Admin Registered: 17 years ago Posts: 7,879 |
I find the tape does not stick as well if you put it on with water so I gave up on 200mm tape and use 50mm strips. I hate putting them on. I always get some bubbles but they slowly disappear during the first few uses. The way to avoid bubbles is to put it on in a vacuum chamber!
The "permanent pressure plate" is a bad translation, I think it should be "permanent printing plate". It is a PEI / fibre glass laminate. The problem I found with it is it bends under the stress of the printed parts, so although they do not lift they are not flat but have a curved base. Same with carbon fibre.
[www.hydraraptor.blogspot.com]
|
Re: Illuminate printing area November 18, 2013 10:41AM |
Registered: 11 years ago Posts: 369 |
|
Re: Illuminate printing area November 18, 2013 12:39PM |
Admin Registered: 17 years ago Posts: 7,879 |
Maybe but if it had a different thermal expansion it would be a problem.
Also maybe if it was held flat the object would lift. I .e. it only stays stuck because it can flex.
[www.hydraraptor.blogspot.com]
Also maybe if it was held flat the object would lift. I .e. it only stays stuck because it can flex.
[www.hydraraptor.blogspot.com]
|
Re: Illuminate printing area December 15, 2013 02:10AM |
Registered: 10 years ago Posts: 363 |


Sorry, only registered users may post in this forum.