Auto bed leveling (kapazitiv) + E3D Hotend nachgerüstet (RepRapPro Mendel)
geschrieben von .xack.
|
Re: Auto bed leveling (kapazitiv) + E3D Hotend nachgerüstet (RepRapPro Mendel) 25. November 2015 03:48 |
Registrierungsdatum: 8 Jahre zuvor Beiträge: 214 |
Quote
Alterego
Hallo Jetiman,
jetzt gerät hier alles etwas durcheinander
Erst zum Thema:
Autoleveling habe ich immer vor jedem Druck gemacht. Dauert ein paar Sekunden - was spricht da dagegen?
Es hat bei mir auch schon mal mit der 0.91 funktioniert ohne Z-Max. Jetzt geht es nicht mehr und ich lege da auch grade keinen Wert drauf.
Wolfgang sollte es halt mal mit der 0.92 probieren...
Babystepping: Schön, dass ich da mal eine Bestätigung bekomme! ich kann manchmal ein paar wenige Ticks am Encoder drehen, dann stürzt das Board so böse ab, dass ich es komplett vom Strom trennen muss. Meine Vermutung: da ist an der Display- bzw. Encoder-Steuerung was faul.
Laser: Es gibt ja einen Default printer mode. Bloß wie schalte ich von diesem in den Laser-Mode? Hintergrund: Ich stecke den Laser einfach anstelle des Drucklüfters an. Ich werde das wohl weiter manuell machen, da weiß ich was passiert...
N'amd,
Stefan

Offtopic:
Babystepping sollte gefixt sein. Einmal die neuste Firmware neu Runterladen.
1-mal bearbeitet. Zuletzt am 25.11.15 03:49.
Prusa Mendel i2 - Ramps 1.4 - Repetier 0.92.9 - Repetier Server RPi2 - E3d v6 Bowden oder (J Head Mk V 0,35/3mm)
P3steel toolson MK2 - RAADS - Repetier 1.0.0dev - Repetier Server RPi2 - E3d v6 Bowden
|
Re: Auto bed leveling (kapazitiv) + E3D Hotend nachgerüstet (RepRapPro Mendel) 25. November 2015 08:43 |
Registrierungsdatum: 11 Jahre zuvor Beiträge: 390 |

|
Re: Auto bed leveling (kapazitiv) + E3D Hotend nachgerüstet (RepRapPro Mendel) 03. December 2015 16:50 |
Registrierungsdatum: 8 Jahre zuvor Beiträge: 3 |
Hi,
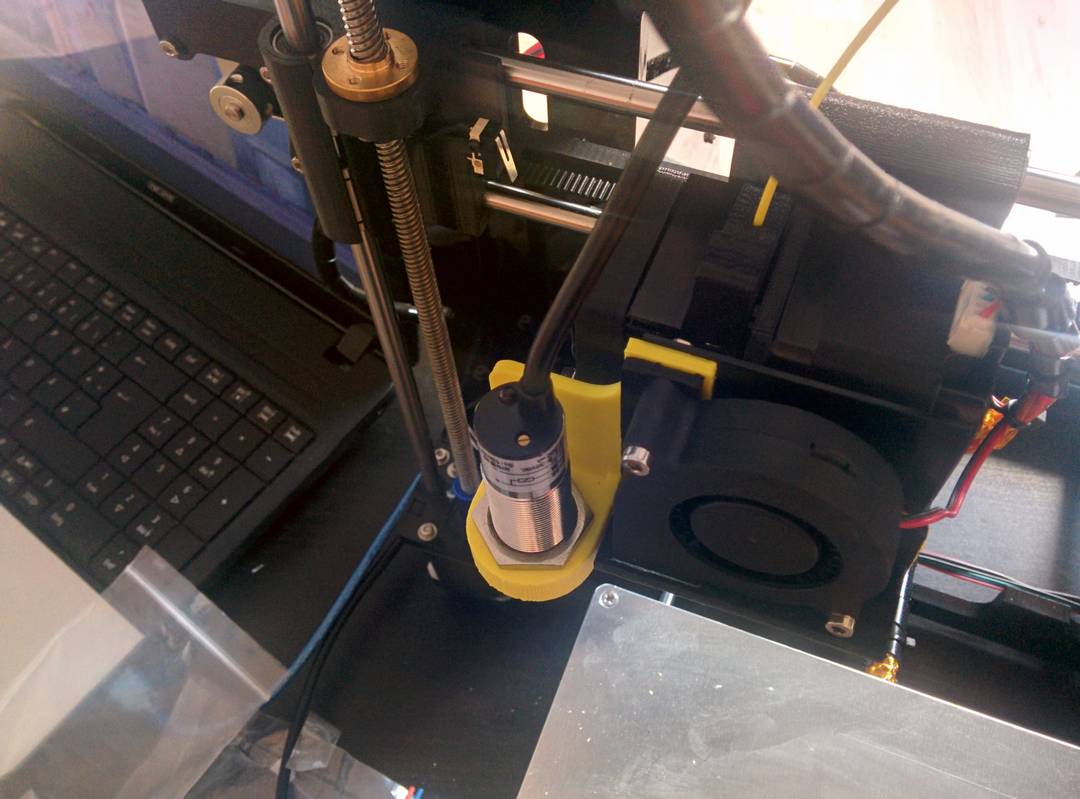
lese hier schon ne weile mit und hab inzwischen meinen Prusa i3 auch mit einem Kapazitiven Sensor ausgestattet !
Der Sensor ist klasse und funktioniert
ABER !
Nachdem ich den Probe Offset gemessen und eingetragen hab , Zickt Arduino IDE und gibt mir diesen Fehler:
Ich steh gerade etwas auf dem Schlauch und hoffe hier hat jemand ne idee.
Hab schon andere Arduino IDE Versionen probiert und Marlin komplett neu runter geladen.
Immer mit dem selben Ergebnis.
Sobald ich die Offset werte eintrage steigt A.IDE aus.
Die Configuration.h häng ich mal mit dran.
Ach ja mein Sensor sitzt Links vor dem Hotend.
Mfg
Ron
1-mal bearbeitet. Zuletzt am 03.12.15 17:04.
lese hier schon ne weile mit und hab inzwischen meinen Prusa i3 auch mit einem Kapazitiven Sensor ausgestattet !
Der Sensor ist klasse und funktioniert
ABER !
Nachdem ich den Probe Offset gemessen und eingetragen hab , Zickt Arduino IDE und gibt mir diesen Fehler:
Arduino: 1.6.6 (Windows 10), Board: "Arduino/Genuino Mega or Mega 2560, ATmega2560 (Mega 2560)"

In file included from C:\Marlin_Prusa.ino:33:0:

Configuration.h:450: error: #error "The Y axis probing range is not enough to fit all the points defined in AUTO_BED_LEVELING_GRID_POINTS"

 #error "The Y axis probing range is not enough to fit all the points defined in AUTO_BED_LEVELING_GRID_POINTS"

  ^
exit status 1
#error "The Y axis probing range is not enough to fit all the points defined in AUTO_BED_LEVELING_GRID_POINTS"
Ich steh gerade etwas auf dem Schlauch und hoffe hier hat jemand ne idee.
Hab schon andere Arduino IDE Versionen probiert und Marlin komplett neu runter geladen.
Immer mit dem selben Ergebnis.
Sobald ich die Offset werte eintrage steigt A.IDE aus.
Die Configuration.h häng ich mal mit dran.
Ach ja mein Sensor sitzt Links vor dem Hotend.
Mfg
Ron
1-mal bearbeitet. Zuletzt am 03.12.15 17:04.
|
Re: Auto bed leveling (kapazitiv) + E3D Hotend nachgerüstet (RepRapPro Mendel) 04. December 2015 02:16 |
Registrierungsdatum: 8 Jahre zuvor Beiträge: 2.094 |
Die Fehlermeldung scheint doch recht selbsterklärend zu sein: Die Punkte, die für die Z-Probe angefahren werden sollen, liegen auf der Y-Achse außerhalb des Druckbett.
--
Microsoft MVP in den Kategorien DirectX/XNA * Visual C++ * Visual Studio and Development Technologies seit 2011
Andere Projekte: FSR Board (ABL-Sensor-Platine inkl. Firmware) * ThirtyTwo (32Bit RepRap-Firmware)
--
Microsoft MVP in den Kategorien DirectX/XNA * Visual C++ * Visual Studio and Development Technologies seit 2011
- Mein Erster (RAMPS 1.4, Selbstbau WolfStrap-Derivat mit Linearführungen, Wade Extruder und E3D lite6 Hotend)
- Cub44 (Selbstbau Dual Wire Gantry Derivat mit Zahnriemen und Linearschienen, RADDS 1.5 und DUE, Custom Hotend - E3D like, Compact Bowden Extruder)
- HexMax (sechseckiger Delta (eigenes Design) mit Druckraum 300mm Durchmesser und >=400mm Höhe, RADDS 1.5, 24V, Custom Hotend, Compact Bowden Extruder)
- P3Steel Toolson MK2 - Keine Zeit zum selbst planen ;-)
Andere Projekte: FSR Board (ABL-Sensor-Platine inkl. Firmware) * ThirtyTwo (32Bit RepRap-Firmware)
|
Re: Auto bed leveling (kapazitiv) + E3D Hotend nachgerüstet (RepRapPro Mendel) 08. December 2015 04:44 |
Registrierungsdatum: 8 Jahre zuvor Beiträge: 3 |
Hi,
Sorry für die späte Antwort.
Musste leider ins Krankenhaus ...
Zum Fehler !
Arduino IDE war das Problem.
Hab immer neue Fehlermeldungen bekommen, u.a das ich erst das Mainboard definieren sollte.
Deinstallation, alle Reste manuell entfernt und neu aufgespielt.
Jetzt geht's wieder !
Auch mein Autobed Leveling !
Cu
|
Re: Auto bed leveling (kapazitiv) + E3D Hotend nachgerüstet (RepRapPro Mendel) 12. December 2015 13:21 |
Registrierungsdatum: 10 Jahre zuvor Beiträge: 8 |
Hallo zusammen ,
Ich bin grade dabei meien China Pursa I3(Zonestar 802) umzurüsten .
Habe Folgendes verbaut ifm kf 5002 (Schließer) +Spannungsteiler .
Geschaltet kommen 4,1V heraus(Sollte reichen )
Doch egal was ich mache Pullups ein oder ausschalter ich habe immer am eingang des Boards 5 V anliegen ,so wird das nix mit dem Sensor .
Habt ihr eine Idee was das sein könnte ?
Im anhang ist die Originale nicht veränderte Firmeware des Druckers (ich vermute mal es ist 0.91)
Wenn alles nicht hilft schalte ich ein Transistor zu ,der mir einfach den GND durchschaltet
gruß Markus
Configuration.h
1-mal bearbeitet. Zuletzt am 12.12.15 13:24.
|
Re: Auto bed leveling (kapazitiv) + E3D Hotend nachgerüstet (RepRapPro Mendel) 12. December 2015 14:05 |
Registrierungsdatum: 11 Jahre zuvor Beiträge: 3.969 |
Moin moin aus HU.
Scheinbar gibt der Sensor nichts oder die Versorgungsspannung aus. Das sind dann 12V am Ausgang. Ich würde da einen Transistor zwischen setzen. Der schaltet nur die Masse durch. Aber dann den Pullup einschalten.
Der Spannungsteiler ist mir suspekt. Ich habe auch den Transistor drin. Dann benötigt man nur einen Draht zum Eingang. Der Transistor verschwindet im Kabel unter dem Schrumpfschlauch.
Liebe Grüße aus Kaltenkirchen.
Frithjof
Meine Seite
[www.facebook.com]
|
Re: Auto bed leveling (kapazitiv) + E3D Hotend nachgerüstet (RepRapPro Mendel) 07. January 2016 15:52 |
Registrierungsdatum: 9 Jahre zuvor Beiträge: 531 |
Quote
Fridi
Repetier Host V1.6.0, Repetier FW 0.92.2
Hier das Sript
G28 X0 Y0; // Homing nur für X und Y
G1 Z10; // wenn er zu nahe am Bett steht funktioniert z-Probe nicht
G32 S0 ; // Autobedleveling
G1 X0 Y0 F9000; // zurück nach Hause
[attachment 66499 pins.h]
[attachment 66498 Configuration.h]
Das Abl mache ich natürlich erst, wenn HB und HE heiss sind.
Bei kalten Komponenten reicht es aber, damit man die Achsen verfahren kann.
Ich hatte auch erst ein Verständnisproblem mit dem Z Endstop. Nach dem mir aber Nico erklärt hatte, dass man den ja nicht braucht, da ja durch das ABL der Z MIN Wert feststeht, war mir alles klar. Bei Düsenwechsel oder anderen Bastelarbeiten stelle ich im EEPROM den ZProbe hight Wert neu ein und dann passt es. Ich gebe aber zu, dass ich mich an den Wert in 0,1mm Schritten herantaste. Das dauert dann eine Minute oder so bis zur nächsten Bastelei.
Mein auto bed leveling funktioniert jetzt wie gewünscht!
Jetzt geht es nochmal um die Nutzung vor dem Druck.
Mit G32 S2 wird die Druckfläche vermessen und eine Matrix im EEprom gespeichert.
Wenn an der Druckfläche nichts geändert wird bleibt die Neigung von einem zum nächsten Tag gleich.
Im Grunde würde es am nächsten Tag genügen einmal die neue Höhe an einem Punkt antasten zu lassen und alles wär gut.
Gibt es einen Befehl um das machen zu lassen?
Das Script oben könnte man dann auch nur von Zeit zu Zeit ablaufen lassen.
LG
Wolfgang
|
Re: Auto bed leveling (kapazitiv) + E3D Hotend nachgerüstet (RepRapPro Mendel) 09. February 2016 12:31 |
Registrierungsdatum: 9 Jahre zuvor Beiträge: 13 |
Hallo Liebe Leute
Ich habe heute den Sensor (LJ12A3-4-Z/BX) verbaut
Er erkennt auch die Platte und bleibt kurz über ihr stehen.
Nur fährt er bei G29 keine Punkte auf der Platte an, sondern bleibt X und Y immer auf der gleichen Stelle.
Im Display sehe ich aber wie sich die Koordinaten ändern.
Auch bleibt er beim G28 an den X und Y an den Endschaltern, obwohl Z_SAFE_HOMING aktiviert ist.
Hat jemand eine Idee?
//===========================================================================
//============================= Mechanical Settings =========================
//===========================================================================

// @section machine

// Uncomment this option to enable CoreXY kinematics
//#define COREXY

// Uncomment this option to enable CoreXZ kinematics
//#define COREXZ

// Enable this option for Toshiba steppers
//#define CONFIG_STEPPERS_TOSHIBA

// @section homing

// coarse Endstop Settings
//#define ENDSTOPPULLUPS // Comment this out (using // at the start of the line) to disable the endstop pullup resistors

#if DISABLED(ENDSTOPPULLUPS)
  // fine endstop settings: Individual pullups. will be ignored if ENDSTOPPULLUPS is defined
  #define ENDSTOPPULLUP_XMAX
  #define ENDSTOPPULLUP_YMAX
  //#define ENDSTOPPULLUP_ZMAX
  #define ENDSTOPPULLUP_XMIN
  #define ENDSTOPPULLUP_YMIN
  //#define ENDSTOPPULLUP_ZMIN
  //#define ENDSTOPPULLUP_ZMIN_PROBE
#endif

// Mechanical endstop with COM to ground and NC to Signal uses "false" here (most common setup).
const bool X_MIN_ENDSTOP_INVERTING = false; // set to true to invert the logic of the endstop.
const bool Y_MIN_ENDSTOP_INVERTING = false; // set to true to invert the logic of the endstop.
const bool Z_MIN_ENDSTOP_INVERTING = true; // set to true to invert the logic of the endstop.
const bool X_MAX_ENDSTOP_INVERTING = false; // set to true to invert the logic of the endstop.
const bool Y_MAX_ENDSTOP_INVERTING = false; // set to true to invert the logic of the endstop.
const bool Z_MAX_ENDSTOP_INVERTING = false; // set to true to invert the logic of the endstop.
const bool Z_MIN_PROBE_ENDSTOP_INVERTING = false; // set to true to invert the logic of the endstop.
//#define DISABLE_MAX_ENDSTOPS
//#define DISABLE_MIN_ENDSTOPS

// If you want to enable the Z probe pin, but disable its use, uncomment the line below.
// This only affects a Z probe endstop if you have separate Z min endstop as well and have
// activated Z_MIN_PROBE_ENDSTOP below. If you are using the Z Min endstop on your Z probe,
// this has no effect.
//#define DISABLE_Z_MIN_PROBE_ENDSTOP

// For Inverting Stepper Enable Pins (Active Low) use 0, Non Inverting (Active High) use 1
// :{0:'Low',1:'High'}
#define X_ENABLE_ON 0
#define Y_ENABLE_ON 0
#define Z_ENABLE_ON 0
#define E_ENABLE_ON 0 // For all extruders

// Disables axis when it's not being used.
// WARNING: When motors turn off there is a chance of losing position accuracy!
#define DISABLE_X false
#define DISABLE_Y false
#define DISABLE_Z false

// @section extruder

#define DISABLE_E false // For all extruders
#define DISABLE_INACTIVE_EXTRUDER true //disable only inactive extruders and keep active extruder enabled

// @section machine

// Invert the stepper direction. Change (or reverse the motor connector) if an axis goes the wrong way.
#define INVERT_X_DIR true
#define INVERT_Y_DIR false
#define INVERT_Z_DIR false

// @section extruder

// For direct drive extruder v9 set to true, for geared extruder set to false.
#define INVERT_E0_DIR true
#define INVERT_E1_DIR false
#define INVERT_E2_DIR false
#define INVERT_E3_DIR false

// @section homing

// ENDSTOP SETTINGS:mes
// Sets direction of endstops when homing; 1=MAX, -1=MIN
// :[-1,1]
#define X_HOME_DIR -1
#define Y_HOME_DIR 1
#define Z_HOME_DIR -1

#define min_software_endstops true // If true, axis won't move to coordinates less than HOME_POS.
#define max_software_endstops true  // If true, axis won't move to coordinates greater than the defined lengths below.

// @section machine

// Travel limits after homing (units are in mm)
#define X_MIN_POS -20
#define Y_MIN_POS 0
#define Z_MIN_POS 0
#define X_MAX_POS 200
#define Y_MAX_POS 210
#define Z_MAX_POS 200


//===========================================================================
//=========================== Manual Bed Leveling ===========================
//===========================================================================
//#define MANUAL_BED_LEVELING  // Add display menu option for bed leveling.
//#define MESH_BED_LEVELING    // Enable mesh bed leveling.

#if ENABLED(MANUAL_BED_LEVELING)
  #define MBL_Z_STEP 0.025  // Step size while manually probing Z axis.
#endif  // MANUAL_BED_LEVELING

#if ENABLED(MESH_BED_LEVELING)
  #define MESH_MIN_X 10
  #define MESH_MAX_X (X_MAX_POS - MESH_MIN_X)
  #define MESH_MIN_Y 10
  #define MESH_MAX_Y (Y_MAX_POS - MESH_MIN_Y)
  #define MESH_NUM_X_POINTS 3  // Don't use more than 7 points per axis, implementation limited.
  #define MESH_NUM_Y_POINTS 3
  #define MESH_HOME_SEARCH_Z 10  // Z after Home, bed somewhere below but above 0.0.
#endif  // MESH_BED_LEVELING

//===========================================================================
//============================ Bed Auto Leveling ============================
//===========================================================================

// @section bedlevel

#define AUTO_BED_LEVELING_FEATURE // Delete the comment to enable (remove // at the start of the line)
//#define DEBUG_LEVELING_FEATURE
//#define Z_MIN_PROBE_REPEATABILITY_TEST  // If not commented out, Z-Probe Repeatability test will be included if Auto Bed Leveling is Enabled.

#if ENABLED(AUTO_BED_LEVELING_FEATURE)

  // There are 2 different ways to specify probing locations:
  //
  // - "grid" mode
  //   Probe several points in a rectangular grid.
  //   You specify the rectangle and the density of sample points.
  //   This mode is preferred because there are more measurements.
  //
  // - "3-point" mode
  //   Probe 3 arbitrary points on the bed (that aren't colinear)
  //   You specify the XY coordinates of all 3 points.

  // Enable this to sample the bed in a grid (least squares solution).
  // Note: this feature generates 10KB extra code size.
  //#define AUTO_BED_LEVELING_GRID

  #if ENABLED(AUTO_BED_LEVELING_GRID)

    #define LEFT_PROBE_BED_POSITION 15
    #define RIGHT_PROBE_BED_POSITION 170
    #define FRONT_PROBE_BED_POSITION 20
    #define BACK_PROBE_BED_POSITION 170

    #define MIN_PROBE_EDGE 10 // The Z probe minimum square sides can be no smaller than this.

    // Set the number of grid points per dimension.
    // You probably don't need more than 3 (squared=9).
    #define AUTO_BED_LEVELING_GRID_POINTS 2

  #else  // !AUTO_BED_LEVELING_GRID

      // Arbitrary points to probe.
      // A simple cross-product is used to estimate the plane of the bed.
      #define ABL_PROBE_PT_1_X 15
      #define ABL_PROBE_PT_1_Y 180
      #define ABL_PROBE_PT_2_X 15
      #define ABL_PROBE_PT_2_Y 20
      #define ABL_PROBE_PT_3_X 170
      #define ABL_PROBE_PT_3_Y 20

  #endif // AUTO_BED_LEVELING_GRID

  // Offsets to the Z probe relative to the nozzle tip.
  // X and Y offsets must be integers.
  #define X_PROBE_OFFSET_FROM_EXTRUDER -0     // Z probe to nozzle X offset: -left  +right
  #define Y_PROBE_OFFSET_FROM_EXTRUDER -20     // Z probe to nozzle Y offset: -front +behind
  #define Z_PROBE_OFFSET_FROM_EXTRUDER 0  // Z probe to nozzle Z offset: -below (always!)

  #define Z_RAISE_BEFORE_HOMING 4       // (in mm) Raise Z axis before homing (G28) for Z probe clearance.
                                        // Be sure you have this distance over your Z_MAX_POS in case.

  #define XY_TRAVEL_SPEED 500         // X and Y axis travel speed between probes, in mm/min.

  #define Z_RAISE_BEFORE_PROBING 15   // How much the Z axis will be raised before traveling to the first probing point.
  #define Z_RAISE_BETWEEN_PROBINGS 5  // How much the Z axis will be raised when traveling from between next probing points.
  #define Z_RAISE_AFTER_PROBING 15    // How much the Z axis will be raised after the last probing point.

//#define Z_PROBE_END_SCRIPT "G1 Z10 F12000\nG1 X15 Y330\nG1 Z0.5\nG1 Z10" // These commands will be executed in the end of G29 routine.
                                                                            // Useful to retract a deployable Z probe.

  //#define Z_PROBE_SLED // Turn on if you have a Z probe mounted on a sled like those designed by Charles Bell.
  //#define SLED_DOCKING_OFFSET 5 // The extra distance the X axis must travel to pickup the sled. 0 should be fine but you can push it further if you'd like.


  //If you have enabled the Bed Auto Leveling and are using the same Z Probe for Z Homing,
  //it is highly recommended you let this Z_SAFE_HOMING enabled!!!

  //#define Z_SAFE_HOMING   // This feature is meant to avoid Z homing with Z probe outside the bed area.
                          // When defined, it will:
                          // - Allow Z homing only after X and Y homing AND stepper drivers still enabled.
                          // - If stepper drivers timeout, it will need X and Y homing again before Z homing.
                          // - Position the Z probe in a defined XY point before Z Homing when homing all axis (G28).
                          // - Block Z homing only when the Z probe is outside bed area.

  #if ENABLED(Z_SAFE_HOMING)

    #define Z_SAFE_HOMING_X_POINT ((100))    // X point for Z homing when homing all axis (G28).
    #define Z_SAFE_HOMING_Y_POINT ((100))    // Y point for Z homing when homing all axis (G28).

  #endif

  // Support for a dedicated Z probe endstop separate from the Z min endstop.
  // If you would like to use both a Z probe and a Z min endstop together,
  // uncomment #define Z_MIN_PROBE_ENDSTOP and read the instructions below.
  // If you still want to use the Z min endstop for homing, disable Z_SAFE_HOMING above.
  // Example: To park the head outside the bed area when homing with G28.
  //
  // WARNING:
  // The Z min endstop will need to set properly as it would without a Z probe
  // to prevent head crashes and premature stopping during a print.
  //
  // To use a separate Z probe endstop, you must have a Z_MIN_PROBE_PIN
  // defined in the pins_XXXXX.h file for your control board.
  // If you are using a servo based Z probe, you will need to enable NUM_SERVOS,
  // Z_ENDSTOP_SERVO_NR and SERVO_ENDSTOP_ANGLES in the R/C SERVO support below.
  // RAMPS 1.3/1.4 boards may be able to use the 5V, Ground and the D32 pin
  // in the Aux 4 section of the RAMPS board. Use 5V for powered sensors,
  // otherwise connect to ground and D32 for normally closed configuration
  // and 5V and D32 for normally open configurations.
  // Normally closed configuration is advised and assumed.
  // The D32 pin in Aux 4 on RAMPS maps to the Arduino D32 pin.
  // Z_MIN_PROBE_PIN is setting the pin to use on the Arduino.
  // Since the D32 pin on the RAMPS maps to D32 on Arduino, this works.
  // D32 is currently selected in the RAMPS 1.3/1.4 pin file.
  // All other boards will need changes to the respective pins_XXXXX.h file.
  //
  // WARNING:
  // Setting the wrong pin may have unexpected and potentially disastrous outcomes.
  // Use with caution and do your homework.
  //
  //#define Z_MIN_PROBE_ENDSTOP

#endif // AUTO_BED_LEVELING_FEATURE


// @section homing

// The position of the homing switches
//#define MANUAL_HOME_POSITIONS  // If defined, MANUAL_*_HOME_POS below will be used
//#define BED_CENTER_AT_0_0  // If defined, the center of the bed is at (X=0, Y=0)

// Manual homing switch locations:
// For deltabots this means top and center of the Cartesian print volume.
#if ENABLED(MANUAL_HOME_POSITIONS)
  #define MANUAL_X_HOME_POS -20
  #define MANUAL_Y_HOME_POS 0
  #define MANUAL_Z_HOME_POS 0
  //#define MANUAL_Z_HOME_POS 402 // For delta: Distance between nozzle and print surface after homing.
#endif

// @section movement

/**
 * MOVEMENT SETTINGS
 */

#define HOMING_FEEDRATE {50*60, 50*60, 4*60, 0}  // set the homing speeds (mm/min)

// default settings

#define DEFAULT_AXIS_STEPS_PER_UNIT   {100,100,407,95}  // default steps per unit for Ultimaker
#define DEFAULT_MAX_FEEDRATE          {200, 200, 5, 50}    // (mm/sec)
#define DEFAULT_MAX_ACCELERATION      {1000,1000,100,5000}    // X, Y, Z, E maximum start speed for accelerated moves. E default values are good for Skeinforge 40+, for older versions raise them a lot.

#define DEFAULT_ACCELERATION          1000    // X, Y, Z and E acceleration in mm/s^2 for printing moves
#define DEFAULT_RETRACT_ACCELERATION  1000    // E acceleration in mm/s^2 for retracts
#define DEFAULT_TRAVEL_ACCELERATION   1000    // X, Y, Z acceleration in mm/s^2 for travel (non printing) moves

// The speed change that does not require acceleration (i.e. the software might assume it can be done instantaneously)
#define DEFAULT_XYJERK                20.0    // (mm/sec)
#define DEFAULT_ZJERK                 0.3     // (mm/sec)
#define DEFAULT_EJERK                 5.0    // (mm/sec)


//=============================================================================
//============================= Additional Features ===========================
//=============================================================================

// @section more

// Custom M code points
#define CUSTOM_M_CODES
#if ENABLED(CUSTOM_M_CODES)
  #if ENABLED(AUTO_BED_LEVELING_FEATURE)
    #define CUSTOM_M_CODE_SET_Z_PROBE_OFFSET 851
    #define Z_PROBE_OFFSET_RANGE_MIN -20
    #define Z_PROBE_OFFSET_RANGE_MAX 20
  #endif
#endif

// @section extras

1-mal bearbeitet. Zuletzt am 09.02.16 13:34.
|
Re: Auto bed leveling (kapazitiv) + E3D Hotend nachgerüstet (RepRapPro Mendel) 10. February 2016 10:30 |
Registrierungsdatum: 9 Jahre zuvor Beiträge: 13 |
|
Re: Auto bed leveling (kapazitiv) + E3D Hotend nachgerüstet (RepRapPro Mendel) 04. March 2016 08:46 |
Registrierungsdatum: 8 Jahre zuvor Beiträge: 888 |
Moin zusammen 
Kann es sein das beim GT2560 alles etwas anders ist?
Wenn ich den LJC 18A3-B-Z/AX mit dem Spannungsteiler (150k und 100k) anschliesse wie auf dem Bild:
kommen nur ca. 2,6 Volt raus wenn der Sensor schließt, ansonsten halt 0 Volt.
Ich dachte das evtl. einer die Widerstände ein Problem hat und daher habe ich mal so ein Teil angeschlossen:
Die Kontroll LED von dem Teil ging je nach Schaltzustand vom Sensor an und aus, aber regeln konnte ich da auch nichts. Kommt wohl durch die niedrige Voltzahl
Es gehen aber definitiv 12 Volt, eigentlich 12,6 Volt, in den Sensor rein.
Jetzt habe ich den mal ohne irgendwelche Spannungswandler bzw. teiler angeschlossen und es kommen etwas mehr als 5 Volt raus.
Jetzt klappt es auch mit dem Stop der Z-Achse. Das die LED dauerleuchten hat bis sie nahe genug an der DDP ist nehme ich mal so hin
Nach dem Problem mit dem SSR und dem jetzt mit dem Sensor war ich schon kurz davor mir ein anderes Board zu kaufen damit ich auch mal Lösungen sehe die zu meiner Hardware passen
Schöne Grüße und ein erholsames Wochende wünscht euch
Siggi
Gruß
Siggi
Geeetech I3 Pro B 8mm Acryl - Mega 2560 - Ramps 1.4 - TMC2100 - MK42 - E3DV6-Clone 0,4 - SSR 522-1dd60-40 (A-Senco) - Marlin RC8Bugfix 26.12.2016 - Repetier Host - Windows 7 64 Bit
Vulcanus mit Linearschienen
Anycubic i3 Mega
Kann es sein das beim GT2560 alles etwas anders ist?
Wenn ich den LJC 18A3-B-Z/AX mit dem Spannungsteiler (150k und 100k) anschliesse wie auf dem Bild:

kommen nur ca. 2,6 Volt raus wenn der Sensor schließt, ansonsten halt 0 Volt.
Ich dachte das evtl. einer die Widerstände ein Problem hat und daher habe ich mal so ein Teil angeschlossen:

Die Kontroll LED von dem Teil ging je nach Schaltzustand vom Sensor an und aus, aber regeln konnte ich da auch nichts. Kommt wohl durch die niedrige Voltzahl
Es gehen aber definitiv 12 Volt, eigentlich 12,6 Volt, in den Sensor rein.
Jetzt habe ich den mal ohne irgendwelche Spannungswandler bzw. teiler angeschlossen und es kommen etwas mehr als 5 Volt raus.
Jetzt klappt es auch mit dem Stop der Z-Achse. Das die LED dauerleuchten hat bis sie nahe genug an der DDP ist nehme ich mal so hin
Nach dem Problem mit dem SSR und dem jetzt mit dem Sensor war ich schon kurz davor mir ein anderes Board zu kaufen damit ich auch mal Lösungen sehe die zu meiner Hardware passen
Schöne Grüße und ein erholsames Wochende wünscht euch
Siggi
Gruß
Siggi
Geeetech I3 Pro B 8mm Acryl - Mega 2560 - Ramps 1.4 - TMC2100 - MK42 - E3DV6-Clone 0,4 - SSR 522-1dd60-40 (A-Senco) - Marlin RC8Bugfix 26.12.2016 - Repetier Host - Windows 7 64 Bit
Vulcanus mit Linearschienen
Anycubic i3 Mega
|
Re: Auto bed leveling (kapazitiv) + E3D Hotend nachgerüstet (RepRapPro Mendel) 04. March 2016 09:10 |
Registrierungsdatum: 11 Jahre zuvor Beiträge: 3.969 |
Moin moin aus HU.
Habe mal nach dem Teil gegoogelt. Das ist ein NPN Ausgang. Da kommt Masse oder nichts raus. Einfach mal ohne Spannungsteiler messen. Nach Möglichkeit einen 10KOhm Woderstand vom Ausgang zur Masse legen und dann messen. So müsste der Ausgang Masse oder nichts haben.
Spannung zwischen Masse und Ausgang messen = 0V.
Spannung zwischen +12V und Ausgang messen = 12 V oder nichts jeh nach
Auslösung.
Wenn das so ist, kann man den direkt an den Messeingang anstecken.
Die 2,5 V sind dann parasitäre Spannungen im unbelasteten Ausgang.
Liebe Grüße aus Kaltenkirchen.
Frithjof
Meine Seite
[www.facebook.com]
|
Re: Auto bed leveling (kapazitiv) + E3D Hotend nachgerüstet (RepRapPro Mendel) 04. March 2016 10:13 |
Registrierungsdatum: 8 Jahre zuvor Beiträge: 888 |
Moin Fridi,
ich habs jetzt mal mit groben Einstellungen in Marlin getestet und es scheint so zu funktionieren mit dem ABL, also ohne andere Widerstände und so. Gefällt mir sogar besser
Warum verwenden nicht alle so einen NPN? Kapazitive sollten doch, im Gegensatz zu Induktiven, immer funktionieren.
LG aus dem schönen HB nach HU
Siggi
Gruß
Siggi
Geeetech I3 Pro B 8mm Acryl - Mega 2560 - Ramps 1.4 - TMC2100 - MK42 - E3DV6-Clone 0,4 - SSR 522-1dd60-40 (A-Senco) - Marlin RC8Bugfix 26.12.2016 - Repetier Host - Windows 7 64 Bit
Vulcanus mit Linearschienen
Anycubic i3 Mega
ich habs jetzt mal mit groben Einstellungen in Marlin getestet und es scheint so zu funktionieren mit dem ABL, also ohne andere Widerstände und so. Gefällt mir sogar besser
Warum verwenden nicht alle so einen NPN?
Kapazitive sollten doch, im Gegensatz zu Induktiven, immer funktionieren.LG aus dem schönen HB nach HU
Siggi
Gruß
Siggi
Geeetech I3 Pro B 8mm Acryl - Mega 2560 - Ramps 1.4 - TMC2100 - MK42 - E3DV6-Clone 0,4 - SSR 522-1dd60-40 (A-Senco) - Marlin RC8Bugfix 26.12.2016 - Repetier Host - Windows 7 64 Bit
Vulcanus mit Linearschienen
Anycubic i3 Mega
|
Re: Auto bed leveling (kapazitiv) + E3D Hotend nachgerüstet (RepRapPro Mendel) 04. March 2016 11:15 |
Registrierungsdatum: 9 Jahre zuvor Beiträge: 531 |
Hallo siggi,
Vielleicht noch ein Hinweis zum Kapazitiven Sensor. Der reagiert zwar auf viele Materialien aber eben nicht mit dem gleichen Schaltabstand. Wenn du also mit verschiedenen Materialien wie Alu, Glas etc. drucken willst dann musst du bei jedem Wechsel den Sensor neu abgleichen!
Dafür gibt es dann bessere Möglichkeiten des AutoLeveling.
LG
Wolfgang
1-mal bearbeitet. Zuletzt am 04.03.16 11:22.
NPN hat zunächst mal nichts mit kapazitiv oder induktiv zu tun! Für beide Sensorarten gibt es sowohl NPN als auch PNP!Quote
Warum verwenden nicht alle so einen NPN? confused smiley Kapazitive sollten doch, im Gegensatz zu Induktiven, immer funktionieren.
Vielleicht noch ein Hinweis zum Kapazitiven Sensor. Der reagiert zwar auf viele Materialien aber eben nicht mit dem gleichen Schaltabstand. Wenn du also mit verschiedenen Materialien wie Alu, Glas etc. drucken willst dann musst du bei jedem Wechsel den Sensor neu abgleichen!
Dafür gibt es dann bessere Möglichkeiten des AutoLeveling.
LG
Wolfgang
1-mal bearbeitet. Zuletzt am 04.03.16 11:22.
|
Re: Auto bed leveling (kapazitiv) + E3D Hotend nachgerüstet (RepRapPro Mendel) 04. March 2016 14:39 |
Registrierungsdatum: 9 Jahre zuvor Beiträge: 25 |
Hallo zusammen,
ich habe meinen Mendel auch mit ABL nachgerüstet. Ich habe das hier [www.dropbox.com] mal zusammengefasst.
Gruß Wolfgang
ich habe meinen Mendel auch mit ABL nachgerüstet. Ich habe das hier [www.dropbox.com] mal zusammengefasst.
Gruß Wolfgang
|
Re: Auto bed leveling (kapazitiv) + E3D Hotend nachgerüstet (RepRapPro Mendel) 05. March 2016 08:48 |
Registrierungsdatum: 8 Jahre zuvor Beiträge: 1.444 |
Quote
siggi60
Warum verwenden nicht alle so einen NPN?
Falls man sich dann doch mal schlauer machen möchte, hier ne einfache gut gemachte Erläuterung.
Erläuterung
Und hier noch ein selbsterklärendes Bild, das den Unterschied im Anschluss verdeutlicht.
Bild
Gruß
Andreas
2-mal bearbeitet. Zuletzt am 05.03.16 08:54.
Einen Sparkcube 1.1XL für größere Objekte, einen Trinus3D im Gehäuse und einen Tantillus R im Bau und einen Qidi Tech Q1 Pro im Zulauf.
Sparkcube: Komplett auf 24V - DDP 8mm + 1,5mm Carbonplatte - RADDS 1.5 + Erweiterungsplatine + RAPS128 - Nema 17/1,7A 0,9 Grad - ind. Sensor für Z-Probe (kein ABL) - FTS - Titan Booster Hotend - Sparklab Extruder - Firmware Repetier mit @ Glatzemanns G33 - Repetier Server pro - Simplify3D
|
Re: Auto bed leveling (kapazitiv) + E3D Hotend nachgerüstet (RepRapPro Mendel) 05. March 2016 09:08 |
Registrierungsdatum: 9 Jahre zuvor Beiträge: 531 |
Der Nachteil dieser einfachen Schaltungen ist, dass man keinen Potentialtrennung hat.
Bei meinem Aufbau nutze ich ein kleines Relais das vom Sensor geschaltet wird.
Damit gibt es eine 100%ig saubere Trennung und man hat sogar noch ein akustisches Signal beim Schaltpunkt!
Den kleine Nachteil der mechanischen Schaltzeit kann man bei normaler Referenzfahrgeschwindigkeit vernachlässigen.
Ich erreiche damit praktisch eine Wiederholgenauigkeit von 0,01mm
LG
Wolfgang
|
Re: Auto bed leveling (kapazitiv) + E3D Hotend nachgerüstet (RepRapPro Mendel) 05. March 2016 11:30 |
Registrierungsdatum: 11 Jahre zuvor Beiträge: 3.969 |
Quote
derschutzhund
Der Nachteil dieser einfachen Schaltungen ist, dass man keinen Potentialtrennung hat.
Bei meinem Aufbau nutze ich ein kleines Relais das vom Sensor geschaltet wird.
Damit gibt es eine 100%ig saubere Trennung und man hat sogar noch ein akustisches Signal beim Schaltpunkt!
Den kleine Nachteil der mechanischen Schaltzeit kann man bei normaler Referenzfahrgeschwindigkeit vernachlässigen.
Ich erreiche damit praktisch eine Wiederholgenauigkeit von 0,01mm
LG
Wolfgang
Eigentlich ist die Transistorschaltung doch eine Potentialtrennung. Beim NPN Transistor kann der Kollektor nur 0V oder den Minus der Masse durchschalten.
Liebe Grüße aus Kaltenkirchen.
Frithjof
Meine Seite
[www.facebook.com]
|
Re: Auto bed leveling (kapazitiv) + E3D Hotend nachgerüstet (RepRapPro Mendel) 05. March 2016 15:17 |
Registrierungsdatum: 9 Jahre zuvor Beiträge: 531 |
Hallo Fridi,
der Transistor ist grundsätzlich keine Potentialtrennung weil der Transistor im Grunde zwei Stromkreise miteinander verbindet.
So lange sich die Spannungen in den vorgesehenen Bereichen bewegen ist alles gut, wenn aber aus irgendwelchen Gründen plötzlich 24V ankommen wo es normal nur 5V sind dann kann man bei solch einer Schaltung richtig Spaß haben!
Eine Potentialtrennung hast du mit einem Optokoppler oder mit einem Relais!
Da ist es dann egal was in dem einen Stromkreis passiert der zweite kann dadurch nicht beschädigt werden!
Wenn ich es richtig verstanden habe hat der Kollege den Sensor ohne jegliche Sicherung direkt an den Arduino geklemmt.
Das kann man machen .... muss man aber nicht!!!
LG
Wolfgang
|
Re: Auto bed leveling (kapazitiv) + E3D Hotend nachgerüstet (RepRapPro Mendel) 05. March 2016 16:38 |
Registrierungsdatum: 11 Jahre zuvor Beiträge: 3.969 |
Moin moin aus HU.
Wo sollen plötzlich andere Patentiale herkommen. Am Kollektor kommt entweder nichts oder 0V = Masse raus. Da ist es auch egal, ob der Sensor mit 6 V oder 200V betrieben wird. Die Masse zieht den Kollektor immer auf 0 V runter.
Natürlich kann man mit Relais arbeiten oder Optokopplern. Vor Verschaltungen und anderen Problemen ist man nie sicher.
Wenn bei einem Spannungsteiler die Erde weg ist, habe ich auch auf dem Eingang die gesamte Versorgungsspannung. Im ungünstigsten Fall mehr als 5 V.
Wenn das ein Problem ist, sollte man wieder mit Fahnen Nachrichten übermittlen oder Kuriere schicken. Kurier braucht aber beim Drucken zu lange.
1-mal bearbeitet. Zuletzt am 05.03.16 16:40.
Liebe Grüße aus Kaltenkirchen.
Frithjof
Meine Seite
[www.facebook.com]
|
Re: Auto bed leveling (kapazitiv) + E3D Hotend nachgerüstet (RepRapPro Mendel) 06. March 2016 02:24 |
Registrierungsdatum: 8 Jahre zuvor Beiträge: 888 |
Hat erQuote
derschutzhund
Wenn ich es richtig verstanden habe hat der Kollege den Sensor ohne jegliche Sicherung direkt an den Arduino geklemmt.
Danke für eure Erklärungen.
Ich habe mir jetzt noch einen Induktiven Sensor bestellt in der 12mm Variante. Der 18er ist doch etwas groß wie ich finde.
Mal sehen ob ein NPN oder PNP geliefert wird
LG
Siggi
Gruß
Siggi
Geeetech I3 Pro B 8mm Acryl - Mega 2560 - Ramps 1.4 - TMC2100 - MK42 - E3DV6-Clone 0,4 - SSR 522-1dd60-40 (A-Senco) - Marlin RC8Bugfix 26.12.2016 - Repetier Host - Windows 7 64 Bit
Vulcanus mit Linearschienen
Anycubic i3 Mega
|
Re: Auto bed leveling (kapazitiv) + E3D Hotend nachgerüstet (RepRapPro Mendel) 06. March 2016 04:28 |
Registrierungsdatum: 9 Jahre zuvor Beiträge: 531 |
Hallo Frithjof,
ich glaube wir reden über zwei verschiedenen Dinge!
Was du erzählst ist die Theorie und ich spreche von der Praxis!
Gerade wenn du mit dem 0-Potential arbeitest kann es absolut leicht passieren, dass sich durch parallel laufende Kabel Spannungsimpulse auf die GND-Leitung "übertragen". Nehmen wir mal an du betreibst deine Schrittmotoren mit 24V und die 4 Motorkabel laufen parallel zur Leitung des Sensors. Bist du dann ungeschickt und schirmst die Kabel nicht richtig ab kannst du fast sicher sein, dass du auf der Signalleitung vom Sensor irgendwas hast was nicht 0 ist!
Gerade wenn du einen Arduino mit 3,3V hast sind dann die Fehlmessungen vorprogrammiert dann gibt es hier wieder eine lange Diskussion wo das wohl herkommt.
Aber wie gesagt! Man kann das so machen....
LG
Wolfgang
|
Re: Auto bed leveling (kapazitiv) + E3D Hotend nachgerüstet (RepRapPro Mendel) 06. March 2016 06:00 |
Registrierungsdatum: 11 Jahre zuvor Beiträge: 3.969 |
Da bin ich bei Dir. Aber das passiert unabhängig von der Schaltungsart. Da ist natürlich ein Relais unempfindlicher. Aber ein Ralais wollen wir ja vermeiden und deswegen irgendwo noch einen Platz suchen, wo ich das hinbauen soll. Aber jeder wie er will.Quote
derschutzhund
Hallo Frithjof,
ich glaube wir reden über zwei verschiedenen Dinge!
Was du erzählst ist die Theorie und ich spreche von der Praxis!
Gerade wenn du mit dem 0-Potential arbeitest kann es absolut leicht passieren, dass sich durch parallel laufende Kabel Spannungsimpulse auf die GND-Leitung "übertragen". .
LG
Wolfgang
Mein P I3 läuft so flüsterleise, auch unter Volldampf, dass mich das ständige Klacken eines Ralais nerven würde.
1-mal bearbeitet. Zuletzt am 06.03.16 06:03.
Liebe Grüße aus Kaltenkirchen.
Frithjof
Meine Seite
[www.facebook.com]
|
Re: Auto bed leveling (kapazitiv) + E3D Hotend nachgerüstet (RepRapPro Mendel) 07. March 2016 14:38 |
Registrierungsdatum: 8 Jahre zuvor Beiträge: 888 |
Nach einiger Suche habe ich jetzt rausgefunden dass mein GT2560 auch direkt auf dem Board 5 Volt bereitstellt. Nahe der CPU ist ein Punkt der auch so beschrieben ist und da könnte man also direkt die 5 Volt abgreifen.
Hier auch mal ein Bild dazu:
Hat eigentlich auch mal einer das ABL mit einem IR-Sensor ausprobiert? Ist allerdings evtl. etwas teurer als die anderen Methoden
Und hier der LINK dazu falls mal jemand gucken mag.
Ist auf alle Fälle was schön kleines.
LG
Siggi
Gruß
Siggi
Geeetech I3 Pro B 8mm Acryl - Mega 2560 - Ramps 1.4 - TMC2100 - MK42 - E3DV6-Clone 0,4 - SSR 522-1dd60-40 (A-Senco) - Marlin RC8Bugfix 26.12.2016 - Repetier Host - Windows 7 64 Bit
Vulcanus mit Linearschienen
Anycubic i3 Mega
Hier auch mal ein Bild dazu:

Hat eigentlich auch mal einer das ABL mit einem IR-Sensor ausprobiert? Ist allerdings evtl. etwas teurer als die anderen Methoden
Und hier der LINK dazu falls mal jemand gucken mag.
Ist auf alle Fälle was schön kleines.
LG
Siggi
Gruß
Siggi
Geeetech I3 Pro B 8mm Acryl - Mega 2560 - Ramps 1.4 - TMC2100 - MK42 - E3DV6-Clone 0,4 - SSR 522-1dd60-40 (A-Senco) - Marlin RC8Bugfix 26.12.2016 - Repetier Host - Windows 7 64 Bit
Vulcanus mit Linearschienen
Anycubic i3 Mega
|
Re: Auto bed leveling (kapazitiv) + E3D Hotend nachgerüstet (RepRapPro Mendel) 01. April 2016 16:19 |
Registrierungsdatum: 10 Jahre zuvor Beiträge: 35 |
Hallo Zusammen
Ich habe eine kleine Frage:
Kann ich die obere Schaltung so verwenden oder muss ich etwas ändern, da es sich um einen NPN Sensor handelt?
Besten Dank für einen kurzen Input
Grüsse Bongo
Ich habe eine kleine Frage:

Kann ich die obere Schaltung so verwenden oder muss ich etwas ändern, da es sich um einen NPN Sensor handelt?
Besten Dank für einen kurzen Input
Grüsse Bongo
|
Re: Auto bed leveling (kapazitiv) + E3D Hotend nachgerüstet (RepRapPro Mendel) 01. April 2016 19:21 |
Registrierungsdatum: 11 Jahre zuvor Beiträge: 3.969 |
Bei einem NPN Sensor benötigst Du keine Schaltung. Der geht direkt auf den Pin.
Liebe Grüße aus Kaltenkirchen.
Frithjof
Meine Seite
[www.facebook.com]
Liebe Grüße aus Kaltenkirchen.
Frithjof
Meine Seite
[www.facebook.com]
|
Re: Auto bed leveling (kapazitiv) + E3D Hotend nachgerüstet (RepRapPro Mendel) 02. April 2016 01:28 |
Registrierungsdatum: 9 Jahre zuvor Beiträge: 4.977 |
Quote
Fridi
Bei einem NPN Sensor benötigst Du keine Schaltung. Der geht direkt auf den Pin.
Pullup dann aber nicht vergessen.
| Triffid Hunter's Calibration Guide | --> X <-- Drill for new Monitor | Most important Gcode. |
|
Re: Auto bed leveling (kapazitiv) + E3D Hotend nachgerüstet (RepRapPro Mendel) 02. April 2016 05:51 |
Registrierungsdatum: 10 Jahre zuvor Beiträge: 35 |
|
Re: Auto bed leveling (kapazitiv) + E3D Hotend nachgerüstet (RepRapPro Mendel) 02. April 2016 06:04 |
Registrierungsdatum: 9 Jahre zuvor Beiträge: 4.977 |
Schreibt er doch. Nur um sicher zu gehen. Man braucht das Ding aber nicht.
| Triffid Hunter's Calibration Guide | --> X <-- Drill for new Monitor | Most important Gcode. |
|
Re: Auto bed leveling (kapazitiv) + E3D Hotend nachgerüstet (RepRapPro Mendel) 02. April 2016 06:54 |
Registrierungsdatum: 11 Jahre zuvor Beiträge: 3.969 |
Moin mmoin aus HU.
Diese Optokopplerschaltung funktioniert aber sowieso nicht mit einem NPN Ausgang.
Liebe Grüße aus Kaltenkirchen.
Frithjof
Meine Seite
[www.facebook.com]
Diese Optokopplerschaltung funktioniert aber sowieso nicht mit einem NPN Ausgang.
Liebe Grüße aus Kaltenkirchen.
Frithjof
Meine Seite
[www.facebook.com]


In diesem Forum dürfen leider nur registrierte Teilnehmer schreiben.