Still warping ...
Posted by dmould
|
Still warping ... January 13, 2014 03:11PM |
Registered: 10 years ago Posts: 2,472 |
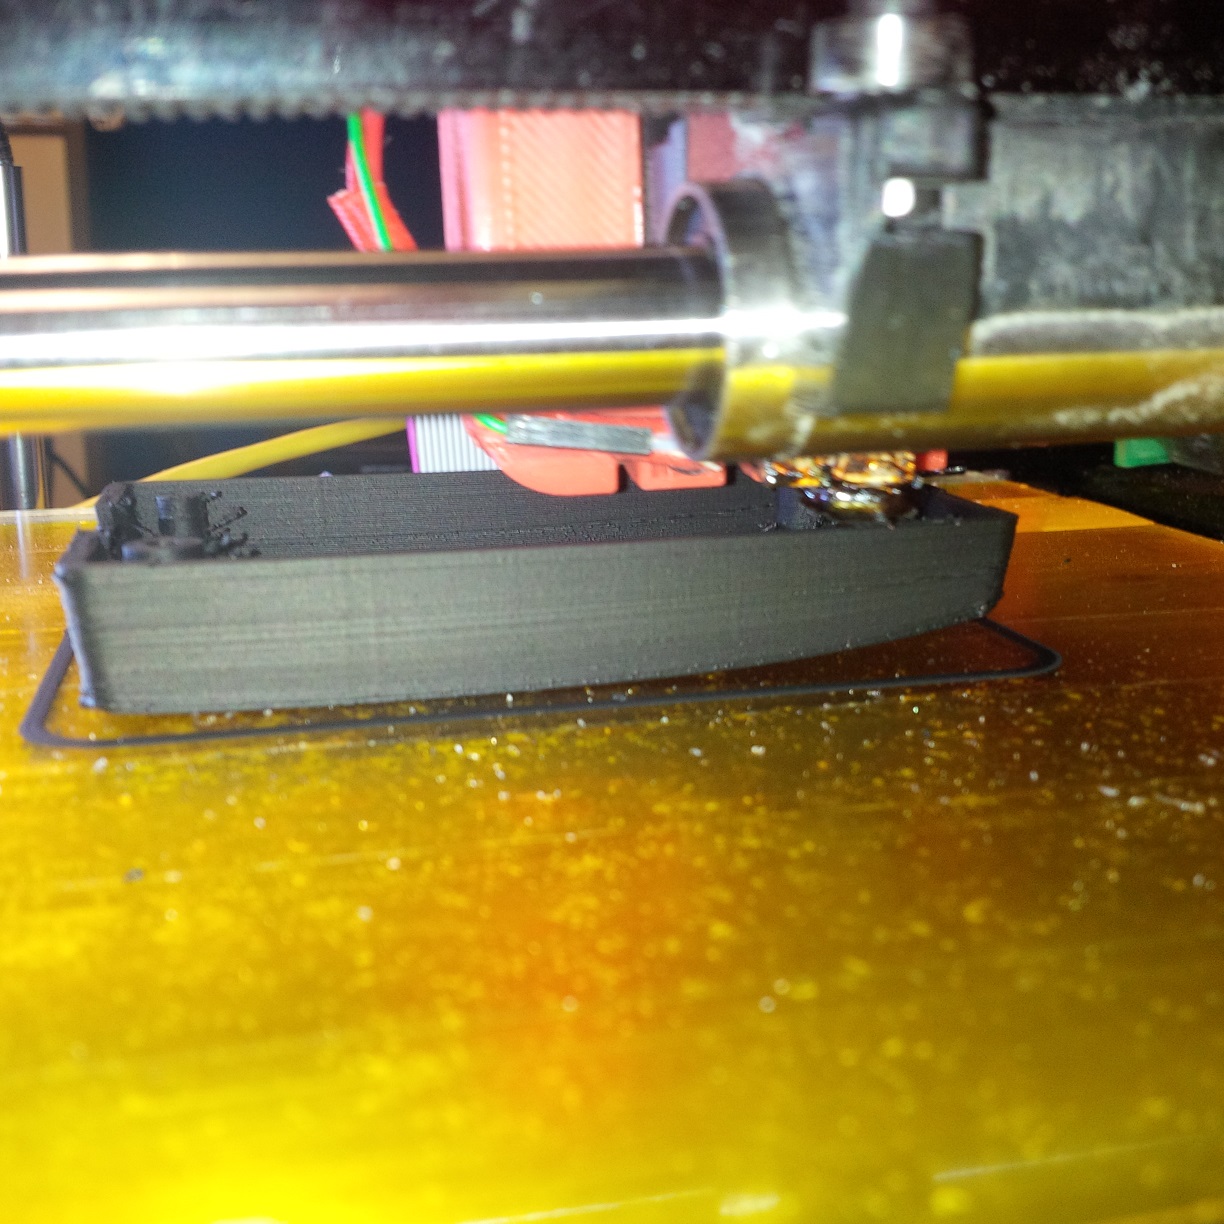
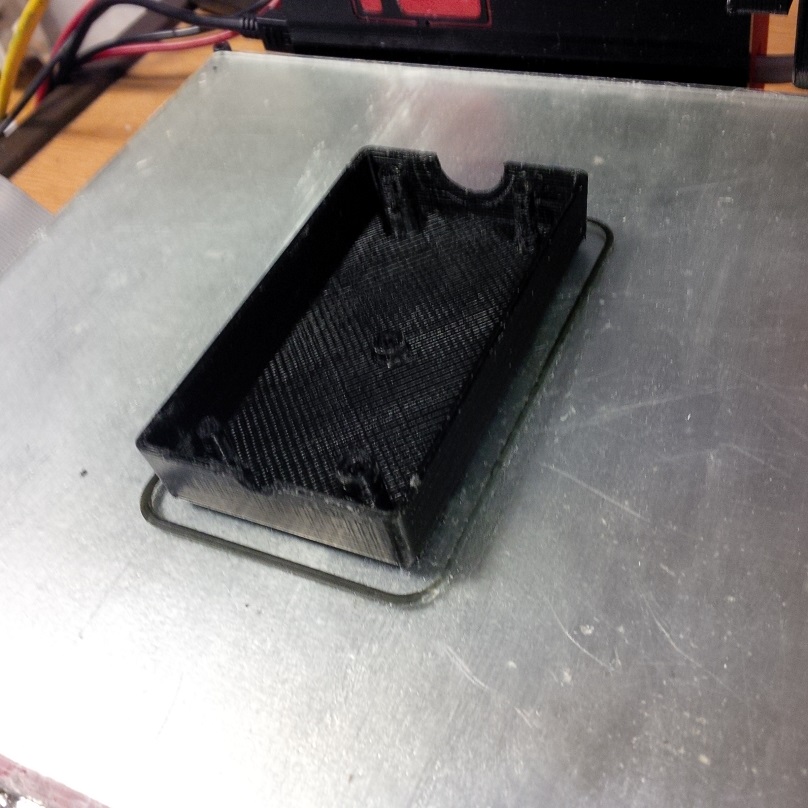
I still get lifting at the rear (i.e. low X side) if the print is longer than about 5cm. I've tried a couple of different fan deflector designs. Watching my latest print however, I'm not convinced the lifting is due to the fan backwash, because the print is narrow enough across the Y axis that the fan intake only just crosses its left-hand edge, and is not there for long when it does, plus I cannot feel any significant air movement behind the fan at bed level with a deflector fitted. It is always the rear (low-X end) that lifts, starting at the left corner (highest Y value). I'm printing in ABS. Since updating the firmware, the bed cannot quite get to the new 110 degree temperature, so I've had to lower it to 100 degrees. The 12V input is measuring 11.7V, and I suspect my temperature probes under-read and the actual temperature is in fact higher than what is being reported - which the latest firmware made worse for me. Unfortunately I do not presently have a suitable calibrated temperature measuring device to check - I'll be getting one soon however. Meanwhile I'll try putting a large base extension at the rear to see whether that manages to prevent the needed part of the print lifting. Attached is a photo of the part I am presently printing - and which will have to be binned. yes - it is supposed to be completely flat at the bottom!
Dave
Dave
|
Re: Still warping ... January 13, 2014 03:41PM |
Registered: 13 years ago Posts: 1,611 |
ABS printing advice, courtesy of RRP Tricolour: [www.reprappro.com]
Getting ABS to stick is a dark art. It shrinks more than PLA, and the shrinking starts at a higher temperature. Cold draughts are an absolute killer. A 'greenhouse' is no bad idea, as is a generally warm ambient temperature. I'm only ever about 50% successful printing ABS.
Ian
RepRapPro tech support
|
Re: Still warping ... January 13, 2014 04:27PM |
Registered: 10 years ago Posts: 314 |
I had a play with an UP! 3D printer last Friday at Falmouth University printing ABS and their method is to use a printing surface that is like a perforated laminate (fibreglass?) pin board ( PCB without copper) on approx 0.05" pich (not standard 0.1" pitch), this sits on and is clipped to the heated base. Their software prints a base layer that sticks to this and in our case exceeded the base of the real 3D print by approx 5mm and was about 1mm thick. Having printed this base, it then does a low density print of the first layer, followed by the real print.
Apparently they get about 99% reliability with this method.
The real 3D print breaks away relatively easily at the low density 'first layer' print. The only disadvantage I see is that this first layer is not smooth as with our Ormerod method on tape.
Ormerod #007 (shaken but not stirred!)
Apparently they get about 99% reliability with this method.
The real 3D print breaks away relatively easily at the low density 'first layer' print. The only disadvantage I see is that this first layer is not smooth as with our Ormerod method on tape.
Ormerod #007 (shaken but not stirred!)
|
Re: Still warping ... January 13, 2014 04:39PM |
Registered: 10 years ago Posts: 578 |
Hi Dave,
I've been printing only ABS for a while (no bigger than 5cm by 5 cm though), I'm doing it with the local heating turned off (we have "climate control " heating/ac style ceiling heating which blows hot or cold and the printer is pretty much directly underneath) it gets pretty cool in the room, probably as low as 15°C at times. Before I updated to dc's weekend fixes, which included the thermistor recalibration, I had the settings at 250 for the hotend and 120 for the bed, since then I turned the hotend down to 240 (it can't actually get past around 245 now) and the bed doesn't report temps past around 98 so I've turned that down to 100 to let it think its doing a good job - just like you have. Before the update, my hotend showed around -9 while the bed showed 19 while at ambient, the hotend this morning showed -25 or so , I forget what the bed said.
Nonetheless, I'm still getting very flat bases on very thin boxes once the bed is up to it's maximum (I've printed tens of copies of a "shell" box with one 0.24mm, one 0.12 or less layer for a base and one 0.5mm thick wall made of various layer heights over the last few days), the only ones that have curled on the base significantly are ones that I've started before the bed has reached it's top temperature, normally they end up with a circular attachment, and all four corners lift to a similar extent (one in particular would lift if the layer-change position wasn't randomised) -your picture looks a bit different from mine in that you've got massive warping on one side, and less so on the other (of the two that are visible). The skirt looks very even so I imagine that it's not a levelling issue, so like Ian says, do you have any draughts coming in from the Z pillar end? If I print a similar box, but with more bottom layers I don't see any curling - maybe you could thicken your base so it's more resistant to the tug of the walls?
Your Kapton looks a little fluffy - is it dust or is it a bit hacked up? I haven't had problems adhering to hacked up Kapton ,but I imagine dusty/fluffy Kapton wouldn't let the abs grip. When printing with PLA (and hitting the tape a lot with the head) I swapped to pipe welding cement, but then swapped back to Kapton when I started using ABS (but I kept this pristine - which was made easier by buying a 5cm wide roll off ebay - much quicker to replace and less fiddly), but since Friday I'm back on the pipe welding cement and it's working great (I was dinging the Kapton too often and it was flaking off onto the prints). If it is dust/fluff, then for cleaning Kapton I find using a cheap tesco microfibre cleaning cloth with a quick squirt of tape-head cleaner (or isopropanol, whichever is nearer) works wonders - tissues and most dusters tend to leave fluff, J-cloths and the like tend to be preloaded with a surfactant which is maybe worse. The pipe glue doesn't need any extra solvent to get rid of finger smudges and blends with any loose bits from the previous coat (it also dries instantly on a heated bed).
I agree that it probably isn't fan backwash from the photo you've shown - this shows itself more on the low Y side rather than the low X side your problem lies on.
What temperature measurer are you going for? I think Ian mentioned they use a pointing thermometer at rrp for the bed, I'm tempted to pop down to Maplin and pick one up soon so I can have a better idea of what my actual bed temp is. Next time I dismantle the hotend I'm going to drill a hole for a thermocouple probe in the heater block too
Cheers
Ray
|
Re: Still warping ... January 13, 2014 04:47PM |
Registered: 10 years ago Posts: 578 |
@ treth,
I think the epoxies in the pipe cement I use are what makes it work so well (and the UP! srpb that you seem to be describing is also probably epoxy based as are carbon fibre and glass fibre solution that people have posted on the forum - and that hunch is what made me try it to start with).
Slic3r has the same capabilities as you describe
The holes probably help to get a grip too
Cheers
Ray
I think the epoxies in the pipe cement I use are what makes it work so well (and the UP! srpb that you seem to be describing is also probably epoxy based as are carbon fibre and glass fibre solution that people have posted on the forum - and that hunch is what made me try it to start with).
Slic3r has the same capabilities as you describe
it's the "brim" option (skirt prints a ring around, brim prints a plate under and around- but you then have to separate it after the print)Quote
treth
Their software prints a base layer that sticks to this and in our case exceeded the base of the real 3D print by approx 5mm and was about 1mm thick.
The holes probably help to get a grip too
Cheers
Ray
|
Re: Still warping ... January 13, 2014 04:52PM |
Registered: 10 years ago Posts: 314 |
Thanks for clarification Ray, explains why your method is probably successful, I shall have to venture out to my local DIY store.
Tomorrow hope to upgrade all the firmware and Pronterface with all good developments that have happened, so thanks to everyone on that.
[edit] to typo....
Edited 1 time(s). Last edit at 01/13/2014 04:53PM by Treth.
Ormerod #007 (shaken but not stirred!)
Tomorrow hope to upgrade all the firmware and Pronterface with all good developments that have happened, so thanks to everyone on that.
[edit] to typo....
Edited 1 time(s). Last edit at 01/13/2014 04:53PM by Treth.
Ormerod #007 (shaken but not stirred!)
|
Re: Still warping ... January 13, 2014 05:14PM |
Registered: 10 years ago Posts: 578 |
|
Re: Still warping ... January 13, 2014 06:12PM |
Registered: 10 years ago Posts: 2,472 |
Quote
rayhicks
Your Kapton looks a little fluffy - is it dust or is it a bit hacked up? I haven't had problems adhering to hacked up Kapton ,but I imagine dusty/fluffy Kapton wouldn't let the abs grip
What temperature measurer are you going for? I think Ian mentioned they use a pointing thermometer at rrp for the bed, I'm tempted to pop down to Maplin and pick one up soon so I can have a better idea of what my actual bed temp is. Next time I dismantle the hotend I'm going to drill a hole for a thermocouple probe in the heater block too
Cheers
Ray
I've coated my Kapton with plastic pipe cement which is why it looks fluffy, which I've found holds the ABS far better than bare Kapton. I've also had a few successful small prints using hairspray on the Kapton.
I've not had a chance to look for a temperature measuring device since discovering this morning that my thermocouple based meter was kaput. I'll most likely get a non-contact IR thermometer, which seems easier to use for this application than a contact device.
Dave
|
Re: Still warping ... January 14, 2014 01:12PM |
Registered: 10 years ago Posts: 2,472 |
Hmm ...
Tried various things with some success, but still not there. Firstly I realised this morning that I had inadvertently made yesterday's print using conductive ABS instead of ordinary black ABS. The conductive ABS, which feels like it contains graphite filler, has several undesirable properties, so I printed again with normal ABS and incorporated some of your suggestions.
1) Took off the Kapton and applied PVC cement direct to the glass
2) Set slic3r for concentric outer layer (looks pretty!)
3) Set slic3r to make an 8mm brim - but that was useless as I forgot to attach the skirt to the part so it is floating!
4) Put a bin liner over the Ormerod with just a small gap to look through to keep drafts out and heat in.
5) In addition I increased the X & Y motor currents to 1000mA and increased the travel speeds to 30mm/s printing and 40mm/s non-printing to print faster.
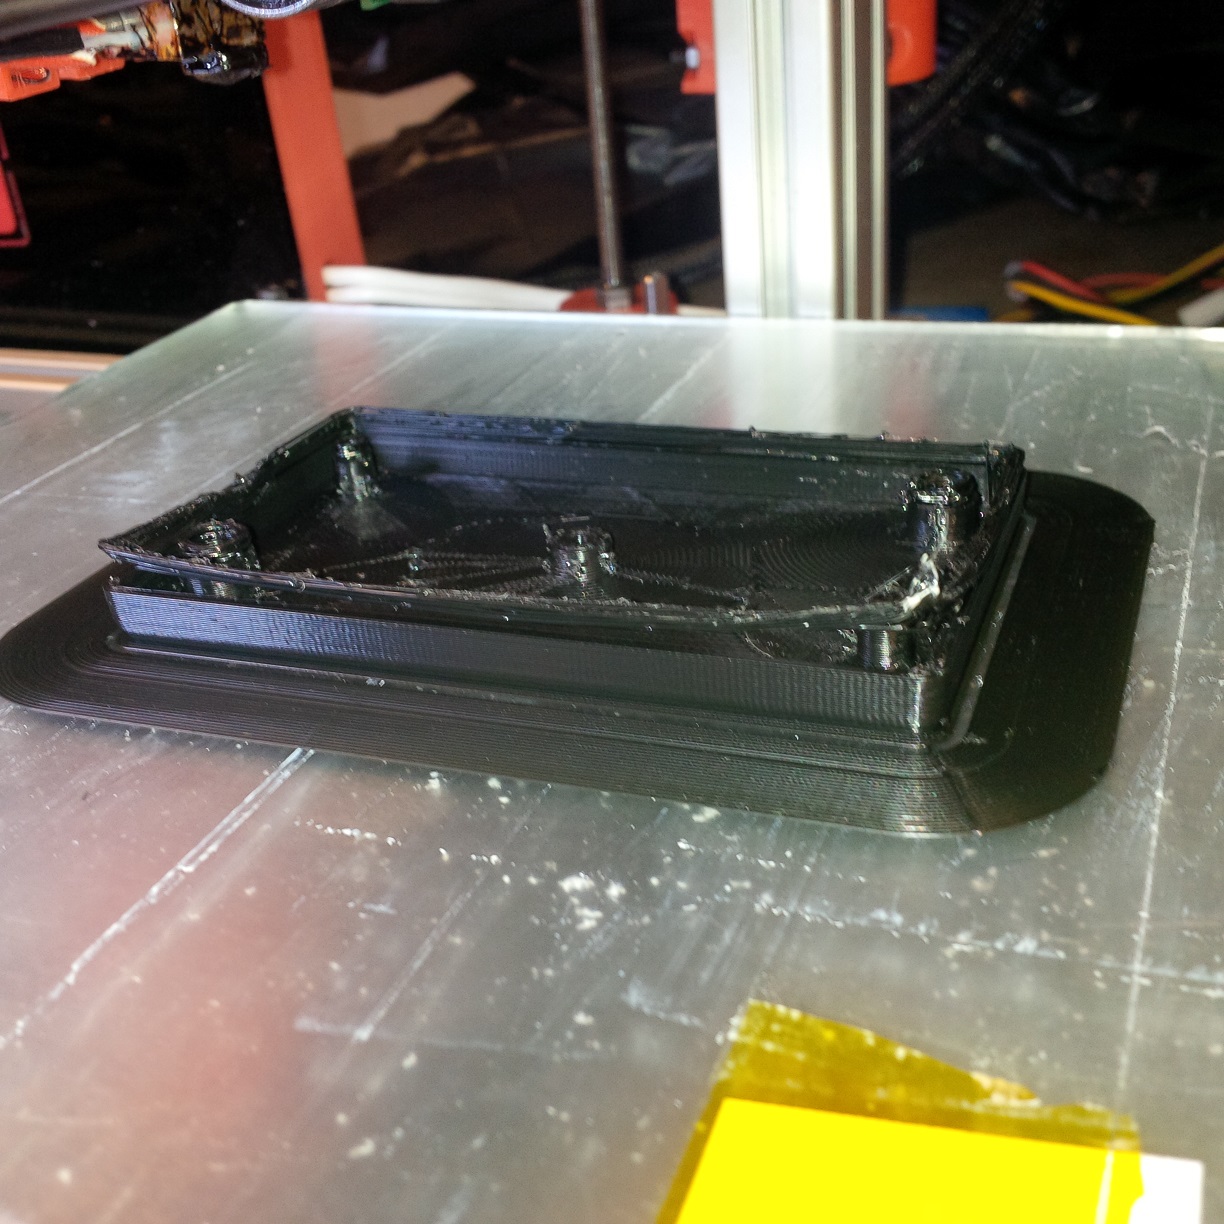
The good news is the speed increase worked OK, with no Y slippage, so now I can print faster. I'll experiment to find the fastest print speed. The part did not lift off the bed at all. However it did warp, with the warp causing the walls to delaminate this time instead of lifting the base (see attached photo). In addition I had been printing without strings forming since changing the retraction to 4mm, but now the strings are back again. So possibly the extruder is now too hot following the firmware change (it struggles to reach temperature which it never did before). Hopefully my digital thermocouple thermometer will arrive tomorrow.
I'm wondering whether my main problem yesterday was using the wrong material (conductive ABS), and perhaps this problem was caused by my bed being too hot? This design is a housing that was designed for injection moulding, and has 2mm thick walls. Perhaps 2mm is too thin for 3D printing? However on the warped part yesterday the vertical walls look fine despite the conductive ABS having generally poorer adhesion between layers, and I have a locking tongue on one top edge and a mating groove at the other edge (the part is designed to be used in pairs as top & bottom of a box) that are just 0.5mm wide and 0.5mm deep, and to my surprise they appear to have printed perfectly (better than the injection moulded part in fact). I wasn't watching when the delamination started, so it's also possible that something caught on the part. Any suggestions as to the cause?
I'll persevere and surely get there in the end!
Dave
Tried various things with some success, but still not there. Firstly I realised this morning that I had inadvertently made yesterday's print using conductive ABS instead of ordinary black ABS. The conductive ABS, which feels like it contains graphite filler, has several undesirable properties, so I printed again with normal ABS and incorporated some of your suggestions.
1) Took off the Kapton and applied PVC cement direct to the glass
2) Set slic3r for concentric outer layer (looks pretty!)
3) Set slic3r to make an 8mm brim - but that was useless as I forgot to attach the skirt to the part so it is floating!
4) Put a bin liner over the Ormerod with just a small gap to look through to keep drafts out and heat in.
5) In addition I increased the X & Y motor currents to 1000mA and increased the travel speeds to 30mm/s printing and 40mm/s non-printing to print faster.
The good news is the speed increase worked OK, with no Y slippage, so now I can print faster. I'll experiment to find the fastest print speed. The part did not lift off the bed at all. However it did warp, with the warp causing the walls to delaminate this time instead of lifting the base (see attached photo). In addition I had been printing without strings forming since changing the retraction to 4mm, but now the strings are back again. So possibly the extruder is now too hot following the firmware change (it struggles to reach temperature which it never did before). Hopefully my digital thermocouple thermometer will arrive tomorrow.
I'm wondering whether my main problem yesterday was using the wrong material (conductive ABS), and perhaps this problem was caused by my bed being too hot? This design is a housing that was designed for injection moulding, and has 2mm thick walls. Perhaps 2mm is too thin for 3D printing? However on the warped part yesterday the vertical walls look fine despite the conductive ABS having generally poorer adhesion between layers, and I have a locking tongue on one top edge and a mating groove at the other edge (the part is designed to be used in pairs as top & bottom of a box) that are just 0.5mm wide and 0.5mm deep, and to my surprise they appear to have printed perfectly (better than the injection moulded part in fact). I wasn't watching when the delamination started, so it's also possible that something caught on the part. Any suggestions as to the cause?
I'll persevere and surely get there in the end!
Dave
|
Re: Still warping ... January 14, 2014 02:25PM |
Registered: 10 years ago Posts: 578 |
Maybe to high a temperature IS your problem then (on top of the conductive stuff of course)- according to dc42 the target temps should drop by around 10 after the firmware upgrade, I've dropped my bed to 100 and nozzle to 240 (from 120 and 240), might be worth cranking them down and seeing if things improve. I didn't get round to buying a thermometer today (and I missed the post )
)
I'd like to enclose mine too but since the head cooling depends on ambient air, I'm holding off on that I've got a vague plan to hook up a peristaltic pump and use water through the cooling block and dispense with the Fan (then look at putting an intentional print cooling fan on - I need to look into that more).
)I'd like to enclose mine too but since the head cooling depends on ambient air, I'm holding off on that
I've got a vague plan to hook up a peristaltic pump and use water through the cooling block and dispense with the Fan (then look at putting an intentional print cooling fan on - I need to look into that more).
|
Re: Still warping ... January 14, 2014 02:36PM |
Registered: 10 years ago Posts: 14,672 |
Quote
rayhicks
Maybe to high a temperature IS your problem then (on top of the conductive stuff of course)- according to dc42 the target temps should drop by around 10 after the firmware upgrade
What I actually said was that you should drop your PLA print temperature by about 12C. At ABS printing temperatures, you will need to drop it a little more. I didn't calculate what the change in bed temp readings would be.
Large delta printer [miscsolutions.wordpress.com], E3D tool changer, Robotdigg SCARA printer, Crane Quad and Ormerod
Disclosure: I design Duet electronics and work on RepRapFirmware, [duet3d.com].
|
Re: Still warping ... January 15, 2014 09:24AM |
Registered: 10 years ago Posts: 2,472 |
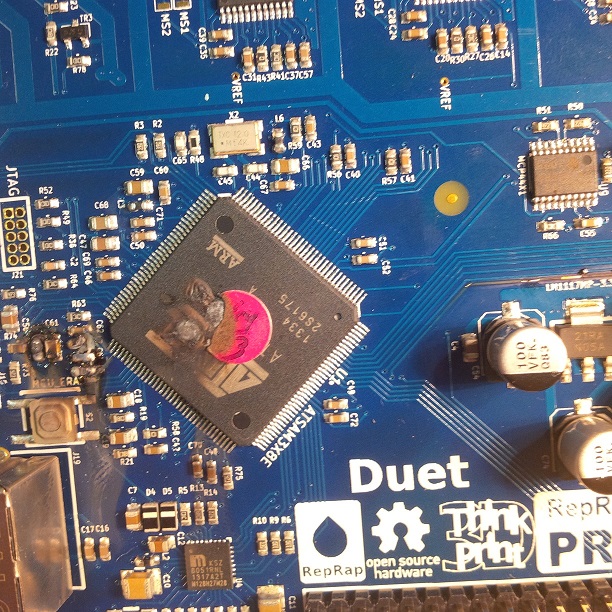
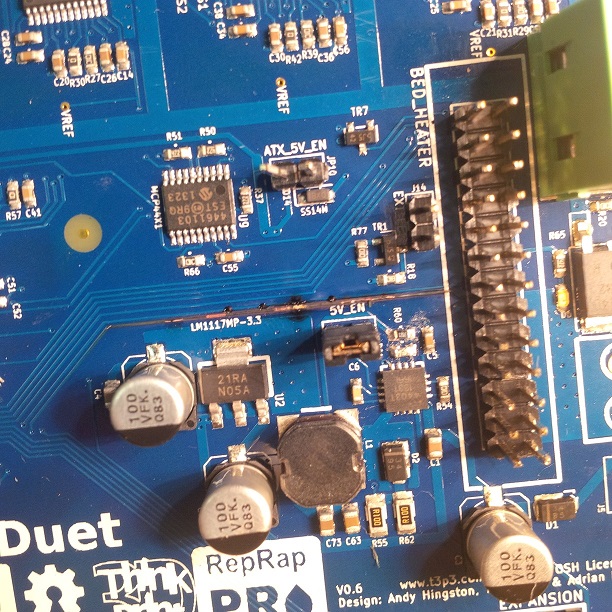
Darn! My Duet board died at first switch-on this morning. U2 (3.3V regulator) gets red hot, burning smell, both heaters come on immediately, no USB or Ethernet comms. My Duet is no more. It is deceased. It is an ex-Duet. The 12V is correct, so there is no obvious cause, I know it was working right up to switch-off last night because I was using Pronterface to monitor the extruder temperature as it cooled prior to switching it off for the night, and the only thing I did this morning prior to switch-on was to slip a thermocouple probe under the glass, intending to measure the bed temperature. I've emailed RRP for a replacement Duet, and I'll try to repair this board in the meanwhile, but it looks like my Ormerod progress is temporarily suspended.
Edit - update: RRP are sending a new board FOC which hopefully will arrive Friday - excellent! So maybe I'll still have an excuse to be busy over the weekend and get out of the weekly shopping trip!
Dave
(#106)
Edited 1 time(s). Last edit at 01/15/2014 09:45AM by dmould.
Edit - update: RRP are sending a new board FOC which hopefully will arrive Friday - excellent! So maybe I'll still have an excuse to be busy over the weekend and get out of the weekly shopping trip!
Dave
(#106)
Edited 1 time(s). Last edit at 01/15/2014 09:45AM by dmould.
|
Re: Still warping ... January 15, 2014 09:55AM |
Registered: 10 years ago Posts: 14,672 |
It sounds to me that you have a short across the 3.3V supply. Before you consign your Duet board to the bin (if you haven't already returned it), I suggest you check it with the wiring disconnected from it - in particular, the bed header ribbon cable, the extruder temp sensor and the IR sensor - in case the short is not on the board.
Large delta printer [miscsolutions.wordpress.com], E3D tool changer, Robotdigg SCARA printer, Crane Quad and Ormerod
Disclosure: I design Duet electronics and work on RepRapFirmware, [duet3d.com].
Large delta printer [miscsolutions.wordpress.com], E3D tool changer, Robotdigg SCARA printer, Crane Quad and Ormerod
Disclosure: I design Duet electronics and work on RepRapFirmware, [duet3d.com].
|
Re: Still warping ... January 15, 2014 11:10AM |
Registered: 10 years ago Posts: 2,472 |
Update - It was my carelessness. I murdered the Duet.
I had forgotten that last night after powering down, I unplugged the bed ribbon from the Duet to measure the thermistor resistance as the bed cooled. First thing this morning I spotted the disconnected cable and plugged it back in, and then was interrupted and did other things for an hour or so before returning to the Ormerod. Although I disconnected all the cables before removing the Duet board without examining them in situ, once I had the board out and saw the damage in the light, it is clear that I must have plugged the bed ribbon in one pin displaced, which would have shorted 12V to the sensor input. As the attached photos show, the board is beyond repair. I really ought to know a lot better. Hair shirt and self-flagellation time, as well as umble pie for lunch.
Dave
(#106)
|
Re: Still warping ... January 15, 2014 11:29AM |
Registered: 10 years ago Posts: 14,672 |
Don't feel too bad about it. By Murphy's Law, if something can be plugged in the wrong way, it won't be long before someone does it. Sounds like the ribbon cable ought to have a blanking position in it, just like the ones in PCs always do these days.
I connected my IR sensor the wrong way round during assembly, but fortunately for me the design is tolerant of that.
Edited 1 time(s). Last edit at 01/15/2014 11:31AM by dc42.
Large delta printer [miscsolutions.wordpress.com], E3D tool changer, Robotdigg SCARA printer, Crane Quad and Ormerod
Disclosure: I design Duet electronics and work on RepRapFirmware, [duet3d.com].
|
Re: Still warping ... January 15, 2014 12:32PM |
Registered: 10 years ago Posts: 300 |
Sad to hear that dmould - such an easy mistake to make. Given the proximity of +12V to the thermistor input going direct to a micrcontroller pin, a shrouded header would have been far more sensible. Easier for the contract manufacturer to assemble as well.
RS Components Reprap Ormerod No. 481
RS Components Reprap Ormerod No. 481
|
Re: Still warping ... January 15, 2014 03:34PM |
Registered: 13 years ago Posts: 1,611 |
dmould, Radian - Dave's is the third board to have done this, or something similar. The others may have put the hot end plug half on the hot end pins, and on the hot end thermistor pins, but the outcome is the same - smoking processor. We're now going to get a shrouded plug put on the board, so it can't be put on wrong.
Ian
RepRapPro tech support
Edited 1 time(s). Last edit at 01/15/2014 06:18PM by droftarts.
Ian
RepRapPro tech support
Edited 1 time(s). Last edit at 01/15/2014 06:18PM by droftarts.
|
Re: Still warping ... January 21, 2014 02:33PM |
Registered: 10 years ago Posts: 2,472 |
Well, after printing and replacing the fan and extruder parts in ABS in case the PLA ones started failing with the high ABS temperatures, I finally got around to printing my test case again. Success! No warping at all, and it is certainly good enough for prototyping purposes, which is what the Ormerod was bought for. It's taken about a month to get there, but finally made it! Still a few more changes to make to my Ormerod in the pipeline, but they are non-urgent, and the machine can now start earning its keep. One thing with this print is that the move speed was pulsing up and down like a yo-yo while doing its "colouring-in" phase of the bottom layer (at first I thought there was a mechanical fault of some sort), even during long straight 45 degree runs. The extrusion speed varied to match, so it didn't affect the print. I've not seen that before, and the G code doesn't look unusual (same Slic3r settings as usual), so I'm wondering whether the firmware gets confused with acceleration/speed with particular combinations of move & speed - perhaps coupled with axis or bed compensation parameters. That must be a fairly complex algorithm - I guess it has to look several moves ahead to know when to begin decelerating an axis prior to a speed or direction change.
|
Re: Still warping ... January 21, 2014 06:37PM |
Registered: 10 years ago Posts: 578 |
phew - that must be a relief! I made a quick hacksaw mod to my fan case today, which may further help for ABS printing:- I sawed off the vents, and taped over the chamber outlet that fed them, then sawed the top off the chamber (upper right corner) so the fan air escapes upwards - no longer cooling the print, and no more snagging (ever!). I did around four hours of printing and the heatsink/block didn't get much above body temperature as usual (I'll check with a thermometer tomorrow). I seem to get less contraction on vertical cylinders (these are normally slightly splayed at the base, the splaying is noticeably less), I'll try it with a large flat cuboid shell tomorrow and see if it improves the corners. (the cylinders are intended as a slip fit into a cylindrical holder, and the slight flare has been annoying, the contraction that causes the flare is the same thing that pulls the corners up on rectangles).
Cheers
Ray
Cheers
Ray
|
Re: Still warping ... January 21, 2014 06:43PM |
Registered: 13 years ago Posts: 1,611 |
rayhicks - you may as well have just removed the fan duct and nozzle duct, and let the fan air exit out the sides of the heatsink, like the Mono Mendel!
Ian
RepRapPro tech support

Ian
RepRapPro tech support
|
Re: Still warping ... January 21, 2014 07:32PM |
Registered: 10 years ago Posts: 578 |
|
Re: Still warping ... January 22, 2014 12:54PM |
Registered: 10 years ago Posts: 2,472 |
Thanks, Ray. Just vandalised my fan mounts with a hacksaw to copy you (you are a bad influence!). Printed the two Z gears, and they look OK. The extruder can now sit at 250 for the entire print - it used to sag down to 240 or so. The cooling block remains cool to the touch. I noticed that the fan mount I printed from the github is different to the part supplied - it has dividers in the air channel that must also be cut away when doing that mod.
Dave
(#106)
Dave
(#106)
|
Re: Still warping ... January 22, 2014 01:30PM |
Registered: 13 years ago Posts: 1,611 |
Oh yes, I forgot we updated that part slightly. Only the first 200 came without the fins, I think. They are more an aid to holding up the roof while printing, than for the airflow.Quote
dmould
I noticed that the fan mount I printed from the github is different to the part supplied - it has dividers in the air channel that must also be cut away when doing that mod.
Ian
RepRapPro tech support
|
Re: Still warping ... January 22, 2014 01:57PM |
Registered: 10 years ago Posts: 2,472 |
It was an interesting exercise to hack a printed part. It's quite tough, but behaves like wood in that it splits more easily "with the grain" (layers), than across the "grain". Something to bear in mind when deciding on how to orient any structural parts for printing. The X and Y arms of "ormaxis" for example would take a far higher load on their ends than the Z axis column.
I might do some strength and elasticity measurements at some stage - it would be nice to have some rough figures to plug into a CAD tool for stress and load bearing capability etc.
Dave
(#106)
I might do some strength and elasticity measurements at some stage - it would be nice to have some rough figures to plug into a CAD tool for stress and load bearing capability etc.
Dave
(#106)
|
50:50 PVA/Water on glass February 04, 2014 09:18AM |
Registered: 10 years ago Posts: 8 |
I've been enjoying success (no warping) by brushing diluted PVA glue (50:50 water PVA) onto the glass plate, and allowing to dry. I also used Slic3er to add a 5mm 'brim' around the base of each model. Before the print I give the bed a quick wipe down with methylated spirits (and the store the lint-free cloth I used in one of the plastic bags the Ormerod parts came in - just to keep the smell down!). The meths makes the bed temporarily tacky, but this fades before the print commences.
Pros:
No warping, even on an unheated bed.
Brim snaps off model very easily... usually doesn't require chasing with a sharp knife.
PVA treatment is good for several prints
Cons:
Can be a bit tricky to remove the completed model from the bed.
Little bits of support structure can be left on the bed (to a height of one layer). Obviously this is of concern for the print head, but it travels over such roughness happily enough.
Conversely, little spots of PVA come away when removing the model.
I have tried Kapton tape, but the PVA works better for me. If you wish to use Kapton tape, search Google for 'Kapton tape wet technique' and you'll find videos showing a technique akin to applying decals to model aircraft- it makes it much easier to get your tape down without bubbles or gaps between strips.
|
Re: 50:50 PVA/Water on glass February 04, 2014 10:52AM |
Registered: 10 years ago Posts: 14,672 |
I use two different techniques depending on the part. If the part has large areas in contact with the bed and not too many sharp corners, then direct-on glass printing works well for me. I heat the glass to 75C, level the bed, wipe the glass with vinegar, check the z-height at the centre of the bed, and print. I reduce the bed temperature by 5C or 10C for subsequent layers.
For parts that that have thin areas or sharp bends in contact with the bed (e.g. Nautilus gears), I sometimes get adhesion problems using direct-on-glass printing, so I currently use KS10 solvent adhesive for these. This dries more or less instantly, especially if the bed is already hot. The disadvantage is that it comes away with the part when you remove the part. So I always have to patch up the bed between prints, although this is easy and only takes a minute or so.
I'll try your diluted PVA technique - maybe if I apply it with the bed already heated, it will dry quite fast.
Large delta printer [miscsolutions.wordpress.com], E3D tool changer, Robotdigg SCARA printer, Crane Quad and Ormerod
Disclosure: I design Duet electronics and work on RepRapFirmware, [duet3d.com].
Sorry, only registered users may post in this forum.