Ormerod 2 from scratch... commissioning, calibrating, and beyond!
Posted by 0x0000
|
Ormerod 2 from scratch... commissioning, calibrating, and beyond! January 02, 2016 07:32PM |
Registered: 8 years ago Posts: 164 |
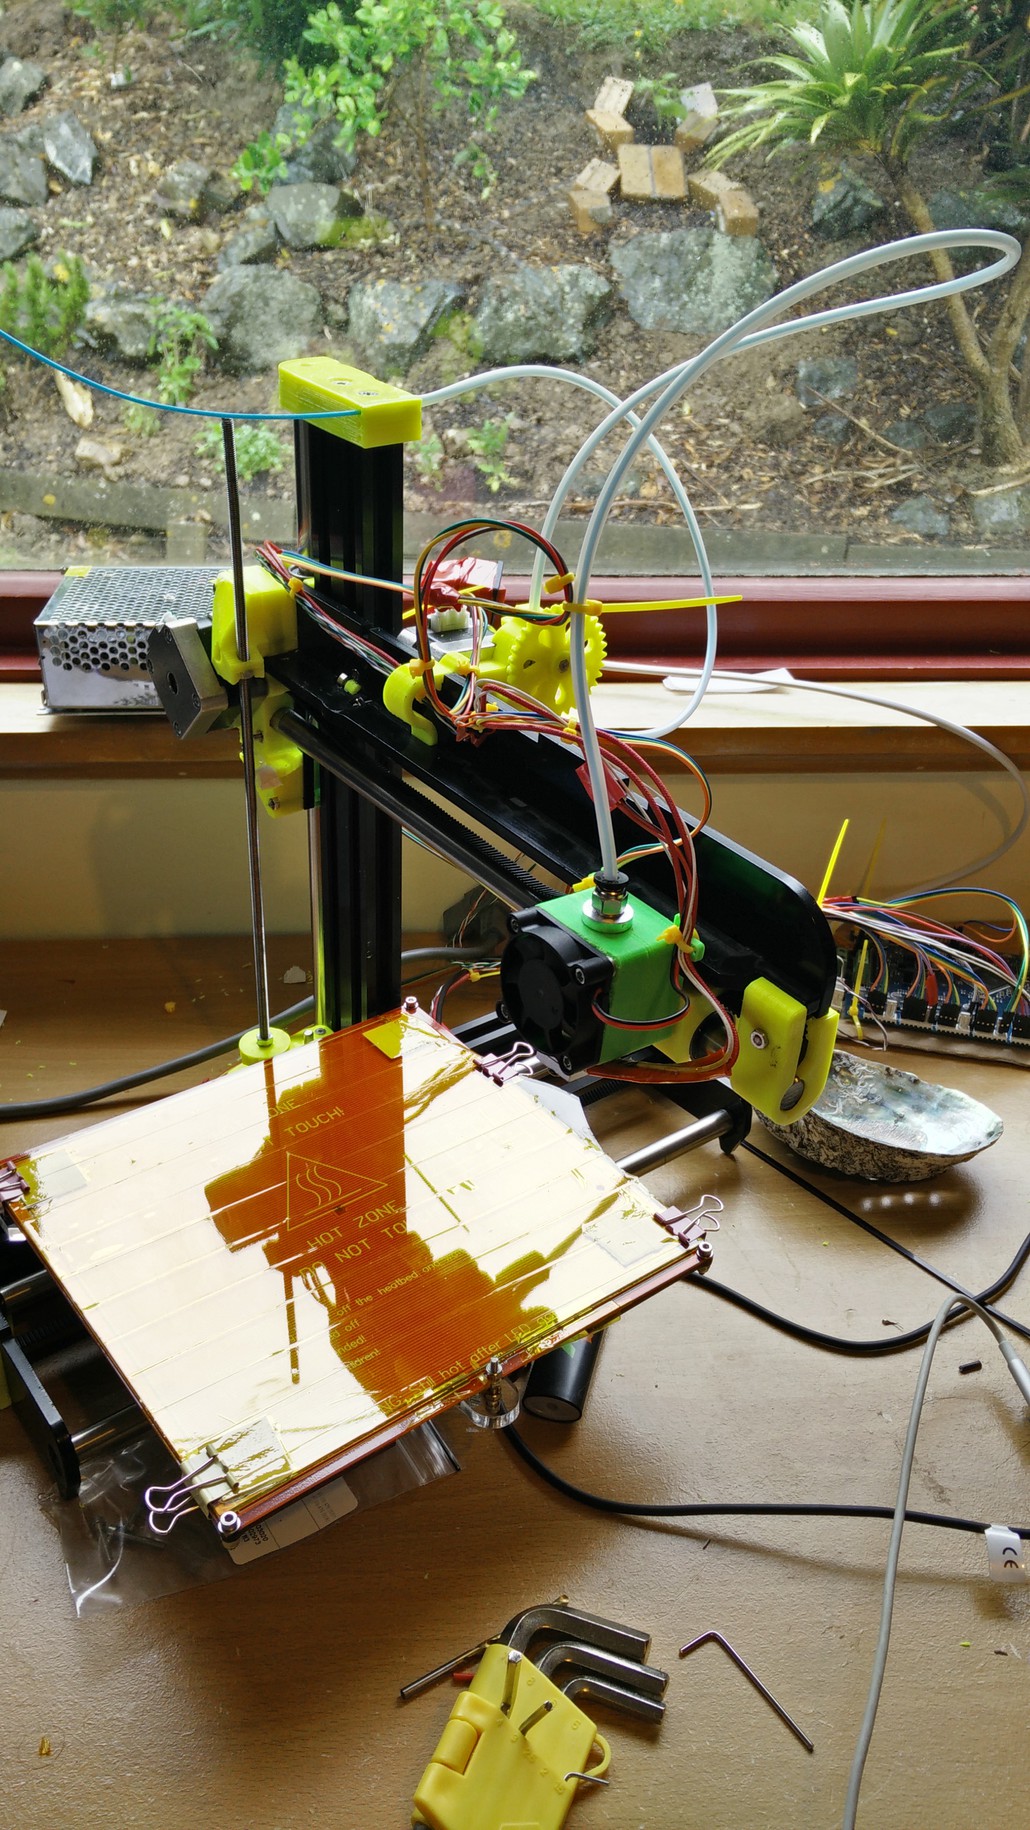
After four months of gathering parts, tools, building, and soldering, I can't believe I finally got this printer put together without injuring myself or burning my house down. I've named him Pintsize. Thanks to @dmould for the excellent ABS parts 
It's not quite working yet. I've reached the point where I'm commissioning and calibrating, and actually attempted to print the orthogonal axes this morning. That went... horribly. X slammed into Z, and Z crashed to the bottom of the bed. Then the hotend screws fell off onto the glass just as it was about to extrude my PLA. Good times. Yay for Emergency Stop!
The machine doesn't seem to want to home correctly. X-home seems to be when it hits the motor on the Z-arm. Y-home seems to be when it slams into the Y-end without the switch, and Z-home seems to be somewhere underneath the heated bed where the hotend hits my glass. The extruder seems OK, but I can't extrude any faster than 5mm/sec without grinding the gears.
Any ideas on why my axes are not homing correctly?
|
Re: Ormerod 2 from scratch... commissioning, calibrating, and beyond! January 02, 2016 10:35PM |
Registered: 8 years ago Posts: 164 |
Just working through some issues I've found so far:
1) X axis was wonky because the motor needed to be tightened. The belt went all floppy when the value was < 100. It couldn't pull hard enough to overcome the "hump" in the x-rib, causing the belt to slip.
2) My x-axis "sticker" for the proximity sensor was not large enough. The sensor moved over an area slightly further back.
3) My Y endstop wires were reversed, and the switch seems to be permanently engaged because it's pressed too close to the Y-end.
4) Will home Z after X and Y are resolved.
I'm a bit stumped on point #3. The switch seems to be too snug with the Y-end. Could the y-motor mount part be warped? Maybe my Y-ends are flexing ever so slightly, or warped (they're HDPE, not acrylic)? Something else?
Thanks!
Edited 2 time(s). Last edit at 01/02/2016 10:36PM by 0x0000.
|
Re: Ormerod 2 from scratch... commissioning, calibrating, and beyond! January 02, 2016 10:47PM |
Registered: 8 years ago Posts: 164 |
I think I found the problem... I overlooked a subtle difference between the switch in the documentation, and the one I obtained from RepRapPro. The switch provided to me has a little metal flap covering the button, so you can engage it anywhere along the axis. This is the part that's causing the switch to engage!
Here's what's on the documentation: [reprappro.com]
Here's what's for sale in the RRP shop: [reprappro.com] <-- (but not Ormerod!)
Now to work out how to remove it without damaging it...
Edited 1 time(s). Last edit at 01/02/2016 10:52PM by 0x0000.
Here's what's on the documentation: [reprappro.com]
Here's what's for sale in the RRP shop: [reprappro.com] <-- (but not Ormerod!)
Now to work out how to remove it without damaging it...
Edited 1 time(s). Last edit at 01/02/2016 10:52PM by 0x0000.
|
Re: Ormerod 2 from scratch... commissioning, calibrating, and beyond! January 03, 2016 06:07AM |
Registered: 10 years ago Posts: 1,230 |
Quote
0x0000
...attempted to print the orthogonal axes this morning. That went... horribly. X slammed into Z, and Z crashed to the bottom of the bed. Then the hotend screws fell off onto the glass just as it was about to extrude my PLA. Good times. Yay for Emergency Stop!..
LOL! - would love to see the video!
Erik
|
Re: Ormerod 2 from scratch... commissioning, calibrating, and beyond! January 03, 2016 06:17AM |
Registered: 10 years ago Posts: 1,230 |
Quote
0x0000
..Now to work out how to remove it without damaging it...

You could dismantle the switch by bending back the latches en both ends but as you seem to have the inverted Midas touch that could make small things flying all over the place so I would just go for cutting the metal flap of with a hacksaw and file it down to the surface :-)
Erik
|
Re: Ormerod 2 from scratch... commissioning, calibrating, and beyond! January 03, 2016 12:43PM |
Registered: 9 years ago Posts: 1,699 |
No risk no fun! I would use a small cutting disc. I love them. I nearly cut all small items with them.
Slicer: Simplify3D 4.0; sometimes CraftWare 1.14 or Cura 2.7
Delta with Duet-WiFi, FW: 1.20.1RC2; mini-sensor board by dc42 for auto-leveling
Ormerod common modifications: Mini-sensor board by dc42, aluminum X-arm, 0.4 mm nozzle E3D like, 2nd fan, Z stepper nut M5 x 15, Herringbone gears, Z-axis bearing at top, spring loaded extruder with pneumatic fitting, Y belt axis tensioner
Ormerod 2: FW: 1.19-dc42 on Duet-WiFi. own build, modifications: GT2-belts, silicone heat-bed, different motors and so on. Printed parts: bed support, (PSU holder) and Y-feet.
Ormerod 1: FW: 1.15c-dc42 on 1k Duet-Board. Modifications: Aluminium bed-support, (nearly) all parts reprinted in PLA/ ABS, and so on.
|
Re: Ormerod 2 from scratch... commissioning, calibrating, and beyond! January 03, 2016 02:34PM |
Registered: 8 years ago Posts: 164 |
I tried bending it back with some pliers but it snapped off. Ah well, the button works now!
Which presents another problem: the "tag" on my y-clamp seems to have broken off, so it can't actually reach the button. I've made a crude shim by jamming some leftover vinyl tape into the hole... The remaining stump will bump into it until I can print a new clamp
Which presents another problem: the "tag" on my y-clamp seems to have broken off, so it can't actually reach the button. I've made a crude shim by jamming some leftover vinyl tape into the hole... The remaining stump will bump into it until I can print a new clamp
|
Re: Ormerod 2 from scratch... commissioning, calibrating, and beyond! January 04, 2016 11:10AM |
Registered: 10 years ago Posts: 2,472 |
Glad to see you are nearly there! You can home all the axis manually - it only has to be done once at the start of a print. Just use the X and Y move buttons on the web interface or Pronterface to move the nozzle to the exact centre of the bed (doesn't need to be too precise), then lower Z to within a mm of the bed and then continue lowering in small (0.1mm) steps until it just grips a piece of copier paper, and then send the command "G92 X100 Y100 Z0" and all the axis are homed. This will allow you to print any replacement parts you need (and you can use the method permanently if you wish - it does not take very long). The Z home position is the most important. You will probably need to experiment to get a "feel" for how tightly the paper must be gripped. If Z home is too low the first layer will print too wide and thin, and the extruder may start to skip because the nozzle is blocked by being too close to the bed. If the zero position is too high, the extruded plastic will not stick to the bed.
Dave
Dave
Sorry, only registered users may post in this forum.