Ormerod from RS
Posted by ROBBED666
|
Re: Ormerod from RS December 13, 2013 11:22AM |
Registered: 10 years ago Posts: 25 |
|
Re: Ormerod from RS December 13, 2013 11:53AM |
Registered: 10 years ago Posts: 578 |
@actiondrone - it would be worth updating the firmware if you haven't already done so, latest build was released two days ago (the saturday release fixed some issues for me I think it provided a fix for some g-codes).
@ markus update - there's now a fix for a bug that stopped printing when selecting the currently selected extruder, released in the last two hours - this should let pronterface print !!!
@ian - rather than us having to poll the github repository for updated firmware, could one of you set up some system to notify users of updates like this please?
Ray
|
Re: Ormerod from RS December 13, 2013 11:56AM |
Registered: 10 years ago Posts: 25 |
|
Re: Ormerod from RS December 14, 2013 05:29AM |
Registered: 10 years ago Posts: 314 |
Hi All,
Thanks again for all your helpful advice and I'm making some progress (in the smaller and smaller time slots that are becoming available!)
Using Pronterface I have been going through the setup procedures and all the commands behave as shown.
My reading for the z probe height seem a bit different from those stated, but I'll check these later.
The hot end fan on the extruder does not operate when I turn the heater on, is there any other command required to do this?
I have the wiring done as per the wiring image with the correct pin spacing (as a 3 pin shell) and on the row of pins shown. I understand that it can also be on the row of pins above but I haven't tried this.
Main area I need to investigate is the relationship between the extruder nozzle and the other parts, I'm not convinced mine is low enough in relation to the other parts. I did on the advice of another post raise my z height sensor (using tolerance in holes) to ensure it will not drag on extrusion.
My earlier confusion on "home" sequence was that Pronterface does in addition to the home on each axis buttons, also has a "home" button, which I think should home all axis, but that obviously is not correct for the Ormerod.
|
Re: Ormerod from RS December 14, 2013 05:50AM |
Registered: 10 years ago Posts: 25 |
|
Re: Ormerod from RS December 14, 2013 06:03AM |
Registered: 10 years ago Posts: 191 |
Hi Loris,
my sd card supplied with the printer never worked irrespective how I formatted it (fat, fat32 etc./ windows/ linux). I took another card (4GB SanDisk) and it worked w/o problems.
As far as I can see reading through the forum there are a lot of people who weren't able to read the (supplied) sd card. The card seems to be very slow and my smartphone doesn't read the card either.
Markus
XBee & electronics blog: [lookmanowire.blogspot.com]
|
Re: Ormerod from RS December 14, 2013 07:05AM |
Registered: 10 years ago Posts: 3 |
Hi everybody (from France),
Just received the kit ( N°215). I have only check the Duet card, and I confirm that the SD card is deffective: When I check the config file (to work, you need to place the 3 folder "sys" "www" "g codes" to the root of SD card), 2 times on 3 it return, a reading error. So I have change the SD card for an old one that I had.
First, It is slimer ( easier to insert in reader)
Second, (after format in FAT32) It work well now and I can access to Web interface ( You have to change in the config file, an compatible IP address with your router, especially, if you have a special ip for this gateway > example :10.0.0.1)
Now, I'll try build the printer
Question : as my number is 215, how can i know if my duet card is "defective" ?
Thanks
Em
|
Re: Ormerod from RS December 14, 2013 07:26AM |
Registered: 10 years ago Posts: 578 |
Hi Treth,
My probe gives 600-700 at 8 or 9 mm over foil, and the same range around 2-3 over kapton (I aligned it by repeatedly sending G31 during positioning until I got maximum signal) - is yours in this higher range? I've found that my machine will run bed compensation directly on the kapton, and it works very well.
"Home All" seems to work sometimes but not others for me (x tends not to move sometimes) depending on whether any previous axis homing has occurred, and where the head is.
My fan runs whenever 12V is supplied (not just during heating) - have you checked that the pins from the fan are fully inserted in the housing near the hot end?
There's a pretty fine tolerance between nozzle tip bottom, fan vent bottom and probe bottom - if Z is homed too low the probe may drag (the head tips if the nozzle rests on the bed, making the probe lower than the nozzle and lifting the fan end), if the fan housing isn't parallel with the bed in the X direction, one end or the other may also drag. I rebuilt my hotend a couple of times, on the last go I made sure that the brass tube was screwed fully in before screwing the nozzle and heater block in - this lowers the nozzle tip slightly compared to how I'd first built it and neither the probe nor the fan cause me troubles now. - I'm probably going to make my own heater block and nozzle ideally using a smooth brass tube for a nozzle, clamped into the heater rather than screwed (the assembly will still screw into the aluminium block above , and I'll make the nozzle a couple of mm longer allowing easier fine tuning of the height. I hope a clamp will make for easier nozzle adjustment/replacement and perhaps better heat transfer to the filament - maybe this has been tried and rejected many times (expansion may be an issue for a clamped nozzle?), but won't take long to try.
|
Re: Ormerod from RS December 14, 2013 07:29AM |
Registered: 10 years ago Posts: 578 |
Hi Em,
sounds like you have a good one
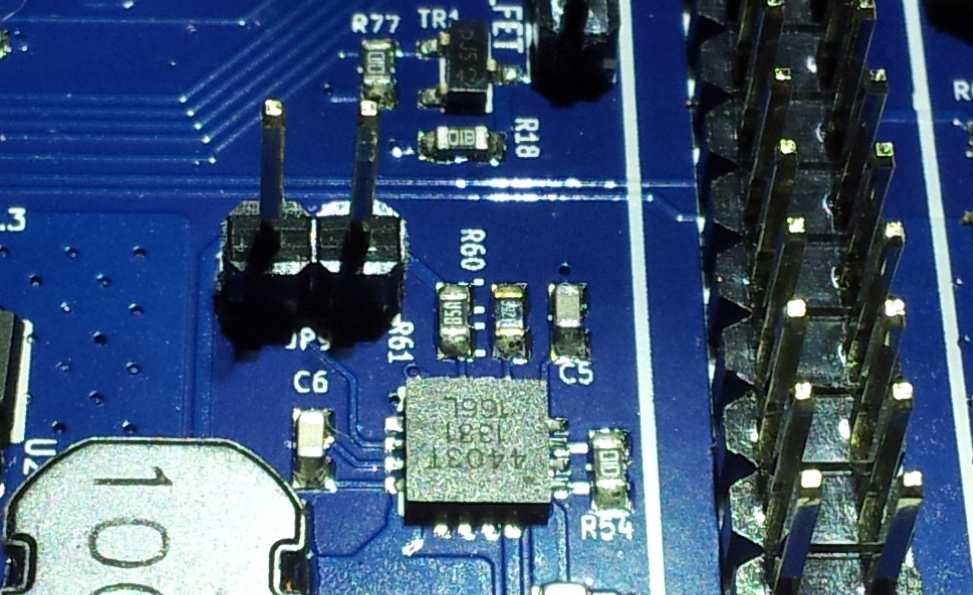
edited : RRP say that the first 220 may have an issue with resistor placement for which they've issued a warranty return call [forums.reprap.org] - your being 215 may have the problem (but it's encouraging that you can connect to ethernet!). Sorry, I misremembered the notice, I initially said the first 200 were mentioned, but in fact it runs up to 220 in the notice. The resistors in question are R60 and R61 - these are up close to Jumper 9 in the top left of the board (when it is mounted in the case), and the lower right in this post from bobc [forums.reprap.org] - they're just to the left of C5, and in bobc's picture they are in the wrong orientation (ie this is a faulty board) - on a good board these resistors should be horizontal.
Good luck with the build, have fun
Ray
Edited 2 time(s). Last edit at 12/14/2013 08:32AM by rayhicks.
Good luck with the build, have fun
Ray
Edited 2 time(s). Last edit at 12/14/2013 08:32AM by rayhicks.
|
Re: Ormerod from RS December 14, 2013 11:17AM |
Registered: 10 years ago Posts: 25 |
Quote
markbee
Hi Loris,
my sd card supplied with the printer never worked irrespective how I formatted it (fat, fat32 etc./ windows/ linux). I took another card (4GB SanDisk) and it worked w/o problems.
As far as I can see reading through the forum there are a lot of people who weren't able to read the (supplied) sd card. The card seems to be very slow and my smartphone doesn't read the card either.
Markus
Today I went out and bought some microSD.
Now I have stock card, 1 SunDisk 4Gb and 1 SunDisk 8Gb.
Tryed formatting in both Fat, exfat, Fat32
Tryed to mark as readonly, and not
But still have error code 3 from pronterface while sending M503.
In arduino serial monitor whit M503 command I have no response.
What can I do? How can I have assistance for what I bought?
Thanks to ALL
|
Re: Ormerod from RS December 14, 2013 12:11PM |
Registered: 10 years ago Posts: 3 |
Thanks for your answer Ray !
Unfortunately, It was defective ! (see picture attachement)
So Maybe I'll send it to UK... As I will not started to mount the all kit before 1 or 2 weeks . Or desolder and resolder by myself...
Em
Unfortunately, It was defective ! (see picture attachement)
So Maybe I'll send it to UK... As I will not started to mount the all kit before 1 or 2 weeks . Or desolder and resolder by myself...
Em
|
Re: Ormerod from RS December 14, 2013 12:23PM |
Registered: 10 years ago Posts: 25 |
Quote
lefaiseurdechoses
Thanks for your answer Ray !
Unfortunately, It was defective ! (see picture attachement)
So Maybe I'll send it to UK... As I will not started to mount the all kit before 1 or 2 weeks . Or desolder and resolder by myself...
Em
Hi, I have the same displacement of those 3 resistor, like in your pic.
That mean I have to send back my duet card?
thanks a lot.
Loris
|
Re: Ormerod from RS December 14, 2013 12:42PM |
Registered: 10 years ago Posts: 3 |
|
Re: Ormerod from RS December 14, 2013 01:48PM |
Registered: 10 years ago Posts: 12 |
|
Re: Ormerod from RS December 14, 2013 01:51PM |
Registered: 10 years ago Posts: 191 |
Hi Georg,
last firmware version on github released today says: "Build volume made less conservative (now 220x200x200)."
Markus
XBee & electronics blog: [lookmanowire.blogspot.com]
last firmware version on github released today says: "Build volume made less conservative (now 220x200x200)."
Markus
XBee & electronics blog: [lookmanowire.blogspot.com]
|
Re: Ormerod from RS December 14, 2013 04:26PM |
Registered: 10 years ago Posts: 314 |
@rayhicks
But, Problem still there! Checked 12V present (Yes) and you are correct this comes direct from the supply so no other control.
Measured fan and it is totally open circuit, so for speed of delivery I'll order the closest match and proceed from there.
Thanks for the help, I'll try checking the Z-axis again tomorrow (with luck!).
(edit) See my later post, fan is OK, it was a +12V crimp pin issue. It looked perfect, but my misuse of a D type crimp tool caused the problem. My old AMP tool looks a good alternative, perhaps RS Components supply a suitable tool, I didn't check. (end edit)
Edited 1 time(s). Last edit at 12/15/2013 03:13AM by Treth.
Yes you are right, the 0V pin would not latch in, so replaced crimp pin (last one, I think crimping these pins and sockets is going to be a major hurdle for the successful build and long term reliability for many printers), which did latch nicely.Quote
My fan runs whenever 12V is supplied (not just during heating) - have you checked that the pins from the fan are fully inserted in the housing near the hot end?
But, Problem still there! Checked 12V present (Yes) and you are correct this comes direct from the supply so no other control.
Measured fan and it is totally open circuit, so for speed of delivery I'll order the closest match and proceed from there.
Thanks for the help, I'll try checking the Z-axis again tomorrow (with luck!).
(edit) See my later post, fan is OK, it was a +12V crimp pin issue. It looked perfect, but my misuse of a D type crimp tool caused the problem. My old AMP tool looks a good alternative, perhaps RS Components supply a suitable tool, I didn't check. (end edit)
Edited 1 time(s). Last edit at 12/15/2013 03:13AM by Treth.
|
Re: Ormerod from RS December 14, 2013 06:35PM |
Registered: 12 years ago Posts: 1,611 |
Treth - The fan MUST BE RUNNING ALL THE TIME. It's vital for smooth running of the nozzle, as it isolates the heat in the nozzle. Without it, the filament will melt further up, the extrusion pressure will increase, and eventually block. The nozzle mount can melt, and molten filament get stuck in the end of the Bowden tube. Basically, a mess. However, you'll have to take the nozzle apart, but it is recoverable.
Fans have low resistance, and are just a coil, so will of course be an open circuit. They need to be connected with the correct polarity. Test it by touching the pins on the 12V input screw terminals, or some other 12V source.
Also, the fan needs to be mounted on the hot end the correct way around. The fan needs to blow air INTO the heatsink, then the air will come OUT of the cooling nozzles. It's possible that if you put your hand over the back of the fan, you will feel air coming out. This may be just backwash. Check air is coming out of the nozzles.
A note on crimps: the hot end connections should all come with crimps on the various parts, they just need plugging into the housing - in the right order. Check the loom-side crimp hasn't pushed out. We do test every single loom! We've been using these crimps and housings for nearly a year, and find them very reliable. There are 4 crimps you have to do on the kit; for the bed thermistor. But you can use any other kind of connector you want, really. Spare a thought for most other printer kit builders; they don't get looms!
Build volume: the most recent firmware update is correct; Adrian had overlooked the setting. The X axis is set to 220, as the homing should cause the nozzle to be 10mm off the bed. You can use M206 to set the offset. The X axis can actually move 230mm. The Z axis can actually move 220mm. I plan on building an Ormerod that can build 400mm high!
Ian
RepRapPro tech support
Edited 1 time(s). Last edit at 12/14/2013 06:36PM by droftarts.
|
Re: Ormerod from RS December 15, 2013 03:09AM |
Registered: 10 years ago Posts: 314 |
Yes, thanks agree and now understand why you run it direct off the 12V supply. Perhaps this should be stated in the commissioning and be an essential check?Quote
droftarts
Treth - The fan MUST BE RUNNING ALL THE TIME.It's vital for smooth running of the nozzle, as it isolates the heat in the nozzle. Without it, the filament will melt further up, the extrusion pressure will increase, and eventually block. The nozzle mount can melt, and molten filament get stuck in the end of the Bowden tube. Basically, a mess. However, you'll have to take the nozzle apart, but it is recoverable.
I don't understand the "will of course be an open circuit", but you are correct, I guess the electronics for the fan drive provide an exceptionally high impedance (when off!). Now running correctly direct from another power supply plug, thanks.Quote
Fans have low resistance, and are just a coil, so will of course be an open circuit. They need to be connected with the correct polarity. Test it by touching the pins on the 12V input screw terminals, or some other 12V source.
The orientation given in the assembly instruction is correct and works for me.Quote
Also, the fan needs to be mounted on the hot end the correct way around. The fan needs to blow air INTO the heatsink, then the air will come OUT of the cooling nozzles. It's possible that if you put your hand over the back of the fan, you will feel air coming out. This may be just backwash. Check air is coming out of the nozzles.
RepRap supplied looms are great and there was not a single issue with anything there. It is a great advantage that you supply the looms as you do and testing them!Quote
A note on crimps: the hot end connections should all come with crimps on the various parts, they just need plugging into the housing - in the right order. Check the loom-side crimp hasn't pushed out. We do test every single loom! We've been using these crimps and housings for nearly a year, and find them very reliable. There are 4 crimps you have to do on the kit; for the bed thermistor. But you can use any other kind of connector you want, really. Spare a thought for most other printer kit builders; they don't get looms!
My point on crimps is there is only 4 crimps we have to do, but from experience good crimp tools are expensive so people tend to use pliers which do not provide consistency across constructors and I think will be a cause of problems. I had access to a high quality D type connector crimp tool and your pins looked a possible fit, but I was wrong! In my last problem with the fan it made one pin distort and not latch, the other I found looked good, but it had snapped the wire inside the insulation! So looked perfect, but was far from it!
Finally I remembered my old "Ampliversal" tool with lots of crimp options labelled A to D for the wire size and E to G for the insulation and this worked perfectly for the 0V pin, but 'no pins left' for +12V. This type of tool is good, but the price to do 4 crimps will put people off.
In summary I think this kit is GREAT and as the instructions have improved and the problems 5V supply (resolved), SD card issues and network connection are sorted it will be Awesome! (But do consider the crimps!)
Thanks.
Edited 1 time(s). Last edit at 12/15/2013 04:34AM by Treth.
|
Re: Ormerod from RS December 15, 2013 07:00AM |
Registered: 12 years ago Posts: 116 |
Hi Treth
Good, glad it's sorted, and thanks for the feedback. We list a reasonably priced crimping tool (certainly no more expensive than a half-decent soldering iron) on the 'Introduction' page; this is the crimp tool we use, though it still needs a little care to get good crimps - [www.rapidonline.com]
Nophead also shows how to crimp using pliers here: [www.youtube.com]
To make connections, it's a toss up between crimping and soldering, or using something like chocolate block screw connectors. There are pros and cons of each method, not least the tools, and the skills to do it. We have found, with our Mendel and Huxley kits, that the wiring is often the most challenging part of the build, and most likely to go wrong - short circuits destroying electronics, poor connections causing print failure, etc. That's why we decided to provide looms, with which crimping is the only real way forward. The heated bed thermistor is the exception; if you have trouble crimping, you can solder it, or use another connector, as you wish. It just needs to be robust. I'll add this to the instructions.
Using the looms does limit customer options for doing it their own way, though. All the hot end parts should come with pre-crimped connectors; if they aren't supplied right, there are a couple of extra crimps supplied with the heated bed thermistor to correct the problem, or we'll send a warranty replacement. Getting consistency from outsourced components is our problem, but we're working with our suppliers to get the quality right, so customers don't have to come up with 'options'!
Ian
RepRapPro tech support
|
Re: Ormerod from RS December 15, 2013 07:59AM |
Registered: 10 years ago Posts: 25 |
|
Re: Ormerod from RS December 15, 2013 08:35AM |
Registered: 12 years ago Posts: 116 |
@actiondrone - Can you post, with a list of what you have done so far, in this thread: [forums.reprap.org]
Questions and replies are getting a bit lost in this 'general' thread. Now we have an Ormerod sub-forum, can everyone post specific queries to existing (or new, if it doesn't exist) threads, please? Then it will be easier to group problems and solutions together. I will monitor the whole Ormerod section.
Thanks!
Ian
RepRapPro tech support
|
Re: Ormerod from RS December 15, 2013 04:09PM |
Registered: 10 years ago Posts: 314 |
Hi All,
I have got there!
I have set the Z sensor and home on all axis works. I have good temperature stability, but a 10C difference even when having stood unpowered for 12hours, but assume this is not 'too' important?
My question now is the PLA is not sticking to the Kapton.
Does this mean my nozzle clearance is too high (looks OK to an untrained eye!) or is there a special cleaning requirement of the plate other than a quick wipe with a tissue?
Any pointers to good advice appreciated.
|
Re: Ormerod from RS December 15, 2013 07:56PM |
Registered: 12 years ago Posts: 1,611 |
Treth
You can use our Mendel Tricolour troubleshooting guide for many problems - it will form the basis of the Ormerod troubleshooting guide (which we're working on), as there will be a large crossover between the two. See specifically: [www.reprappro.com]
Ian
RepRapPro tech support
You can use our Mendel Tricolour troubleshooting guide for many problems - it will form the basis of the Ormerod troubleshooting guide (which we're working on), as there will be a large crossover between the two. See specifically: [www.reprappro.com]
Ian
RepRapPro tech support
|
Re: Ormerod from RS December 16, 2013 03:16PM |
Registered: 10 years ago Posts: 314 |
Thanks Ian this is a good guide.Quote
droftarts
You can use our Mendel Tricolour troubleshooting guide for many problems - it will form the basis of the Ormerod troubleshooting guide (which we're working on), as there will be a large crossover between the two. See specifically: [www.reprappro.com]
Ian
RepRapPro tech support
I now have one successful print of a snowman (2d shape with thickness) which I assume looks like what it is supposed to!
Anyway it 'stuck' and printed, so on with more test printing tomorrow. I tried the orthogonal print supplied, but this would not remain stuck, so I need to investigate further.
Thanks again to everyone who helped me at various points.
|
Re: Ormerod from RS December 17, 2013 02:38PM |
Registered: 10 years ago Posts: 314 |
Many post back I mentioned my Z-axis distance sensor readings.
Just as an example and to help you visualise what to expect, I share my data over a 4.5mm range with my original build and also my current readings after adjusting the extrude nozzle to be lower in respect to the z-sensor face.
Hope this may help in understanding choosing the values for the G31 Z1.4 P687 command (but with your values!)

|
Re: Ormerod from RS December 18, 2013 06:52AM |
Registered: 10 years ago Posts: 9 |
On Monday afternoon I saw the future!
Ian arranged a visit for meto the local RepRappro factory to swap my Duet with the wrongly mounted resistors and he demonstrated the replacement board talks to Pronterface via Lan.
Thanks Ian.
I saw the factory at work..lovely packing ladies and Sally and many other workers and about 20 Mendels breeding or laying Ormerod eggs.
One self replicating machine is fascinating, seeing 20 trundling is scary. so I went home and reread Azimov's 1st law of robotics.
Anyway, family from Italy collected at Bristol airport so gobbling time. I hope to reassemble my Ormerod electrics soon and will report success as soon as!
|
Re: Ormerod from RS December 18, 2013 12:27PM |
Registered: 10 years ago Posts: 2 |
Hi Treth,
I had the same issues with the prints not sticking.
Found two causes -
1 - print head too high to start with. I now set by sliding a bit of paper under the print head, fine adjust in 0.1 steps, the paper should drag ever so slightly on the head.
2 - clean the Kapton tape after every print. I use paper tissue and RS solvent cleaner. Wipe dry after to ensure no residue.
Haven't had an issue since following these two points.
|
Re: Ormerod from RS December 18, 2013 04:19PM |
Registered: 10 years ago Posts: 314 |
Thanks Moigy,Quote
Moigy
Hi Treth,
I had the same issues with the prints not sticking.
Found two causes -
1 - print head too high to start with. I now set by sliding a bit of paper under the print head, fine adjust in 0.1 steps, the paper should drag ever so slightly on the head.
2 - clean the Kapton tape after every print. I use paper tissue and RS solvent cleaner. Wipe dry after to ensure no residue.
Haven't had an issue since following these two points.
I now set the print head low, probably lower than you, I pinch a piece of paper and then reduce the gap by 0.1 step, so I might be a bit too close.
I also rebuilt my extruder to move the nozzle lower by inserting some washers between the thermal insulator and the aluminium mounting block. This has in effect raised the z-sensor 3D printed mounting block (it has worked for me, but may not be relevant for others!)
I am now using IPA solvent, but your solution looks more friendly so I'll look into the RS wipes, thanks for the tip.
|
Re: Ormerod from RS December 23, 2013 01:55PM |
Registered: 10 years ago Posts: 3 |
More on the fan:
During commissioning, I felt so much air coming from the fan that I was convinced I had it turning the wrong way round. It turns out that this fan (the Elma HDF4020L) will only run in one direction. If you wire it back to front, it just doesn't move, which surprised me a bit - it must have a brushless motor. I also confirmed, by removing the fan, that it is running in the right direction, what I feel is "just" backwash.
So: don't underestimate that backwash.
|
Re: Ormerod from RS December 23, 2013 01:59PM |
Registered: 10 years ago Posts: 314 |
@skebengaboy, yes you are correct, there will probably be some changes in this area.
See [forums.reprap.org] for some results.
See [forums.reprap.org] for some results.


Sorry, only registered users may post in this forum.