Z height instability
Posted by dc42
|
Re: Z height instability January 06, 2014 07:17PM |
Registered: 10 years ago Posts: 14,672 |
Quote
droftarts
@dc42: Going back to the initial problem, have you swapped the motors around on the axes? To eliminate a motor/wiring/stepper driver problem.
Ian
RepRapPro tech support
No, I haven't yet. The motors are not missing steps (except when the extruder stutters due to the head being too low). The main issue is that the Z axis G31 setting is repeatable at the start of a print, but not always between the start of a print and the end of a print. I'm fairly sure that the head sags more at the end of a print than at the start. Next time, I'll try to measure the sensor board height when the nozzle is just above the bed, before and after a long print, to test that theory.
Large delta printer [miscsolutions.wordpress.com], E3D tool changer, Robotdigg SCARA printer, Crane Quad and Ormerod
Disclosure: I design Duet electronics and work on RepRapFirmware, [duet3d.com].
|
Re: Z height instability January 06, 2014 07:23PM |
Registered: 10 years ago Posts: 14,672 |
Quote
rayhicks
I'd thought of indirect force sensing - perhaps a strain-gauge coupled to the nozzle, and that has probably got legs - and it looks like the FSR monitoring the X-bearing load may be more elegant, but also requires some redesign of the firmware and hardware and may have variable reponse requiring a "window" comparison. Have you considered a switch (either a roller microswitch in parallel with the bearing that breaks when the bearing is unloaded, or conductivity between the bearing and a strip of foil tape running along the rib again breaking when the bearing is unloaded, along with a simple debounce circuit).
If the switch shorts the upper arm of a resistive voltage divider, it wouldn't require firmware changes (nor would the FSR if used in a divider I guess).
Either way, replacing the optical sensor would probably require a new home sensor for X (I understand there's already a mount for a microswitch) and that would require another firmware rewrite.
The nice thing about as force sensor on the x-carriage bearing is that it ill need very little head movement to activate it. The microswitch and the contact sensor would both require more movement of the bearing, and due to the lever effect this would involve even more vertical movement of the nozzle.
The existing IR sensor could be retained for the x-homing, or a microswitch added. I've no problem with modifying the firmware, I've already done that to get Ethernet working reliably in my setup.
Large delta printer [miscsolutions.wordpress.com], E3D tool changer, Robotdigg SCARA printer, Crane Quad and Ormerod
Disclosure: I design Duet electronics and work on RepRapFirmware, [duet3d.com].
|
Re: Z height instability January 07, 2014 03:10AM |
Registered: 10 years ago Posts: 314 |
Can someone clarify the 'plan'?
Sounds good, but are you using this in place of the z height sensor or is this on the extruder assembly to detect physical contact?
As far as I can see it can't be applied in place of the z height sensor as you require this to be higher than the extruder tip. If placed on the hot end, the only place I can see that would function is mounted on the fan assembly and sensing in near contact with the laser cut arm. This would detect tip to bed contact as the hot end rotates on the shaft.
Any sketches of the proposal?
Interesting that someone spotted the new microswitch now in use for y home (on the z drive mount), is this a recommended up grade?
Ormerod #007 (shaken but not stirred!)
|
Re: Z height instability January 07, 2014 04:05AM |
Registered: 10 years ago Posts: 14,672 |
The plan is to use the x-runner bearing force measurement in place of the z-height sensor. We may retain the existing sensor for x-homing, also perhaps for course measurement so that we know when we are getting close to contact and can slow down. When the force on the bearing drops significantly, we will know that we are at a small negative height - we'll find out how much when we test it. I will modify the firmware if necessary to allow the bed setting code it to work with negative Z31 heights.
Large delta printer [miscsolutions.wordpress.com], E3D tool changer, Robotdigg SCARA printer, Crane Quad and Ormerod
Disclosure: I design Duet electronics and work on RepRapFirmware, [duet3d.com].
Large delta printer [miscsolutions.wordpress.com], E3D tool changer, Robotdigg SCARA printer, Crane Quad and Ormerod
Disclosure: I design Duet electronics and work on RepRapFirmware, [duet3d.com].
|
Re: Z height instability January 08, 2014 10:21AM |
Registered: 10 years ago Posts: 14,672 |
I've just measured the distance between the top of the glass and the top of the MDF bed support along the back. The results:
Left 13.0mm
Centre 11.0mm
Right 11.9mm
The left and right values are constrained by the mounting screws, adjusted to level the bed as per RRPs manual bed-levelling instructions. So the left hand side is sagging by 2mm and the right hand end by 0.9mm. It's unlikely that the amount of sag remains constant with changes in temperature (e.g. after a print) or humidity, so this looks like one cause of z-height instability. I have 3mm aluminium plate on order for making a replacement bed support.
Large delta printer [miscsolutions.wordpress.com], E3D tool changer, Robotdigg SCARA printer, Crane Quad and Ormerod
Disclosure: I design Duet electronics and work on RepRapFirmware, [duet3d.com].
|
Re: Z height instability January 09, 2014 06:53PM |
Registered: 10 years ago Posts: 14,672 |
So I replaced the mdf bed support with sagging corners by one made from 3mm aluminium, in a triangular shape to save weight.
The new bed weighs 172g compared with 80g for the old one. But the heater pcb + heat spreader + card weigh another 372g, and then there's the glass. So the percentage weight increase is not too bad.
This could be an even better solution.
Edited 1 time(s). Last edit at 01/09/2014 06:53PM by dc42.
Large delta printer [miscsolutions.wordpress.com], E3D tool changer, Robotdigg SCARA printer, Crane Quad and Ormerod
Disclosure: I design Duet electronics and work on RepRapFirmware, [duet3d.com].
|
Re: Z height instability January 10, 2014 07:13AM |
Registered: 10 years ago Posts: 256 |
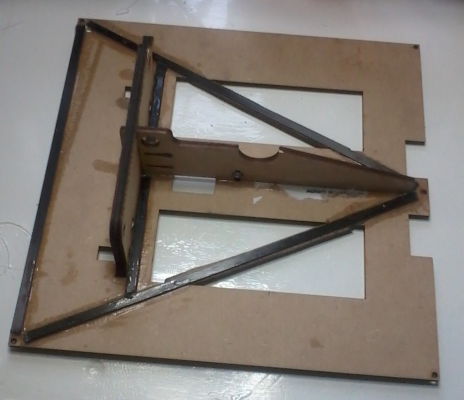
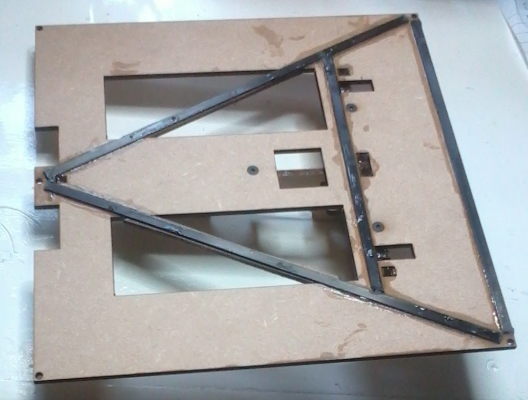
I had a go at reinforcing the bed this morning. I used 5 x 1 mm carbon strip ( which you can get on ebay). In all pretty much exactly 2 1 m lengths.
I had to remove the print bed obviously but didnt have to dismantle it and also took the opportunity to glue the existing parts together.
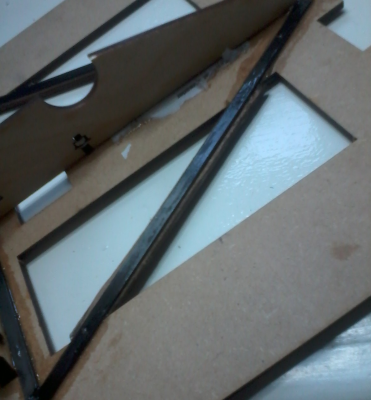
The result is pretty stiff, but larger section strip would be even better (this strip is all I had, but you can get larger stuff on ebay). I have reassembled everything now but at some point I might dissassemble it and add some more laminations. Anyway its a pretty simple mod to do and adds very little weight. If you try it, Do beware to check you arent fouling anything that must be screwed back on etc before you glue anything! The clips that came with the kit for attaching the glass are pretty good clamps for this job btw! The third pic shows where I used a bit of scrap mdf to create a web between the carbon strios where the cutouts are.
regards
Andy
Edited 1 time(s). Last edit at 01/10/2014 07:14AM by kwikius.
Ormerod #318
www.zoomworks.org - Free and Open Source Stuff

|
Re: Z height instability January 10, 2014 07:48AM |
Registered: 10 years ago Posts: 2,472 |
I use a combination of IR sensor and manual adjustment. My Z-home macro (homez.g) code is:
M561 ; Remove bed compensation
M120 ; Push feedrate & absolute/relative positioning
G91 ; Set relative movement
G1 Z5 F200 ; Move up 5mm
G90 ; set absolute movement
G1 X60 Y30 ; Move to IR reading point
G30 ; Use IR probe to set height
G30 P0 X60 Y30 Z0.00 ; Bed compensation
G30 P1 X60 Y170 Z1.10 ; Bed compensation
G30 P2 X150 Y170 Z2.40 ; Bed compensation
G30 P3 X150 Y30 Z1.10 S ; Bed compensation
G1 X60 Y30 ; Move to the zero compensation position
G1 Z0 F200 ; Move to Z zero position
M121 ; Pop feedrate and absolute/relative positioning
After running, the nozzle is at zero height at the first (zero) fixed bed compensation position, ready for me to fine-adjust with the 0.1mm up/down buttons and a sheet of paper under the nozzle, after which I send the G92 Z0 command which works because the position is at the zero (uncompensated) point. Note also that the G30 command moves the X home position a tad for some reason, so always zero X before running multiple times otherwise it gradually gets further and further away from the correct position. Obviously substitute your own IR sense position and bed compensation variables.
Dave
|
Re: Z height instability January 10, 2014 08:58AM |
Registered: 10 years ago Posts: 59 |
Quote
dmould
... after which I send the G92 Z0 command which works because the position is at the zero (uncompensated) point...
Dave
Ah right thanks Dave, that explains why G92 wasn't working when I was using bed compensation. I had not realised G92 Z0 will only work at the G30 P0 position. It's all gradually becoming clearer!
RS Ormerod #472
|
Re: Z height instability January 10, 2014 11:59AM |
Registered: 10 years ago Posts: 2,472 |
Also read my new post regarding the IR sensor - since I changed the X-runner (on which it mounts) to one printed in black[/b] plastic, my readings have become consistent (but much lower) and I can use the automatic Z homing without manual adjustments. I haven't tried automatic bed compensation since, but perhaps that will now work OK also.
|
Re: Z height instability January 10, 2014 02:34PM |
Registered: 10 years ago Posts: 14,672 |
Quote
dmould
Also read my new post regarding the IR sensor - since I changed the X-runner (on which it mounts) to one printed in black[/b] plastic, my readings have become consistent (but much lower) and I can use the automatic Z homing without manual adjustments. I haven't tried automatic bed compensation since, but perhaps that will now work OK also.
Interesting! I guess the issue is that part of the X-runner piece is right next to the sensor. I'll try putting a piece of black tape over that piece.
After replacing the MDF bed support with an aluminium one, I've levelled the bed and then checked the G31 readings. For some reason, at the same nozzle height, the reading at X53 Y0 is quite a bit greater (610 vs about 565) than the readings at X55 Y180 and X230 Y90. I can't see why this should be. I've tried replacing the white PVC tape.
I'm using a 3-point bed compensation instead of 4-point, because I found that the second-order bed compensation wasn't working for me. If I put a steel ruler against the surface of the glass bed, then it appears to sag in the front left corner. Unfortunately the bed compensation seems to think this affects much more than that corner. I'm going to get a piece of 4mm float glass and see if that is better.
Large delta printer [miscsolutions.wordpress.com], E3D tool changer, Robotdigg SCARA printer, Crane Quad and Ormerod
Disclosure: I design Duet electronics and work on RepRapFirmware, [duet3d.com].
Sorry, only registered users may post in this forum.


