Aluminium part for Ormerod
Posted by Joar107
|
Aluminium part for Ormerod January 08, 2014 04:51AM |
Registered: 10 years ago Posts: 94 |
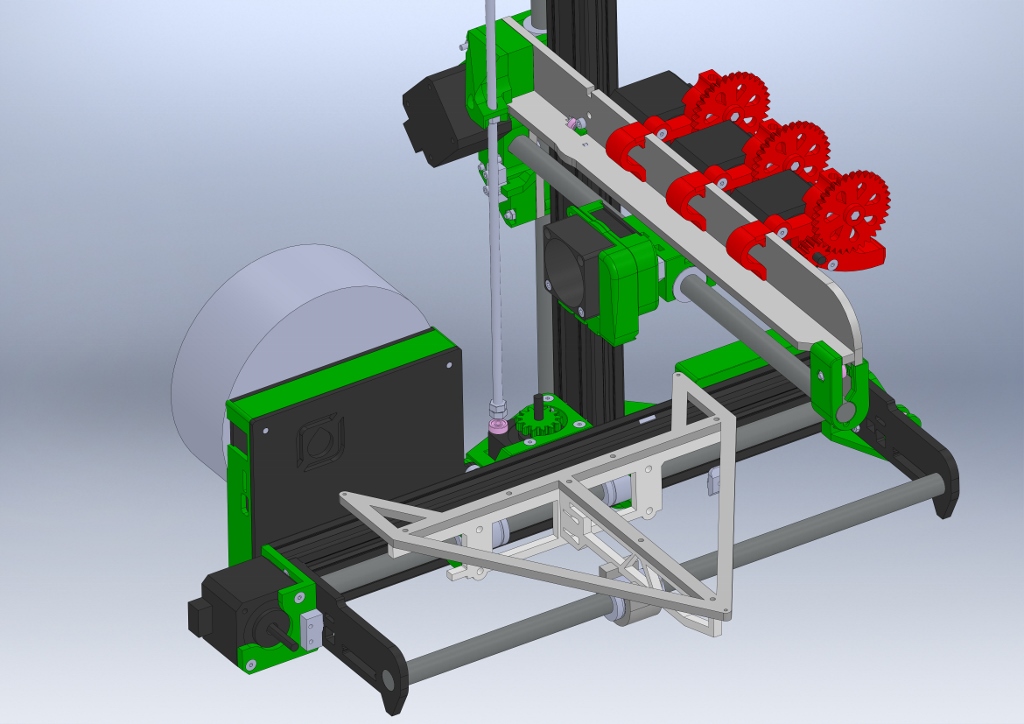
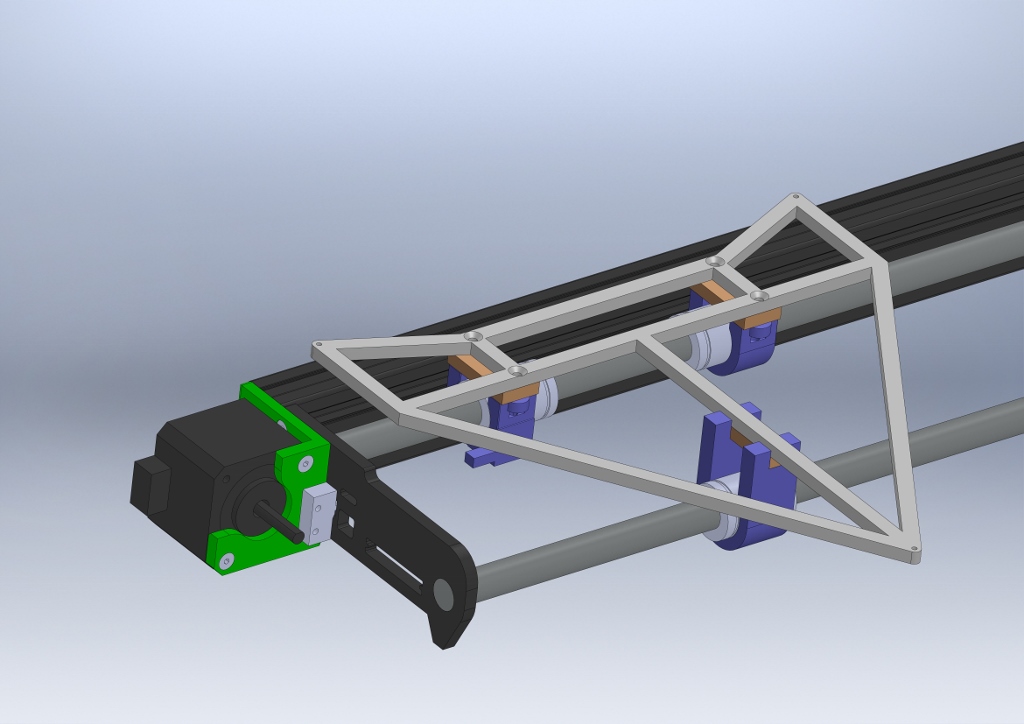
Hi All, I have had some problem with the X axis S shape and decided to manufacture the X-axis plate and X- rib in 5 mm aluminum I think this will improve the accuracy allot. I did a redesigned Y-axis bed as well but I think I have over done it and I would appreciate some input on this.
The problem with the bed is that the leveling has to be redone to often due to the instability of the mdf and this is mainly in the back corner.
I use three points when I do leveling and I have springs between to make it easier.
The designed I made is more or less a copy of the original design but I have done the bed “floating on the front bearing so I don’t have to think about if the shafts are parallel or not, the idea was to just use a rubber band to hold it down on the front bearing.
I think this could be done with only the top piece and some new printed parts instead, that would make it much easier to manufacture cause I don’t have mill and drill and tap any piece, any ideas?
/Joar Ormerod #25
|
Re: Aluminium part for Ormerod January 08, 2014 05:07AM |
Registered: 10 years ago Posts: 256 |
Looks like a nice design!
To make printed bed .. here is an idea. Create a shallow groove in the top and bottom of each beam of the part ( e.g. the long part of the groove cross section horizontal for a part designed for vertical loads), then wet up some Carbon tow and lay it in the groove to make an I - beam ( with the plastic part as the web) Use epoxy from e.g boatbuilders chanders etc. The only issue is I dont know how well epoxy sticks to PLA , but if that could be solved, the same technique could be used for X axis parts too...
EDIT : To get round screw holes etc.. widen the part at that point and gently curve the groove each side of the hole
EDIT: A slightle cleaner alternative is carbon strip, if the part was redesigned for straight pices of reinforcement.
regards
Andy
Edited 2 time(s). Last edit at 01/08/2014 05:14AM by kwikius.
Ormerod #318
www.zoomworks.org - Free and Open Source Stuff
|
Re: Aluminium part for Ormerod January 08, 2014 05:07AM |
Registered: 10 years ago Posts: 14,672 |
I have the same problem with the MDF bed sagging substantially in both back corners. I am planning to remake it in 3mm alu plate in a trapezoidal shape, leaving out the front corners, but your design looks nicer and might be lighter.
Large delta printer [miscsolutions.wordpress.com], E3D tool changer, Robotdigg SCARA printer, Crane Quad and Ormerod
Disclosure: I design Duet electronics and work on RepRapFirmware, [duet3d.com].
Large delta printer [miscsolutions.wordpress.com], E3D tool changer, Robotdigg SCARA printer, Crane Quad and Ormerod
Disclosure: I design Duet electronics and work on RepRapFirmware, [duet3d.com].
|
Re: Aluminium part for Ormerod January 08, 2014 09:30AM |
Registered: 10 years ago Posts: 314 |
@Joar107, looks good! I might need the same.......
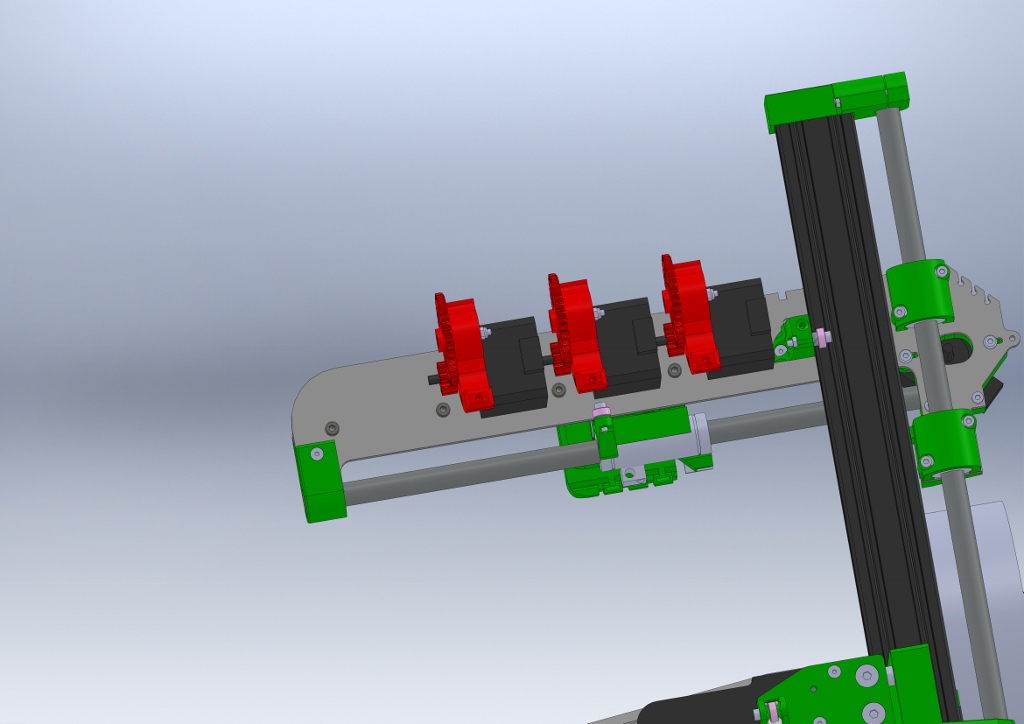
Only suggestion is the slots in the X arm for the extruder feeds. We are all using the centre slot, BUT if you try using the slot nearest the vertical arm the feed does not fit, you cannot perform the rotate of the feeder to fit the slot due to the bearing mount on the z axis.
Also the slots are too close when you have 3 extruders (my rough test) to allow insertion and removal except in sequence from the Z axis end.
Easy cure is not to have the lip on the slots (mine are gradually breaking off!) to allow vertical insertion, or space out the slots!
What software did you use to produce your designs?
Ormerod #007 (shaken but not stirred!)
|
Re: Aluminium part for Ormerod January 08, 2014 01:15PM |
Registered: 10 years ago Posts: 31 |
|
Re: Aluminium part for Ormerod January 08, 2014 01:53PM |
Registered: 10 years ago Posts: 14,672 |
Quote
Treth
@Joar107, looks good! I might need the same.......
Only suggestion is the slots in the X arm for the extruder feeds. We are all using the centre slot, BUT if you try using the slot nearest the vertical arm the feed does not fit, you cannot perform the rotate of the feeder to fit the slot due to the bearing mount on the z axis.
Has anyone tried this using the new adjustable design for the z-bearing mount, in case it has already been fixed? I suspect not, because the mounting screw is so close. A fix might be to change the extruder mount printed part to raise the motor a little.
Large delta printer [miscsolutions.wordpress.com], E3D tool changer, Robotdigg SCARA printer, Crane Quad and Ormerod
Disclosure: I design Duet electronics and work on RepRapFirmware, [duet3d.com].
|
Re: Aluminium part for Ormerod January 08, 2014 03:25PM |
Registered: 10 years ago Posts: 94 |
I will move it the slot out a couple of mm that will help, actually I am using the inner slot to have less stress on the x-axis. It might be better to set a second "x" axis that doesn't move then it could be possible to ad 5 without putting any weight on Z.Quote
Treth
@Joar107, looks good! I might need the same.......
Only suggestion is the slots in the X arm for the extruder feeds. We are all using the centre slot, BUT if you try using the slot nearest the vertical arm the feed does not fit, you cannot perform the rotate of the feeder to fit the slot due to the bearing mount on the z axis.
Also the slots are too close when you have 3 extruders (my rough test) to allow insertion and removal except in sequence from the Z axis end.
Easy cure is not to have the lip on the slots (mine are gradually breaking off!) to allow vertical insertion, or space out the slots!
What software did you use to produce your designs?
I using Solidworks unfourtunately I havent updated to 2014 and that is what RepRapPro is using.
/Joar #25
|
Re: Aluminium part for Ormerod January 08, 2014 03:46PM |
Registered: 12 years ago Posts: 1,611 |
|
Re: Aluminium part for Ormerod January 08, 2014 03:46PM |
Registered: 10 years ago Posts: 1,230 |
Nice modeling!
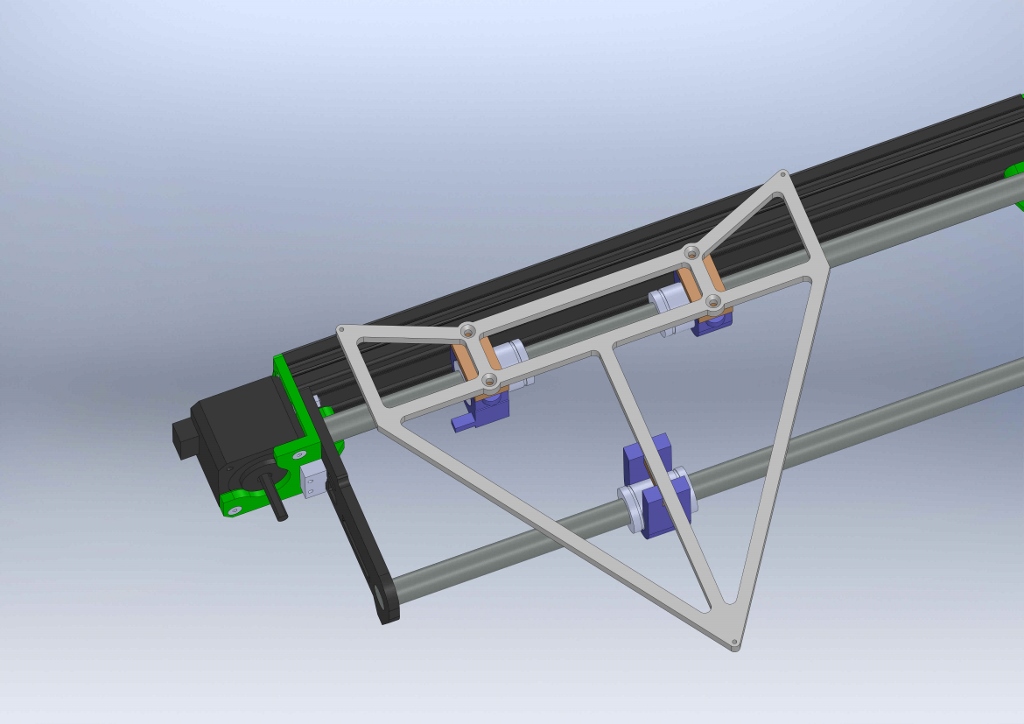
Move the y-axis-cross-rib over on the other side of the y-rod, mount the y-bearing-clamps from the other side? - better support for the corners and a cleaner triangle design, the part of cross rib that activates the micro switch could be printed out as a part of the bearing clamp
Btw, I just noticed the varying downward force of the filament tube on the printer head as i moves along the x-axis, this will not turn out well with 3 tubes me think
Erik
Edited 1 time(s). Last edit at 01/08/2014 03:48PM by ormerod168.
|
Re: Aluminium part for Ormerod January 08, 2014 05:05PM |
Registered: 10 years ago Posts: 135 |
Hi All
There are many ways to solve a problem and I too am working on an aluminium bed support. As a prototype only I have folded 3mm ali to form the bearing mounts and added angle pieces to tie the verticals together. It seems strong and light but I am intending to add a few extra mm of height in order to continue the stiffness to the edge of the bed. When It is complete I will weigh it as a comparison to the MDF.
Rory
|
Re: Aluminium part for Ormerod January 08, 2014 07:26PM |
Registered: 10 years ago Posts: 176 |
Quote
dc42
I have the same problem with the MDF bed sagging substantially in both back corners. I am planning to remake it in 3mm alu plate in a trapezoidal shape, leaving out the front corners, but your design looks nicer and might be lighter.
Hi DC42,
I tried a lot of MDF material in my previous experiments and proof that MDF can't be use for my previous projects . It will out of shape very fast, especially a lot of warm up and cool down cycle .3D printers are precise equipments, need more suitable material for the job. I did mentioned in earlier post . really need to think of a solution to solve this . I think I need to spend more $ on custom upgraded parts to get Ormerod running stable.
Edited 1 time(s). Last edit at 01/08/2014 07:28PM by tru168.
|
Re: Aluminium part for Ormerod January 09, 2014 05:47AM |
Registered: 10 years ago Posts: 275 |
|
Re: Aluminium part for Ormerod January 09, 2014 05:50AM |
Registered: 10 years ago Posts: 191 |
Hi Ormerod187,
there is a new printed part to circumvent the poor design of the x-axis rib and the nut trap - it's the z-nut-trap.
Markus
XBee & electronics blog: [lookmanowire.blogspot.com]
there is a new printed part to circumvent the poor design of the x-axis rib and the nut trap - it's the z-nut-trap.
Markus
XBee & electronics blog: [lookmanowire.blogspot.com]
|
Re: Aluminium part for Ormerod January 09, 2014 06:05AM |
Registered: 10 years ago Posts: 275 |
|
Re: Aluminium part for Ormerod January 09, 2014 07:54AM |
Registered: 10 years ago Posts: 94 |
I have made some changes to the bed, now it is only 1 laser part, 5 mm thick and the width of the ribs is 6mm. As Erik suggested I have printed the tab for the end stop. Let me know what you think I am eager to get this in production
/Joar#25
/Joar#25
|
Re: Aluminium part for Ormerod January 09, 2014 07:59AM |
Registered: 10 years ago Posts: 256 |
Quote
Joar107
I have made some changes to the bed, now it is only 1 laser part, 5 mm thick and the width of the ribs is 6mm. As Erik suggested I have printed the tab for the end stop. Let me know what you think I am eager to get this in production
/Joar#25
Maybe thicken the part where the holes are so total material area in cross section is uniform at section through holes and add some material at joints ( radiused in) ?
regards
Andy
Ormerod #318
www.zoomworks.org - Free and Open Source Stuff
|
Re: Aluminium part for Ormerod January 09, 2014 09:31AM |
Registered: 10 years ago Posts: 94 |
Agree looks much better now!Quote
kwikius
Quote
Joar107
I have made some changes to the bed, now it is only 1 laser part, 5 mm thick and the width of the ribs is 6mm. As Erik suggested I have printed the tab for the end stop. Let me know what you think I am eager to get this in production
/Joar#25
Maybe thicken the part where the holes are so total material area in cross section is uniform at section through holes and add some material at joints ( radiused in) ?
regards
Andy
/Joar #25
|
Re: Aluminium part for Ormerod January 09, 2014 01:54PM |
Registered: 10 years ago Posts: 275 |

|
Re: Aluminium part for Ormerod January 09, 2014 03:09PM |
Registered: 10 years ago Posts: 94 |
|
Re: Aluminium part for Ormerod January 09, 2014 04:52PM |
Registered: 10 years ago Posts: 275 |
|
Re: Aluminium part for Ormerod January 09, 2014 05:15PM |
Registered: 10 years ago Posts: 275 |

|
Re: Aluminium part for Ormerod January 10, 2014 02:45AM |
Registered: 10 years ago Posts: 94 |
I have printed the design I had in my last post seems good, will not be able to try it until I have made the laser cutted bed....Quote
Ormerod187
if you can help .... Imagine a bullet that has to start .... release the load on the two bearings?
the most we can be fast more things we can do even more precisely
/Joar #25
|
Re: Aluminium part for Ormerod January 28, 2014 06:42AM |
Registered: 10 years ago Posts: 94 |

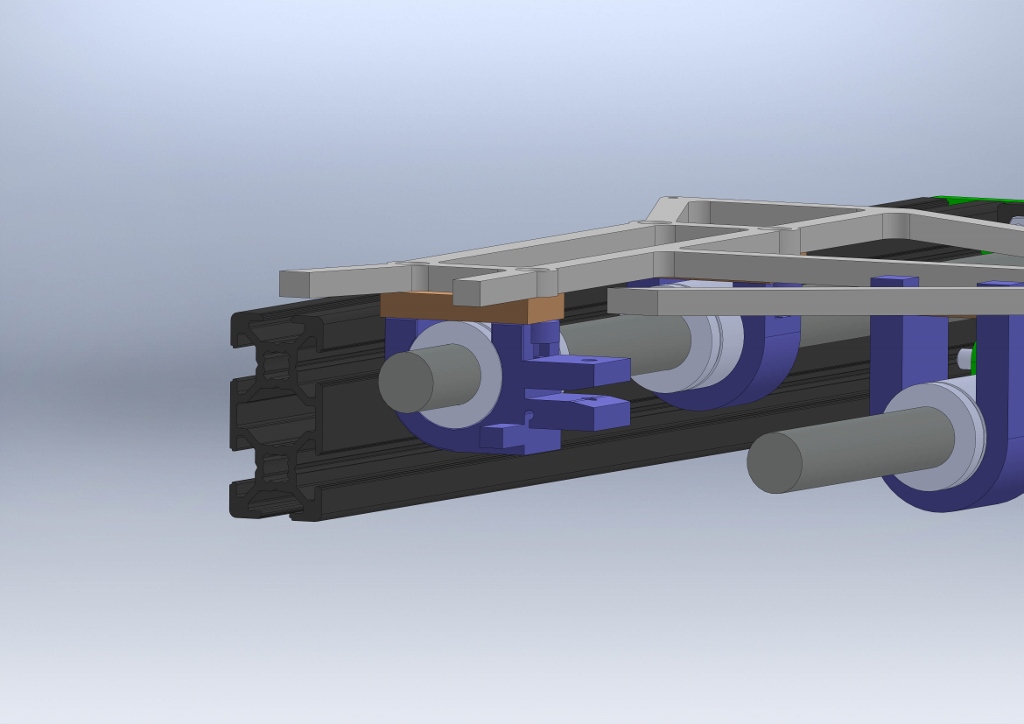
Finally had time to manufacture new x-axis and bed in aluminum
I have prepared for direct drive from motor anyone that have tried it yet?
/Joar
Edited 1 time(s). Last edit at 01/28/2014 06:44AM by Joar107.
|
Re: Aluminium part for Ormerod January 28, 2014 06:47AM |
Registered: 10 years ago Posts: 14,672 |
I want one!
How will you be attaching the front bearing to the bed frame?
Large delta printer [miscsolutions.wordpress.com], E3D tool changer, Robotdigg SCARA printer, Crane Quad and Ormerod
Disclosure: I design Duet electronics and work on RepRapFirmware, [duet3d.com].
How will you be attaching the front bearing to the bed frame?
Large delta printer [miscsolutions.wordpress.com], E3D tool changer, Robotdigg SCARA printer, Crane Quad and Ormerod
Disclosure: I design Duet electronics and work on RepRapFirmware, [duet3d.com].
|
Re: Aluminium part for Ormerod January 28, 2014 07:15AM |
Registered: 10 years ago Posts: 275 |
|
Re: Aluminium part for Ormerod February 03, 2014 04:00AM |
Registered: 10 years ago Posts: 94 |


I have now upgraded my machine and it works perfect mechanicaly, now I have to catch up with all great work that has been done with firmware and web development.
@dc42 here is the front support.
/Joar
Edited 1 time(s). Last edit at 02/03/2014 04:08AM by Joar107.
|
Re: Aluminium part for Ormerod February 03, 2014 04:24AM |
Registered: 10 years ago Posts: 1,230 |
|
Re: Aluminium part for Ormerod February 03, 2014 04:27AM |
Registered: 10 years ago Posts: 14,672 |
Quote
ormerod168
No twisting x-axis = no variating in nozzle hight, glass again flat (the bulged glass illusion), bed stable as it should be, 3 point bed spring adjustment - well done, bravo!
Erik
Bulging glass is not entirely an illusion. If it were, then you would get the same amount of "bulging" at all y-axis positions. I get more at Y=100 than I do at Y=0 or Y=190.
Large delta printer [miscsolutions.wordpress.com], E3D tool changer, Robotdigg SCARA printer, Crane Quad and Ormerod
Disclosure: I design Duet electronics and work on RepRapFirmware, [duet3d.com].
|
Re: Aluminium part for Ormerod February 03, 2014 04:59AM |
Registered: 10 years ago Posts: 1,230 |
Quote
dc42
Quote
ormerod168
No twisting x-axis = no variating in nozzle hight, glass again flat (the bulged glass illusion), bed stable as it should be, 3 point bed spring adjustment - well done, bravo!
Erik
Bulging glass is not entirely an illusion. If it were, then you would get the same amount of "bulging" at all y-axis positions. I get more at Y=100 than I do at Y=0 or Y=190.
You may be right, I only have measured at Y=100, have no aluminum plate to bend the glass any more, seems to me it prints fine without - so took it for granted that it would be the same amount across the bed, could it be the heat that makes the glass bulge, more heat loss at the upside? - must do another test
On another note, many thanks for all the hard work you do around here, without you and the help and ideas of many others I think a lot of us had given up long time ago and send it all back
Erik
|
Re: Aluminium part for Ormerod February 03, 2014 05:30AM |
Registered: 10 years ago Posts: 132 |

Sorry, only registered users may post in this forum.