Design idea - fixation and tightening of the y-drive belt
Posted by markbee
|
Design idea - fixation and tightening of the y-drive belt January 14, 2014 04:26AM |
Registered: 10 years ago Posts: 191 |
Hi all,
as I was testing speedy prints yesterday I recognized that the y-drive belt is not that tight as it could be or even should be avoiding any slippage. The current design to fix the belt by joining two ends together in a slot below the bed is quite nice, but some people seem to have problems with it and reported slippage, because the belt fixation may wear and slip out of the slot.
Another problem is you won't get the belt very tight, because of the type of fixation and the fact that the belt only meshes together with teeth matching.
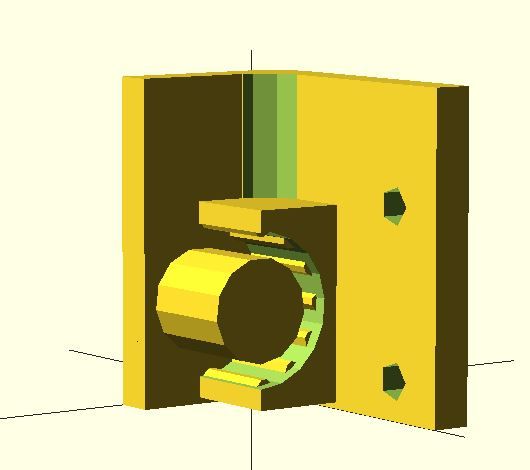
I redesigned the y-idler-bracket in OpenSCAD to allow adjustable tightening and maybe to pass the slot fixation and tightening with a two part y-idler-bracket. Tightening is done by four M3 threaded rods and nuts.
It's just a prototype now and I already printed one (fast & raw) and will try it out today, but would be interested of any comments or any suggestions from this awesome forum
y-idler-bracket
y-idler-bracket with adjustable bearing mount
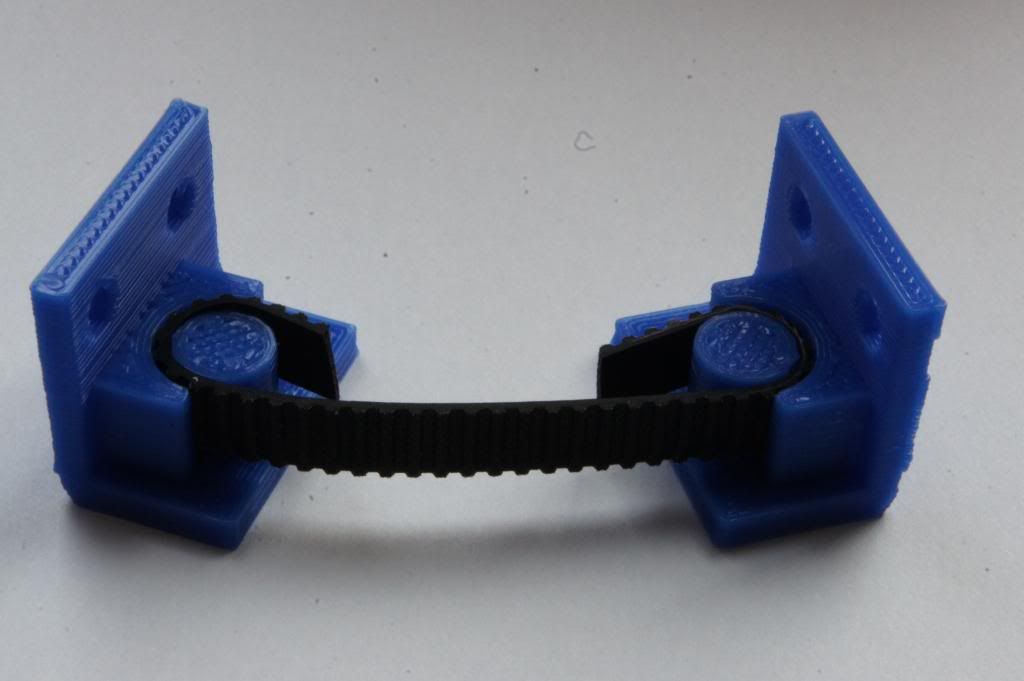
Printed prototype (compared to original bracket) with short M3 threaded rods and nuts for tension adjustment of the belt
Markus
P.S. Thx again to rayhicks for sorting out ideas
Edited 1 time(s). Last edit at 01/14/2014 04:27AM by markbee.
XBee & electronics blog: [lookmanowire.blogspot.com]
as I was testing speedy prints yesterday I recognized that the y-drive belt is not that tight as it could be or even should be avoiding any slippage. The current design to fix the belt by joining two ends together in a slot below the bed is quite nice, but some people seem to have problems with it and reported slippage, because the belt fixation may wear and slip out of the slot.
Another problem is you won't get the belt very tight, because of the type of fixation and the fact that the belt only meshes together with teeth matching.
I redesigned the y-idler-bracket in OpenSCAD to allow adjustable tightening and maybe to pass the slot fixation and tightening with a two part y-idler-bracket. Tightening is done by four M3 threaded rods and nuts.
It's just a prototype now and I already printed one (fast & raw) and will try it out today, but would be interested of any comments or any suggestions from this awesome forum

y-idler-bracket

y-idler-bracket with adjustable bearing mount


Printed prototype (compared to original bracket) with short M3 threaded rods and nuts for tension adjustment of the belt
Markus
P.S. Thx again to rayhicks for sorting out ideas
Edited 1 time(s). Last edit at 01/14/2014 04:27AM by markbee.
XBee & electronics blog: [lookmanowire.blogspot.com]
|
Re: Design idea - fixation and tightening of the y-drive belt January 14, 2014 04:51AM |
Registered: 10 years ago Posts: 578 |
|
Re: Design idea - fixation and tightening of the y-drive belt January 14, 2014 04:59AM |
Registered: 10 years ago Posts: 191 |
Hi rayhicks,
yes you could fix the belt anywhere below the bed on the mdf. A shorter belt and fixation at the outer part of the mdf could even help having a less flexible belt.
Markus
XBee & electronics blog: [lookmanowire.blogspot.com]
yes you could fix the belt anywhere below the bed on the mdf. A shorter belt and fixation at the outer part of the mdf could even help having a less flexible belt.
Markus
XBee & electronics blog: [lookmanowire.blogspot.com]
|
Re: Design idea - fixation and tightening of the y-drive belt January 14, 2014 05:28AM |
Registered: 10 years ago Posts: 256 |
Looks good.
I was wondering though. Could you not use just one bolt (m4, m5,m6 largest that would fit) for adjustment passing through the Y-axis endplate B between the two slots for the belt The actual adjustment would be from the belt side in between the belt using an allen key.
regards
Andy
Ormerod #318
www.zoomworks.org - Free and Open Source Stuff
|
Re: Design idea - fixation and tightening of the y-drive belt January 14, 2014 10:53AM |
Registered: 10 years ago Posts: 191 |
@Andy
The acrylic parts are so brittle I dare even touch them
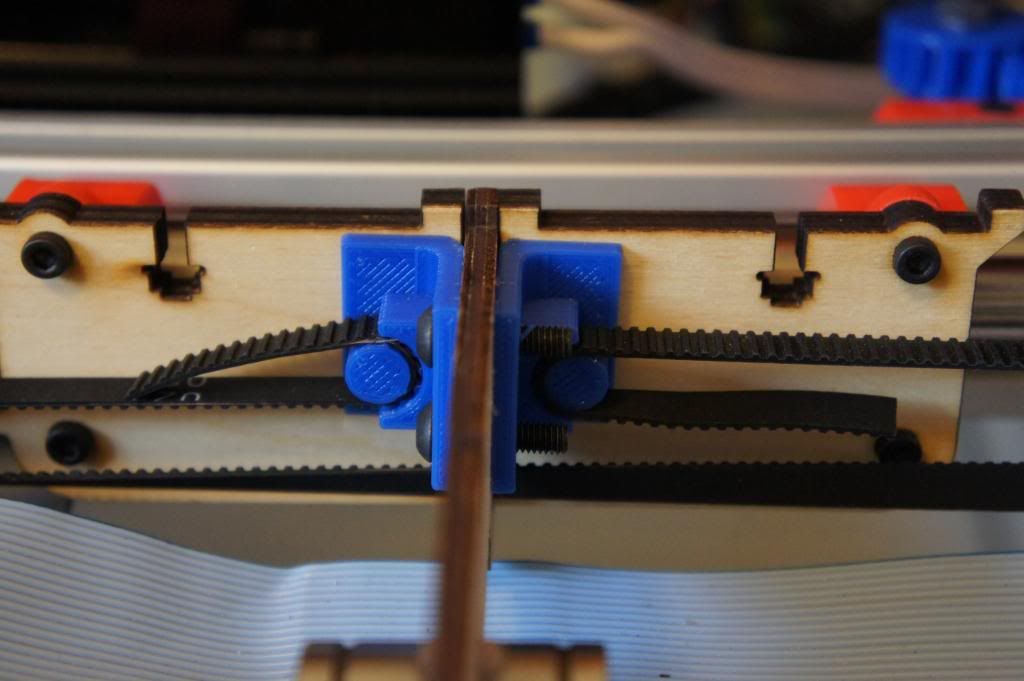
Ok I made some tests today.
The GOOD NEWS is, it is now very easy to get the belt for the y-axis tightened so much as you want and avoiding any (potential) oscillation/ slippage when moving fast. Before I couldn't get the belt tightened not even near I can do it now. It's now also possible to fix the belt at another place (below the bed) and get the tension with the redesigned y-idler-bracket.
The PRINTER DANCE
The BAD NEWS: the rattling originates not from an oscillating y-axis belt - it is the WHOLE PRINTER MOVING! So it was a misconception that something on the y/x-drive was responsible for the rattling. The printer moves fast around the tip below the z-axis extrusion according to the moves on the printbed. This causes motion around the Z-axis and the y-end brackets make that rattling sound. Hard to see because ist moving in very small steps (and back and forth) so no real travel to the left or right is visible. Call it the small step PRINTER DANCE.
So one problem solved (y-axis belt), another occurred. MacGyver to the rescue!
I'm done for today, because I also have a really unadjusted heat bed now after changing the y-idler-bracket...
Some photos:
Markus
XBee & electronics blog: [lookmanowire.blogspot.com]
The acrylic parts are so brittle I dare even touch them
Ok I made some tests today.
The GOOD NEWS is, it is now very easy to get the belt for the y-axis tightened so much as you want and avoiding any (potential) oscillation/ slippage when moving fast. Before I couldn't get the belt tightened not even near I can do it now. It's now also possible to fix the belt at another place (below the bed) and get the tension with the redesigned y-idler-bracket.
The PRINTER DANCE
The BAD NEWS: the rattling originates not from an oscillating y-axis belt - it is the WHOLE PRINTER MOVING! So it was a misconception that something on the y/x-drive was responsible for the rattling. The printer moves fast around the tip below the z-axis extrusion according to the moves on the printbed. This causes motion around the Z-axis and the y-end brackets make that rattling sound. Hard to see because ist moving in very small steps (and back and forth) so no real travel to the left or right is visible. Call it the small step PRINTER DANCE.
So one problem solved (y-axis belt), another occurred. MacGyver to the rescue!
I'm done for today, because I also have a really unadjusted heat bed now after changing the y-idler-bracket...
Some photos:


Markus
XBee & electronics blog: [lookmanowire.blogspot.com]
|
Re: Design idea - fixation and tightening of the y-drive belt January 14, 2014 11:30AM |
Registered: 12 years ago Posts: 116 |
Well done Marcus! However, doing it with just one adjuster, something like this, would be nice... [www.thingiverse.com]
Ian
RepRapPro tech support
Ian
RepRapPro tech support
|
Re: Design idea - fixation and tightening of the y-drive belt January 14, 2014 11:34AM |
Registered: 10 years ago Posts: 578 |
|
Re: Design idea - fixation and tightening of the y-drive belt January 14, 2014 11:41AM |
Registered: 10 years ago Posts: 256 |
Yes I thought about that after. As is, Its a good mod with minmal disturbance to everything else. OTOH I would have thought the acrylic parts are toast pretty quick (bits seem to be flaking off all over the place!), then they can be replaced with some aluminium angle. Then bolt that down to something heavy ... like a railway sleeper or some heavy steel plate.
Anyway droftarts solution looks good !
regards
Andy
Ormerod #318
www.zoomworks.org - Free and Open Source Stuff
Anyway droftarts solution looks good !
regards
Andy
Ormerod #318
www.zoomworks.org - Free and Open Source Stuff
|
Re: Design idea - fixation and tightening of the y-drive belt January 14, 2014 11:42AM |
Registered: 10 years ago Posts: 191 |
@Ian
It's just the first prototype so any suggestions very welcome What about the bearing part hinged to the bracket at the bottom and on the top the adjustment screw? Like a "V" which when opened increases the tension.
@Ray
My bed is so angled now, I cant even print the snowman any more....
Markus
XBee & electronics blog: [lookmanowire.blogspot.com]
It's just the first prototype so any suggestions very welcome
What about the bearing part hinged to the bracket at the bottom and on the top the adjustment screw? Like a "V" which when opened increases the tension.@Ray
My bed is so angled now, I cant even print the snowman any more....
Markus
XBee & electronics blog: [lookmanowire.blogspot.com]
|
Re: Design idea - fixation and tightening of the y-drive belt January 14, 2014 06:28PM |
Registered: 10 years ago Posts: 275 |

|
Re: Design idea - fixation and tightening of the y-drive belt January 15, 2014 02:24AM |
Registered: 10 years ago Posts: 12 |
Does anyone use a clothes peg spring as a belt tensioner?
Are there any problems with doing this?
[www.youtube.com]
Daryl
RS Ormerod #299
Are there any problems with doing this?
[www.youtube.com]
Daryl
RS Ormerod #299
|
Re: Design idea - fixation and tightening of the y-drive belt January 15, 2014 03:00AM |
Registered: 10 years ago Posts: 314 |
@djb, nice idea about clothes peg spring, hadn't seen that one.
@markus, great tensioning and adjustment idea, that looks good.
Thoughts for improvement (while we have acrylic end plates) is, could you add a web along the top (may need to increase the height slightly) to stop it flexing under the belt tension and pressing on the acrylic part?
This could be similar to the bottom edge web of the original part, but protruding outwards.
Or, "additional thought coming through"..... what if there was a built in space between your printed part and the acrylic side part, i.e. built up where it connects to extrusion, a 'boss' or whatever it's called, a raised 'bump' could then be added to the design to transfer the force of the belt tension to the ground rods rod.
This could also be done at the stepper end, but that end looks more robust.
The single screw adjustment also has appeal, but I like your 'action' and 'solve it' drive.......
Ormerod #007 (shaken but not stirred!)
|
Re: Design idea - fixation and tightening of the y-drive belt January 15, 2014 03:38AM |
Registered: 10 years ago Posts: 191 |
@Treth
thank you for your suggestions! Not sure though what you mean with a "web along the top"?
I already redesigned the part with the bearing to be hinged on the y-idler-end-bracket (like Ian suggested with the shown part on thingiverse). Adjustment is now done with a single M5 screw (hole above the belt feed through) and the coupling to the base will be less complex than that shown on thingiverse.
It will look like this:
Markus
XBee & electronics blog: [lookmanowire.blogspot.com]
thank you for your suggestions! Not sure though what you mean with a "web along the top"?
I already redesigned the part with the bearing to be hinged on the y-idler-end-bracket (like Ian suggested with the shown part on thingiverse). Adjustment is now done with a single M5 screw (hole above the belt feed through) and the coupling to the base will be less complex than that shown on thingiverse.
It will look like this:

Markus
XBee & electronics blog: [lookmanowire.blogspot.com]
|
Re: Design idea - fixation and tightening of the y-drive belt January 15, 2014 03:46AM |
Registered: 10 years ago Posts: 14,672 |
Why not instead put 2 printed parts under the bed, either side the centre plywood rib? These could have serrated grooves to grip the belt, just as the x-carriage does, avoiding the problem of the belt slipping in the groove in the plywood rib which some users have reported. One of the printed parts could be attached to the rib, the other attached to the first part via a screw to adjust the tension. It's more awkward to adjust the tension under the bed, but it should only have to be done once.
Large delta printer [miscsolutions.wordpress.com], E3D tool changer, Robotdigg SCARA printer, Crane Quad and Ormerod
Disclosure: I design Duet electronics and work on RepRapFirmware, [duet3d.com].
Large delta printer [miscsolutions.wordpress.com], E3D tool changer, Robotdigg SCARA printer, Crane Quad and Ormerod
Disclosure: I design Duet electronics and work on RepRapFirmware, [duet3d.com].
|
Re: Design idea - fixation and tightening of the y-drive belt January 15, 2014 03:48AM |
Registered: 10 years ago Posts: 578 |
Markus when you say your bed is angled, do you mean you haven't got round to levelling it yet, or that it is hard to level?
The reason I ask is in case moving the belt anchor has ended up with the two belt end at different heights, in which case tensioning the belt may cause a twisting action between the two belt end fixing positions
The new design looks much easier to mount and adjust, you should just need a pin of plain rod for the pivot in the hinge maybe just a nail or some coat hanger wire cut to length to keep the sourcing easy?
Edited 2 time(s). Last edit at 01/15/2014 03:58AM by rayhicks.
|
Re: Design idea - fixation and tightening of the y-drive belt January 15, 2014 03:55AM |
Registered: 10 years ago Posts: 314 |
Probably the wrong term, but a piece coming out at right angles (as if machined from aluminium angle) which is similar to original printed part on the bottom edge (which should be retained). Or any other solution which removes the belt force from the acrylic parts.Quote
markbee
@Treth
Not sure though what you mean with a "web along the top"?
Markus
Ormerod #007 (shaken but not stirred!)
|
Re: Design idea - fixation and tightening of the y-drive belt January 15, 2014 03:58AM |
Registered: 10 years ago Posts: 191 |
@dc42
Nice & simple idea! Would fix the belt better than with the wooden slot. I like the idea of having control of the tension though with the part on the y-idler-bracket. Maybe a combination of both ideas would be best?
@Ray
It's just that the bed was really good leveled before working on the printer and after tilting and working on the printer it was (still is) sagging at the front. The belts are still leveled - there is no change in any height. That was one main reason why I tried a four screw solution first, avoiding any height differences with the belt. I'm not sure how this will go with the hinged part as the bearing will minimally come down and so does the belt, when tensioning the belt.
Markus
Edited 1 time(s). Last edit at 01/15/2014 04:00AM by markbee.
XBee & electronics blog: [lookmanowire.blogspot.com]
|
Re: Design idea - fixation and tightening of the y-drive belt January 15, 2014 09:30AM |
Registered: 10 years ago Posts: 265 |
My first OpenSCAD experience so apologies for the poor model.
Following on from dc42's idea of securing the y belt to the bed, i was thinking something like this (a and mirror of it) attached to either side of the bed support rib, the screw holes line up with the current slots, so fix belts around them hand tight, then screw together through bed rib to tension the belt.
Matt
Limited Edition Red RS Ormerod 1 #144 of 200 - RRP 1.09fw
iamburnys Ormerod Upgrades Github
Follow me on ThingiVerse My Designs
|
Re: Design idea - fixation and tightening of the y-drive belt January 15, 2014 10:42AM |
Registered: 10 years ago Posts: 578 |
|
Re: Design idea - fixation and tightening of the y-drive belt January 15, 2014 11:31AM |
Registered: 10 years ago Posts: 265 |
Hi Ray,
I have just tried printing a couple, however my openscad skills are lacking and the teeth to retain the belt dont show in the stl file
I'm trying to resolve this, if anyone with more experience would care to take a look i'd be grateful.
.scad file attached bedYbeltHook.scad
Matt
Limited Edition Red RS Ormerod 1 #144 of 200 - RRP 1.09fw
iamburnys Ormerod Upgrades Github
Follow me on ThingiVerse My Designs
|
Re: Design idea - fixation and tightening of the y-drive belt January 15, 2014 11:39AM |
Registered: 10 years ago Posts: 132 |
I've been doing a bit of parallel development, I was producing a two screw Y belt adjuster and then saw Ians reference to an hinged adjuster for the Y axis. So modified my design as can be seen in the attachment. Seems to work quite well.
Ormerod 096

Ormerod 096
|
Re: Design idea - fixation and tightening of the y-drive belt January 15, 2014 11:51AM |
Registered: 10 years ago Posts: 191 |
Hi johneato,
nice work! Does it work well? Has the upper belt enough space when you tension it?
Just finished mine:
Markus
XBee & electronics blog: [lookmanowire.blogspot.com]
nice work! Does it work well? Has the upper belt enough space when you tension it?
Just finished mine:

Markus
XBee & electronics blog: [lookmanowire.blogspot.com]
|
Re: Design idea - fixation and tightening of the y-drive belt January 15, 2014 12:04PM |
Registered: 10 years ago Posts: 132 |
Markus
Your design looks very similar. Excellent.
The belt is fine, it is more or less in the centre of the existing slot. I think if the belt was too slack and you tried to adjust then with the increased angle of the adjuster, it would touch the bottom of the slot. Its amazing how tight you make the belt and the Y-axis still performs. Trying to decide what is an appropriate tension.
Regards
John
|
Re: Design idea - fixation and tightening of the y-drive belt January 15, 2014 12:36PM |
Registered: 10 years ago Posts: 275 |
|
Re: Design idea - fixation and tightening of the y-drive belt January 15, 2014 12:40PM |
Registered: 10 years ago Posts: 191 |
Ormerod187
Could you post a photo of your y-idler-bracket part?
Markus
XBee & electronics blog: [lookmanowire.blogspot.com]
Could you post a photo of your y-idler-bracket part?
Markus
XBee & electronics blog: [lookmanowire.blogspot.com]
|
Re: Design idea - fixation and tightening of the y-drive belt January 15, 2014 03:22PM |
Registered: 10 years ago Posts: 275 |
I'm printing at the moment (in low light) I'll do a photo but my "y" is the original one .. for now.
I have to check every day. Every day the position changes, the tension from the belt accordingly changes.
You are getting the same belt tension after a printing day?
I'm not talking about worn belt I'm talking about sagging.
......
Dario
I have to check every day. Every day the position changes, the tension from the belt accordingly changes.
You are getting the same belt tension after a printing day?
I'm not talking about worn belt I'm talking about sagging.
......
Dario
|
Re: Design idea - fixation and tightening of the y-drive belt January 15, 2014 03:30PM |
Registered: 10 years ago Posts: 191 |
Hi Dario,
I had no problems with the belt before - it didn't change even after weeks of printing. It was only the case that I tried printing at higher speeds (50mm/s) and thought the belt had not enough tension, because the printer was "rattling" when doing short moves. But that was a misconception. It's the whole machine moving that causes the sound.
I have still version 1 of my belt tension bracket and printed some things. No change in tension since then (as far as I can see).
Markus
XBee & electronics blog: [lookmanowire.blogspot.com]
|
Re: Design idea - fixation and tightening of the y-drive belt January 15, 2014 03:42PM |
Registered: 10 years ago Posts: 578 |
Dario - it sounds like the belt is slipping in the place under the carriage where both ends meet. some people have solved this problem using hotmelt glue, or cable ties, or bulldog clips (like the ones that hold the glass plate down) - use any of these methods to hold the two belt ends together and make sure that the thing that holds them is pushed up against the wood that they pass through.
dc42 and others suggested, and iambarmy has started modeling a better way of fixing these ends using a toothed piece to bite the belt (rather than the belt biting itself and being helf by friction in the wood)
Ray
dc42 and others suggested, and iambarmy has started modeling a better way of fixing these ends using a toothed piece to bite the belt (rather than the belt biting itself and being helf by friction in the wood)
Ray
|
Re: Design idea - fixation and tightening of the y-drive belt January 15, 2014 04:04PM |
Registered: 10 years ago Posts: 275 |
Yes.... speed...
all done...
belt fixing, bed fixed and glued, all screws to the maximum...
I printed out almost anything if I break something... no problem...
If I print the same machine with acetal I'll go 200%... more fast and more accurate.
But the real problem for doing so are the temperatures to reach.
[en.wikipedia.org]
Together we can!
Dario
|
Re: Design idea - fixation and tightening of the y-drive belt January 16, 2014 10:41AM |
Registered: 10 years ago Posts: 265 |
Y Bed attachment parts to avoid slipage
Limited Edition Red RS Ormerod 1 #144 of 200 - RRP 1.09fw
iamburnys Ormerod Upgrades Github
Follow me on ThingiVerse My Designs
Limited Edition Red RS Ormerod 1 #144 of 200 - RRP 1.09fw
iamburnys Ormerod Upgrades Github
Follow me on ThingiVerse My Designs

Sorry, only registered users may post in this forum.