My New Duct... On ThingyVerse
Posted by KimBrown
|
My New Duct... On ThingyVerse March 04, 2014 07:20PM |
Registered: 10 years ago Posts: 859 |
Seems you guys like the replacement Fan Duct. It's only been up on ThingyVerse for 24hrs now, and getting lots of hits and downloads.
It kills BackWash and so REDUCES print Warping, especialy with the Grill fitted. I like the Grill my self, as It makes it look better, as well as alter the flow of the air from any escaping backwash.
I'm about to start work on the Mk2 version which I'll release in a couple of days.
If you have printed the Mk1 version then you probably won't find a great deal to gain from the Mk2.
(Unless someone can suggest anything else that needs adding or altered).
The main differance will be recessed lighting, where if like me you've fitted an LED stip light under the Duct (if you haven't done it yet, I can only say your missing out..... It's great.....), then the LED strip connecters will be hidden so can't be shorted out.
Also the top wire cleat will be altered, as on the Mk1 it needs filing down to get the fan in.
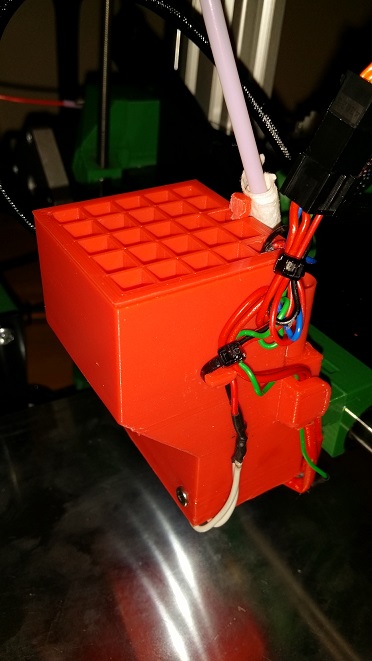
Here's the lighting affect on the Mk1 fitted with the 3 LED strip.... (I used no flash for this, just moved the head back over the print after it was finished).
Kim
Edited 1 time(s). Last edit at 03/04/2014 07:23PM by KimBrown.
Please send me a PM if you have suggestions, or problems with Big Blue 360.
I won't see comments in threads, as I move around to much.
Working Link to Big Blue 360 Complete
It kills BackWash and so REDUCES print Warping, especialy with the Grill fitted. I like the Grill my self, as It makes it look better, as well as alter the flow of the air from any escaping backwash.
I'm about to start work on the Mk2 version which I'll release in a couple of days.
If you have printed the Mk1 version then you probably won't find a great deal to gain from the Mk2.
(Unless someone can suggest anything else that needs adding or altered).
The main differance will be recessed lighting, where if like me you've fitted an LED stip light under the Duct (if you haven't done it yet, I can only say your missing out..... It's great.....), then the LED strip connecters will be hidden so can't be shorted out.
Also the top wire cleat will be altered, as on the Mk1 it needs filing down to get the fan in.
Here's the lighting affect on the Mk1 fitted with the 3 LED strip.... (I used no flash for this, just moved the head back over the print after it was finished).

Kim
Edited 1 time(s). Last edit at 03/04/2014 07:23PM by KimBrown.
Please send me a PM if you have suggestions, or problems with Big Blue 360.
I won't see comments in threads, as I move around to much.
Working Link to Big Blue 360 Complete
|
Re: My New Duct... On ThingyVerse March 05, 2014 02:29AM |
Registered: 10 years ago Posts: 42 |
|
Re: My New Duct... On ThingyVerse March 05, 2014 03:13AM |
Registered: 10 years ago Posts: 36 |

|
Re: My New Duct... On ThingyVerse March 05, 2014 07:53AM |
Registered: 10 years ago Posts: 859 |
Hi, first the Slic3r settings, I used a 4mm retraction, 195' for the hotEnd, and 60' for the HotBed, with a 10mm brim.
I nearly always use the brim on everything now, as I print directly on to plain clean glass, washed with soapy water, rinsed, and then
once mounted cleaned with Vinager. I did have a BackWash plate fitted at the time to reduce warping, but my design kills it dead.
As for bridging, for some time I've been printing with the vents blocked off, and two holes drilled in the top of Iamburnys unit.
It bridges ok... If you print my duct, then you will find Slic3r stuggles will the start of the chimneys, as it trys to put loops in mid air
that have nothing to support them.... Don't give up if you see it, as it does work eventualy. Similar with the wire cleats.
But most prints need a little cleaning up after printing.
I came up with the design because I was printing some big prints and even with a BackWash plate on the old unit I had 3mm of Warping due to Backwash escaping. Now I'm printing away all safe and sound.... Backwash is a thing of the past for me now.
Enjoy the design.... Please leave a comment if you print it.
Kim..
Please send me a PM if you have suggestions, or problems with Big Blue 360.
I won't see comments in threads, as I move around to much.
Working Link to Big Blue 360 Complete
|
Re: My New Duct... On ThingyVerse March 05, 2014 09:19AM |
Registered: 10 years ago Posts: 859 |
OOps 190' for the hotEnd, but I don't think 5' will make a differance.
Sorry Mike I didn't answer your second question.
I will draw up an adapter plate to clip on to the finger on the side of my duct later this afternoon for you and upload it to this thread after I've printed it and made sure it fits.
I use the probe in the original positon on my machine, but I didn't want to exclude others that use the probe in the position DC42 and Iamburny came
up with. Bare with me, as I'll need to find the measurements to make the adapter. It'll mean that if the tiny holes that the screws for the probe is held on by get stripped sometime that you can just renew the adapter plate. So that would be good.
Thanks for jogging my memory about this, I meant to add the clip, but forgot to be honest. All feed back is encouraging.
Hopefully I'll put the design up in the next 4 or 5 hrs depending on what else I have cooking this afternoon.
I wanted to add the mount as Iamburny design (which is very good by the way) but I couldn't see a way of doing it without printing the duct
on stilts as it protrudes below the duct.
All the Best,
Kim..
Please send me a PM if you have suggestions, or problems with Big Blue 360.
I won't see comments in threads, as I move around to much.
Working Link to Big Blue 360 Complete
|
Re: My New Duct... On ThingyVerse March 05, 2014 10:09AM |
Registered: 11 years ago Posts: 2,469 |
|
Re: My New Duct... On ThingyVerse March 05, 2014 10:38AM |
Registered: 10 years ago Posts: 14,672 |
Quote
KimBrown
I use the probe in the original positon on my machine, but I didn't want to exclude others that use the probe in the position DC42 and Iamburny came
up with. Bare with me, as I'll need to find the measurements to make the adapter. It'll mean that if the tiny holes that the screws for the probe is held on by get stripped sometime that you can just renew the adapter plate. So that would be good.
Unfortunately, I don't think my new sensor board will fit on your duct. For kits 2 & 3, the sensor connector is on the board, and for kits 4 & 5 all the hotend connectors are on the board. I have placed the connectors at the top of the board, overhanging the top of the original hatsink duct, so that the wires are facing the right way - but it looks to me that your duct is a lot taller, in which case this won't be possible

Large delta printer [miscsolutions.wordpress.com], E3D tool changer, Robotdigg SCARA printer, Crane Quad and Ormerod
Disclosure: I design Duet electronics and work on RepRapFirmware, [duet3d.com].
|
Re: My New Duct... On ThingyVerse March 05, 2014 10:44AM |
Registered: 10 years ago Posts: 859 |
Here's a picture of the adapter plate to fit the IR Probe on to the side of my Fan Ducting.
I'll print it out later this afternoon to check it out, then if it's ok I'll put the STL file up on this thread and ThingyVerse.
I have to go out, so it'll be a couple of hours.
Kim
Please send me a PM if you have suggestions, or problems with Big Blue 360.
I won't see comments in threads, as I move around to much.
Working Link to Big Blue 360 Complete
I'll print it out later this afternoon to check it out, then if it's ok I'll put the STL file up on this thread and ThingyVerse.
I have to go out, so it'll be a couple of hours.
Kim

Please send me a PM if you have suggestions, or problems with Big Blue 360.
I won't see comments in threads, as I move around to much.
Working Link to Big Blue 360 Complete
|
Re: My New Duct... On ThingyVerse March 05, 2014 10:52AM |
Registered: 10 years ago Posts: 859 |
LoL I've already spotted something.
I wanted to leave space for the thermister wire...
Please send me a PM if you have suggestions, or problems with Big Blue 360.
I won't see comments in threads, as I move around to much.
Working Link to Big Blue 360 Complete
I wanted to leave space for the thermister wire...

Please send me a PM if you have suggestions, or problems with Big Blue 360.
I won't see comments in threads, as I move around to much.
Working Link to Big Blue 360 Complete
|
Re: My New Duct... On ThingyVerse March 05, 2014 11:11AM |
Registered: 10 years ago Posts: 859 |
Hi DC, if you have a picture and maybe some sizes I can alter the adapter plate to suit....
I have to go out, but will look in here later before printing my new plate and will alter it to fit, but this plate should fit your probe.
Well that's the theory.....LoL But I don't know the sizes of your probe..
Let me print it later this afternoon, and I'll release the STL as soon as I'm happy it fits ok...
I've decided rather than make a Mk2 Duct to hide my LED wiring, I will make another addon to glue below the Duct to hide the LED connections.
@Le-Seaw
Hi, I did think about doing just that, but there isn't space when the HotEnd homes for the X-axis.
I had two choices, up or further out along the X-axis. I thought going along the X-axis would look terrible, and add a possible twisting moment weight wise.
On top of this, the Duct works by having an Inlet tunnel, to capture any escaping air (BackWash).
Using the Duct here, the only draught I can feel around this area now is upwards away from the print.
So if you were thinking of printing this Duct but were waiting for the LED connections Mod, don't wait any longer.
I'll design the addon connections cover later while the printers busy printing the test adapter plate...

Edited 1 time(s). Last edit at 03/05/2014 11:15AM by KimBrown.
Please send me a PM if you have suggestions, or problems with Big Blue 360.
I won't see comments in threads, as I move around to much.
Working Link to Big Blue 360 Complete
I have to go out, but will look in here later before printing my new plate and will alter it to fit, but this plate should fit your probe.
Well that's the theory.....LoL But I don't know the sizes of your probe..
Let me print it later this afternoon, and I'll release the STL as soon as I'm happy it fits ok...
I've decided rather than make a Mk2 Duct to hide my LED wiring, I will make another addon to glue below the Duct to hide the LED connections.
@Le-Seaw
Hi, I did think about doing just that, but there isn't space when the HotEnd homes for the X-axis.
I had two choices, up or further out along the X-axis. I thought going along the X-axis would look terrible, and add a possible twisting moment weight wise.
On top of this, the Duct works by having an Inlet tunnel, to capture any escaping air (BackWash).
Using the Duct here, the only draught I can feel around this area now is upwards away from the print.
So if you were thinking of printing this Duct but were waiting for the LED connections Mod, don't wait any longer.
I'll design the addon connections cover later while the printers busy printing the test adapter plate...
Edited 1 time(s). Last edit at 03/05/2014 11:15AM by KimBrown.
Please send me a PM if you have suggestions, or problems with Big Blue 360.
I won't see comments in threads, as I move around to much.
Working Link to Big Blue 360 Complete
|
Re: My New Duct... On ThingyVerse March 05, 2014 02:39PM |
Registered: 10 years ago Posts: 859 |

Here's the adapter plate to suit DC42s probe....
There's a 2mm cut out to accomodate the connectors which I hope should be enough.
I've designed the adapter to make it a clip on addon.
However if the clips break while fitting then adapter plater can be glued on using 5 min Apoxy.
Kim
Please send me a PM if you have suggestions, or problems with Big Blue 360.
I won't see comments in threads, as I move around to much.
Working Link to Big Blue 360 Complete
|
Re: My New Duct... On ThingyVerse March 05, 2014 02:56PM |
Registered: 10 years ago Posts: 36 |
|
Re: My New Duct... On ThingyVerse March 05, 2014 03:31PM |
Registered: 10 years ago Posts: 859 |
The adapter plate and instructions for fettling and fitting are now on ThingyVerse.
Adapter Plate for DC42s IR Probe
Please send me a PM if you have suggestions, or problems with Big Blue 360.
I won't see comments in threads, as I move around to much.
Working Link to Big Blue 360 Complete
Adapter Plate for DC42s IR Probe
Please send me a PM if you have suggestions, or problems with Big Blue 360.
I won't see comments in threads, as I move around to much.
Working Link to Big Blue 360 Complete
|
Re: My New Duct... On ThingyVerse March 05, 2014 03:40PM |
Registered: 10 years ago Posts: 859 |
OK Mike... If one of the clips break (they are quite brittle) when mounting, 5min apoxy will hold it.
I used that glue to seal the heatsink in IamBurnys fan mount, and I had to distroy the mount to get the heatsink out.
IF you decide to stick the 3 LED stip under the Duct like I have then I found the best way to give the LED sticky stuff something to stick to was to paint the bottom of the Duct with Tamiya clear Acrylic varnish, but any thing to seal the surface will do.
Please send me a PM if you have suggestions, or problems with Big Blue 360.
I won't see comments in threads, as I move around to much.
Working Link to Big Blue 360 Complete
|
Re: My New Duct... On ThingyVerse March 06, 2014 03:10PM |
Registered: 10 years ago Posts: 36 |
Hi Kim,
It all went together quite nicely, I warmed the clip before trying to fit it. The clip just needed a little filing to mount the IR sensor (for the plug), ALL warping has gone and I have been able to start prints with a temp of 180 dropping to 170 without issue. I may try going even lower, just for the sake of it.....
I haven't tried any bridging as yet.
Many thanks,
Mike
|
Re: My New Duct... On ThingyVerse March 06, 2014 11:45PM |
Registered: 10 years ago Posts: 859 |
Hi Mike, BRAVO!!!!!
GREAT! Thank you so much for givening me feed back about the Fan Duct.
Where did you have to adjust the clip please? I haven't mounted mine on there, as it's still in the original position, and I'll adjust the design if it needs adjusting.
Yes it does stop the down draughts on the print, as much as possible, but that was what I designed it to do.
And I suspect that the Bigger names will soon be poaching OUR design..
I do have a design in my head (not at all on CAD yet) for a radical Mk2 version, but I really wanted to see the feed back from Mk1
first. Glad it's working for you, and me at least..... I have other ideas for the Duct.... I won't say more... And an idea for a Double
filament Head......( WoW!!!!! did you hear the ears prick Up then?????? Shhhhhhhhhhhhhh! don't tell any one I told you first..... )..
The other week I did a print, and ok it was abit extream, I used a HIGH infill [so lots of localised heat], and over a distance of 70-80mm I had Warping of 3mm at one end and 2mm the other... That was the reason for my design..... I decided that enough was enough, I'd turn the HotBed up as high
as I dare for PLA, and still was getting the problem. I'm a smoker (Does that upset the E.U.?????lol), so smoke tested the Fan Duct I was using at the time and found that no matter what I did I was still getting a down draught on the print to a degree.... Hence my design of Mk1.
Mk2 I hope will add a few features, but will need me to trial for at least a week before releasing, and I haven't even got it in to CAD yet, so it's a couple of weeks away at least.
On the adapter plate I had to use the dimensions of the original probe for the hole spacings (10mm), as DC42 is so busy he hasn't past me the sizes or clearances of his probe yet. So I ensured there was enough plastic to be filed away.
Unfortunately I can see it'll be a month before I get one of DCs probes in my hand because I have to move around the country, and it won't catch up with me. DC if your watching, please send me the sizes so I can adjust the probe adapter to suit it please.......
Please send me a PM if you have suggestions, or problems with Big Blue 360.
I won't see comments in threads, as I move around to much.
Working Link to Big Blue 360 Complete
|
Re: My New Duct... On ThingyVerse March 07, 2014 03:20AM |
Registered: 10 years ago Posts: 36 |
Hi Kim,
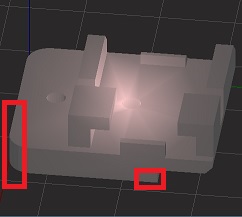
The attached fettled shows (more or less) where I filed, one was so the IR head fitted under without too much protrusion, the second so the wiring plug fitted comfortably although tightly.
The second image, shows where the design could be slightly altered, removing a mm from the bottom (the IR head will fit easier), and the other end can be extended (Dc's new sensor board looks to be around 70mm high, allowing 10mm for the connectors, the holes look to start approx. 18mm from the sensor end and look to be around 20/21mm apart).
If you are after ideas for the Mk2, I am thinking of adding a second fan (the pwm controlled one) and have been trawling thingyverse for a ducting that literally goes around the nozzle(s) and blows straight down when if necessary, Ideally this would be on the other side of the X carriage for balance (mmmmmmm, could it be an all in one duct and X carriage ). I really need to learn to draw . Thankfully I don't need to worry about things hitting the control box, mine lays flat.
Dual Heads, funny you should say that, I have been looking longingly at the Duex expansion board, but to be honest I trust DC's firmware far more than I would an alpha branch, so I may be waiting for a while yet!
I used a Multi Vape thing to test airflow!
HTH
Mike
The attached fettled shows (more or less) where I filed, one was so the IR head fitted under without too much protrusion, the second so the wiring plug fitted comfortably although tightly.
The second image, shows where the design could be slightly altered, removing a mm from the bottom (the IR head will fit easier), and the other end can be extended (Dc's new sensor board looks to be around 70mm high, allowing 10mm for the connectors, the holes look to start approx. 18mm from the sensor end and look to be around 20/21mm apart).
If you are after ideas for the Mk2, I am thinking of adding a second fan (the pwm controlled one) and have been trawling thingyverse for a ducting that literally goes around the nozzle(s) and blows straight down when if necessary, Ideally this would be on the other side of the X carriage for balance (mmmmmmm, could it be an all in one duct and X carriage
). I really need to learn to draw . Thankfully I don't need to worry about things hitting the control box, mine lays flat.Dual Heads, funny you should say that, I have been looking longingly at the Duex expansion board, but to be honest I trust DC's firmware far more than I would an alpha branch, so I may be waiting for a while yet!
I used a Multi Vape thing to test airflow!
HTH
Mike
|
Re: My New Duct... On ThingyVerse March 07, 2014 04:54AM |
Registered: 10 years ago Posts: 36 |
Another slight change to the adapter, (found by accident), if you remove the side clip (furthest from the hooks) the adapter plate just slides on!
Mike.
Edit to add image
Edited 1 time(s). Last edit at 03/07/2014 04:56AM by Mykey.
Mike.
Edit to add image
Edited 1 time(s). Last edit at 03/07/2014 04:56AM by Mykey.
|
Re: My New Duct... On ThingyVerse March 07, 2014 07:18AM |
Registered: 10 years ago Posts: 32 |

|
Re: My New Duct... On ThingyVerse March 07, 2014 04:12PM |
Registered: 10 years ago Posts: 859 |
Hi, Ok the clip on the adapter can be filed down. It's purpose is to secure the adapter. If you file it down then I'd suggest leaving part of it.
I'll take a look at the bottom of the adapter to see if it might need shortening later, and amend the STL in due coarse.
As for the LED strip lighting. I got the adheasive strip of LEDs from Ebay sometime ago for another project and 'had' a reel of it here.
The rest is now recessed lighting in my sisters kitchen......
I used the Ulta Bright LEDs. If I recall it was about £10 to £15 for a 5m reel. They can be cut into 50mm lengths as required.
Here's a similar Ebay item, but in Cool White... I couldn't spot the Ultra Bright version at the time I looked and I have to go out.
Ebay LED strip Lights
I've powered mine from the Fan supply as I've replaced my Fan with a quiet type (again from Ebay at £2.50), but you can run a seperate 12V supply using thin multi-strand wire if you wish..
Please send me a PM if you have suggestions, or problems with Big Blue 360.
I won't see comments in threads, as I move around to much.
Working Link to Big Blue 360 Complete
Sorry, only registered users may post in this forum.