Regular blobs on a print - Help
Posted by Fiddler
|
Regular blobs on a print - Help March 31, 2014 09:19AM |
Registered: 10 years ago Posts: 38 |
Hello
I have owned my Ormerod for a few weeks now and slowly tuning and tweeking it to produce
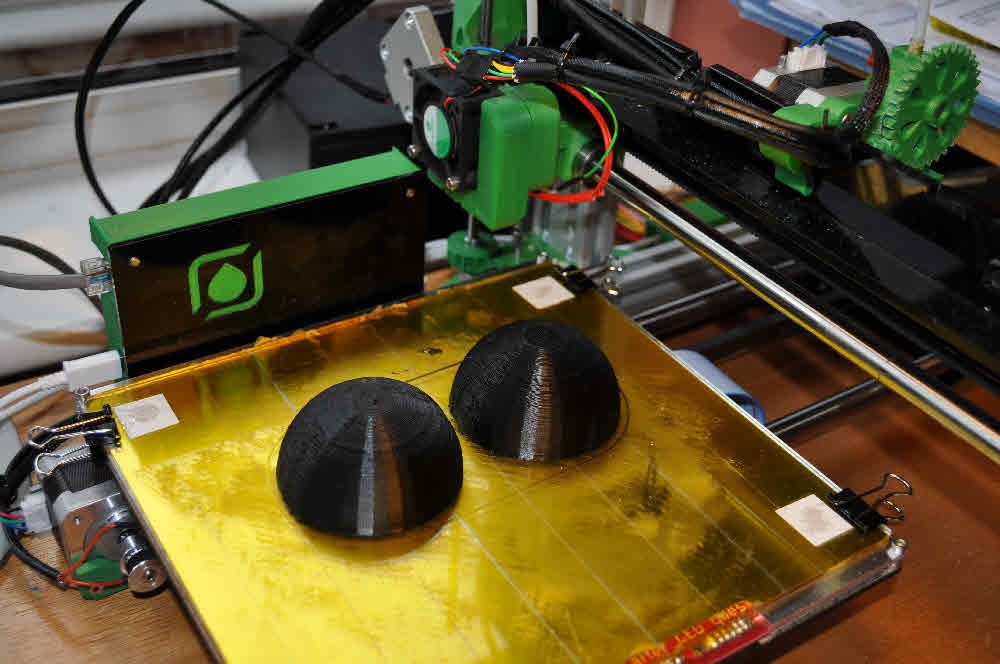
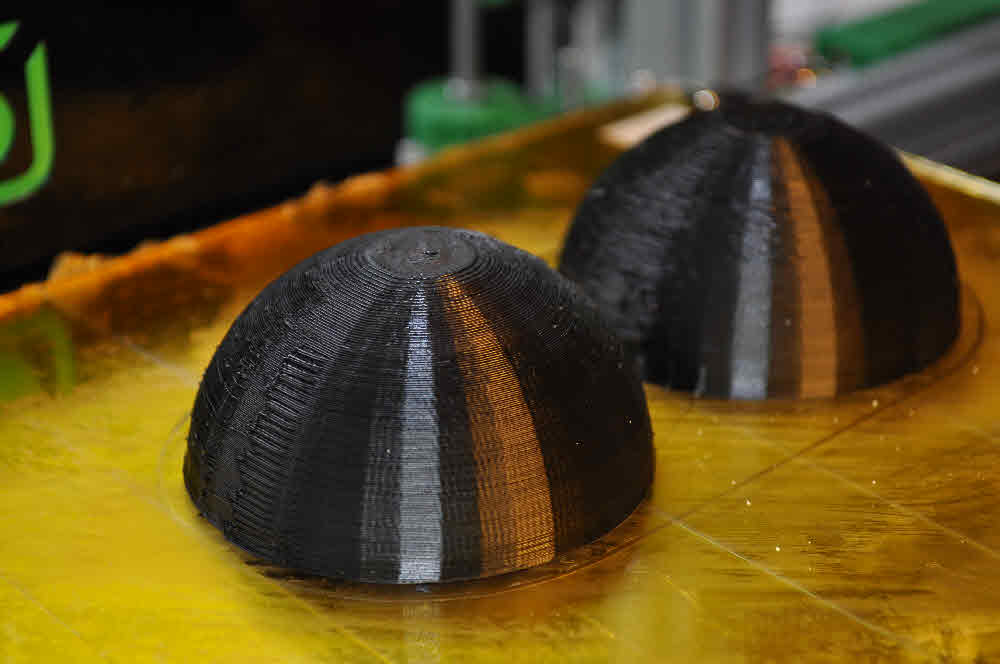
I am printing out 2 half-spheres across the Y-axis.
Both spheres are exactly the same. They are hollow with a 1.5mm shell. They have a column of support being built up the centre which coincides with an overhang threshold of 50^
They both finish printing and for the most part the printing is pretty good - for me.
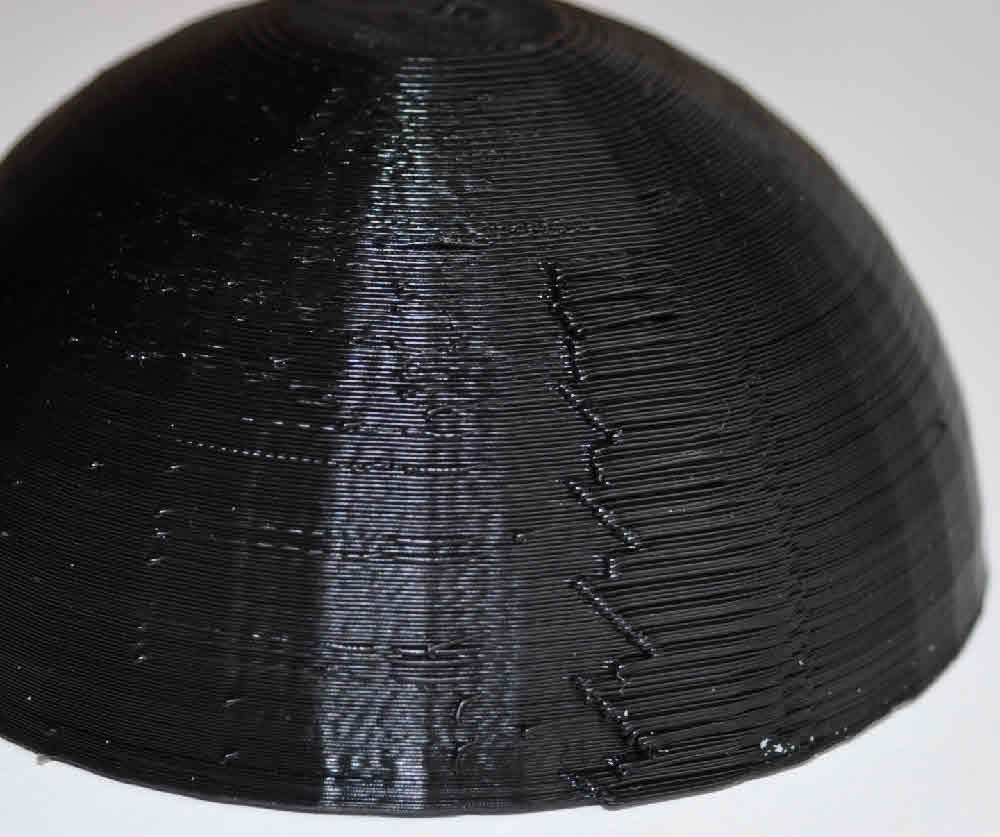
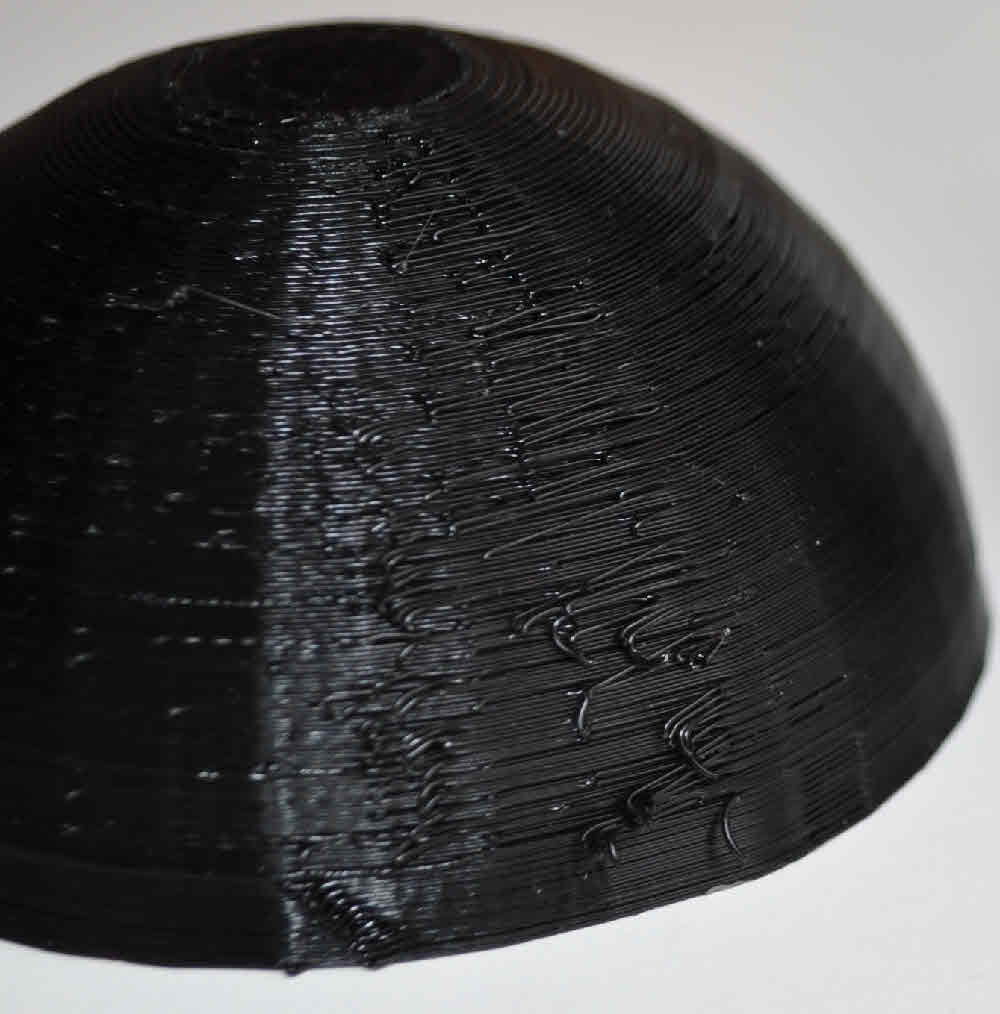
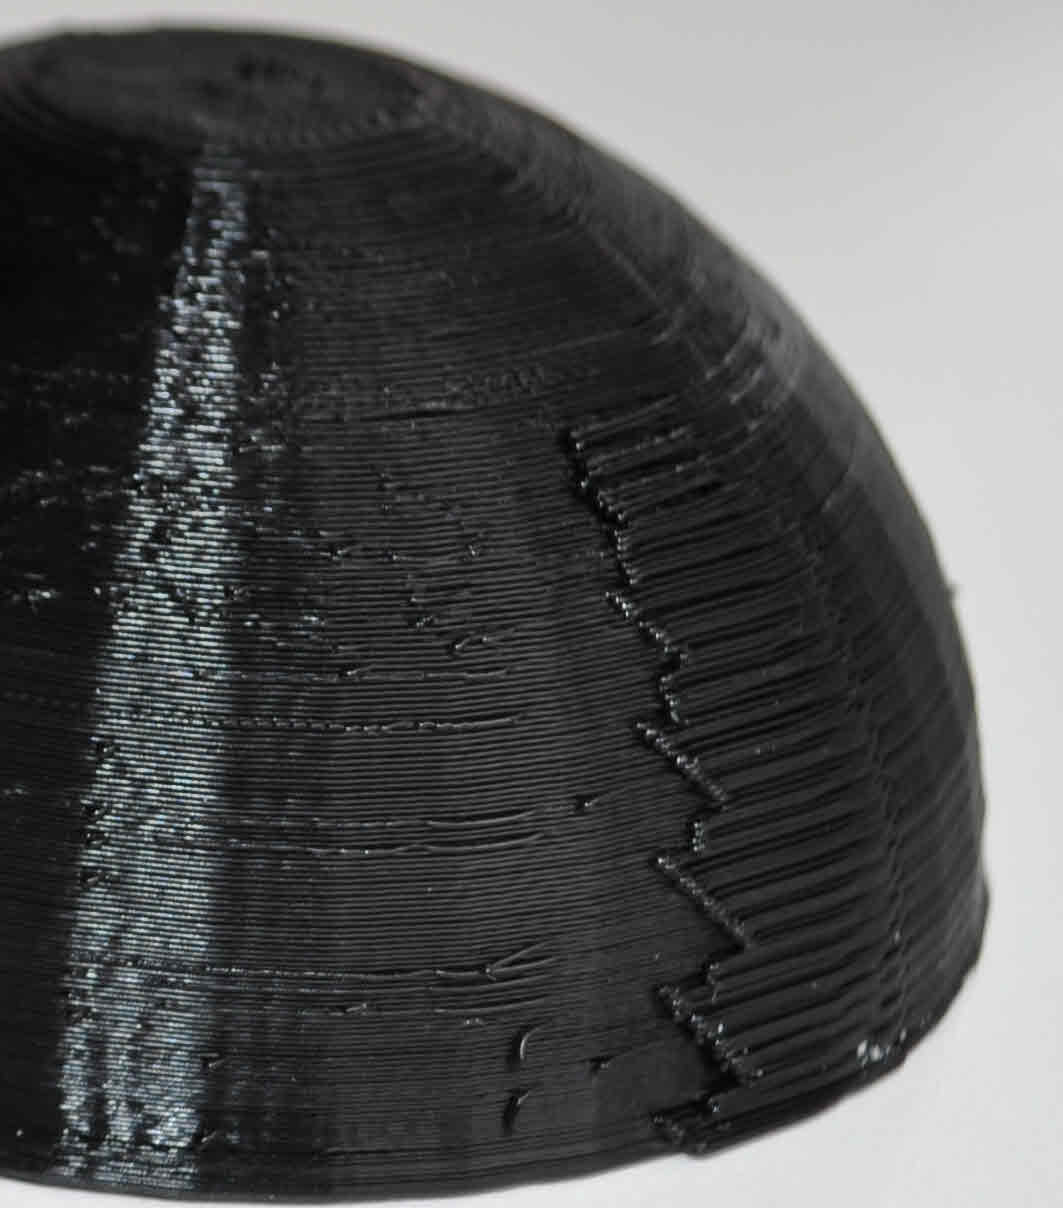
But there is a regular pattern of blobs appearing in the same place which obviously marks the finish.
There are two spheres on the printing bed and they both have similiar, but not exactly, the same patterns.
The more regular pattern seen on one of the spheres in image Sphere5 seems to stop when the core of support, which is built up in the centre of the spheres, finally touches the shell of the sphere.
Does this look like a hardware problem ie me not having the axis or motors etc set correctly?
Or does it suggest a Slic3r setting not tuned correctly?
Here are some of the settings I am using in Slic3r
default_acceleration = 0
external_perimeter_speed = 70%
external_perimeters_first = 1
extrusion_width = 0.3
filament_diameter = 1.73
first_layer_height = 0.25
first_layer_speed = 40%
layer_height = 0.20
nozzle_diameter = 0.3
only_retract_when_crossing_perimeters = 0
perimeter_extrusion_width = 0.3
perimeter_speed = 40
retract_before_travel = 2
retract_layer_change = 1
retract_length = 4.4
retract_length_toolchange = 10
retract_lift = 0
retract_speed = 60
small_perimeter_speed = 15
start_perimeters_at_non_overhang = 1
support_material = 1
support_material_speed = 50
support_material_threshold = 50
Ian from Ormerod gave me the following tweeks which I am also using but these patterns appeared even before these tweeks
M203 X15000 Y15000 Z300 E3600; tweaks to speed for improved finish
M201 X1000 Y1000 Z15 E1000; tweaks to acceleration for improved finish
M906 X1000 Y1000 Z1000 E1000 ; Motor current
Thanks for your help
Tim
I have owned my Ormerod for a few weeks now and slowly tuning and tweeking it to produce
I am printing out 2 half-spheres across the Y-axis.
Both spheres are exactly the same. They are hollow with a 1.5mm shell. They have a column of support being built up the centre which coincides with an overhang threshold of 50^
They both finish printing and for the most part the printing is pretty good - for me.
But there is a regular pattern of blobs appearing in the same place which obviously marks the finish.
There are two spheres on the printing bed and they both have similiar, but not exactly, the same patterns.
The more regular pattern seen on one of the spheres in image Sphere5 seems to stop when the core of support, which is built up in the centre of the spheres, finally touches the shell of the sphere.
Does this look like a hardware problem ie me not having the axis or motors etc set correctly?
Or does it suggest a Slic3r setting not tuned correctly?
Here are some of the settings I am using in Slic3r
default_acceleration = 0
external_perimeter_speed = 70%
external_perimeters_first = 1
extrusion_width = 0.3
filament_diameter = 1.73
first_layer_height = 0.25
first_layer_speed = 40%
layer_height = 0.20
nozzle_diameter = 0.3
only_retract_when_crossing_perimeters = 0
perimeter_extrusion_width = 0.3
perimeter_speed = 40
retract_before_travel = 2
retract_layer_change = 1
retract_length = 4.4
retract_length_toolchange = 10
retract_lift = 0
retract_speed = 60
small_perimeter_speed = 15
start_perimeters_at_non_overhang = 1
support_material = 1
support_material_speed = 50
support_material_threshold = 50
Ian from Ormerod gave me the following tweeks which I am also using but these patterns appeared even before these tweeks
M203 X15000 Y15000 Z300 E3600; tweaks to speed for improved finish
M201 X1000 Y1000 Z15 E1000; tweaks to acceleration for improved finish
M906 X1000 Y1000 Z1000 E1000 ; Motor current
Thanks for your help
Tim
|
Re: Regular blobs on a print - Help March 31, 2014 09:48AM |
Registered: 10 years ago Posts: 43 |
|
Re: Regular blobs on a print - Help March 31, 2014 09:54AM |
Registered: 12 years ago Posts: 1,611 |
Hi Tim
It looks like you're suffering from a little backlash in the Y axis - the loops are over the previous layer, making it look like it's moving over. See: [reprappro.com] and the section afterwards. Generally, you will get a bit of a seam, where the perimeter joins, but I think it could be a bit tidier than your pictures.
Ian
RepRapPro tech support
|
Re: Regular blobs on a print - Help March 31, 2014 09:57AM |
Registered: 12 years ago Posts: 1,611 |
|
Re: Regular blobs on a print - Help March 31, 2014 10:46AM |
Registered: 10 years ago Posts: 1,230 |
|
Re: Regular blobs on a print - Help March 31, 2014 07:04PM |
Registered: 10 years ago Posts: 46 |
My 2 cents:
Give a little more length to the wires going to the hotend
Are you printing at too high temperatures ?
Belt on one axis could appear loose , cant tell if it is x or Y (alternatively z gears are not round and displacing z-rod)mecha
My prints was something like this in the start, i dont even know what fixed it.
I have made very few mechanical corrections (z gears and a all parts moving with hotend) so might have just been Slic3r settings making the difference.
|
Re: Regular blobs on a print - Help March 31, 2014 08:03PM |
Registered: 10 years ago Posts: 859 |
Hiya Tim, hihihihi, I like the comments above, they all seem sound... And yes your Fan is running the wrong way round....
I know in the instructions, it states to put the Feeder assembly in the middle notch of the arm, but I found my cables were running abit
tight with it there. So moved it to the notch nearer the Z axis. If you Mechanicaly level your bed like I do, then you will have to check the
bed is level again after moving it, as the weight of the feeder I found made a big difference here, but it's worth doing.
Also, the patterning in the sheres I think is where the HotEnd is starting a new layer. In Slic3r you can set it for a random start position, which should stop that pattern forming. You can find the setting in the 'Printer Settings' Tab, 'Layers and Perimeters', On the right hand side scroll down to advanced, then tick 'Randomized Starting Points'. I've found that when altering some settings in Slic3r that you have to save the settings, exit Slic3r, then restart it again to ensure that the settings take affect....
Good Luck.. Let us know what happends.
All the Best,
Kim...
Please send me a PM if you have suggestions, or problems with Big Blue 360.
I won't see comments in threads, as I move around to much.
Working Link to Big Blue 360 Complete
|
Re: Regular blobs on a print - Help April 04, 2014 04:31PM |
Registered: 10 years ago Posts: 38 |
Hello Kim, Erik, Ian et al.
Thanks for all the comments
I am running with a 0.3mm nozzle.
Fan is now turned round the correct way. Oops.
I am printing about 175.
I have now checked the motors, grub screws and tightened the belts as much as I think I can.
All the gears etc are as supplied in the original kit so I am presuming they will be printed much better than I currently can.
The hot end seems to be moving without any hinderance either to the carriage or the attendant cabling.
I have moved my feeder now to the notch closer to the z axis.
Ihave also increased the retraction length.
Random start position was selected anyway.
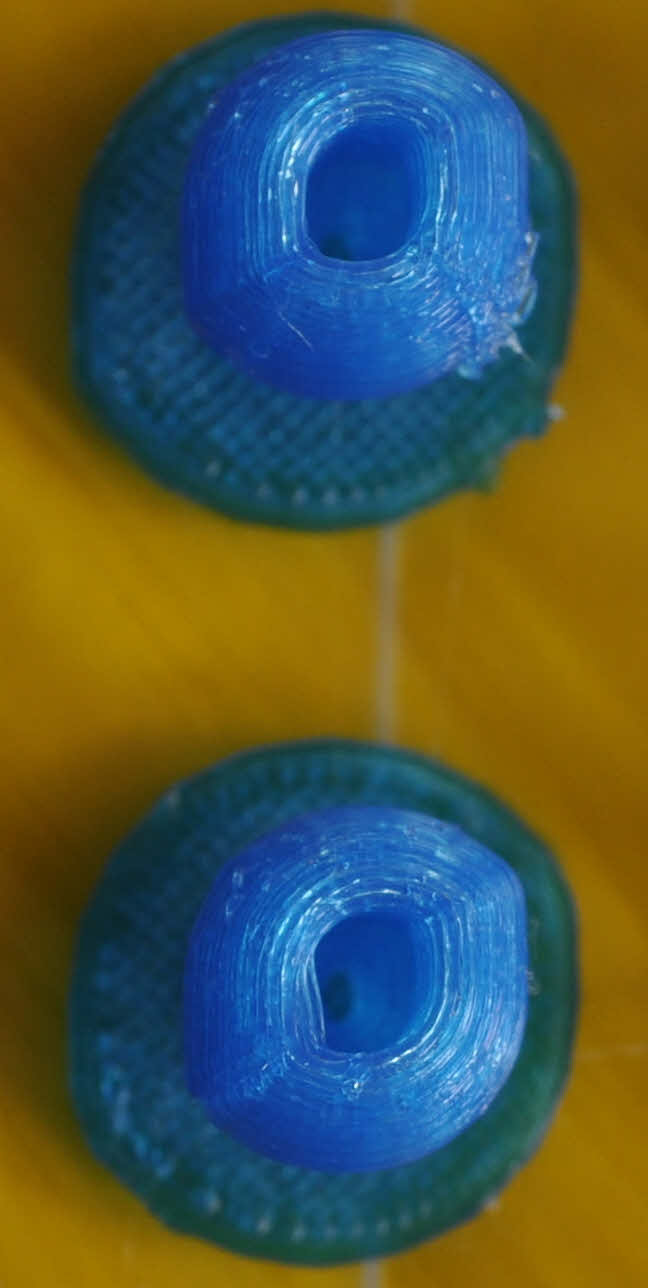
I have attached a photo of my latest test - a ball joint (from a ball and socket joint) There is much improvement with all these tweeks but as you can see I am still getting a non-circular circle.
The ball joint printed dimensions were
x axis - 10.18
y axis - 9.15
In Netfabb the ball part measures 9.95mm diameter
I also printed a test 50mm diameter cyclinder, the printed dimensions ended up as
x axis - 49.98
y axis - 49.14
It seems the Y axis is coming out smaller than it should, but not an increasing error with size.
Would this still suggest I have not got my Y axis belt tight enough? or should I be looking elsewhere?
Tim
Thanks for all the comments
I am running with a 0.3mm nozzle.
Fan is now turned round the correct way. Oops.
I am printing about 175.
I have now checked the motors, grub screws and tightened the belts as much as I think I can.
All the gears etc are as supplied in the original kit so I am presuming they will be printed much better than I currently can.
The hot end seems to be moving without any hinderance either to the carriage or the attendant cabling.
I have moved my feeder now to the notch closer to the z axis.
Ihave also increased the retraction length.
Random start position was selected anyway.
I have attached a photo of my latest test - a ball joint (from a ball and socket joint) There is much improvement with all these tweeks but as you can see I am still getting a non-circular circle.
The ball joint printed dimensions were
x axis - 10.18
y axis - 9.15
In Netfabb the ball part measures 9.95mm diameter
I also printed a test 50mm diameter cyclinder, the printed dimensions ended up as
x axis - 49.98
y axis - 49.14
It seems the Y axis is coming out smaller than it should, but not an increasing error with size.
Would this still suggest I have not got my Y axis belt tight enough? or should I be looking elsewhere?
Tim
Sorry, only registered users may post in this forum.