Z Probe wiring
Posted by imekon
|
Z Probe wiring June 07, 2014 04:14AM |
Registered: 9 years ago Posts: 21 |
I've just finished putting together my Ormerod kit and I'm finding issues with the Z probe. The connector on the loom has lugs on it that foul the plastic. It seems to work itself loose as the head moves around.
The symptoms are that X axis home sometimes fails. Home all axis command G28 buries the head in the bed. Yet if I try Z Home, it stops exactly where it should, where I set it.
G31 is reading values and I'm seeing results consistent with the instructions, but the way the connector moves makes me think that needs sorting out.
|
Re: Z Probe wiring June 07, 2014 04:19AM |
Registered: 9 years ago Posts: 39 |
|
Re: Z Probe wiring June 07, 2014 04:38AM |
Registered: 9 years ago Posts: 21 |
|
Re: Z Probe wiring June 07, 2014 04:40AM |
Registered: 10 years ago Posts: 327 |
I was always having issues with my probe connector so I soldered the wires directly to the pins and covered them in heatshrink.
Regards,
Les
Pointy's Things
Pointy's Blog
Regards,
Les
Pointy's Things
Pointy's Blog
|
Re: Z Probe wiring June 07, 2014 04:55AM |
Registered: 9 years ago Posts: 21 |
|
Re: Z Probe wiring June 07, 2014 05:21AM |
Registered: 10 years ago Posts: 14,672 |
Or use one of my hot end boards instead, which uses locking connectors 
Large delta printer [miscsolutions.wordpress.com], E3D tool changer, Robotdigg SCARA printer, Crane Quad and Ormerod
Disclosure: I design Duet electronics and work on RepRapFirmware, [duet3d.com].
Large delta printer [miscsolutions.wordpress.com], E3D tool changer, Robotdigg SCARA printer, Crane Quad and Ormerod
Disclosure: I design Duet electronics and work on RepRapFirmware, [duet3d.com].
|
Re: Z Probe wiring June 07, 2014 03:43PM |
Registered: 9 years ago Posts: 21 |
I unplugged the sensor, snipped off the lugs that got in the way, reseated the probe. I plugged back in, cable tied the cable so it won't tilt as the head moves. X Home and Z Home work fine now.
Yet the command G28 still buries the head in the bed - this is in the test files; if I home X, Y and Z manually, fine. Yet, G28 zeroes Z to somewhere different (X is not 55). Am I missing something?
Yet the command G28 still buries the head in the bed - this is in the test files; if I home X, Y and Z manually, fine. Yet, G28 zeroes Z to somewhere different (X is not 55). Am I missing something?
|
Re: Z Probe wiring June 07, 2014 04:45PM |
Registered: 10 years ago Posts: 14,672 |
The coordinates at which z homing is done are defined in files homez.g and homeall.g in the sys directory of the SD card. If G28 Z0 works but just G28 does not, then the coordinates in homeall.g are wrong. You need to set the coordinates to be over the white tape in the corner of the bed. I suggest you use the same coordinate as your first bed compensation coordinate.
Large delta printer [miscsolutions.wordpress.com], E3D tool changer, Robotdigg SCARA printer, Crane Quad and Ormerod
Disclosure: I design Duet electronics and work on RepRapFirmware, [duet3d.com].
Large delta printer [miscsolutions.wordpress.com], E3D tool changer, Robotdigg SCARA printer, Crane Quad and Ormerod
Disclosure: I design Duet electronics and work on RepRapFirmware, [duet3d.com].
|
Re: Z Probe wiring June 07, 2014 05:07PM |
Registered: 9 years ago Posts: 21 |
|
Re: Z Probe wiring June 08, 2014 01:37AM |
Registered: 10 years ago Posts: 859 |
Fit a switch.....
It ALWAYS works......
Please send me a PM if you have suggestions, or problems with Big Blue 360.
I won't see comments in threads, as I move around to much.
Working Link to Big Blue 360 Complete
It ALWAYS works......

Please send me a PM if you have suggestions, or problems with Big Blue 360.
I won't see comments in threads, as I move around to much.
Working Link to Big Blue 360 Complete
|
Re: Z Probe wiring June 11, 2014 06:09PM |
Registered: 9 years ago Posts: 21 |
|
Re: Z Probe wiring June 11, 2014 06:33PM |
Registered: 10 years ago Posts: 14,672 |
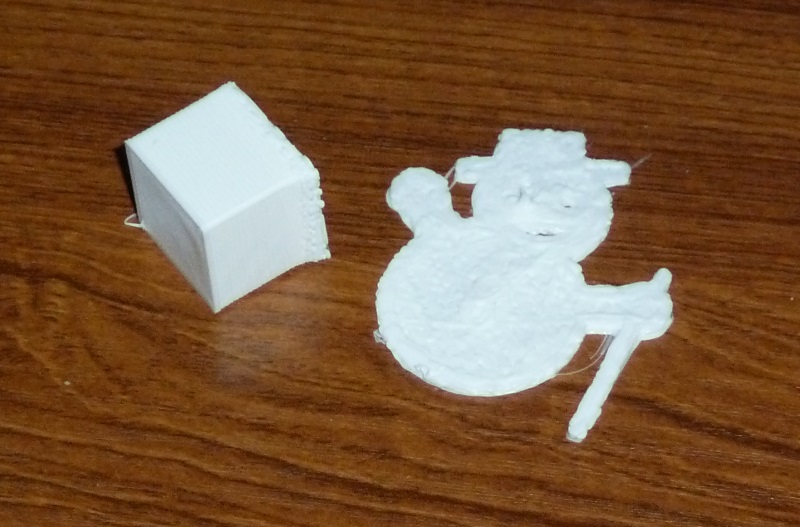
It looks to me like your hollow cube print started OK but then went blobby, and the snowman went blobby sooner. Here are some things to check:
1. Are you using a recent firmware version, either RepRapPro 0.65e firmware or my own 0.65f-dc42 firmware? Send command M115 to find out.
2. What temperature does the snowman file use for the hot end? The temperatures set in the SD card files shipped with early Ormerods set the temperatures too high. I suggest no more than 195C for the first layer and no more than 190C for subsequent layers. Blobby prints are often an indication of too high a temperature.
3. Does the filament move smoothly through the extruder during printing?
4. The filament needs to be protected from high levels of humidity, otherwise it absorbs moisture, which reduces print quality.
Large delta printer [miscsolutions.wordpress.com], E3D tool changer, Robotdigg SCARA printer, Crane Quad and Ormerod
Disclosure: I design Duet electronics and work on RepRapFirmware, [duet3d.com].
|
Re: Z Probe wiring June 11, 2014 09:32PM |
Registered: 9 years ago Posts: 21 |
|
Re: Z Probe wiring June 12, 2014 04:39PM |
Registered: 9 years ago Posts: 21 |

|
Re: Z Probe wiring June 12, 2014 04:55PM |
Registered: 10 years ago Posts: 14,672 |
Quote
imekon
MUCH better results once I set the bed levelling compensation. Now I get a 20x20x20mm cube.
A couple of tips for using the bed compensation:
1. Bright sunlight or incandescent light will affect the reading of the sensor. So shield the Ormerod from these types of light when doing z-homing or bed compensation. Fluorescent and incandescent light is OK.
2. You will have chosen the bed compensation coordinates to be near the middle of the white targets at the corners of the bed. However, the coordinates used for z-homing may not be in the middle of a white target, leading to unreliable homing. So edit the homex.g files and homeall.g files in the sys directory of the SD card, changing the XY coordinates in the line G1 X55 Y0 to whatever coordinates you used for your first bed compensation point.
Large delta printer [miscsolutions.wordpress.com], E3D tool changer, Robotdigg SCARA printer, Crane Quad and Ormerod
Disclosure: I design Duet electronics and work on RepRapFirmware, [duet3d.com].
Sorry, only registered users may post in this forum.