The Easy Way to print ABS 
Posted by Ludo91
|
The Easy Way to print ABS July 14, 2014 04:12PM |
Registered: 9 years ago Posts: 40 |
Hello everybody,
I thinkered around a bit and I am getting very good results printing ABS without all the "hassles" of the standard method. Therefore, here is "Ludo`s way to easy abs printing" mini guide to print abs modifying ONLY one component of the printer. If other people find this useful and replicate my very satisfactory results (abs is lovely, expecially for the acetone thing) I think it should be included in the wiki instead of the much intimidating your-printer-will-melt-under-a-cardboard-thing-while-overvolted-to-13v-to-take-the-bed-to-900c-if-you-want-to-print-abs. The first version of this is in another topic but I think its something that can help so much that its worth to open a new topic. Hope it helps! :-)
1- temperatures:
First layer: 234c, then 256 the others. Bed: 78c I Am also experimenting with 228 and 260. I am using 3Dprima ABS.
This is done in order to have the first layer plus the brim with the minimun retraction possible due to the low temperature (no warping) and then ensue that the subsequent layers are going to stick even if the ambient temperature is not super hot (no box over the printer or whatsoever is required). Bed to 78 is in order to have a temperature easy to reach and not high enough to damage pla components but still useful to stop warping.
2- bed: PERFECTLY leveled and with NO overlapping of the kampton tape,its ok to have like half a millimiter in between a strip and another. This is super important. Also the zeroing of the Z axis must be very good.
3- layers: 0.3mm layer height, first layer 0.45mm and brim 15mm. On my printer sometimes even the brim itself is not warping such is the effect of a fat thick cold slow printed brim!
4- speed: 14 mm/s, first layer 50% 2.6mm retraction at 30mm/s
5- fan: close the central venting hole, cover the whole fan except fro 10mm of its width.
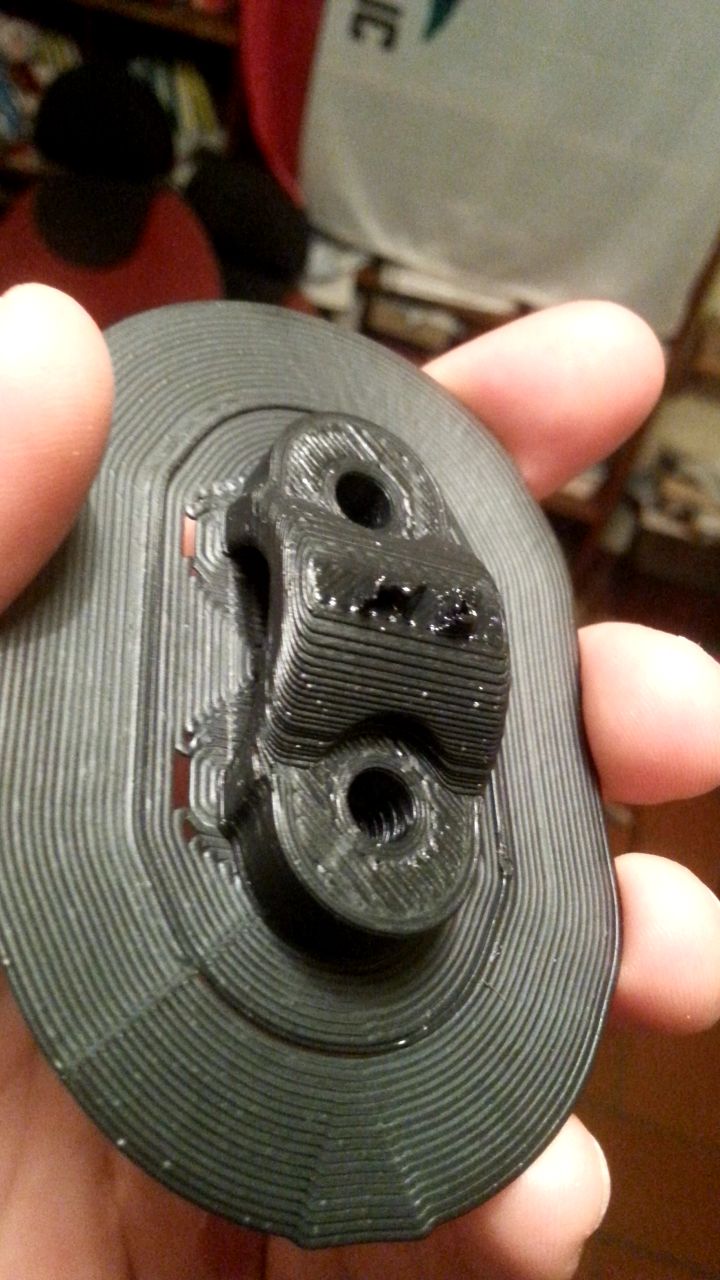
6- extruder support: we dont have a lot of heat from the bed, but a 260 c estruder is super hot. So we need to keep it far from everything else or it will warp things. We do this using long screws to support it, also it is good to print the nozzle mount piece in ABS. If pla-made it will only last a few prints. In the pictures you can see how I did it, a picture is worth 1000 words. Also, I designed a modified nozzle mount but its still pre- alpha, going to post the stl as soon as I make it decent.
(pics in next post)
I thinkered around a bit and I am getting very good results printing ABS without all the "hassles" of the standard method. Therefore, here is "Ludo`s way to easy abs printing" mini guide to print abs modifying ONLY one component of the printer. If other people find this useful and replicate my very satisfactory results (abs is lovely, expecially for the acetone thing) I think it should be included in the wiki instead of the much intimidating your-printer-will-melt-under-a-cardboard-thing-while-overvolted-to-13v-to-take-the-bed-to-900c-if-you-want-to-print-abs. The first version of this is in another topic but I think its something that can help so much that its worth to open a new topic. Hope it helps! :-)
1- temperatures:
First layer: 234c, then 256 the others. Bed: 78c I Am also experimenting with 228 and 260. I am using 3Dprima ABS.
This is done in order to have the first layer plus the brim with the minimun retraction possible due to the low temperature (no warping) and then ensue that the subsequent layers are going to stick even if the ambient temperature is not super hot (no box over the printer or whatsoever is required). Bed to 78 is in order to have a temperature easy to reach and not high enough to damage pla components but still useful to stop warping.
2- bed: PERFECTLY leveled and with NO overlapping of the kampton tape,its ok to have like half a millimiter in between a strip and another. This is super important. Also the zeroing of the Z axis must be very good.
3- layers: 0.3mm layer height, first layer 0.45mm and brim 15mm. On my printer sometimes even the brim itself is not warping such is the effect of a fat thick cold slow printed brim!
4- speed: 14 mm/s, first layer 50% 2.6mm retraction at 30mm/s
5- fan: close the central venting hole, cover the whole fan except fro 10mm of its width.
6- extruder support: we dont have a lot of heat from the bed, but a 260 c estruder is super hot. So we need to keep it far from everything else or it will warp things. We do this using long screws to support it, also it is good to print the nozzle mount piece in ABS. If pla-made it will only last a few prints. In the pictures you can see how I did it, a picture is worth 1000 words. Also, I designed a modified nozzle mount but its still pre- alpha, going to post the stl as soon as I make it decent.
(pics in next post)
|
Re: The Easy Way to print ABS July 14, 2014 04:30PM |
Registered: 9 years ago Posts: 40 |


|
Re: The Easy Way to print ABS July 15, 2014 07:00AM |
Registered: 9 years ago Posts: 40 |
More hours of printing and I can confirm that with bed up to 85c just with the mod of the longer screws+ abs nozzle support nothing is bending nor working over the glass transition temperature. Printing with no problem smallish pieces.
Now, I`d like your opinion on a few things Id like to try in order to make the above work even with pieces bigger than a credit card, since doing so makes the first layer detach. Hitting pause and fixing the esternal part of the brim with kapton gives good results, but I want more. (And I want it to be easyly doable by anyone keeping things as easy as pla prinintg).
-could going even slower on first layer help? // I think yes, I`ll try 25% speed
-what about using a different extrusion multiplier in the first layer (easy added manually to the gcode)? //as last resort
-what about using a higher temperature for the first layer? I am pondering doing this! My doubt is: lower temperature reduces the subsequent retraction of ABS, but does it cause the plastic to stick less so much that the disadvantages are higher than the advantages?
-of course abs+ acetone slur on the bed prior to printing is helping.
Your help is greatly apreciated!
|
Re: The Easy Way to print ABS July 15, 2014 09:17AM |
Registered: 10 years ago Posts: 378 |
It does seem rather dangerous to me to have the hotend temperature that high. The PTFE (Teflon) liner inside the hotend will start degrading at around 260°C. Given the uncertainty of the thermistor values and that the heater often "overshoots" a fair bit when heating up, I would hesitate to go beyond 250°C. Especially when closing off so much of the fan, which affects the cooling of the hot end.
With the stock fan duct you are using, you can just remove half of it (the part that has the "exhaust ports" facing the hotend nozzle). That will get you full cooling for the hotend via the heatsink, but nothing on the print. If you cover some part of the fan anyway, at least have the open end be on the other side so the air flows across the length of the heatsink.
Also, I'm not sure a lower first layer temperature would help with warping. I would think the thermal expansion of the molten ABS shouldn't really matter, it should just get a tiny bit thinner as it cools. It should only be whatever shrinkage you get after it solidifies that causes any internal stress and warping.
|
Re: The Easy Way to print ABS July 15, 2014 11:38AM |
Registered: 9 years ago Posts: 40 |
I disassembled the hot end after a test to 265 and it looked fine, so ill stick to 255. It really gets the layer sticking toghether with no need of a hot ambient ! Thanks for the warning tho!
About the bottom layer, here is where I have tehoretical doubts! The combination that I wrote above turns out to be working great but i d like to understand if a) a thick first layer is bad because it has more "retracton force" and still the surface is the same b) as far as I know the thermal dilatation is linear, so no "step" when the vetrous temperature is crossed, but is the theraml dilatation making it bend? c) a hotter first layer sticks noticeably better tahn a cold one? that is my bottom line right now because otherwise prints are coming out delicious
About the bottom layer, here is where I have tehoretical doubts! The combination that I wrote above turns out to be working great but i d like to understand if a) a thick first layer is bad because it has more "retracton force" and still the surface is the same b) as far as I know the thermal dilatation is linear, so no "step" when the vetrous temperature is crossed, but is the theraml dilatation making it bend? c) a hotter first layer sticks noticeably better tahn a cold one? that is my bottom line right now because otherwise prints are coming out delicious
|
Re: The Easy Way to print ABS July 15, 2014 11:42AM |
Registered: 10 years ago Posts: 2,472 |
|
Re: The Easy Way to print ABS July 15, 2014 12:43PM |
Registered: 10 years ago Posts: 665 |
I always print ABS at a first layer temperature of 120°C and all other layers at a temperature of 90°C on a thin coat of dried glue stick. I usually extrude my ABS at a temperature of 250°C to achieve best line bondage, anything else seems to weaken these parts, but that really depends on the part I print. For smaller parts I can reduce the temperature without problems, because the layer time will be lower anyway.
I get absolutely no warping with iamburny's fan duct, but the difference in my case is a 4-pin PWM-modulated fan. I found that too much filament cooling at the first 30-40 layers inevitably causes ABS parts to warp, so this was a great improvement for me.
I get absolutely no warping with iamburny's fan duct, but the difference in my case is a 4-pin PWM-modulated fan. I found that too much filament cooling at the first 30-40 layers inevitably causes ABS parts to warp, so this was a great improvement for me.
|
Re: The Easy Way to print ABS July 15, 2014 02:46PM |
Registered: 10 years ago Posts: 2,472 |
Quote
zombiepantslol
I always print ABS at a first layer temperature of 120°C and all other layers at a temperature of 90°C on a thin coat of dried glue stick. I usually extrude my ABS at a temperature of 250°C to achieve best line bondage, anything else seems to weaken these parts, but that really depends on the part I print. For smaller parts I can reduce the temperature without problems, because the layer time will be lower anyway.
I get absolutely no warping with iamburny's fan duct, but the difference in my case is a 4-pin PWM-modulated fan. I found that too much filament cooling at the first 30-40 layers inevitably causes ABS parts to warp, so this was a great improvement for me.
I have removed the air nozzles completely (by hacksaw) and blocked them off, and all fan air is expelled from the top of my fan duct (via a large hole drilled for that purpose), so my fan won't cool the print no matter how hard it is blowing. Maybe that's why I don't need as high a temperature as well. I used to print with the bed hotter for the first layer, but found that was worse rather than better, because it means that the bed contracts a little and weakens the bond that the first layer originally had to the glass (I coat my glass with a solution of ABS dissolved in acetone).
Dave
(#106)
|
Re: The Easy Way to print ABS July 29, 2014 04:14PM |
Registered: 9 years ago Posts: 40 |
Fellow reprappers I am experimenting a hella lot of possibile combinations of cold/hot thick/thin ecc ecc first layer in abs in order to keep working thro the goaal of a really easy abs printing setup.
I`ll post on here my results in form of a table fro everyone to comment in a matter of days :-)
I have one doubt tho: I wanna test acetone/abs slur vs hairspray in a "scientific" manner but... I cant make the slur! If I mix acetone and abs the abs become buttery but never dissolves or become antything near somethign that i can apply to the glass.... how so?!
I`ll also share the modified extrude suppport I am using
|
Re: The Easy Way to print ABS July 29, 2014 06:15PM |
Registered: 10 years ago Posts: 378 |
Quote
Ludo91
I have one doubt tho: I wanna test acetone/abs slur vs hairspray in a "scientific" manner but... I cant make the slur! If I mix acetone and abs the abs become buttery but never dissolves or become antything near somethign that i can apply to the glass.... how so?!
More acetone / less ABS. You can dissolve quite a lot of ABS in acetone, but eventually it will become pretty thick. I find a bit thinner solution is easier to apply.
|
Re: The Easy Way to print ABS July 30, 2014 10:08AM |
Registered: 9 years ago Posts: 40 |
HI!
First of all: BEWARE OF THE "BUG!"
In the preconfigured slic3r setting for Ormerod I downloaded there is a M140 commad in the custom Gcode: that makes the temperature setting for the first layer uneffective and defaults it to the PLA temperature, as correcly explained in this topic [forums.reprap.org]
I fixed it but still, I cant understand why slic3r then uses an M190 command to set the first bed temperature and my Ormered just ignores it saying "invalid M code" and for it to work I have to manually change it to M140 in the Gcode. Slic3r then uses correctly M140 to set the bed temperature from second layer on. Any hints?
I may just add an M190 with the reference to the variable in the setup and let the machine ignore the M190 but looks not very elegant to me....
Now, back to the setups test:
---First of all I raised bed tempoerature (for first layer only) to 87, as this is the maximum that my printer reaches in a legitimate amount of time with no covers or 13v psu. I tested what the "easy attainable bed temperatures are" and decided to tuse 87 as a reference, since it can easily reach it even in front of an open window.
Then I tested various combination of height, extrusion temperature and first layer speed here are the results:
--- a lower first layer speed makes things way better, now I use 25% but I may try with an even lower (this was easy tho ).
).
----high first layer temp is no good because it makes the plastic shrink more and thus makes it more prone to detaching. ~230 - 234 seems to make the cut as going lowr reduced layer adesion "side by side" in the brim too much.
----to my surprise, a thick first layes is bad, I explained this as "more plastic cooling down and retracting has more pulling force than a thin layer colling down ". Going lower in thickness helps a lot, but it makes side to side layer adhesion in the brim harder and makes the printer ultra sensitive to bed leveling. I tried different thickeness for 0.2 to 0.4. I opted for 0.32 as is the lowest were i can get solid side to side adhesin in the brim.
----Solid layers: thinking about the fact that having more plastic makes it pulling more, I set it to two layers, seems to make things better
---- bed leveling MUST be insanely well done
SO, this is the Setup I am experimenting with right now:
1- temperatures:
First layer: 232c, then 256 the others. Bed: 86 first layer then 78 I am using 3Dprima ABS.
2- bed: PERFECTLY leveled and with NO overlapping of the kampton tape,its ok to have like half a millimiter in between a strip and another. This is super important. Also the zeroing of the Z axis must be very good.
3- layers: 0.32mm layer height, first layer 0.32mm and brim 15mm. Filling 0.3. 2 solid layers on bottom.
4- speed: 14 mm/s, first layer 25% 2.6mm retraction at 30mm/s
5- fan: close the central venting hole, cover the whole fan except fro 10mm of its width.
6- custom extrudes support to keep the hot end far from the rest of the printer.
This works awesomely on a ~ 50*50 object.
I am now trying to print a huge object and see how it performs.
What I want to try next is :
--Bed at 87 C even for further layers
--Reducing extruder temperature for further layers to ~250c and see if it helps reduce warping forces in a tollerable combination with less layes to layer adhesion
-- try higher speed for layer >1
-- try hayrspray.
Hints?
Edited 1 time(s). Last edit at 07/30/2014 10:11AM by Ludo91.
First of all: BEWARE OF THE "BUG!"
In the preconfigured slic3r setting for Ormerod I downloaded there is a M140 commad in the custom Gcode: that makes the temperature setting for the first layer uneffective and defaults it to the PLA temperature, as correcly explained in this topic [forums.reprap.org]
I fixed it but still, I cant understand why slic3r then uses an M190 command to set the first bed temperature and my Ormered just ignores it saying "invalid M code" and for it to work I have to manually change it to M140 in the Gcode. Slic3r then uses correctly M140 to set the bed temperature from second layer on. Any hints?
I may just add an M190 with the reference to the variable in the setup and let the machine ignore the M190 but looks not very elegant to me....
Now, back to the setups test
: ---First of all I raised bed tempoerature (for first layer only) to 87, as this is the maximum that my printer reaches in a legitimate amount of time with no covers or 13v psu. I tested what the "easy attainable bed temperatures are" and decided to tuse 87 as a reference, since it can easily reach it even in front of an open window.
Then I tested various combination of height, extrusion temperature and first layer speed here are the results:
--- a lower first layer speed makes things way better, now I use 25% but I may try with an even lower (this was easy tho
).----high first layer temp is no good because it makes the plastic shrink more and thus makes it more prone to detaching. ~230 - 234 seems to make the cut as going lowr reduced layer adesion "side by side" in the brim too much.
----to my surprise, a thick first layes is bad, I explained this as "more plastic cooling down and retracting has more pulling force than a thin layer colling down ". Going lower in thickness helps a lot, but it makes side to side layer adhesion in the brim harder and makes the printer ultra sensitive to bed leveling. I tried different thickeness for 0.2 to 0.4. I opted for 0.32 as is the lowest were i can get solid side to side adhesin in the brim.
----Solid layers: thinking about the fact that having more plastic makes it pulling more, I set it to two layers, seems to make things better
---- bed leveling MUST be insanely well done
SO, this is the Setup I am experimenting with right now:
1- temperatures:
First layer: 232c, then 256 the others. Bed: 86 first layer then 78 I am using 3Dprima ABS.
2- bed: PERFECTLY leveled and with NO overlapping of the kampton tape,its ok to have like half a millimiter in between a strip and another. This is super important. Also the zeroing of the Z axis must be very good.
3- layers: 0.32mm layer height, first layer 0.32mm and brim 15mm. Filling 0.3. 2 solid layers on bottom.
4- speed: 14 mm/s, first layer 25% 2.6mm retraction at 30mm/s
5- fan: close the central venting hole, cover the whole fan except fro 10mm of its width.
6- custom extrudes support to keep the hot end far from the rest of the printer.
This works awesomely on a ~ 50*50 object.
I am now trying to print a huge object and see how it performs.
What I want to try next is :
--Bed at 87 C even for further layers
--Reducing extruder temperature for further layers to ~250c and see if it helps reduce warping forces in a tollerable combination with less layes to layer adhesion
-- try higher speed for layer >1
-- try hayrspray.
Hints?
Edited 1 time(s). Last edit at 07/30/2014 10:11AM by Ludo91.
|
Re: The Easy Way to print ABS July 30, 2014 10:50AM |
Registered: 10 years ago Posts: 14,672 |
Quote
Ludo91
I fixed it but still, I cant understand why slic3r then uses an M190 command to set the first bed temperature and my Ormered just ignores it saying "invalid M code" and for it to work I have to manually change it to M140 in the Gcode. Slic3r then uses correctly M140 to set the bed temperature from second layer on. Any hints?
It sounds to me that you are using very old firmware that doesn't support the M190 command. I added support for that command in my firmware fork months ago, and I think RRP's 0.78 firmware supports it too.
Large delta printer [miscsolutions.wordpress.com], E3D tool changer, Robotdigg SCARA printer, Crane Quad and Ormerod
Disclosure: I design Duet electronics and work on RepRapFirmware, [duet3d.com].
|
Re: The Easy Way to print ABS July 30, 2014 03:47PM |
Registered: 9 years ago Posts: 40 |
|
Re: The Easy Way to print ABS July 30, 2014 06:21PM |
Registered: 9 years ago Posts: 40 |
Thanks to dc42 I sortd out the problems.
The above setup effectively makes me print abs with only the extruder support mod, which is awesome, still I`d like to be able to print larger part, seems that I have to use the acetone-abs slur thing... problem is I can t make it! I punt some abs extra pieces in a bottle with acetone but they didnt melt, they have been in there for more that 8 hrs and just turnet into a "chewing gum"! Nothing that resembles a slur. Why is that? Is it a matter of temperatures?
The above setup effectively makes me print abs with only the extruder support mod, which is awesome, still I`d like to be able to print larger part, seems that I have to use the acetone-abs slur thing... problem is I can t make it! I punt some abs extra pieces in a bottle with acetone but they didnt melt, they have been in there for more that 8 hrs and just turnet into a "chewing gum"! Nothing that resembles a slur. Why is that? Is it a matter of temperatures?
|
Re: The Easy Way to print ABS July 31, 2014 01:05AM |
Registered: 9 years ago Posts: 176 |
I found that on bigger parts a thick brim is essential. I now print ABS only on the glass with a thick (visible) layer of slurry that has air-dried (heating causes bubbles). This makes a Kapton substitute that doesn't pull off the bed after 4mm of printing and it's a lot easier to apply. I smear on a thin layer with paper, then pour on a generous amount and tilt the glass around until it's flowed everywhere nicely. Got to work quite quickly because it starts drying quickly.
|
Re: The Easy Way to print ABS July 31, 2014 09:50AM |
Registered: 9 years ago Posts: 40 |
Hi!
Did it! And here are the setting if someone wants to try too and confirm this is really the "easy way"! :-)
I picked a real piece of abs,big lego brick (only three of them because I was feeling too guilty ) and dissolved it about a glass of acetone.
I kept it thin, I`d say like whole milk, and now I spray it using one glass cleaner spray. I spray it three times from distance and give it time to dry so the surface is almost perfectly even, as soon as you spray a bit too much it messes up a lot.
I probably should put more abs in the mix because that "whiterish powder " acetone leaves when drying doesnt looks like somethink you want on your 3d printer bed.
I also increased a bit the speed and everything seems perfectly working so far, even on a 150mm long thick walled box (worst thing possible to print I suspect).
Attached are the Slic3r setup I am using and the modified extruder support I used to mount the extruder with the long screws, from the bottom of it to the extruder the distance is about 25mm. Also, put some insulation between it and the heatsink and you should really be fine.
Hope this can help other people as it really makes you able to setup your printer to print beautiful abs parts in less than an hour and with almost zero hassle
Did it! And here are the setting if someone wants to try too and confirm this is really the "easy way"! :-)
I picked a real piece of abs,big lego brick (only three of them because I was feeling too guilty
) and dissolved it about a glass of acetone. I kept it thin, I`d say like whole milk, and now I spray it using one glass cleaner spray. I spray it three times from distance and give it time to dry so the surface is almost perfectly even, as soon as you spray a bit too much it messes up a lot.
I probably should put more abs in the mix because that "whiterish powder " acetone leaves when drying doesnt looks like somethink you want on your 3d printer bed.
I also increased a bit the speed and everything seems perfectly working so far, even on a 150mm long thick walled box (worst thing possible to print I suspect).
Attached are the Slic3r setup I am using and the modified extruder support I used to mount the extruder with the long screws, from the bottom of it to the extruder the distance is about 25mm. Also, put some insulation between it and the heatsink and you should really be fine.
Hope this can help other people as it really makes you able to setup your printer to print beautiful abs parts in less than an hour and with almost zero hassle
|
Re: The Easy Way to print ABS August 01, 2014 06:43AM |
Registered: 10 years ago Posts: 314 |
|
Re: The Easy Way to print ABS August 01, 2014 08:16AM |
Registered: 9 years ago Posts: 40 |
Great Thret, looking forward to hear about your experience, curious if I m just the lucky dude or if with just one piece and a 5 minute spraying we can print abs with no others mods.
Here is my glass+kapton tape covered in sprayed acetone. 4 pass, one minut apart. Result is GREAT, feels like silk and has monster adhesion. Only "downside" is that the sprayer need some convincing because itis not made to spray glue but hey it works. I made an overnight combined print on it and nothing bended. Yay!
I d add my nozzle support (or something similar, it can easily be improved) in the box and sell the ormerod as a ABS ready printer
PS I am using 3D PRIMA abs, I am not sure what is it addictionated with, but there must be something since it doesnt dissolve in acetone. I`d really like to hear from someone else trying my mods if "my" method works also with "real" abs
Edited 1 time(s). Last edit at 08/01/2014 10:38AM by Ludo91.
Here is my glass+kapton tape covered in sprayed acetone. 4 pass, one minut apart. Result is GREAT, feels like silk and has monster adhesion. Only "downside" is that the sprayer need some convincing because itis not made to spray glue but hey it works. I made an overnight combined print on it and nothing bended. Yay!

I d add my nozzle support (or something similar, it can easily be improved) in the box and sell the ormerod as a ABS ready printer
PS I am using 3D PRIMA abs, I am not sure what is it addictionated with, but there must be something since it doesnt dissolve in acetone. I`d really like to hear from someone else trying my mods if "my" method works also with "real" abs
Edited 1 time(s). Last edit at 08/01/2014 10:38AM by Ludo91.
|
Re: The Easy Way to print ABS August 01, 2014 11:49AM |
Registered: 10 years ago Posts: 2,472 |
I use about 1 part white or "natural" ABS (from scrapped prints, crudely snipped up into chunks of 1cm or less) to about 6 parts acetone by volume. Shake every 10 minutes or so at room temperature, and all the ABS is dissolved in about an hour, it has a similar appearance and viscosity as milk. When the bottle gets low I just top up with acetone and add a few chunks of ABS - if that makes it too thick I dilute with acetone and if too thin I add a bit more ABS, it is not at all critical. Originally I used solvent cement (obtained from a plumbing supply or DIY shop and meant for use in joining plastic pipes), and now use the same bottle for my ABS/acetone solution. The bottle has a brush attached in the lid and I use that to coat plain glass (no tape). Spraying would probably be better. After lifting off a print I touch up the bare areas with more solution - if it starts to look too uneven I rub down the glass with kitchen towel soaked in acetone to redistribute the coating. A rub over the base of the print with an acetone soaked kitchen towel takes off the thin film of white ABS - and I also rub all over the print with a generous coating of acetone, which I find soaks between the layers and helps cement them together, making the print stronger and smoother. The only issue is that the glass should not be coated while it is very hot - doing so causes the solution to bubble and makes for a a very rough coating that does not stick quite as well.
There is of course nothing wrong with using coloured ABS in the solution, but to avoid staining the base of the print it should be the same colour as you are printing with. White or natural can be used with any colour of print.
Dave
(#106)
There is of course nothing wrong with using coloured ABS in the solution, but to avoid staining the base of the print it should be the same colour as you are printing with. White or natural can be used with any colour of print.
Dave
(#106)
|
Re: The Easy Way to print ABS August 01, 2014 11:54AM |
Registered: 10 years ago Posts: 2,472 |
Just to add that to print ABS you must replace the hotend, fan enclosure, X carriage and extruder parts with parts printed with ABS. If you don't do so you will find the PLA parts will start deforming due to the higher temperatures they are subjected to during ABS printing. They will however last long enough to print those replacements.
Dave
(#106)
Dave
(#106)
|
Re: The Easy Way to print ABS August 01, 2014 12:46PM |
Registered: 9 years ago Posts: 40 |

|
Re: The Easy Way to print ABS August 04, 2014 06:13AM |
Registered: 9 years ago Posts: 176 |
|
Re: The Easy Way to print ABS August 05, 2014 04:23PM |
Registered: 10 years ago Posts: 469 |
Its funny, I keep my bed around 80c and the head gets a 230c first layer then 225c on every other layer. However my j-head is not cooled at all. I am working on a different head design for my delta. I am in the drawing stages right now. However I do not feel actively cooling a hot end is necessary.... At least with the right design. I have to say that as of now im only printing in natural color abs, and have only done about 3/4 of kilo. I did warp my end effector that was pla, I then covered it in aluminum sheet and straightened it. I have a ABS carriage printed that I have not yet put in place. As of this moment I am tearing my hair out designing and building a geared extruder with some old laser printer gears. Once that is done, I will be redesigning the carrige to handle 100+c in heat. The whole idea is that the carrige should also be the heatsink.
My Personal Blog. Build blog.
[engineerd3d.ddns.net]
Modicum V1 sold on e-bay user jaguarking11
My Personal Blog. Build blog.
[engineerd3d.ddns.net]
Modicum V1 sold on e-bay user jaguarking11
|
Re: The Easy Way to print ABS August 19, 2014 01:40PM |
Registered: 9 years ago Posts: 40 |
News!
I am printing abs like crazy and the mothod works flawlessy, still Id like to point out one thing: the acetone dissolved abs need to be sprayed in various different pass so that when it lands on the bed it remains "organized in maaany very small spheres" like when it s nebulized. Doing so lets you have a "silk like" surface which has monster adhesion, if you make a "lake" the surface will come out as a mirror instead, and has a lower adhesion.
Also, I increased speeds up to 55 mm/s for infills and 35 mm/s for perimeters, it still works great from an aesterhic point of view, nees to find out aboit adhesion.
If you experiments with this method please give feedback!
Cheers,
Ludo91
|
Re: The Easy Way to print ABS August 20, 2014 02:24AM |
Registered: 10 years ago Posts: 378 |
When I've printed with "ABS juice", I just applied it with a piece of a regular cleaning sponge, which creates a pretty rough but still flat surface. Lately when doing ABS I have used a glue stick, that has worked well enough and is less messy to apply (and can also be applied while the bed is a bit warmer, between prints). A large brim (4-10mm depending on model) has always done the trick, and without brim, no method seems perfectly reliable.
Sorry, only registered users may post in this forum.