Re-wiring Ormerod
Posted by jsv555
|
Re-wiring Ormerod January 03, 2015 06:26PM |
Registered: 9 years ago Posts: 73 |
Hi
I'm going to re-wire my Ormerod 2 for a couple of reasons:
1. I'm sick of having random wiring issues from breaks in the wiring to connectors being dodgy.
2. I'm putting the printer in an insulated / temp controlled enclosure, so I can play around with a few things in a known environment. The PSU, board and extruder drive will be external to the enclosure meaning that the looms are not long enough any more.
I've been looking for some suitable wire and am struggling to know what's best to use (electrics are not my strong point). I've got some 4 Core alarm wire kicking around but don't know if it will be up taking the current to the heater etc. Any advice anyone can give me would be appreciated
Thanks
Jon
|
Re: Re-wiring Ormerod January 04, 2015 04:54AM |
Registered: 10 years ago Posts: 314 |
Quote
jsv555
I'm going to re-wire my Ormerod 2 for a couple of reasons:
I'm sick of having random wiring issues from breaks in the wiring to connectors being dodgy.
I've been looking for some suitable wire and am struggling to know what's best to use (electrics are not my strong point). I've got some 4 Core alarm wire kicking around but don't know if it will be up taking the current to the heater etc. Any advice anyone can give me would be appreciated
I'm surprised you are having wire breaks, is this in any particular area?
Connector/contacts can be a problem, particularly if crimped without a proper crimp tool or with excessive pressure as this can 'nick' the wire and cause it to break at the end of the crimp with repeated flexing.
I don't think there are any points where current is an issue except for the heated bed, but I assume this is OK.
As for the wire/cable, I'm not sure what alarm cable is, but as I don't think this is designed for flexing, I would not expect it to be suitable. If I was changing my wiring I would probably look for a 16 strand wire [uk.rs-online.com] for flexibility and check that this is suitable for the crimps. Not sure what the standard wire supplied is, but as said I'm surprised you have an issue, certainly not been an issue on Ormerod 1.
My issues have been the thermistor contacts and crimps not locating in their casing.
Ormerod #007 (shaken but not stirred!)
|
Re: Re-wiring Ormerod January 04, 2015 07:05AM |
Registered: 9 years ago Posts: 395 |
|
Re: Re-wiring Ormerod January 04, 2015 08:45AM |
Registered: 9 years ago Posts: 73 |
Quote
Treth
I'm surprised you are having wire breaks, is this in any particular area?
Connector/contacts can be a problem, particularly if crimped without a proper crimp tool or with excessive pressure as this can 'nick' the wire and cause it to break at the end of the crimp with repeated flexing.
Treth I've had 2 wiring fractures which have taken me a while to track down. Both on thermistors although I don't think they are related. I had the bed keep turning off which I tracked down to a fracture to a thermistor wire resulting in the temp reading dropping out.
The second was the hot end thermistor wiring between the thermistor wire and the loom. Wire clearly had a fracture in it which again was preventing a proper reading. I've now rectified both.
Don't get me started on the connectors. They simply didn't fit properly to the board and kept coming loose or as you say the crimps weren't done properly resulting in dodgy connections. I'm trying to find a proper solution to this.
With regard to current I was concerned with the hot end. If it's a 50W heater and 12V then it's pulling about 4.2 Amps if my maths are correct. I don't think the wire I have is rated at more than about 0.5A
Edited 1 time(s). Last edit at 01/04/2015 08:49AM by jsv555.
|
Re: Re-wiring Ormerod January 04, 2015 08:51AM |
Registered: 9 years ago Posts: 73 |
|
Re: Re-wiring Ormerod January 04, 2015 09:04AM |
Registered: 9 years ago Posts: 73 |
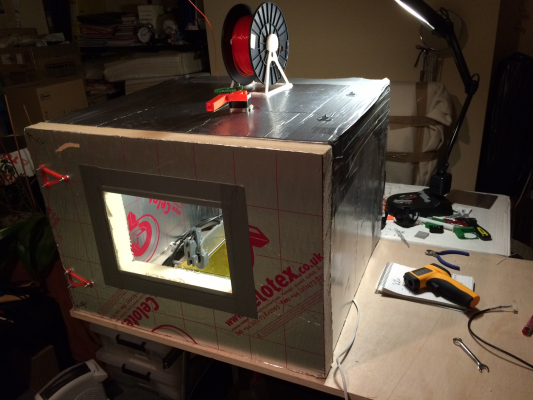
Just thought I would stick a pic of my enclosure mid build. It's made from 50mm Celotex insulation held together with printed brackets and good old fashioned Gaffer Tape. Door hinges are printed as well.
As you can see I have just installed some lighting. When finished it should be able to be temp regulated up to about 40 deg C ( just wondered what impact ambient temp had on prints). Extruder and spool will be top mounted and feed vertically down through to the head.
|
Re: Re-wiring Ormerod January 04, 2015 10:01AM |
Registered: 10 years ago Posts: 1,230 |
Quote
jsv555
..( just wondered what impact ambient temp had on prints)...
Me too! - I would think you can get away with a lot of warm air moving around in a closed environment like that, esp. if you take it to bed temperature - and that might be the cure against curl-ups
I don't think its coincidence that the ormerod is designed to use the from the hotend pre-heated air as cooling for the print - looking forward to you test, thank you for frontrunning :-)
Erik
|
Re: Re-wiring Ormerod January 04, 2015 11:19AM |
Registered: 9 years ago Posts: 73 |
Thanks for the words of encouragement Erik. It seems to me if you can control ambient temp while cooling specific areas ie. the recently extruded filament then you should be able to dramatically improve the quality of the print while eliminating curling (which is the bane of my life). I've been messing around with running a small compressor (12v tyre inflater), as I found the output from fans to be inadequate and splitting the air into 3 paths so that I can cool directly around the nozzle at 120 deg intervals.
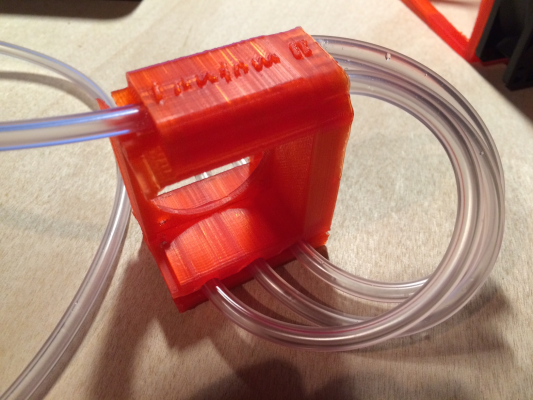
So far I've got as far as developing a hot end fan encasement that will successfully split the single output from the compressor into 3 reasonable air paths. Got some small alu tubing that I'm going to make nozzles from. Attached shows the prototype. In retrospect it is overly complicated and I'm working on a simplified version.
Haven't found a way of easily controlling the output from the compressor yet. Was hoping to wire it to FAN0 and see what the result was. Compressor claims to pull 10A though and I don't think the PSU is up to the job.
Think I will start a new thread to discuss this when I get a bit further down the track
|
Re: Re-wiring Ormerod January 05, 2015 07:27AM |
Registered: 10 years ago Posts: 2,472 |
Quote
jsv555
Haven't found a way of easily controlling the output from the compressor yet. Was hoping to wire it to FAN0 and see what the result was. Compressor claims to pull 10A though and I don't think the PSU is up to the job.
I'm not sure a compressor is all that suitable. Tyre inflators have no reservoir bottle and usually produce a comparatively low and pulsating flow rate. They also have a start-up current surge that may possibly introduce glitches on the PSU that could crash the Duet. I would certainly not risk switching such a high-current inductive load directly from the Duet's fan output - I would instead use the fan output to operate an automotive 12V relay and switch the compressor with that.
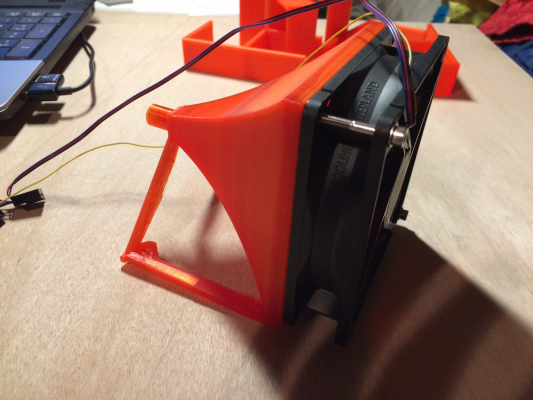
You may possibly be better off making a fan enclosure that funnels the fan's output to your three tubes instead of using the tyre inflator. That way you can use the Duet's fan output to not only turn the airflow on and off, but also control the fan's speed. It will be far more quiet as well!
Dave
|
Re: Re-wiring Ormerod January 05, 2015 07:41AM |
Registered: 10 years ago Posts: 2,472 |
Quote
jsv555
Hi
I'm going to re-wire my Ormerod 2 for a couple of reasons:
1. I'm sick of having random wiring issues from breaks in the wiring to connectors being dodgy.
2. I'm putting the printer in an insulated / temp controlled enclosure, so I can play around with a few things in a known environment. The PSU, board and extruder drive will be external to the enclosure meaning that the looms are not long enough any more.
I've been looking for some suitable wire and am struggling to know what's best to use (electrics are not my strong point). I've got some 4 Core alarm wire kicking around but don't know if it will be up taking the current to the heater etc. Any advice anyone can give me would be appreciated
Thanks
Jon
For extremely flexible wire take a look at the R/C model shops. Here's a link to very flexible wire from 8AWG to 24AWG that has an insulation that will easily withstand soldering and hotend temperatures. (12AWG is thick enough to supply 30A over a couple of meters, go thicker for longer distances).
[www.hobbyking.co.uk]
Dave
|
Re: Re-wiring Ormerod January 05, 2015 07:55AM |
Registered: 9 years ago Posts: 73 |
Thanks for your input Dave.
At the minute I'm just trying a few things out. I had the same reservations about the compressor but having played around with it the output seems reasonably consistent and higher than I have achieved with fans. As you say the high current was the thing that concerned me. I haven't dared run it off the duet . Running a separate PSU and switching it manually at the minute.
I've played around with funnelling air from a large PWM fan but the results were quite frankly terrible with virtually no air flow at all (and yes I did check that the fan was the correct way round!)
I've got some large (3x75mm), cheap blower fans on the way from China which I have had better results with in the past. Will try funnelling them separately to the head. They aren't PWM fans but I did get some speed variation wiring them to FAN0 although it appeared backwards to me; slowing down when I would have expected it to speed up and vice versa. Any ideas?
As I say it's all experimentation at the minute.
|
Re: Re-wiring Ormerod January 07, 2015 03:13AM |
Registered: 10 years ago Posts: 1,230 |
Quote
jsv555
...I've played around with funnelling air from a large PWM fan but the results were quite frankly terrible with virtually no air flow at all (and yes I did check that the fan was the correct way round!).
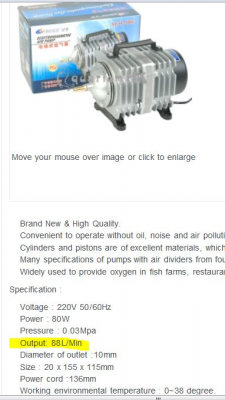
Yes the static pressure from a normal fan is way too low and I was thinking in the same line as you, using tubes with higher pressure from a secondary source but was thinking more in the line of aquarium pumps as I guess these pumps are made for continuous and quiet use - just an example:
[www.hinterfeld.com]
But as said, when you get your printer boxed and the printing environment temperature higher, I would think that you will be able to get away with a lot of air moving around all over the bed without the danger of warping the print and if so, you may not need that much direct cooling around the nozzle
Linear regulating the output of the pump itself is not easy, would be easier to regulate the flow I think - and the air may be pulsing so you may need some sort of buffer tank
Erik
|
Re: Re-wiring Ormerod January 07, 2015 04:36AM |
Registered: 9 years ago Posts: 73 |
Great minds and all that Erik. Thanks for the link, I hadn't even considered using an aquarium pimp but it may be a lot better than a compressor. Only started playing around with the compressor as I had one in the car and couldn't think of anything else.
Think it's going to be a few weeks yet before I get the enclosure fully finished (waiting for parts and work etc. getting in the way) but it will be interesting to see the results. I will keep you updated.
Think it's going to be a few weeks yet before I get the enclosure fully finished (waiting for parts and work etc. getting in the way) but it will be interesting to see the results. I will keep you updated.
|
Re: Re-wiring Ormerod January 07, 2015 05:37AM |
Registered: 9 years ago Posts: 73 |
|
Re: Re-wiring Ormerod January 07, 2015 05:29PM |
Registered: 10 years ago Posts: 1,230 |
Quote
jsv555
Just found a cheap multiple outlet, variable flow pump on ebay so I think I will give it a try.Flow rate (540l/h) is not as high as the pump you show but still works out at 0.15l/s which seems pretty good to me.
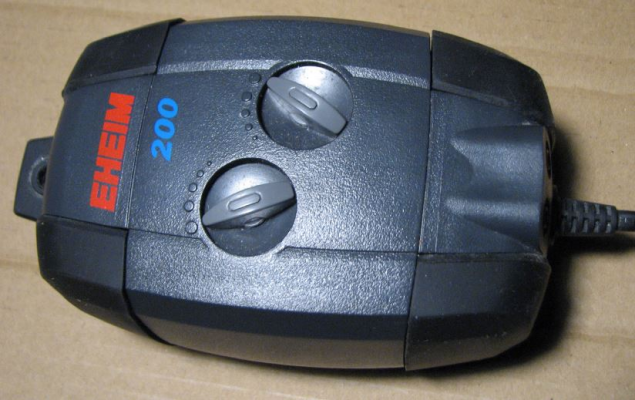
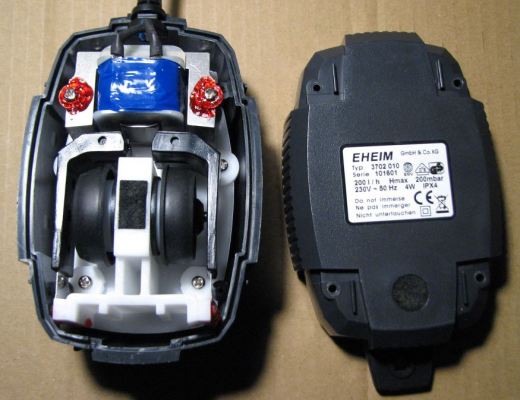
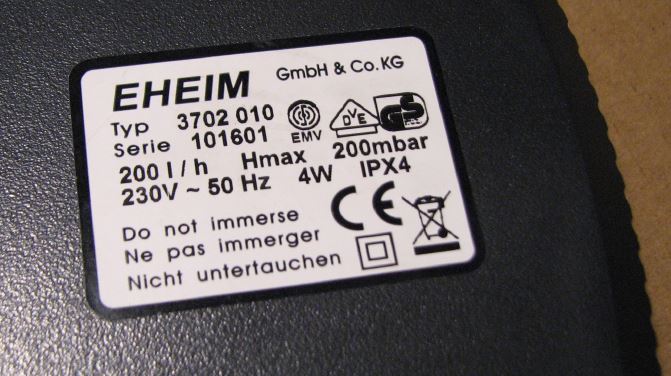
I think that will do because it just came to me that insistently, I do have an aquarium pump in the cellar, just found it, two outlets, labeled Eheim 200, type 3702 010, 200l/h, Himax 200mbar
[www.eheim.com]
- did a quick test and it will blow out a Bic lighter from a distance of 15cm, that was from 2 nozzles directly
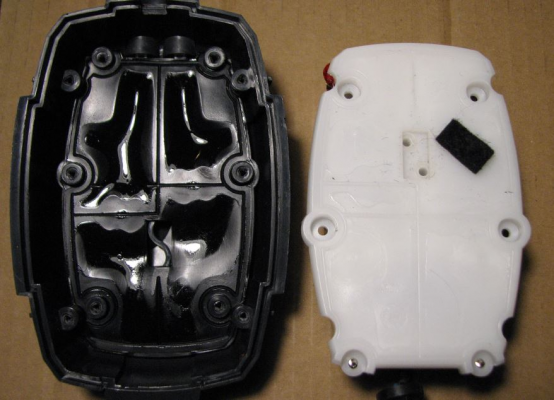
... BTW, I'm a bit puzzled about the 2 outlets, (both regulated) this was a Q&D test but it seems to me that while regulating one up the other did go down aka the sum of air seems to be the same, not what I expected and nothing was stated about this - will have to take it apart to see what going on inside (stand back, I'm a pro :-))
..but its very quiet!, just a low buzzing sound..hold on the that idea, way to go for direct nozzle cooling IMHO
Erik
|
Re: Re-wiring Ormerod January 08, 2015 01:43AM |
Registered: 9 years ago Posts: 395 |
Quote
jsv555
Quote
Fpex
Yea the thermistor is a pain. They always get out. I blocked it with some pfte tape, but I might revert to the Mendel approach for it
Fpex. I've found that a bit of Kapton tape holds them together pretty well.
I used pfte tape, since it was the first at hand even if horrible to use, same result. It holds better.
|
Re: Re-wiring Ormerod January 08, 2015 02:24AM |
Registered: 9 years ago Posts: 92 |
Eric you will find those aquarium pumps are generally very simple in design, so the air regulation is usually awful!
Often the best way is to leave the pump on maximum output, split the air output and bleed off any excess air through one side rather than use the built in regulation.
You could use something like this to regulate the amount of air you bleed off [www.thingiverse.com]
James
Often the best way is to leave the pump on maximum output, split the air output and bleed off any excess air through one side rather than use the built in regulation.
You could use something like this to regulate the amount of air you bleed off [www.thingiverse.com]
James
|
Re: Re-wiring Ormerod January 08, 2015 08:11AM |
Registered: 9 years ago Posts: 73 |
Thanks for the info Erik. I've ordered one of these [www.ebay.co.uk] to play around with. Looks as if the compressors in this are controlled rather than the output being restricted, but we will have to see. Will let you know how I get on.
Also found a different thermostatic controller which should allow me to run at a higher temp to the enclosure than the vivarium item I was going to use (restricted to 38 deg C) so I will hopefully be able to get internal temp up to bed temp which should be interesting. I'm planning on using a hairdryer to heat the enclosure. Did some prelim tests the other day with a very poorly sealed enclosure and managed to get it up to 40 deg C without much effort in about 2 minutes. Insulation seemed to work pretty well as it was still about 33 deg C 15 minutes later when I opened the door and that is with gaps everywhere. Going to draft seal the door and try to get the base of the enclosure level tonight to reduce air gaps.
.
Jon
|
Re: Re-wiring Ormerod January 08, 2015 09:46AM |
Registered: 10 years ago Posts: 2,472 |
Quote
jsv555
... BTW, I'm a bit puzzled about the 2 outlets, (both regulated) this was a Q&D test but it seems to me that while regulating one up the other did go down aka the sum of air seems to be the same, not what I expected and nothing was stated about this - will have to take it apart to see what going on inside (stand back, I'm a pro :-))
If you feed two air pipes into an aquarium at different levels (heights), they will need different pressures to give the same volume output due to the water pressure being different at the two outlets. I expect the "regulators" are simply flow valves in two pipes teed off the same source.
Dave
Edited 1 time(s). Last edit at 01/09/2015 07:18AM by dmould.
|
Re: Re-wiring Ormerod January 08, 2015 05:44PM |
Registered: 9 years ago Posts: 73 |
Turns out achieving bed temp is slightly optimistic. At around 50 deg C everything becomes a lot more pliable than I would have liked. Going to have to re-route some wiring (which I sort of expected) and stick some metal door hinges on. My PLA hinges ( even though pretty well protected so I thought), warped pretty badly. Would print them in ABS but they are too large and I know will curl.Did achieve a steady 58 deg C though so the basics seem ok..
Edited 1 time(s). Last edit at 01/08/2015 06:28PM by jsv555.
Edited 1 time(s). Last edit at 01/08/2015 06:28PM by jsv555.
|
Re: Re-wiring Ormerod January 09, 2015 07:25AM |
Registered: 10 years ago Posts: 2,472 |
Using printed parts on or very near to the heated bed is likely to fail, because the whole idea of the heating is to keep the plastic soft and relatively pliable, so any parts on the bed will deform over time. The only exception would be if you used higher temperature plastic (such as ABS) for the bed prints, and then only ever used the printer with lower temperature plastic (such as PLA) thereafter.
Dave
Dave
|
Re: Re-wiring Ormerod January 09, 2015 07:40AM |
Registered: 9 years ago Posts: 73 |
Yep, common sense should have told me that running the temperature of a printer enclosure close to the bed temp was likely to soften everything. I've decided to reprint my door hinges and thermostatically control the enclosure temp to no higher than 40-45 deg C, seeing as the softening point of PLA is about 50 deg C. Going to have problems if I go any warmer than that. I may limit the temp to less. Think the temp probe needs to be placed at the top rather than the bottom (as I was going to do) of the enclosure. Appear to be getting between 6 and 8 deg C temp difference between the floor and roof of the enclosure which is higher than I expected and I don't want to run the risk of melting the extruder which is going to be mounted through the roof.
Experiment did prove that you can use a hair dryer to heat the enclosure space to a reasonable temp in a short period (4-5 minutes). .
Edited 1 time(s). Last edit at 01/09/2015 07:44AM by jsv555.
Experiment did prove that you can use a hair dryer to heat the enclosure space to a reasonable temp in a short period (4-5 minutes). .
Edited 1 time(s). Last edit at 01/09/2015 07:44AM by jsv555.
|
Re: Re-wiring Ormerod January 09, 2015 08:35AM |
Registered: 10 years ago Posts: 2,472 |
Quote
jsv555
Yep, common sense should have told me that running the temperature of a printer enclosure close to the bed temp was likely to soften everything. I've decided to reprint my door hinges and thermostatically control the enclosure temp to no higher than 40-45 deg C, seeing as the softening point of PLA is about 50 deg C. Going to have problems if I go any warmer than that. I may limit the temp to less. Think the temp probe needs to be placed at the top rather than the bottom (as I was going to do) of the enclosure. Appear to be getting between 6 and 8 deg C temp difference between the floor and roof of the enclosure which is higher than I expected and I don't want to run the risk of melting the extruder which is going to be mounted through the roof.
Experiment did prove that you can use a hair dryer to heat the enclosure space to a reasonable temp in a short period (4-5 minutes). .
Probably the best solution for you would be to bite the bullet and reprint all the Ormerod parts in ABS. You will then be able to run the enclosure at PLA bed temperatures without softening the plastic - though you should probably arrange the enclosure so that the Duet board is outside the heated environment. I suspect that an enclosure that hot will cause printing problems however, because the plastic will take a long time to harden after being extruded, which will be especially problematic with single columns, overhangs or bridges.
I believe the commercial printers have enclosures that are temperature controlled, but not to a particularly high temperature (30 deg or so). The idea is to eliminate draughts and large temperature variations over sections of the print, and to keep the ambient temperature non-variable so that you can tweak other variables (speed, hotend temp etc.) for the best results and the quality will remain consistent from print to print.
Dave
|
Re: Re-wiring Ormerod January 09, 2015 09:17AM |
Registered: 9 years ago Posts: 73 |
Yeah, I'm thinking the same. The problem is that I can't print ABS very well at the minute. Anything bigger than a credit card curls like nothing on earth. This was one of the reasons for the enclosure and, as you say,to take the ambient temp variable out of the equation. Think last nights " see how hot I can get it" experiment was mainly driven by beer and I don't think I will ever want to achieve a temp this high in practice.
Edited 1 time(s). Last edit at 01/09/2015 09:18AM by jsv555.

Edited 1 time(s). Last edit at 01/09/2015 09:18AM by jsv555.
|
Re: Re-wiring Ormerod January 09, 2015 09:53AM |
Registered: 10 years ago Posts: 2,472 |
Quote
jsv555
Yeah, I'm thinking the same. The problem is that I can't print ABS very well at the minute. Anything bigger than a credit card curls like nothing on earth. This was one of the reasons for the enclosure and, as you say,to take the ambient temp variable out of the equation. Think last nights " see how hot I can get it" experiment was mainly driven by beer and I don't think I will ever want to achieve a temp this high in practice.
The Ormerod is perfectly capable of printing ABS (it's all I use). My first prints were exactly as you describe, but it wasn't long before I got them right. I usually print with hotend 230 deg and bed 110 deg on all layers but your thermistors may be under or over-reading so you may find you need to set different temperatures. I have measured my hotend and bed with those temperatures set, and so know that they are what are actually achieved. I found that printing on Kapton did not work well, so ended up coating the bare glass with solvent instead. Solvent cement used for plastic plumbing fittings and sold at DIY hardware stores works well, but I eventually changed to making my own by dissolving white ABS in acetone. Other people have found other things that also work. Avoid printing anything with open-ended tall thin walls or square corners as much as possible. You definitely need a fan deflector to stop the fan backwash hitting the print, and one of the biggest secrets is to keep room temperature warmish (20 deg or more) and the print area completely draught-free. You could shield it with a large cardboard box and in the early days I used to put a bin-bag over the printer after starting the print, but now I just ensure doors and windows are kept closed while printing and there are no other sources for a draught to hit the print (e.g. fireplace with chimney, extraction fans, PSU fan, people frequently walking back and forth past the printer etc).
Dave
|
Re: Re-wiring Ormerod January 09, 2015 02:56PM |
Registered: 9 years ago Posts: 73 |
|
Re: Re-wiring Ormerod January 10, 2015 05:42PM |
Registered: 9 years ago Posts: 191 |
Regarding pump's, maybe this can be of interest. Printing a pump [forums.reprap.org]
|
Re: Re-wiring Ormerod January 12, 2015 05:39AM |
Registered: 9 years ago Posts: 73 |
|
Re: Re-wiring Ormerod January 14, 2015 02:56AM |
Registered: 10 years ago Posts: 1,230 |
Quote
jsv555
Turns out achieving bed temp is slightly optimistic. At around 50 deg C everything becomes a lot more pliable than I would have liked.
Sorry to hear about you melt down, I do not think you have to go that high with bed temperature in a controlled environment, hope you did not destroy too much so still able to print repair parts - well front running is a dirty job but someones got to do it, thank you for taking the punches ;-)
Erik
|
Re: Re-wiring Ormerod January 14, 2015 03:46AM |
Registered: 10 years ago Posts: 1,230 |
Quote
jamesf
Eric you will find those aquarium pumps are generally very simple in design, so the air regulation is usually awful!..
Yes simple but very well designed and build and regulates just fine, two channels yes, but from the same source so not really a two channel pump
Erik
Sorry, only registered users may post in this forum.
