Printing axis Calibration 90 ABS problem on Z
Posted by Zonzo
|
Printing axis Calibration 90 ABS problem on Z June 11, 2015 12:36PM |
Registered: 10 years ago Posts: 73 |
Hi,
after a long time of inactivity with my printer, I found in these days the time to upgrade it with the modulater IR probe bought some month ago...
I took the opportunity to update the firmware and web interface (1.9a dc42 & DuetWebControl) inverted x axis motor wiring and took some minute to understand what happen in few month of absence from the forum
everithing ok, the probe work well so I start with some sample print to calibrate it.
But when I try to print the Ormaxis calibration pieces... I took the STL file from the RepRapFirmware-master file and with the new Slic3r 1.2.8 and generates the gcode with the same configuration used before.
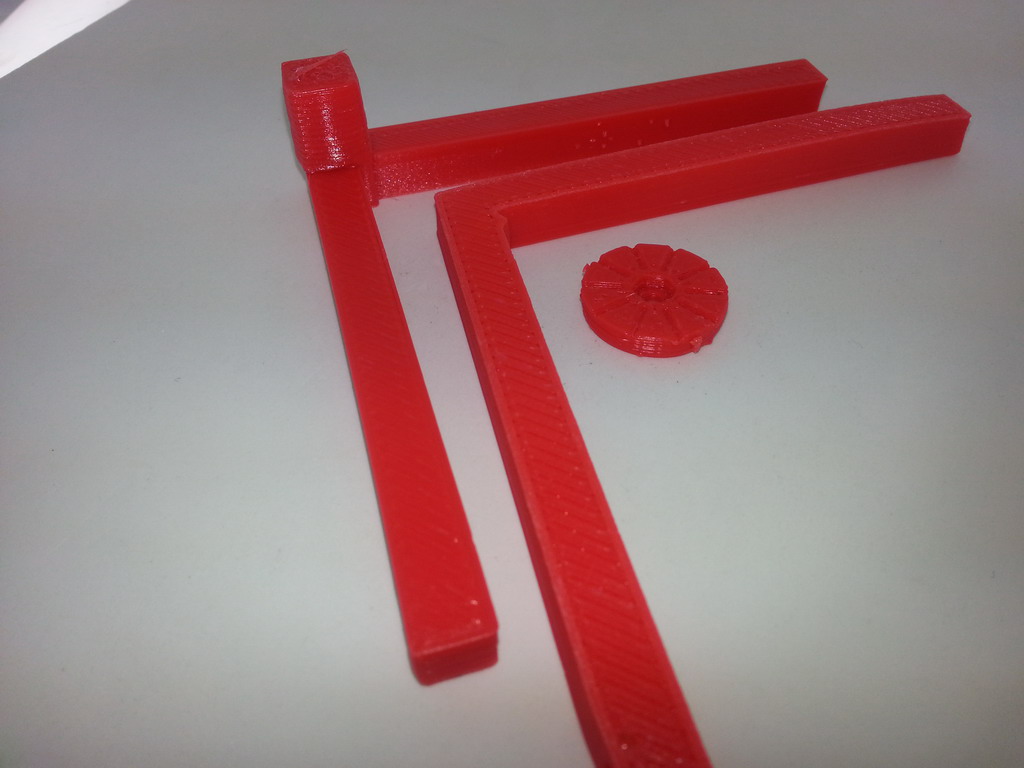
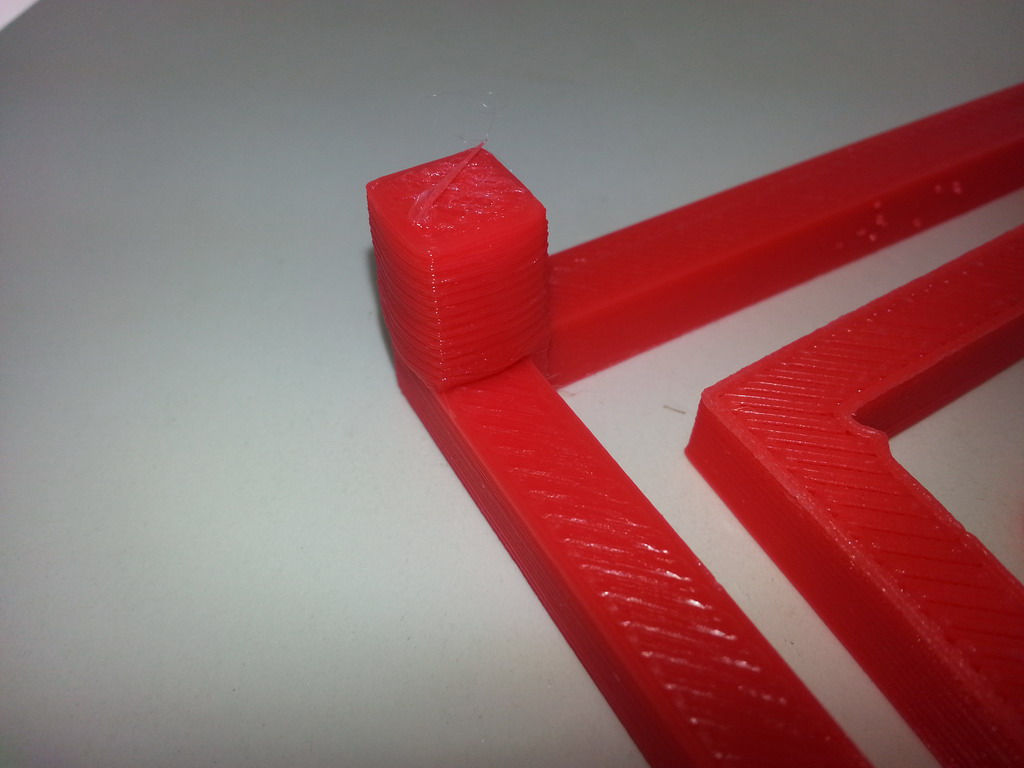
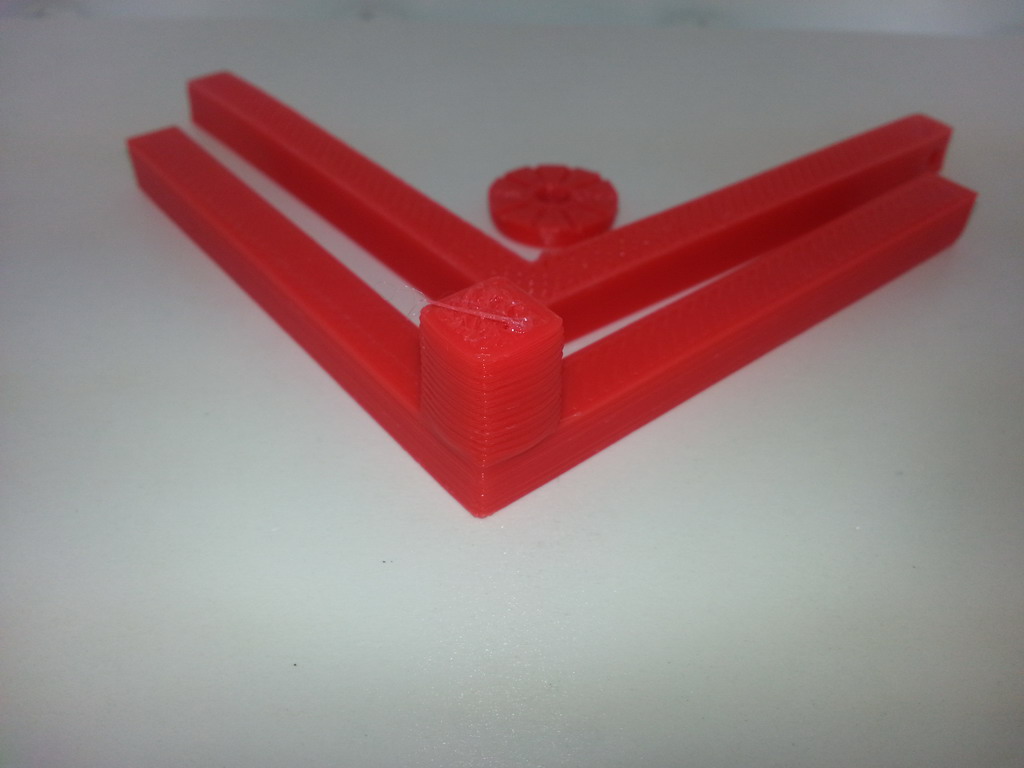
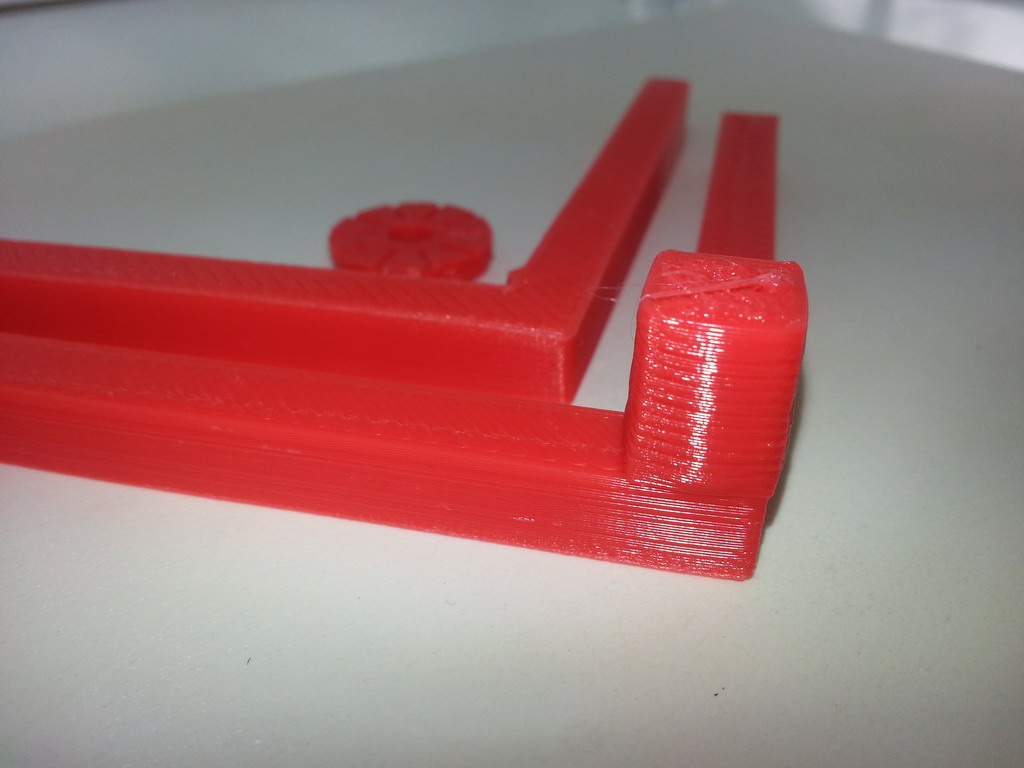
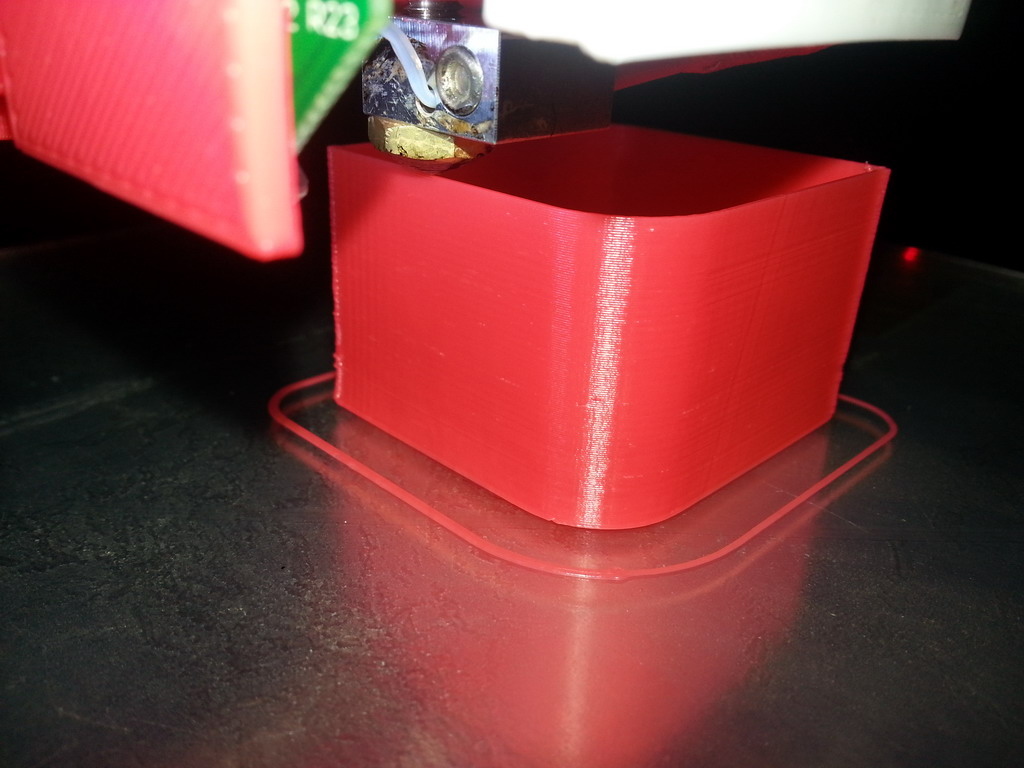
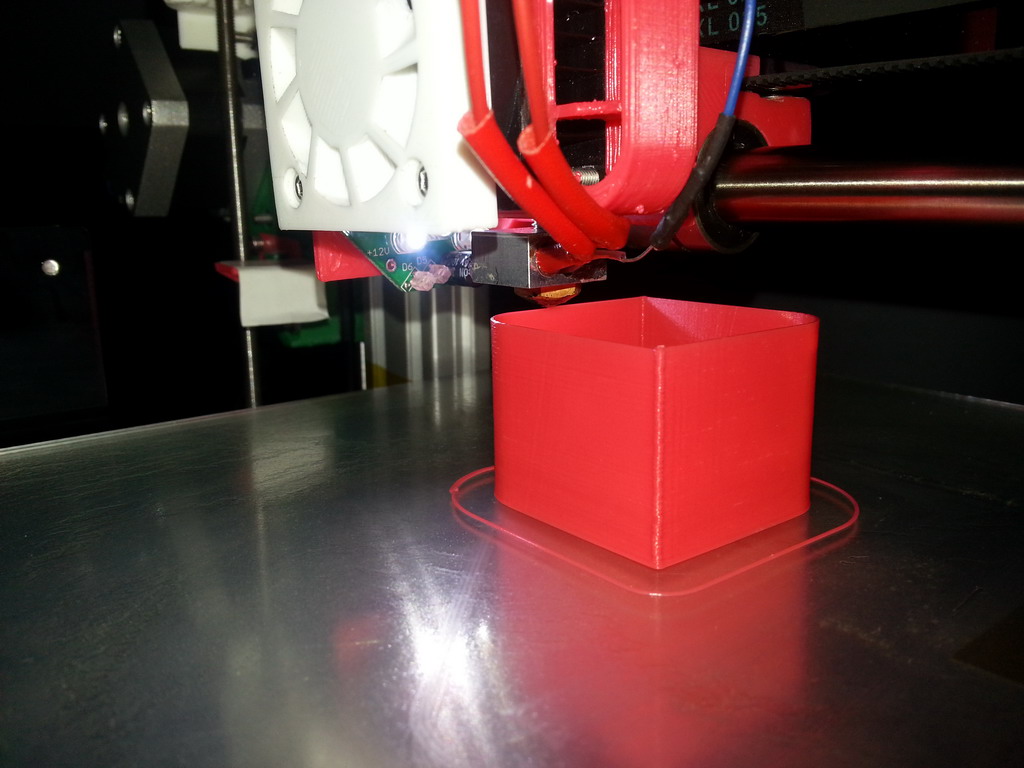
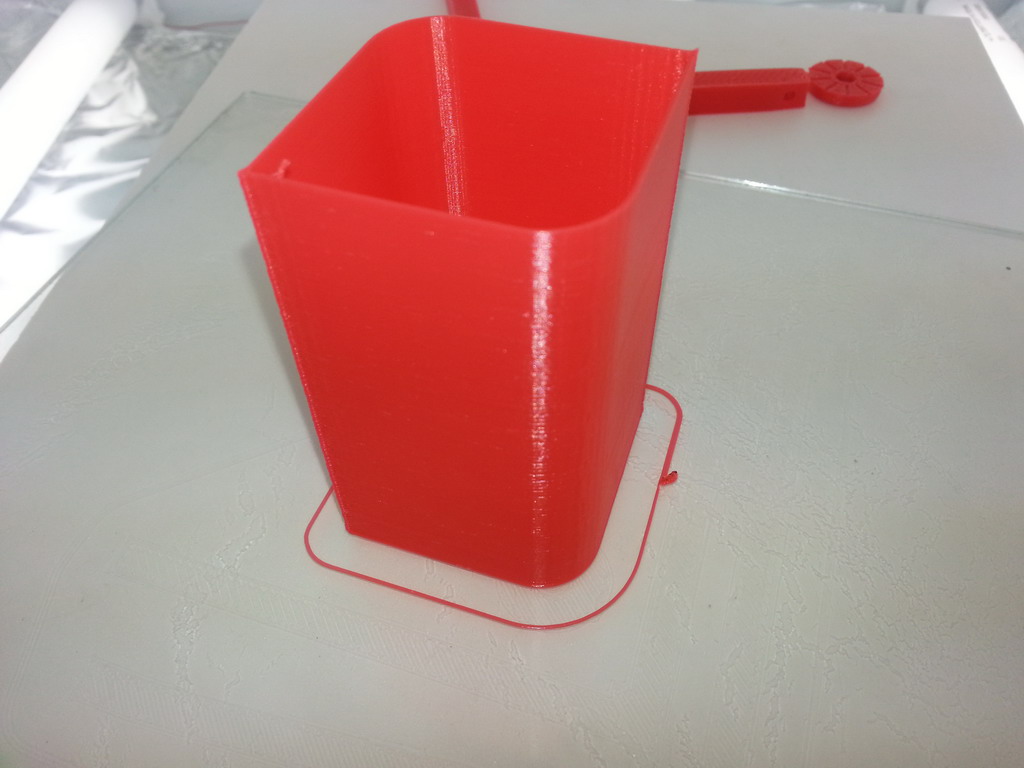
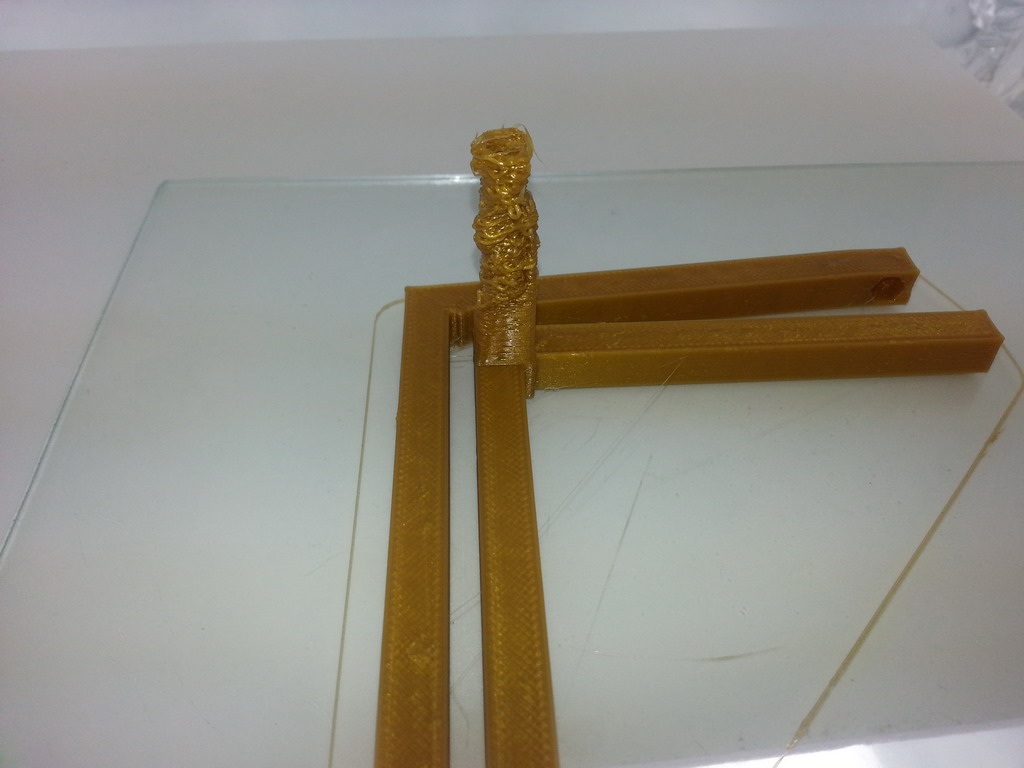
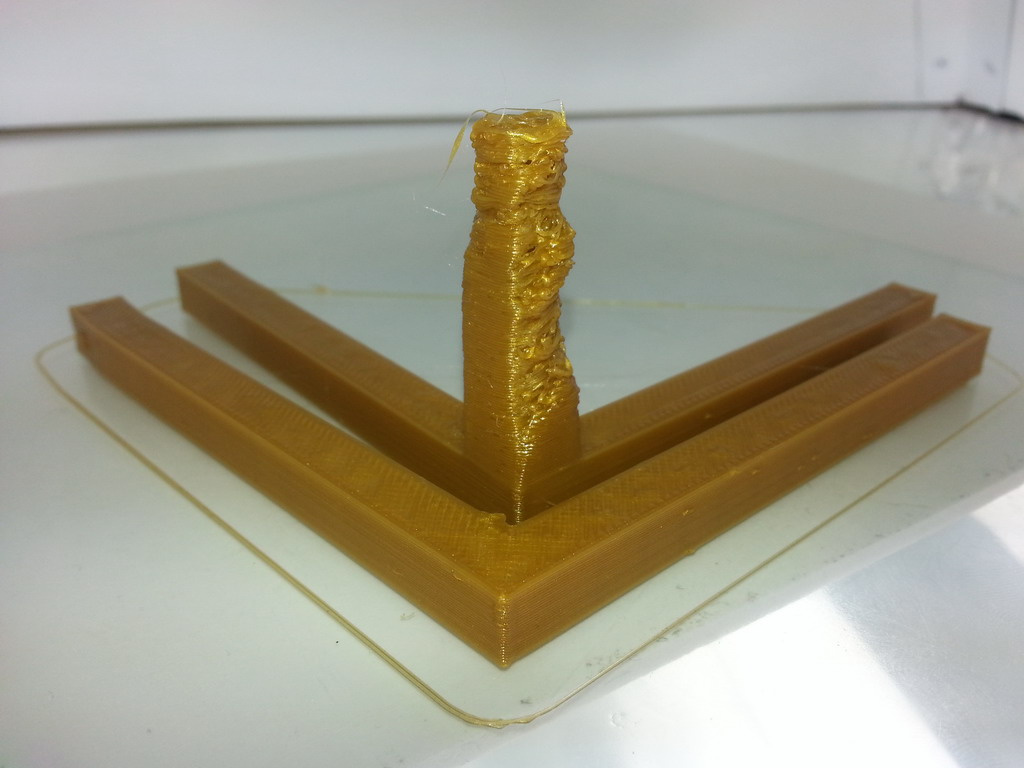
All ok, some little sticking problem with the ABS but nothing noticeable, since the print start the Z axis column the print quality was horrible...
I think about a problem with Z axis, but a "thin wall" print goes perfectly... (see image) I try again with different speed setting, but same results
so I think it is only an Hot point problem and that in the column the ABS remains too hot and tender
what do you think?
following my Slic3r setting and my config file.
after a long time of inactivity with my printer, I found in these days the time to upgrade it with the modulater IR probe bought some month ago...
I took the opportunity to update the firmware and web interface (1.9a dc42 & DuetWebControl) inverted x axis motor wiring and took some minute to understand what happen in few month of absence from the forum
everithing ok, the probe work well so I start with some sample print to calibrate it.
But when I try to print the Ormaxis calibration pieces... I took the STL file from the RepRapFirmware-master file and with the new Slic3r 1.2.8 and generates the gcode with the same configuration used before.
All ok, some little sticking problem with the ABS but nothing noticeable, since the print start the Z axis column the print quality was horrible...
I think about a problem with Z axis, but a "thin wall" print goes perfectly... (see image) I try again with different speed setting, but same results
so I think it is only an Hot point problem and that in the column the ABS remains too hot and tender
what do you think?
following my Slic3r setting and my config file.
# generated by Slic3r 1.2.8 on Thu Jun 11 17:51:08 2015
avoid_crossing_perimeters = 1
bed_shape = 0x0,200x0,200x200,0x200
bed_temperature = 110
before_layer_gcode =
bottom_solid_layers = 3
bridge_acceleration = 0
bridge_fan_speed = 100
bridge_flow_ratio = 1
bridge_speed = 15
brim_width = 0
complete_objects = 0
cooling = 0
default_acceleration = 0
disable_fan_first_layers = 3
dont_support_bridges = 1
duplicate_distance = 6
end_gcode = G1 X2 Y190; park the machine\nM0; stop
external_fill_pattern = rectilinear
external_perimeter_extrusion_width = 0
external_perimeter_speed = 70%
external_perimeters_first = 0
extra_perimeters = 1
extruder_clearance_height = 20
extruder_clearance_radius = 20
extruder_offset = 0x0
extrusion_axis = E
extrusion_multiplier = 0.833
extrusion_width = 0
fan_always_on = 0
fan_below_layer_time = 60
filament_colour = #FFFFFF
filament_diameter = 1.75
fill_angle = 45
fill_density = 40%
fill_pattern = rectilinear
first_layer_acceleration = 0
first_layer_bed_temperature = 110
first_layer_extrusion_width = 0
first_layer_height = 0.3
first_layer_speed = 50%
first_layer_temperature = 240
gap_fill_speed = 15
gcode_arcs = 0
gcode_comments = 0
gcode_flavor = reprap
infill_acceleration = 0
infill_every_layers = 1
infill_extruder = 1
infill_extrusion_width = 0
infill_first = 0
infill_only_where_needed = 0
infill_overlap = 15%
infill_speed = 60
interface_shells = 0
layer_gcode =
layer_height = 0.2
max_fan_speed = 100
max_print_speed = 80
max_volumetric_speed = 0
min_fan_speed = 35
min_print_speed = 10
min_skirt_length = 10
notes =
nozzle_diameter = 0.5
octoprint_apikey =
octoprint_host =
only_retract_when_crossing_perimeters = 1
ooze_prevention = 0
output_filename_format = [input_filename_base].g
overhangs = 1
perimeter_acceleration = 0
perimeter_extruder = 1
perimeter_extrusion_width = 0
perimeter_speed = 60
perimeters = 2
post_process =
pressure_advance = 0
raft_layers = 0
resolution = 0
retract_before_travel = 2
retract_layer_change = 1
retract_length = 5
retract_length_toolchange = 10
retract_lift = 0
retract_restart_extra = 0
retract_restart_extra_toolchange = 0
retract_speed = 45
seam_position = random
skirt_distance = 6
skirt_height = 1
skirts = 3
slowdown_below_layer_time = 0
small_perimeter_speed = 20
solid_infill_below_area = 70
solid_infill_every_layers = 0
solid_infill_extruder = 1
solid_infill_extrusion_width = 0
solid_infill_speed = 60
spiral_vase = 0
standby_temperature_delta = -5
start_gcode = G21 ; set units to millimeters\nM203 X6000 Y6000 Z500 E3000  ; Allow 100mm/s speeds\nG90 ; use absolute coordinates\nM83 ; use relative distances for extrusion\nG1 Z5 F200 ; lift nozzle\nG1 X2 Y50 F2000; Go to wait for warm position\nM140 S[first_layer_bed_temperature] ; Set bed heater\nM116 ; Wait for everything (Bed temp)\nT0; Select extruder\nM104 S[first_layer_temperature]\nM116; Wait for extruder temp as well
support_material = 0
support_material_angle = 0
support_material_contact_distance = 0.2
support_material_enforce_layers = 0
support_material_extruder = 1
support_material_extrusion_width = 0
support_material_interface_extruder = 1
support_material_interface_layers = 0
support_material_interface_spacing = 0
support_material_interface_speed = 100%
support_material_pattern = rectilinear
support_material_spacing = 2.5
support_material_speed = 70
support_material_threshold = 0
temperature = 240
thin_walls = 1
threads = 5
toolchange_gcode =
top_infill_extrusion_width = 0
top_solid_infill_speed = 70%
top_solid_layers = 4
travel_speed = 150
use_firmware_retraction = 0
use_relative_e_distances = 1
use_volumetric_e = 0
vibration_limit = 0
wipe = 0
xy_size_compensation = 0
z_offset = 0
; Ormerod 1 config file for dc42 Duet firmware
M111 S0                           	; Debug off
M550 PZonzo 3D			        ; Machine name (can be anything you like)
M551 Preprap                        	; Machine password (currently not used)
M540 P0xBE:0xEF:0xDE:0xAD:0xFE:0xED 	; MAC Address
M552 P192.168.0.14                 	; IP address
M554 P192.0.0.1                   	; Gateway
M553 P255.255.255.0                	; Netmask
M555 P2                             	; Set output to look like Marlin
G21                                 	; Work in millimetres
G90                                 	; Send absolute coordinates...
M83                                 	; ...but relative extruder moves
M574 X0 Y2 Z0 P1			; set endstop configuration (Y endstop only, at high end, active high)
M906 X800 Y1000 Z800 E800        	; Set motor currents (mA)
M563 P0 D0 H1                       	; Define tool 0
G10 P0 S0 R0                        	; Set tool 1 operating and standby temperatures
M92 E420                        	; Set extruder steps per mm (single nozzle)
M558 P1                         	; Use an unmodulated Z probe or an intelligent Z probe
G31 Z0.35 P500                      	; Set the probe height and threshold (put your own values here)
;*** If you have a Duet board with 4.7K thermistor series resistors, change R1000 to R4700 to the following M305 commands
M305 P0 R1000 H0 L0			; Put your own H and/or L values here to set the bed thermistor ADC correction
M305 P1 R1000 H0 L0			; Put your own H and/or L values here to set the first nozzle thermistor ADC correction
M305 P2 R1000 H0 L0			; Put your own H and/or L values here to set the second nozzle thermistor ADC correction
;*** Adjust the XY coordinates in the following M557 commands to suit your build and the position of the IR sensor
M557 P0 X30 Y30                      	; Four...
M557 P1 X30 Y170                     	; ...probe points...
M557 P2 X170 Y170                    	; ...for bed...
M557 P3 X170 Y30                     	; ...levelling
M557 P4 X100 Y100                    	; 5th probe point for levelling (un-comment this if you are using a dc42 differential IR probe)
;*** if you are using axis compensation, put the figures in the following command
M556 S78 X0 Y0 Z0                   	; Axis compensation here
M201 X800 Y800 Z15 E1000            	; Accelerations (mm/s^2)
M203 X15000 Y15000 Z100 E3600       	; Maximum speeds (mm/min)
M566 X600 Y600 Z30 E20              	; Minimum speeds mm/minute
M208 X214 Y204				; set axis maxima (adjust to suit your machine)
M208 X-4 Y0 S1				; set axis minimum (adjust to make X=0 the edge of the bed)
Attachments:
open | download - 20150611_165821_ridimensionare.jpg (108.9 KB)
open | download - 20150611_165828_ridimensionare.jpg (119.4 KB)
open | download - 20150611_165801_ridimensionare.jpg (96.6 KB)
open | download - 20150611_165808_ridimensionare.jpg (116.1 KB)
open | download - 20150611_165358_ridimensionare.jpg (145.8 KB)
open | download - 20150611_165342_ridimensionare.jpg (140.7 KB)
open | download - 20150611_173106_ridimensionare.jpg (113.7 KB)
|
Re: Printing axis Calibration 90 ABS problem on Z June 11, 2015 01:02PM |
Registered: 10 years ago Posts: 665 |
Trust me, ABS is the wrong material for that testpiece. I tried to print one on my Ormerod 1 a few days ago but then switched back to PLA, because the X+Y columns will actually deform a tiny bit as they cool down.
The reason why your Z column looks so horrible is the lack of cooling. I replaced my fan duct with a modified version of the O2 variant with enlarged cooling holes about a week ago, however I wouldn't recommend it unless you have a 4-pin PWM fan installed. With proper cooling I get much better results, but this still doesn't prevent the main parts of your testpiece from deforming a tiny bit (which is enough to create inaccurate measurements).
I can provide the modified fan duct if anyone is interested.
|
Re: Printing axis Calibration 90 ABS problem on Z June 11, 2015 02:33PM |
Registered: 9 years ago Posts: 638 |

|
Re: Printing axis Calibration 90 ABS problem on Z June 11, 2015 06:03PM |
Registered: 10 years ago Posts: 73 |
Zombiepantslol, I've stop printing pla when the reel received with the printer reach the end...
In any case tomorrow I'll try again... But to print pla I need to modify the hotend fan duct (actually half mounted and closed for ABS print) and after the print close the air flow again, so I hope all that operation don't change the axis compensation just made...
Do You think that my actual parameter is ok for PLA printing after change the temperature?
Edited 2 time(s). Last edit at 06/11/2015 06:10PM by Zonzo.
|
Re: Printing axis Calibration 90 ABS problem on Z June 11, 2015 07:57PM |
Registered: 10 years ago Posts: 665 |
Quote
Darathy
if it no trouble i would be interested to test it
No problem, here you go
 [github.com]
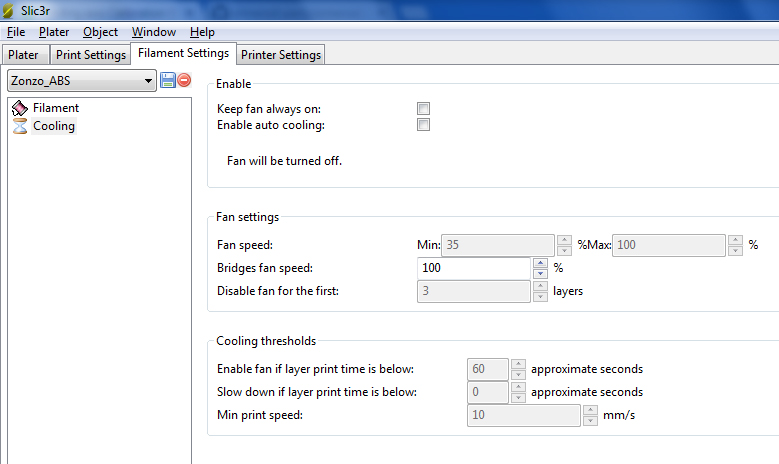
Zonzo, your Slic3r config looks good to me except for two things: You have this "M203 X6000 Y6000 Z500 E3000 ; Allow 100mm/s speeds" in your start G-code but you don't need it, it actually slows down some moves, and you have slowdown_below_layer_time set to zero. In Slic3r you can find this setting if you go to "Filament Settings" -> "Cooling" -> "Slow down if layer time is below:", there you should increase it a reasonable value like 10 or 15 seconds - you can experiment a bit depending on your cooling capabilities.
|
Re: Printing axis Calibration 90 ABS problem on Z June 12, 2015 02:30AM |
Registered: 10 years ago Posts: 73 |
ok, thanks for the tips, I've already remove the 100mm/s speed row, but about the second things I've some doubt: the cooling setting is a section that I have not set, do you think it's a good idea to activate it for PLA printing?
thanks
thanks
|
Re: Printing axis Calibration 90 ABS problem on Z June 12, 2015 09:22AM |
Registered: 10 years ago Posts: 2,472 |
The minimum layer time setting does not help with the deformation problem when printing thin columns because it just slows down the print speed which won't improve cooling time if the layer has a small perimeter (because the nozzle never moves far enough away to allow the layer to cool). You should either add a sacrificial column or two, or set up a layer-change custom G-code that moves the head some distance away from the print, delays and then moves it back.
Any ABS warping is more likely to result in the X & Y arms of the test piece curling up slightly, which will not affect the accuracy of the angle measurements. The sides of an open box can pull in slightly (thus affecting the vertical angle), but a solid column will not warp in that way.
Dave
Any ABS warping is more likely to result in the X & Y arms of the test piece curling up slightly, which will not affect the accuracy of the angle measurements. The sides of an open box can pull in slightly (thus affecting the vertical angle), but a solid column will not warp in that way.
Dave
|
Re: Printing axis Calibration 90 ABS problem on Z June 13, 2015 08:08AM |
Registered: 9 years ago Posts: 1,699 |
I have somehow the same issu. Starting with the Z-axis alone it does not look good anymore. Okay maybe it is caused by the fact that existent errors are compressed on a smaller area. I hope you can understand what I mean.
I printed in PLA.
Sven
Slicer: Simplify3D 4.0; sometimes CraftWare 1.14 or Cura 2.7
Delta with Duet-WiFi, FW: 1.20.1RC2; mini-sensor board by dc42 for auto-leveling
Ormerod common modifications: Mini-sensor board by dc42, aluminum X-arm, 0.4 mm nozzle E3D like, 2nd fan, Z stepper nut M5 x 15, Herringbone gears, Z-axis bearing at top, spring loaded extruder with pneumatic fitting, Y belt axis tensioner
Ormerod 2: FW: 1.19-dc42 on Duet-WiFi. own build, modifications: GT2-belts, silicone heat-bed, different motors and so on. Printed parts: bed support, (PSU holder) and Y-feet.
Ormerod 1: FW: 1.15c-dc42 on 1k Duet-Board. Modifications: Aluminium bed-support, (nearly) all parts reprinted in PLA/ ABS, and so on.
|
Re: Printing axis Calibration 90 ABS problem on Z June 13, 2015 01:52PM |
Registered: 10 years ago Posts: 73 |
Hi Dave,
Probably add to the printing area a small column on the opposite side of the glass is a good and also simple way to fix that problem, Monday I'll try this solution
In any case I've try to print again that pieces with PLA, but unfortunately with that filament I had another problem that result in a print worst than the ABS... I think the filament is a poor quality one, so the diameter is not regular and the extruder fault half the time to extruder. Next print: spring loaded extruder.
I'm also not satisfy by the air duct, I need something with adjustable air flow and if I found it whit a bigger and silent fan.
|
Re: Printing axis Calibration 90 ABS problem on Z July 03, 2015 06:19AM |
Registered: 10 years ago Posts: 73 |
Hi again...
I've tried to print this damn Axis Calibration colum a lot of time but it seems to me that there is something wrong with the setting, the printer or on me!
from my last message I've improve the bed levelling and some other stuff, including the return to print PLA instead od ABS and the consequent use of open air duct to cool down the print.
So please someone can give me a ready to print gcode of that "calibration 90mm.stl" that give a good quality print?
just to test if it is a slic3r problem or other
thanks.
|
Re: Printing axis Calibration 90 ABS problem on Z July 03, 2015 10:39AM |
Registered: 10 years ago Posts: 73 |
Honestly I think that the problem is due to the upgrade I do to the firmware and also to the Slic3r that I do before restart my adventure in the 3d printing.
when the Ormerod run the dc42 0.78 firmware an old web interface and an old Slic3r version in febbruary I've done a lot of print with a really good quality, all in ABS and without that kind of temperature problem.
look again at the attached file what happen to the Z collumn.
I attach also the gcode I've printed today with the result you can see on the image, if someone can try to print it and post the result...
(in that gcode I've also reduce the infill to reduce the temperature inside the column)
Attachments:
open | download - calibration_90mm_PLA_185.gcode (597.6 KB)
open | download - axis calibration print fault 1.jpg (120.7 KB)
open | download - axis calibration print fault 2.jpg (104.1 KB)
open | download - axis calibration print fault 3.jpg (114.1 KB)
open | download - axis calibration print fault 4.jpg (65.6 KB)
|
Re: Printing axis Calibration 90 ABS problem on Z July 03, 2015 11:54AM |
Registered: 10 years ago Posts: 2,472 |
The plastic is not cooling adequately, which is often a problem on tall columns. Looking at your photographs, it seems that the column is OK on the side facing the cooling air vents, but not the side away from the airflow. In such a case I simply put a sacrificial column on the build plate at a distance from the part I want. You could however try reducing the hotend temperature or changing the print speed. On the question of speed, it is quite possible that your previous successful prints were sliced with a different minimum layer time which can affect the speed that the column is printed. Be aware however than slowing down the layer time can make the problem worse instead of better. You could try changing the speed slower or faster with the web slider for a few layers and see which direction (if any) gives an improvement.
Dave
Dave
|
Re: Printing axis Calibration 90 ABS problem on Z July 03, 2015 02:16PM |
Registered: 10 years ago Posts: 1,230 |
Yes you need more cooling, just printed your sliced calibration_90mm_PLA_185.gcode, here's how it look from the normal cooling side:
notice I did open the original cooling slots and that makes the difference between your and my print:
could have finished the print like that but the other side needed more cooling, added a fan and its shows:
another thing, I think your infill is way too skinny to do be of any use, my take would be to raise the infill extrusion width to 150%, if you do, you may have to slow down the infill speed a bit for the extruder to keep up
there are some small holes in the perimeters of the z-part, never seen that before, I don't see that in my slice of the ormeaxis, might be an effect of the skinny infill
Erik

notice I did open the original cooling slots and that makes the difference between your and my print:

could have finished the print like that but the other side needed more cooling, added a fan and its shows:

another thing, I think your infill is way too skinny to do be of any use, my take would be to raise the infill extrusion width to 150%, if you do, you may have to slow down the infill speed a bit for the extruder to keep up

there are some small holes in the perimeters of the z-part, never seen that before, I don't see that in my slice of the ormeaxis, might be an effect of the skinny infill

Erik
|
Re: Printing axis Calibration 90 ABS problem on Z July 03, 2015 06:04PM |
Registered: 10 years ago Posts: 73 |
Ok,
Dave & Erik, thanks for your help.
I agree that it is a temperature problem but I can't understand why the same hardware configuration have work well some month ago and give me problem now.
That's why I thinks it could be a firmware or a slic3r setting problem, my first doubt was that something change on the termistor reading parameter and I forgot to adjust something on the config file or hardware (like the x motor inverted wire that took to me some minutes to understand what happens and invert the step motor connection on the duet), or that there are some new setting in the updated version of slic3r that I haven't set correctly.
About the infill I know that it is skinny but it was an experiment to reduce the temperature concentration.
Anyway tomorrow I'll try to open the hole as suggested.
(nobody have designed an airduct that use a bigger fan??)
Ps, I've just update the firmware to 1.9c
|
Re: Printing axis Calibration 90 ABS problem on Z July 04, 2015 03:20AM |
Registered: 9 years ago Posts: 1,699 |
I do not think that this is firmware reated in any way.
Oh there is such a new firmware released? You forgot something.
However there was a a change i the firmware regarding the thermistor but this effected only some faulty bugs. Without this change I would had my Duet to be replaced. I think this feature was introduced with FW 0.78. And you would have seen if you were effected. After turning on the printer the hot-end would have a temperature reading about 50°.
What are your temperature readings directly after turning on your OM?
Slicer: Simplify3D 4.0; sometimes CraftWare 1.14 or Cura 2.7
Delta with Duet-WiFi, FW: 1.20.1RC2; mini-sensor board by dc42 for auto-leveling
Ormerod common modifications: Mini-sensor board by dc42, aluminum X-arm, 0.4 mm nozzle E3D like, 2nd fan, Z stepper nut M5 x 15, Herringbone gears, Z-axis bearing at top, spring loaded extruder with pneumatic fitting, Y belt axis tensioner
Ormerod 2: FW: 1.19-dc42 on Duet-WiFi. own build, modifications: GT2-belts, silicone heat-bed, different motors and so on. Printed parts: bed support, (PSU holder) and Y-feet.
Ormerod 1: FW: 1.15c-dc42 on 1k Duet-Board. Modifications: Aluminium bed-support, (nearly) all parts reprinted in PLA/ ABS, and so on.
Quote
Zonzo
...my first doubt was that something change on the termistor reading parameter
Ps, I've just update the firmware to 1.9c
Oh there is such a new firmware released? You forgot something.
However there was a a change i the firmware regarding the thermistor but this effected only some faulty bugs. Without this change I would had my Duet to be replaced. I think this feature was introduced with FW 0.78. And you would have seen if you were effected. After turning on the printer the hot-end would have a temperature reading about 50°.
What are your temperature readings directly after turning on your OM?
Slicer: Simplify3D 4.0; sometimes CraftWare 1.14 or Cura 2.7
Delta with Duet-WiFi, FW: 1.20.1RC2; mini-sensor board by dc42 for auto-leveling
Ormerod common modifications: Mini-sensor board by dc42, aluminum X-arm, 0.4 mm nozzle E3D like, 2nd fan, Z stepper nut M5 x 15, Herringbone gears, Z-axis bearing at top, spring loaded extruder with pneumatic fitting, Y belt axis tensioner
Ormerod 2: FW: 1.19-dc42 on Duet-WiFi. own build, modifications: GT2-belts, silicone heat-bed, different motors and so on. Printed parts: bed support, (PSU holder) and Y-feet.
Ormerod 1: FW: 1.15c-dc42 on 1k Duet-Board. Modifications: Aluminium bed-support, (nearly) all parts reprinted in PLA/ ABS, and so on.
|
Re: Printing axis Calibration 90 ABS problem on Z July 04, 2015 04:36AM |
Registered: 10 years ago Posts: 73 |
|
Re: Printing axis Calibration 90 ABS problem on Z July 04, 2015 05:40AM |
Registered: 9 years ago Posts: 1,699 |
And the bed temperature at the same time?
Slicer: Simplify3D 4.0; sometimes CraftWare 1.14 or Cura 2.7
Delta with Duet-WiFi, FW: 1.20.1RC2; mini-sensor board by dc42 for auto-leveling
Ormerod common modifications: Mini-sensor board by dc42, aluminum X-arm, 0.4 mm nozzle E3D like, 2nd fan, Z stepper nut M5 x 15, Herringbone gears, Z-axis bearing at top, spring loaded extruder with pneumatic fitting, Y belt axis tensioner
Ormerod 2: FW: 1.19-dc42 on Duet-WiFi. own build, modifications: GT2-belts, silicone heat-bed, different motors and so on. Printed parts: bed support, (PSU holder) and Y-feet.
Ormerod 1: FW: 1.15c-dc42 on 1k Duet-Board. Modifications: Aluminium bed-support, (nearly) all parts reprinted in PLA/ ABS, and so on.
|
Re: Printing axis Calibration 90 ABS problem on Z July 04, 2015 07:18AM |
Registered: 10 years ago Posts: 73 |
|
Re: Printing axis Calibration 90 ABS problem on Z July 04, 2015 12:43PM |
Registered: 9 years ago Posts: 1,699 |
So your problem seems to be not directly firmware related. Of course the firmware may have some indirect influence like the moving was changed this affects the printing speed and if the printing speed changes you may experience problems with ABS. I could watch how only the direction of the part was the difference between fail or not fail, even the type and amount of infill does influence ABS warping...
Slicer: Simplify3D 4.0; sometimes CraftWare 1.14 or Cura 2.7
Delta with Duet-WiFi, FW: 1.20.1RC2; mini-sensor board by dc42 for auto-leveling
Ormerod common modifications: Mini-sensor board by dc42, aluminum X-arm, 0.4 mm nozzle E3D like, 2nd fan, Z stepper nut M5 x 15, Herringbone gears, Z-axis bearing at top, spring loaded extruder with pneumatic fitting, Y belt axis tensioner
Ormerod 2: FW: 1.19-dc42 on Duet-WiFi. own build, modifications: GT2-belts, silicone heat-bed, different motors and so on. Printed parts: bed support, (PSU holder) and Y-feet.
Ormerod 1: FW: 1.15c-dc42 on 1k Duet-Board. Modifications: Aluminium bed-support, (nearly) all parts reprinted in PLA/ ABS, and so on.
|
Re: Printing axis Calibration 90 ABS problem on Z July 04, 2015 02:45PM |
Registered: 10 years ago Posts: 1,230 |
Quote
Zonzo
..I agree that it is a temperature problem but I can't understand why the same hardware configuration have work well some month ago and give me problem now...
and I'm a bit puzzled why I now, with the bigger cooling slots, have temperature problems printing the ormaxis, AFAIR my very first print of the ormaxis was perfect with sharp corners all the way to the top, will have to have another go at the original reprappro sliced ormaxis.g
Quote
..(nobody have designed an airduct that use a bigger fan??)
the original fan's output is more than needed, its the fanduct's 90 degree turn of the airflow and the small output slots that is the problem, the fan cannot supply the air pressure needed to get the air though
but there are several mods on thingiverse, I printed a long time with iamburny's mod with the rotated heat sink for direct airflow, I liked that a lot but had to change to something else (johneato's brilliant Control air to the nozzles, the one I use now with drilled out air slots) when started to print ABS
link to joheato's mod of the original ormerod1, same airflow but with control of the amount to the nozzle so great for ABS prints
iamburny's mod will let more air though just not on the nozzle directly (but I don't remember this to be a problem), is very close to the nozzle so best printed in ABS
iamburny's original:
[www.thingiverse.com]
dc42's mod of same:
[www.thingiverse.com]
and there is Kim's big blue (looks good but haven't tried it)
[www.thingiverse.com]
and not to forget Form232-tek/Joar's scary cooling duct monster mod that will deliver about double airflow compared to the original as far as I can measure (simple BIC lighter test) this
I did print that one just for fun as I do need to control the air to nozzle for ABS prints
[forums.reprap.org]


uhu...
Erik
|
Re: Printing axis Calibration 90 ABS problem on Z July 05, 2015 09:32AM |
Registered: 10 years ago Posts: 2,472 |
What I suspect is that the first (successful) print was with firmware that had inaccurate temperature calibration, and printed at a lower temperature than was set. The later firmware has more accurate thermistor calibration and is printing at the temperature you have set, which is higher than previously.
Dave
Dave
|
Re: Printing axis Calibration 90 ABS problem on Z July 05, 2015 12:27PM |
Registered: 10 years ago Posts: 73 |
last test:
when the print start to lift the "z" column I've
1- add an extra external fan to cool the print
2- increase the print speed to 250% via Duet Web Control
3- reduce the temperature form 180 to 170° (with step of 2° tosse the difference)
Slicer speed setting was:
Perimeters = 60
Small Perimeters = 30
External Perimeters = 70%
Infill = 60
when the print reach the colum the print slow down so I think all the column is considered by Slic3r as small perimeter...
I'll add the picture tomorrow, now I let the print do his work
|
Re: Printing axis Calibration 90 ABS problem on Z July 05, 2015 12:36PM |
Registered: 10 years ago Posts: 73 |
|
Re: Printing axis Calibration 90 ABS problem on Z July 05, 2015 02:25PM |
Registered: 10 years ago Posts: 1,230 |
Quote
Zonzo
...2- there is another way to make the axis compensation?
if you scale it up to max it will be a much easier print (and make more sense), did that some time ago to confirm my setup, notice it was printed with iamburny's fan-duct (on the picture you will notice my mind reading Indian helper cunningly shooting arrows at it), besides that no extra cooling, was printed in same orientation as the original


Edit: found the gcode:
; generated by Slic3r 1.0.0RC3 on 2014-06-22 at 14:34:23
; layer_height = 0.25
; perimeters = 2
; top_solid_layers = 4
; bottom_solid_layers = 3
; fill_density = .4
; perimeter_speed = 60
; infill_speed = 60
; travel_speed = 100
; nozzle_diameter = 0.5
; filament_diameter = 1.75
; extrusion_multiplier = 0.791
; perimeters extrusion width = 0.50mm
; infill extrusion width = 0.84mm
; solid infill extrusion width = 0.84mm
; top infill extrusion width = 0.84mm
; first layer extrusion width = 0.48mm
G21 ; set units to millimeters
M107
G21 ; set units to millimeters
M203 X6000 Y6000 Z500 E3000 ; Allow 100mm/s speeds
G90 ; use absolute coordinates
M83 ; use relative distances for extrusion
G1 Z5 F200 ; lift nozzle
G1 X2 Y50 F2000; Go to wait for warm position
M140 S60 ; Set bed heater
M116 ; Wait for bed temperature only
T1; Select extruder
M104 S195
M116; Wait for extruder temp as well
G90 ; use absolute coordinates
M83 ; use relative distances for extrusion
Pardon me, but I think the whole orthogonal axis compensation test pieces process is a bit silly, there is way too many variables on top of each others to give any meaningful result, you will be much better of setting up your printer manually, if you leave it to software you will always have doubt if something don't turn out right, don't leave any loose end, do it proper once and for all, use a set square to set op the Z against Y-axis, ditto Y and X-axis (shim or file contact point of z-runner-mount to x-axis-plate), ditto z and x-axis (adjust slack in bearing clamps), adjust the y-end parts to make the smooth rods parallel, then level the bed against the nozzle
Erik
Edited 1 time(s). Last edit at 07/05/2015 02:51PM by ormerod168.
|
Re: Printing axis Calibration 90 ABS problem on Z July 05, 2015 03:42PM |
Registered: 10 years ago Posts: 73 |
Thanks, great point Erik.
I want to fix my ormerod structure with some aluminium pcs like you, but in any case I think that this is ok for a good adjustment, but the software correction give to the printer some fine tuning.
the same for the bed, I've manually set the bed almost perfectly but at every print i do also the 5 point bed compensation with the Dc42 probe.
|
Re: Printing axis Calibration 90 ABS problem on Z July 07, 2015 03:20PM |
Registered: 10 years ago Posts: 1,230 |
Just to test the cooling effect on the ormaxis and for the fun of it I installed Form232-tek/Joar's amazing cooling duct, unfortunately I see no way to get dc42/David's probe in there, not enough space, will collide with the treaded rod, so I just secured it temporary with a cable strip while doing a test print (no probe was harmed in this printing session) and manually zeroed thehot end, center bed, nozzle down by sending G92 X100 Y100 Z0
Could not find the original ormaxis so re-sliced your calibration_90mm.stl with setting found in the newer ormaxis from the original (SD-card, gcode folder) besides a few changes
; layer_height = 0.24
; perimeters = 2
; top_solid_layers = 4
; bottom_solid_layers = 3
; fill_density = 0.4
; perimeter_speed =20 40
; infill_speed =20 40
; travel_speed =60 150
; nozzle_diameter = 0.5
; filament_diameter = 1.75
; extrusion_multiplier =1 0.90
; perimeters extrusion width =0.85mm 0.60
; infill extrusion width =0.87mm 0.90
bed temperature 65
extruder temperature 205
re-sliced for better infill, I do think this is at least part of your problem, that infill might help distribute the heat, here it is, nice and thick
And the prints side by side, the last one printed with Joar's cooling duct look much much better, even with the 15 degree higher temperature and no extra cooling added like with the first print
and the small holes is gone, must have been caused by the collapsing infill
will have to print your original sliced calibration_90mm.gcode again to see how much influence the skinny infill have
A big Thank You goes to Form232-tek/Joar for sharing his amazing design!
Erik


Could not find the original ormaxis so re-sliced your calibration_90mm.stl with setting found in the newer ormaxis from the original (SD-card, gcode folder) besides a few changes
; layer_height = 0.24
; perimeters = 2
; top_solid_layers = 4
; bottom_solid_layers = 3
; fill_density = 0.4
; perimeter_speed =
; infill_speed =
; travel_speed =
; nozzle_diameter = 0.5
; filament_diameter = 1.75
; extrusion_multiplier =
; perimeters extrusion width =
; infill extrusion width =
bed temperature 65
extruder temperature 205
re-sliced for better infill, I do think this is at least part of your problem, that infill might help distribute the heat, here it is, nice and thick


And the prints side by side, the last one printed with Joar's cooling duct look much much better, even with the 15 degree higher temperature and no extra cooling added like with the first print

and the small holes is gone, must have been caused by the collapsing infill

will have to print your original sliced calibration_90mm.gcode again to see how much influence the skinny infill have
A big Thank You goes to Form232-tek/Joar for sharing his amazing design!
Erik
|
Re: Printing axis Calibration 90 ABS problem on Z July 08, 2015 01:35AM |
Registered: 10 years ago Posts: 73 |
Yes, the print result much better!
I have print that cooling duct and I've think to attach the dc probe using a "L" printed support fixed to the hole of the original probe.... I'll check for that this evening
Erik, cous You post your last gode please, i want to print that and see the difference
I have print that cooling duct and I've think to attach the dc probe using a "L" printed support fixed to the hole of the original probe.... I'll check for that this evening
Erik, cous You post your last gode please, i want to print that and see the difference
|
Re: Printing axis Calibration 90 ABS problem on Z July 08, 2015 02:58AM |
Registered: 10 years ago Posts: 1,230 |
Quote
Zonzo
..I have print that cooling duct and I've think to attach the dc probe using a "L" printed support fixed to the hole of the original probe.... I'll check for that this evening..
Good luck, You may need a shoe horn :-)
Quote
Erik, cous You post your last gode please, i want to print that and see the difference
Attached, sliced the axis part only to save on printing time
Erik
|
Re: Printing axis Calibration 90 ABS problem on Z July 08, 2015 01:49PM |
Registered: 10 years ago Posts: 1,230 |
Quote
ormerod168
..will have to print your original sliced calibration_90mm.gcode again to see how much influence the skinny infill have..
So here's the lineup, same file (calibration_90mm_PLA_185.gcode) printed with different fanducts
Left, printed with Form232-tek/Joar design - right, printed with modified Ormerod fanduct (extra cooling added at Z 30mm)

both prints has small indent in the surface, my guess is collapsing infill pulling perimeters in

the three prints together, hotend/temperature/infill extrusion width, left to right
Form232-tek/205C/150% - Form232-tek/185C/100% - Ormerod (mod)/185C/100%

..and the winner is...ta-daaaa..
Another alternative Hot-end cooling duct
[forums.reprap.org]
Erik
|
Re: Printing axis Calibration 90 ABS problem on Z July 09, 2015 01:13AM |
Registered: 9 years ago Posts: 1,699 |
The second and third print of the last picture used the identically gcode-file? That would be quite interesting as my last print was a mixture of the first and third picture.Did you use the delivered fan or another type of fan?
Slicer: Simplify3D 4.0; sometimes CraftWare 1.14 or Cura 2.7
Delta with Duet-WiFi, FW: 1.20.1RC2; mini-sensor board by dc42 for auto-leveling
Ormerod common modifications: Mini-sensor board by dc42, aluminum X-arm, 0.4 mm nozzle E3D like, 2nd fan, Z stepper nut M5 x 15, Herringbone gears, Z-axis bearing at top, spring loaded extruder with pneumatic fitting, Y belt axis tensioner
Ormerod 2: FW: 1.19-dc42 on Duet-WiFi. own build, modifications: GT2-belts, silicone heat-bed, different motors and so on. Printed parts: bed support, (PSU holder) and Y-feet.
Ormerod 1: FW: 1.15c-dc42 on 1k Duet-Board. Modifications: Aluminium bed-support, (nearly) all parts reprinted in PLA/ ABS, and so on.

Sorry, only registered users may post in this forum.