Printing axis Calibration 90 ABS problem on Z
Posted by Zonzo
|
Re: Printing axis Calibration 90 ABS problem on Z July 09, 2015 02:26AM |
Registered: 10 years ago Posts: 1,230 |
|
Re: Printing axis Calibration 90 ABS problem on Z July 10, 2015 12:21PM |
Registered: 10 years ago Posts: 73 |
|
Re: Printing axis Calibration 90 ABS problem on Z July 10, 2015 01:12PM |
Registered: 9 years ago Posts: 1,699 |
As I really like the design of the fan in theory (not printed yet) I will look how to make an adapter for both - the hotend and the sensor. I think of an adapter plate between one fan side and the airduct. I think on monday there could be results. I hope you have enough patience.
Slicer: Simplify3D 4.0; sometimes CraftWare 1.14 or Cura 2.7
Delta with Duet-WiFi, FW: 1.20.1RC2; mini-sensor board by dc42 for auto-leveling
Ormerod common modifications: Mini-sensor board by dc42, aluminum X-arm, 0.4 mm nozzle E3D like, 2nd fan, Z stepper nut M5 x 15, Herringbone gears, Z-axis bearing at top, spring loaded extruder with pneumatic fitting, Y belt axis tensioner
Ormerod 2: FW: 1.19-dc42 on Duet-WiFi. own build, modifications: GT2-belts, silicone heat-bed, different motors and so on. Printed parts: bed support, (PSU holder) and Y-feet.
Ormerod 1: FW: 1.15c-dc42 on 1k Duet-Board. Modifications: Aluminium bed-support, (nearly) all parts reprinted in PLA/ ABS, and so on.
|
Re: Printing axis Calibration 90 ABS problem on Z July 10, 2015 01:35PM |
Registered: 10 years ago Posts: 1,230 |
Quote
Zonzo
Sorry for the stupid question, but HOW the heatsink have to fit on the Form232-tek/Joar's airduct???
Quote
Form232-tek
....This is not a print and play conversion. I have cut away 1/3 of the aluminium cooling ribs, and drilled a new hole in it. The cooling rib is also rotated 90 deg. Since the plastic is fairly close to the hot end, I have also made a small heat shield between the hot aluminium and the plastic. A small hole in the plastic cools down the heat shield.
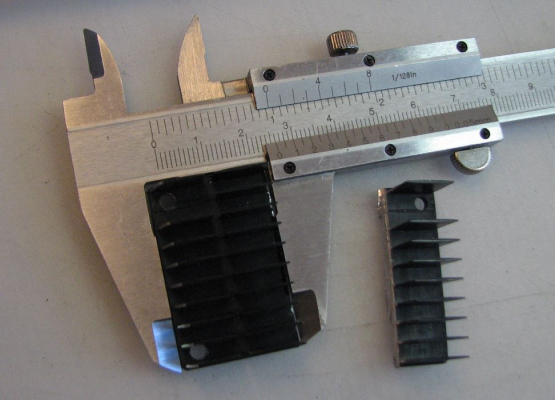
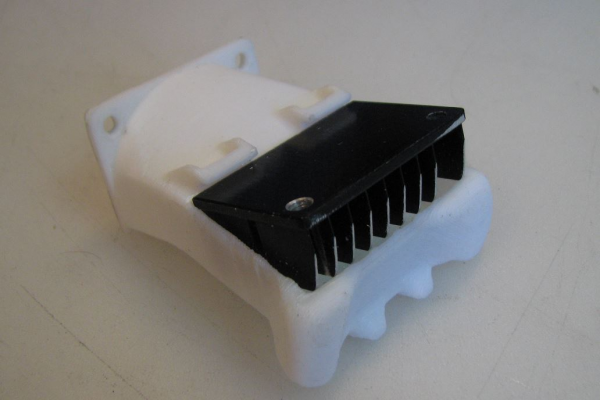
as Joar wrote, you will have to cut the heatsink 1/3, down to a total of 26mm, but don't sweat it, its right in line with the slots in the ribs across the heatsink so its actually only the plate of the heatsink you will have to cut, 10 sec. with a hacksaw and you are done
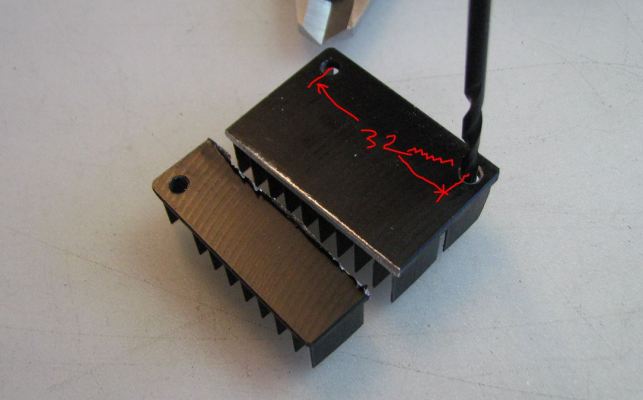
now you have a heatsink with only one 3mm hole - drill another in a distance of 32mm from the centerline of the first (you can use the aluminium block as a guide to mark the position of the hole or secure it to the heatsink with a 3mm screw and run a 2.5mm drill bit though, dismount the heatsink and drill the hole to 3mm
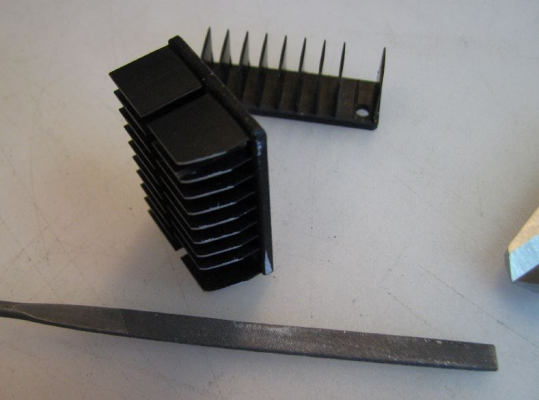
use a file to round the corners of the ribs nearest the holes (the lowest part of the heatsink when mounted on the printer)
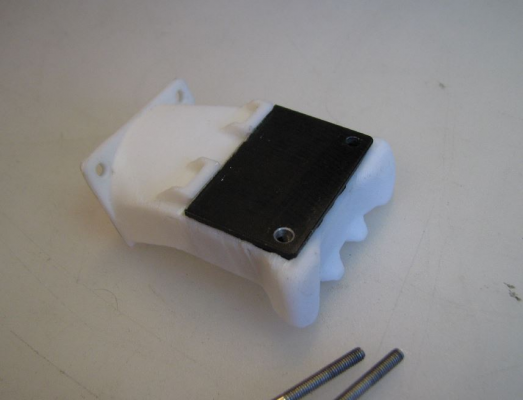
mount the heatsink in the fanduct by first inserting the upper part under the two hooks and then swing the lower part in
wish I had taken some pictures I could show you, will make a pictorial and post later this evening
Erik
|
Re: Printing axis Calibration 90 ABS problem on Z July 10, 2015 03:33PM |
Registered: 10 years ago Posts: 1,230 |
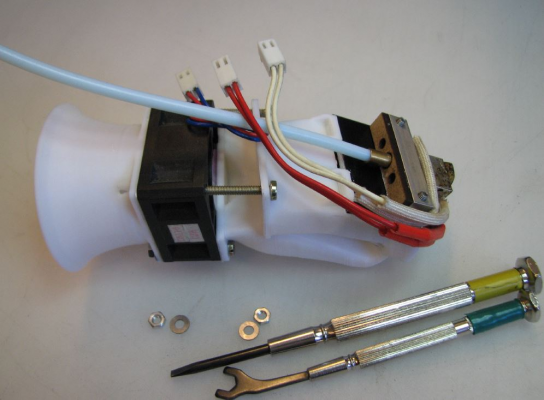
Use a hacksaw to cut the heatsink to a total of 26mm
file the lower (as mounted on printer) part, round it in a radius of 26mm to permit it to "swing" into the fanduct
drill a 3mm hole 32mm from the center of the other one (event. use aluminium cooling block as guide)
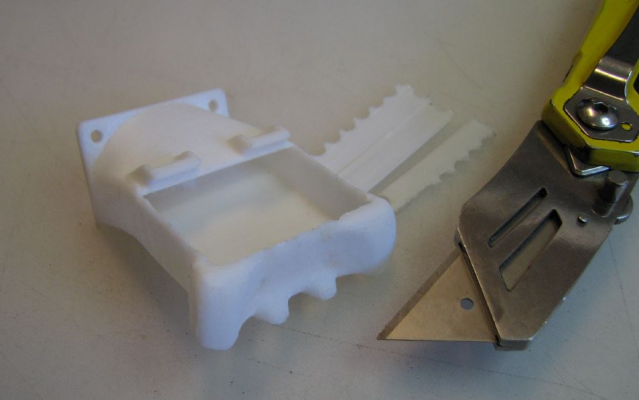
cut out the print support
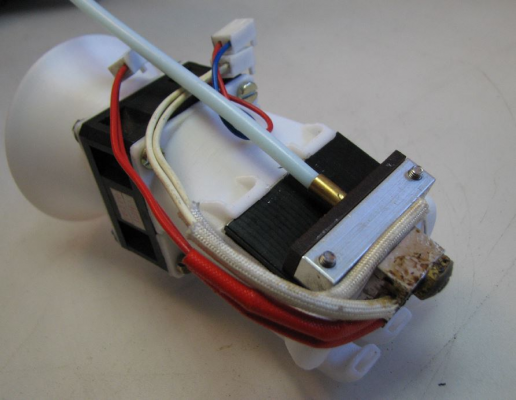
position the upper part of the heatsink under the lashes of the fanduct and "swing" the heatsink in place
heatsink in place
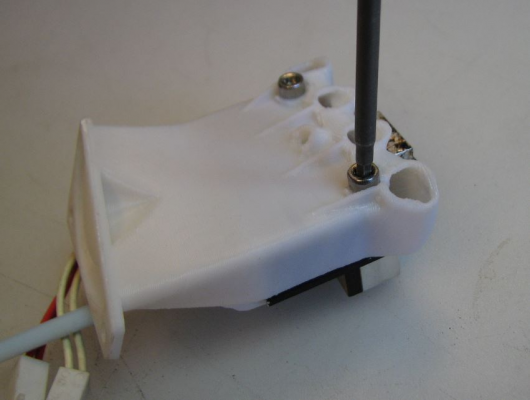
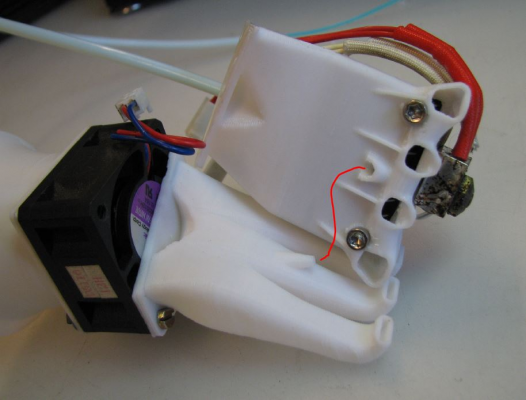
secure with screws (the ribs of the heatsink will support the screws but don't over tighten)
make sure to line up the parts properly before tightening the screws
you may have to file a flat part on the heat of two of the screws to get them in there, also use shims under the nuts
I did not find it necessary to install a heat shield to protect the plastic (ABS) from the hotend as it hold up just fine without it
should have posted this in Joar's thread but strangely got stuck in a login loop
Erik
|
Re: Printing axis Calibration 90 ABS problem on Z July 10, 2015 03:55PM |
Registered: 10 years ago Posts: 1,230 |
Quote
Treito
As I really like the design of the fan in theory (not printed yet) I will look how to make an adapter for both - the hotend and the sensor. I think of an adapter plate between one fan side and the airduct. I think on monday there could be results. I hope you have enough patience.
Yes I too like, the design its awesome! - did print and install it just for the fun of it - and of cause to see how effective it was
I mostly print ABS so its not perfect for me, as there is no way to shot down the cooling
also I would prefer something that that would cool all around the nozzle, but up to now I think this is the best option, much better than than the stock one
but lucky me got two printers, will keep it on one of them for PLA print...and eye candy, it's a real crowd pleaser :-)
Erik
|
Re: Printing axis Calibration 90 ABS problem on Z July 11, 2015 03:13AM |
Registered: 9 years ago Posts: 1,699 |
Quote
ormerod168
but lucky me got two printers, will keep it on one of them for PLA print...and eye candy, it's a real crowd pleaser :-)
I am working on this but I am still missing some parts due to customs and a parcel strike over more than 3 weeks.
So it can be a good idea to use the new one for PLA (my preferred material) and the old one for ABS.
But I do not like the idea to destroy the original heatsink without a replacement. I think I should test this big blue
Slicer: Simplify3D 4.0; sometimes CraftWare 1.14 or Cura 2.7
Delta with Duet-WiFi, FW: 1.20.1RC2; mini-sensor board by dc42 for auto-leveling
Ormerod common modifications: Mini-sensor board by dc42, aluminum X-arm, 0.4 mm nozzle E3D like, 2nd fan, Z stepper nut M5 x 15, Herringbone gears, Z-axis bearing at top, spring loaded extruder with pneumatic fitting, Y belt axis tensioner
Ormerod 2: FW: 1.19-dc42 on Duet-WiFi. own build, modifications: GT2-belts, silicone heat-bed, different motors and so on. Printed parts: bed support, (PSU holder) and Y-feet.
Ormerod 1: FW: 1.15c-dc42 on 1k Duet-Board. Modifications: Aluminium bed-support, (nearly) all parts reprinted in PLA/ ABS, and so on.
|
Re: Printing axis Calibration 90 ABS problem on Z July 19, 2015 06:57AM |
Registered: 10 years ago Posts: 1,230 |
|
Re: Printing axis Calibration 90 ABS problem on Z July 19, 2015 07:22AM |
Registered: 9 years ago Posts: 1,699 |
Quote
ormerod168
Quote
zombiepantslol
You have this "M203 X6000 Y6000 Z500 E3000 ; Allow 100mm/s speeds" in your start G-code but you don't need it, it actually slows down some moves...
that may be true with the axises but slows down the extruder so I'll keep the M203 E3600 string
Erik
I had to slow down my z-axis as it squeezes very loud otherwise and I am not able to find the source. So what is wrong about this:
M201 X1000 Y1000 Z15 E1000; acceleration tweaks for improved finish
M203 X15000 Y15000 Z150 E3600; speed tweaks for improved finish
Slicer: Simplify3D 4.0; sometimes CraftWare 1.14 or Cura 2.7
Delta with Duet-WiFi, FW: 1.20.1RC2; mini-sensor board by dc42 for auto-leveling
Ormerod common modifications: Mini-sensor board by dc42, aluminum X-arm, 0.4 mm nozzle E3D like, 2nd fan, Z stepper nut M5 x 15, Herringbone gears, Z-axis bearing at top, spring loaded extruder with pneumatic fitting, Y belt axis tensioner
Ormerod 2: FW: 1.19-dc42 on Duet-WiFi. own build, modifications: GT2-belts, silicone heat-bed, different motors and so on. Printed parts: bed support, (PSU holder) and Y-feet.
Ormerod 1: FW: 1.15c-dc42 on 1k Duet-Board. Modifications: Aluminium bed-support, (nearly) all parts reprinted in PLA/ ABS, and so on.
|
Re: Printing axis Calibration 90 ABS problem on Z July 19, 2015 07:50AM |
Registered: 10 years ago Posts: 1,230 |
Quote
Treito
I had to slow down my z-axis as it squeezes very loud otherwise and I am not able to find the source. So what is wrong about this:
M201 X1000 Y1000 Z15 E1000; acceleration tweaks for improved finish
M203 X15000 Y15000 Z150 E3600; speed tweaks for improved finish
my string for config.g running with no problem whatsoever:
M201 X800 Y800 Z15 E3600 ; Accelerations (mm/s^2)
M203 E3600 ; Maximum speeds (mm/min)
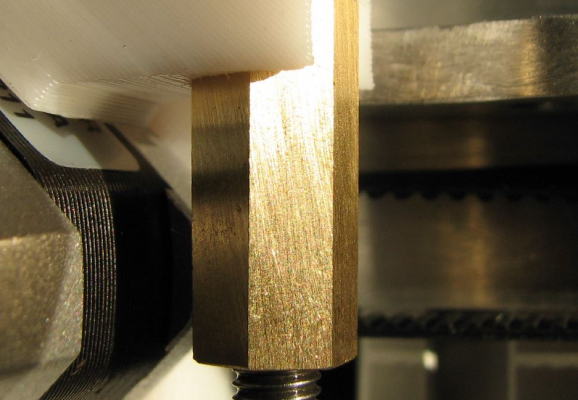
sound to me like a mechanical problem, do you use the original Z steel nut on the steel treaded rod?, if so, do change it for a long brass or bronze one or keep the original very well greased (don't think a normal household oil film will do, as the carrying surface of the nut with the few thread is very small)
Erik
|
Re: Printing axis Calibration 90 ABS problem on Z July 19, 2015 08:01AM |
Registered: 9 years ago Posts: 1,699 |
If you would have take a look into my signature I use a 15mm long nut but not brass or bronze. It is steel or I think even stainless steel. I also use the extended nut trap block so the nut isb totally inside the plastic block. The threaded rod is guided by a bearing at the top (but not fixed to it with nuts or something like this).
I used silicon spray to lubricate everything after WD-40 killed my original threaded rod. The original was not straight and wobbling. The new one is straight and that is why I could use the bearing at the top. The problem was since the beginning with original gears, rod, nut and so on but not that heavy. Except for the motor and the bearing on the motor I replaced everything since the beginning.
If my Ormerod 2 is finished I can disassemble all again and maybe change the motor as I have two spares now even three as long as I have no second extruder at the new Ormerod. I do not know why I have ordered so much motors. Okay I wanted one for spare, but two?
Slicer: Simplify3D 4.0; sometimes CraftWare 1.14 or Cura 2.7
Delta with Duet-WiFi, FW: 1.20.1RC2; mini-sensor board by dc42 for auto-leveling
Ormerod common modifications: Mini-sensor board by dc42, aluminum X-arm, 0.4 mm nozzle E3D like, 2nd fan, Z stepper nut M5 x 15, Herringbone gears, Z-axis bearing at top, spring loaded extruder with pneumatic fitting, Y belt axis tensioner
Ormerod 2: FW: 1.19-dc42 on Duet-WiFi. own build, modifications: GT2-belts, silicone heat-bed, different motors and so on. Printed parts: bed support, (PSU holder) and Y-feet.
Ormerod 1: FW: 1.15c-dc42 on 1k Duet-Board. Modifications: Aluminium bed-support, (nearly) all parts reprinted in PLA/ ABS, and so on.
Sorry, only registered users may post in this forum.
