Any Ormerod oners from Cape Town?
Posted by Karoo Klong
|
Any Ormerod oners from Cape Town? June 22, 2017 01:51PM |
Registered: 6 years ago Posts: 174 |
Good day all
I bought a second hand Ormerod 1 from a fellow forum member.
I came across this site which I followed to the letter [reprappro.com]
I flashed the Duet v0.6 board it with v0.78 Firmware and then had some issues in connecting with the web interface.
I also struggled to get the z-sensor to auto level.
I eventually installed v1.09 an a friend helped me with the setup for the web interface.
We managed to get the auto home working fine and all axes homed and also the Auto Bed Compensation worked.
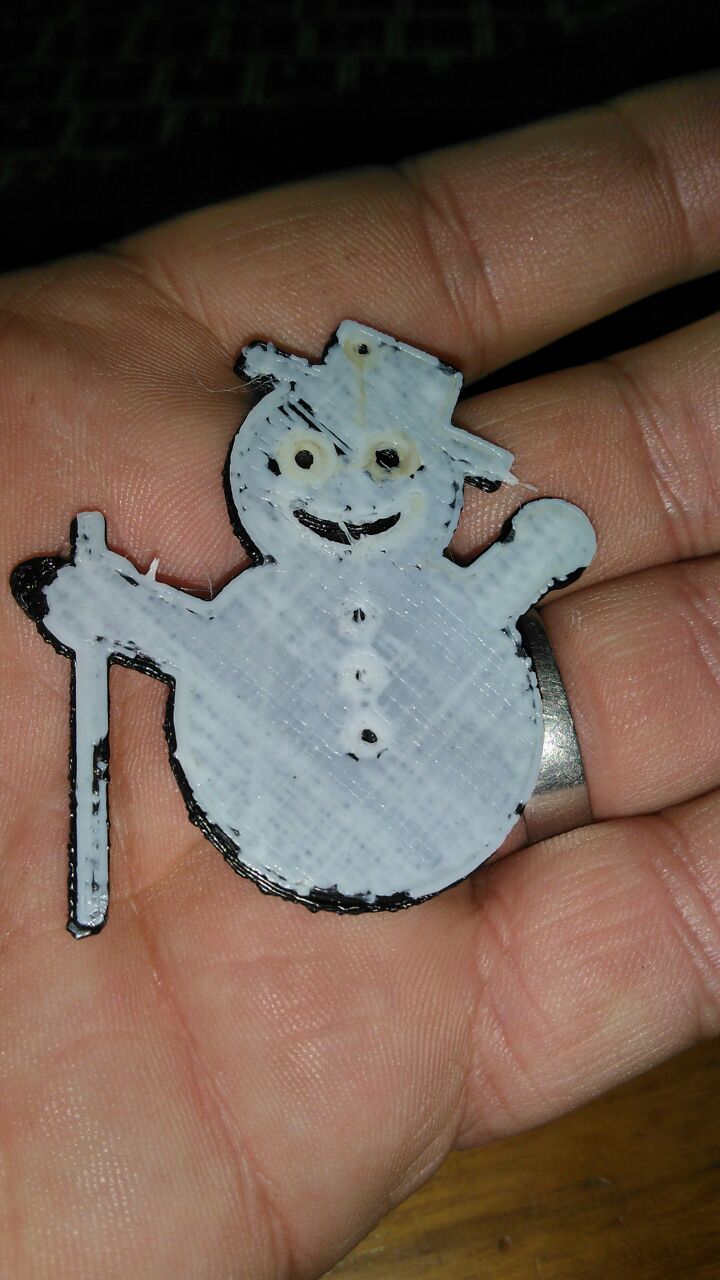
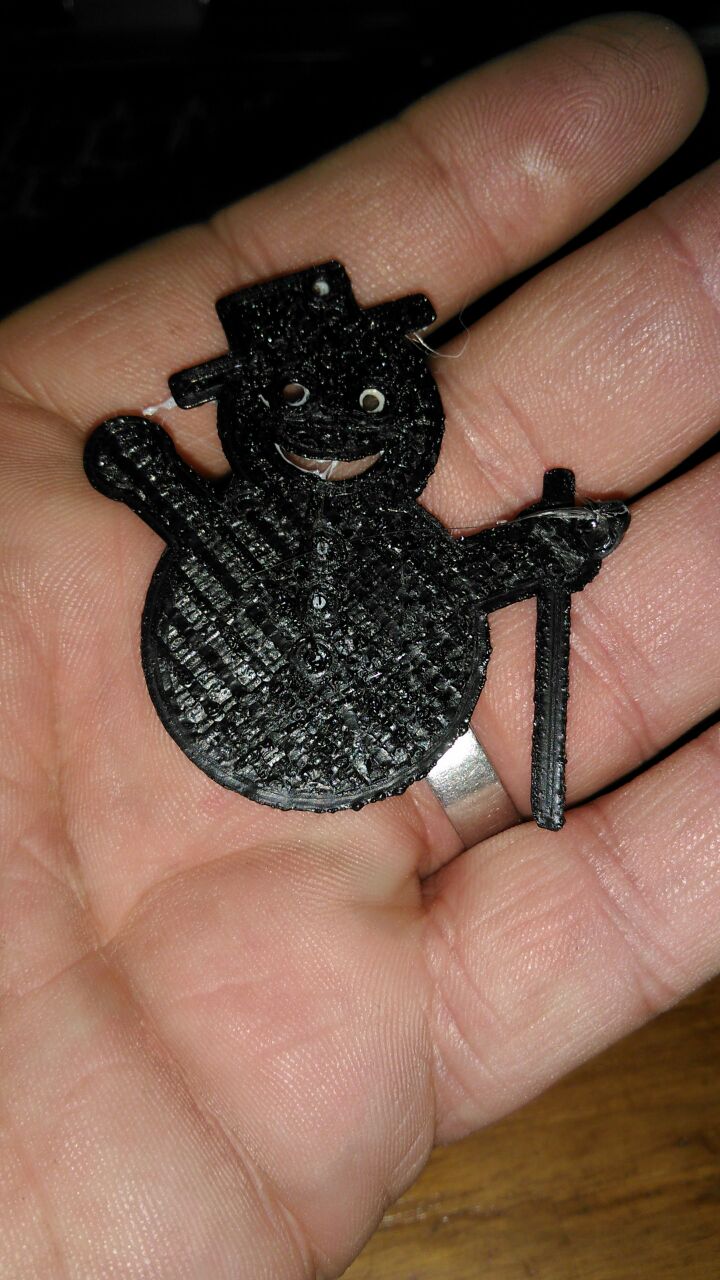
I adjusted the extruder calibration as described and then tried to do the first print (Snowman)
The printer stated with Auto Bed Compensation and then proceded to "print" 5mm above the bed and with no extrusion happening.
The software just keeps telling me "no tool selected".
I have been selecting all the tools and none of the tools and some of the tools but to no avail.
Eventually I managed to find a post here pointing to the new v1.18.1 Firmware.
I installed it and adjusted my config.g file as mentioned.
Now the tool selection is still not active and my Y-Axis is inverted. But no matter how I incert the wireing of the code,
the printer still tries to find the limit switch for the Y-Axis on the opposite side.
dc42 suggested that I try the [configurator.reprapfirmware.org] in order to generate a new config.g file for my machine.
I am currently struggling to get this done and would really appreciate some help from a fellow Ormeroder.
I came across this article from dc42 [miscsolutions.wordpress.com]
and am trying to make heads of tails from it.
I have great respect for dc42 as I see he is very passionate about this subject and I would like to learn all I can from this community.
His continued support and upgrading of a product that is already almost 4 years old is quite commendable and amazing.
I see some of you have quite amazing modded machines and I would also like to try and contribute to some modding in order to make it and even more stable machine.
I stay in Durbanville area and work in Somerset West. I put in time every evening after work to try and get this machine to work again.
I am at my witts end as it keeps feeling like I am just reading and reading and I keep hitting walls.
I trust that someone will be willing and patient enough to try and help me to also realise my dream of being able to print my own designs and models.
Best regards
Michiel
I bought a second hand Ormerod 1 from a fellow forum member.
I came across this site which I followed to the letter [reprappro.com]
I flashed the Duet v0.6 board it with v0.78 Firmware and then had some issues in connecting with the web interface.
I also struggled to get the z-sensor to auto level.
I eventually installed v1.09 an a friend helped me with the setup for the web interface.
We managed to get the auto home working fine and all axes homed and also the Auto Bed Compensation worked.
I adjusted the extruder calibration as described and then tried to do the first print (Snowman)
The printer stated with Auto Bed Compensation and then proceded to "print" 5mm above the bed and with no extrusion happening.
The software just keeps telling me "no tool selected".
I have been selecting all the tools and none of the tools and some of the tools but to no avail.
Eventually I managed to find a post here pointing to the new v1.18.1 Firmware.
I installed it and adjusted my config.g file as mentioned.
Now the tool selection is still not active and my Y-Axis is inverted. But no matter how I incert the wireing of the code,
the printer still tries to find the limit switch for the Y-Axis on the opposite side.
dc42 suggested that I try the [configurator.reprapfirmware.org] in order to generate a new config.g file for my machine.
I am currently struggling to get this done and would really appreciate some help from a fellow Ormeroder.
I came across this article from dc42 [miscsolutions.wordpress.com]
and am trying to make heads of tails from it.
I have great respect for dc42 as I see he is very passionate about this subject and I would like to learn all I can from this community.
His continued support and upgrading of a product that is already almost 4 years old is quite commendable and amazing.
I see some of you have quite amazing modded machines and I would also like to try and contribute to some modding in order to make it and even more stable machine.
I stay in Durbanville area and work in Somerset West. I put in time every evening after work to try and get this machine to work again.
I am at my witts end as it keeps feeling like I am just reading and reading and I keep hitting walls.
I trust that someone will be willing and patient enough to try and help me to also realise my dream of being able to print my own designs and models.
Best regards
Michiel
|
Re: Any Ormerod oners from Cape Town? June 23, 2017 07:26AM |
Registered: 10 years ago Posts: 2,472 |
Gooidag
You are using the configuration and homing files for the Ormerod 2 rather than the Ormerod 1 - the Ormerod 2 has the Y motor on the opposite side. All motors can be easily reversed in the configuration, or you can simply reverse the connection of the motor on the Duet board, but the homing files also need to drive the motors to the correct side of the machine. Tool selection numbering went through a few changes, and the extruder is now selected with "T1"
Unfortunately the original G code files were probably made using the older tool numbering standard so may need editing (just use any text editor). While you are at it, remove the homing command from the G-code file. It is a lot easier to home the printer by hand before you start the print. Always manually home the Z axis rather than using the automatic Z homing, because that is very unreliable on the original Ormerod 1.
To manually home Z, first home X and Y, then move to the middle of the bed (using web interface controls or issue command "G1 X100 Y100" ) Then tell the Duet that Z is very high using the command "G92 Z200" If you do not do that, the Duet will not allow you to lower Z below what it "thinks" is zero. Make sure the nozzle is clean (pick off any bits of hardened plastic) and move it so that it is about a mm or two from the bed. Put a sheet of ordinary copier paper (or newspaper) under the nozzle. Continually move the paper around slightly, ensuring that you are not pressing down on the bed while doing so, and use the web control to lower the nozzle by small amounts at a time (0.05mm). You are looking to lower the nozzle so that you can feel the paper being gripped fairly firmly but not so tight that is cannot be moved. When you have found that position, enter the command "G92 Z0" then use the web control to raise Z by about 5mm so you can remove the paper. The printer is now homed.
I do not have my config or homing files available where I am right now, but hopefully someone will upload them or point you to where they can be found soon.
Dave
|
Re: Any Ormerod oners from Cape Town? June 23, 2017 10:55AM |
Registered: 10 years ago Posts: 1,230 |
Quote
Karoo Klong
Now the tool selection is still not active
You should have a line with M563 to define a tool and a line with T0 to set it active
[reprap.org]
e.g from my config:
M563 P0 D0 H1 ; Define tool 1
T0
Quote
....and my Y-Axis is inverted. But no matter how I incert the wireing of the code,
the printer still tries to find the limit switch for the Y-Axis on the opposite side.
you should also have a line with M574 to set the endstop configuration
[reprap.org]
e.g from my config:
M574 X0 Y2 Z0 S1
just as an exampel, my config for ormerod 1, dc42's firmware RepRapFirmware-1.17e.bin -R
please not that "M569 P0 S0 ; direction off X motor" could be the wrong way for your setup as I may have turn over the motor cables some time ago, also I have dc42's intelligent Z probe installed
- M111 S0; Debug off
M550 PBigfoot ; Machine name (can be anything you like)
M551 Preprap ; Machine password
M552 P192.168.1.14 ; IP address
M553 P255.255.255.0 ; Netmask
M554 P192.168.1.1 ; Gateway
M555 P2 ; Set output to look like Marlin
G21 ; Work in millimetres
G90 ; Send absolute coordinates
M83 ; relative extruder moves
M569 P0 S0 ; direction off X motor
M906 X1000 Y1200 Z800 E1200 ; Set motor currents (mA)
M563 P0 D0 H1 ; Define tool 1
G10 P0 S-273 R-273 ; Set tool 1 operating and standby temperatures
M92 E420 ; Set extruder steps per mm
M558 P1 ; Use an unmodulated Z probe or an intelligent Z probe
G31 Z0.15 P500 ; Set the probe height and threshold (put your own values here)
M305 P0 T10000; added
M305 P1 T100000 R1000 B4138 C0; Put your own H and/or L values here to set the first nozzle thermistor ADC correction
M201 X1200 Y1200 Z20 E3600 ; set accelerations (mm/s^2)
M556 S78 X0 Y0 Z0 ; axis compensation
M203 X15000 Y15000 Z250 E3600; Maximum speeds (mm/min)
M566 X1800 Y1800 Z30 E20 ; maximum jerk speed mm/minute(i.e. maximum instantaneous change in speed)
M208 X210 Y205 Z185; set axis travel
M208 X 0 S1 ; set axis minimum
M574 X0 Y2 Z0 S1
T0
Erik
|
Re: Any Ormerod oners from Cape Town? June 23, 2017 11:02AM |
Registered: 10 years ago Posts: 1,230 |
|
Re: Any Ormerod oners from Cape Town? June 23, 2017 05:27PM |
Registered: 6 years ago Posts: 174 |
Thank you Dave and Erik for your help.
I will do these alterations tomorrow and see whats happening from there.
Yesterday I reinstalled v1.09 and all was working fine. It even "printed" but still no tool selected. I could not even manually select the tool. But it was nice to finaly see and hear it priting Snowman.
Thanks Dave. Goeie dag to you as wel.
Erik. I saw some of the mods you did to your machine. WOW!!!!!
I would also like to make majour improvements like you did.
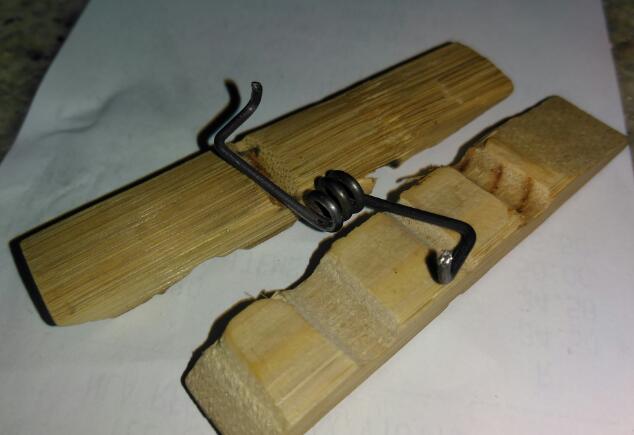
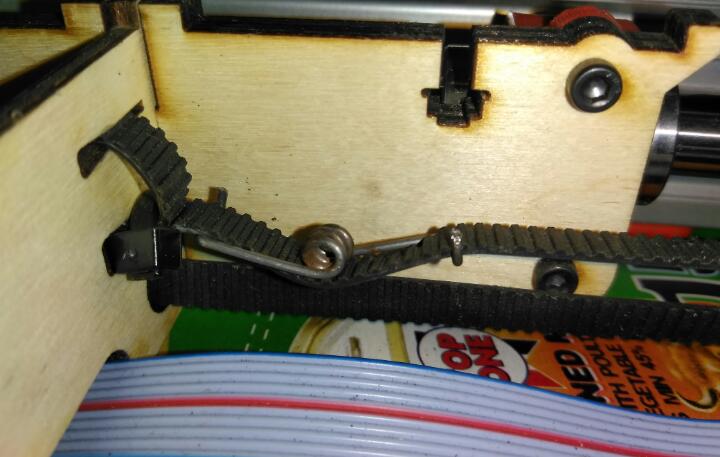
Yesterday i did my fisrts modification to my Ormerod.
I made a belt Tentioner from a cheap washing peg and it works very well.
Edited 1 time(s). Last edit at 06/23/2017 07:19PM by Karoo Klong.
I will do these alterations tomorrow and see whats happening from there.
Yesterday I reinstalled v1.09 and all was working fine. It even "printed" but still no tool selected. I could not even manually select the tool. But it was nice to finaly see and hear it priting Snowman.
Thanks Dave. Goeie dag to you as wel.
Erik. I saw some of the mods you did to your machine. WOW!!!!!
I would also like to make majour improvements like you did.
Yesterday i did my fisrts modification to my Ormerod.
I made a belt Tentioner from a cheap washing peg and it works very well.
Edited 1 time(s). Last edit at 06/23/2017 07:19PM by Karoo Klong.
|
Re: Any Ormerod oners from Cape Town? July 03, 2017 06:21PM |
Registered: 6 years ago Posts: 174 |
Thank you so much for your help Erik.
I used your advice om the firmware and used your config.g file as well.
I substituted my parameters into it.
Finally I could print something.
I used snowman as by first 5 prints and Plated around with the settings gaan in the Gcode of the print.
I love how fast you made the reaction of the machine!
I now only manualy evel the bed.
I used hairspray to get the prints to stick. My prints look rather crappy and it seems as if the nozzle is staging through the precious prints.
I have kind of lost my urge you want to print anymore.
I don't know or where and how to start fixing this problem.
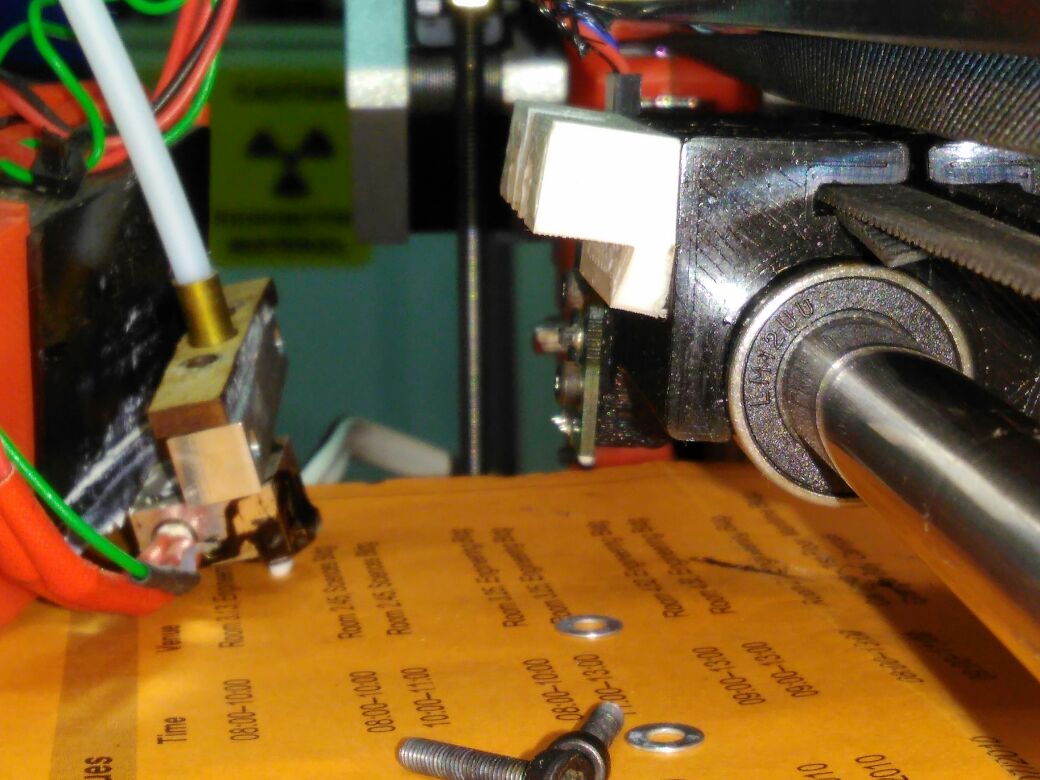
I noticed that the spacer between the hotende and the x-carridge was charged down at an angle that was causing the sensor to knock the part as it was printing. I put a cardboard spacer in and then it seemed to work better.
I am buddy iteering a aluminium X-Arm for my printer. Before I tackle the printing g resolution problem again.
Any help and tips would be appreciated.
I used your advice om the firmware and used your config.g file as well.
I substituted my parameters into it.
Finally I could print something.
I used snowman as by first 5 prints and Plated around with the settings gaan in the Gcode of the print.
I love how fast you made the reaction of the machine!
I now only manualy evel the bed.
I used hairspray to get the prints to stick. My prints look rather crappy and it seems as if the nozzle is staging through the precious prints.
I have kind of lost my urge you want to print anymore.
I don't know or where and how to start fixing this problem.
I noticed that the spacer between the hotende and the x-carridge was charged down at an angle that was causing the sensor to knock the part as it was printing. I put a cardboard spacer in and then it seemed to work better.
I am buddy iteering a aluminium X-Arm for my printer. Before I tackle the printing g resolution problem again.
Any help and tips would be appreciated.
|
Re: Any Ormerod oners from Cape Town? July 05, 2017 03:11PM |
Registered: 10 years ago Posts: 1,230 |
Quote
Karoo Klong
Thank you so much for your help Erik.
No problem, always glad to help and nice to see some action in the forum again!
Quote
I now only manualy evel the bed.
I use dc42's brilliant probe but still fine adjust the nozzle on paper by turning the treaded rod manually, easy to do esp. when the motor current turns down after half a minute or so - I installed a star wheel on top of the treaded rod to make adjustment easier and more precise

Quote
I used hairspray to get the prints to stick. My prints look rather crappy and it seems as if the nozzle is staging through the precious prints.
I have kind of lost my urge you want to print anymore.
I don't know or where and how to start fixing this problem.
I noticed that the spacer between the hotende and the x-carridge was charged down at an angle that was causing the sensor to knock the part as it was printing. I put a cardboard spacer in and then it seemed to work better.
yes you better print a new one first thing - it's important to have the nozzle sit square to the bed so the filament is squished out equally to all sides and that may well be your problem
The original design with countersunk screws and open slots is not so great, the red one is the original, the white one is much better


Here link to the tread with Simon's new-nozzle-mount.stl :
[forums.reprap.org]
|
Re: Any Ormerod oners from Cape Town? July 19, 2017 11:07AM |
Registered: 6 years ago Posts: 174 |
Hi Erik.
Thank you for that tip.
I have been considering dc42's probe and was wondering how well it works.
For now I just need to get my printer going.
I have got the new aluminium X-Arm reinstalled now and I changed the design to be like it was in the Ormerod 1 where the rib actually grips the M5 nut, Since I cant successfully print yet that's the way I have to make things happen. I wonder why did they remove that nut grip on the Ormerod 2?
Anyway, I have started attempting a print again and your settings work very well.
BUT
My prints keep failing halfway in with the following error message
Error: heating fault on heater 0, temperature excursion exceeded 15.0C
I had this error previously before I changed any of the parts but it went away.
I am now so disappointed. I find it difficult to gather the courage to try and find the fault. The constant struggle to be able to print an object is just so tiresome.
I am using ABS and extruder heat setting at 235'C and heated bed at 107'C (Since its winter here I cant seem to get the heated bed up to 110'C)
I know that I will also have to eventually get to the point where I need to look at extruder settings as well as retraction and find the optimum heat for the hot end as well as the correct printing speed.
It is getting to a point where I have projects that I need to do with the printer but I just cant do them due to not being able to print.
I will scavenge the forum for possible answers.
Regards
Michiel
|
Re: Any Ormerod oners from Cape Town? July 19, 2017 03:01PM |
Registered: 10 years ago Posts: 14,672 |
Regarding that message:
see [duet3d.com]. As your bed heater appears to be under-powered (which is common on Ormerod 1 printers using the supplied ATX PSU), you probably need to use the M570 command, or get a better PSU.
Edited 1 time(s). Last edit at 07/19/2017 03:02PM by dc42.
Large delta printer [miscsolutions.wordpress.com], E3D tool changer, Robotdigg SCARA printer, Crane Quad and Ormerod
Disclosure: I design Duet electronics and work on RepRapFirmware, [duet3d.com].
Quote
Error: heating fault on heater 0, temperature excursion exceeded 15.0C
see [duet3d.com]. As your bed heater appears to be under-powered (which is common on Ormerod 1 printers using the supplied ATX PSU), you probably need to use the M570 command, or get a better PSU.
Edited 1 time(s). Last edit at 07/19/2017 03:02PM by dc42.
Large delta printer [miscsolutions.wordpress.com], E3D tool changer, Robotdigg SCARA printer, Crane Quad and Ormerod
Disclosure: I design Duet electronics and work on RepRapFirmware, [duet3d.com].
|
Re: Any Ormerod oners from Cape Town? July 20, 2017 03:14AM |
Registered: 10 years ago Posts: 1,230 |
Quote
Karoo Klong
I have got the new aluminium X-Arm reinstalled now and I changed the design to be like it was in the Ormerod 1 where the rib actually grips the M5 nut, Since I cant successfully print yet that's the way I have to make things happen. I wonder why did they remove that nut grip on the Ormerod 2?
The acrylic part was very fragile in that area and would often brake, also mine came with a undersized hole so had to file the nut down

Quote
...(Since its winter here I cant seem to get the heated bed up to 110'C)
As dc42 said, the voltage from your ATX may be a bit on the low side, with the original 550W Alpine ATX, 11.0V measured at Duet in I can heat the bed up to 111.6C in 10minutes, mind you thats at room temperature 15C in a draft free area and with better isolation under the heat bed, found my original notes

More read about the ATX
[forums.reprap.org]].
Erik
|
Re: Any Ormerod oners from Cape Town? August 04, 2017 07:47AM |
Registered: 6 years ago Posts: 174 |
In my search for improvements to be made on the Ormerod I came across Ludo91's post on The Easy Way to print ABS.
Since my prints in ABS are very blobby I copied Ludo's .ini file and changed the speed settings to half of what he had.
I then started adjusting as I was printing the XYZ calibration cube from thingyverse.
I finally managed to get good results!
I have now printed a replacement part for the Z-Runner because the X-Arm was wobbly and I think the reason for the misalignment on the back of the X-Axis on the block.
But alas my machine keeps braking the filament and I have to keep a close eye on it. If the filament shreds I pause the print, change the filament, then get the z-axis close to the printed plain again if it missed a few layers and then continue the print.
After the filament breaking five times on the print I actually managed to get a rather decent part that I can use to replace the broken z-runner.
Now I need your help.
What is the best way to fix this confounded extruder shredding problem?
I believe the ABS I got with the machine is not of the best quality and might vary in thickness. By printing slowly this seems to prevent over extrusion visibility, but this causes the filament to get squashed and shredded to bits.
I know of the spring-loaded extruder but my question is, aren't there better extruders now that I should use or is the spring-loaded Ormerod extruder still the best?
I saw this and this on YouTube and that's what made me wonder what would be the best?
Edited 2 time(s). Last edit at 08/04/2017 08:49AM by Karoo Klong.
|
Re: Any Ormerod oners from Cape Town? August 04, 2017 02:32PM |
Registered: 9 years ago Posts: 638 |
you will probably have to print another peice to mount the extruder somewhere if you will choose those two and printing the ormerod spring loaded one will probably be easier.
[www.thingiverse.com]
Edited 1 time(s). Last edit at 08/04/2017 02:33PM by Darathy.
[www.thingiverse.com]
Edited 1 time(s). Last edit at 08/04/2017 02:33PM by Darathy.
|
Re: Any Ormerod oners from Cape Town? August 04, 2017 03:12PM |
Registered: 6 years ago Posts: 174 |
|
Re: Any Ormerod oners from Cape Town? August 07, 2017 01:47PM |
Registered: 6 years ago Posts: 174 |
With much difficulty I managed to get the very brittle PLA that I have to print the Ormerod spring-loaded extruder.
It works really nice. I am yet to use it on my ABS filament but I haven't had any shredding since.
SHREDDER is no more.
Well lets hope.
So now....
I am using the stock Slic3r 0.9 and I could not get the extruder motor WITH the supports to print so I had to wing it.
I had to wait till the part started printing that needed the support and propped some press stick under it
I tried to download a new Slic3r update but every single version I tried to download gave me this annoying error.
It seems Sli3r no longer allows you to download their software.
Second problem.
I still cant get my ABS to stay stuck.
So I very reluctantly mixed up some ABS slurry. but have not yet tested or used it.
I also bought a 12V 360Watt 30Amp LED power supply and would like to fit it to the side of my Ormerod like the Ormerod2
Also I am contemplating what to do with the Duet housing as I cannot fit a fan cover with it in the way.
Any suggestions and help would be greatly appreciated.
I am just glad That I finally managed to get my print settings right for ABS.
It prints really neat in 0.1mm layer heights.
|
Re: Any Ormerod oners from Cape Town? August 07, 2017 03:46PM |
Registered: 9 years ago Posts: 638 |
The Extruder works really well for me ,havent had any problems with it. As for the ABS sticking i suggest you buy this: [shop.prusa3d.com]
I am using it and it sticks to it really good ,i sometimes have a bit of a problem geting PLA off but otherwise its good.
I have stoped using Slic3r since i invested in Simplify3D(its expensive but worth the 150$)
Edited 1 time(s). Last edit at 08/07/2017 03:48PM by Darathy.
I am using it and it sticks to it really good ,i sometimes have a bit of a problem geting PLA off but otherwise its good.
I have stoped using Slic3r since i invested in Simplify3D(its expensive but worth the 150$)
Edited 1 time(s). Last edit at 08/07/2017 03:48PM by Darathy.
|
Re: Any Ormerod oners from Cape Town? August 12, 2017 01:18PM |
Registered: 10 years ago Posts: 1,230 |
Quote
Karoo Klong
I tried to download a new Slic3r update but every single version I tried to download gave me this annoying error.
It seems Sli3r no longer allows you to download their software.
? - I have no problems downloading from the official site here (just did):
[slic3r.org]
Quote
I still cant get my ABS to stay stuck.
So I very reluctantly mixed up some ABS slurry. but have not yet tested or used it.
Yep it's can be tricky and a mess to ad, I use a thin mix and let it flow down pre-cooled glass standing in 45 degrees angle with a tray under to recycle the spill
Quote
Also I am contemplating what to do with the Duet housing as I cannot fit a fan cover with it in the way.
You could drill a hole in the y-motor mount to secure the duet enclosure instead of the nut in the y-extrusion, that did it for me
Erik
|
Re: Any Ormerod oners from Cape Town? August 21, 2017 11:37AM |
Registered: 6 years ago Posts: 174 |
I have been modifying my printer quite extensively as I said.
Here are some pictures I took over the weekend.
I now have the 12v 360Watt 30Amp power supply installed and it stabalises the Y and Z Axis against each other. So its properly rigid.
The voltage is currently set at 12.5V but to what safe value can I boost the voltage on the Duet v0.6 in order to get more efficient heated bed operation?
Edited 2 time(s). Last edit at 08/21/2017 12:37PM by Karoo Klong.
Here are some pictures I took over the weekend.


I now have the 12v 360Watt 30Amp power supply installed and it stabalises the Y and Z Axis against each other. So its properly rigid.
The voltage is currently set at 12.5V but to what safe value can I boost the voltage on the Duet v0.6 in order to get more efficient heated bed operation?
Edited 2 time(s). Last edit at 08/21/2017 12:37PM by Karoo Klong.
|
Re: Any Ormerod oners from Cape Town? August 21, 2017 01:16PM |
Registered: 10 years ago Posts: 14,672 |
If you go above 13V, it's safest to connect 2 silicon diodes in series with each fan, to reduce the fan voltage back towards 12V. Then you can go up to 14V, which is probably as high as the PSU will go.
Large delta printer [miscsolutions.wordpress.com], E3D tool changer, Robotdigg SCARA printer, Crane Quad and Ormerod
Disclosure: I design Duet electronics and work on RepRapFirmware, [duet3d.com].
Large delta printer [miscsolutions.wordpress.com], E3D tool changer, Robotdigg SCARA printer, Crane Quad and Ormerod
Disclosure: I design Duet electronics and work on RepRapFirmware, [duet3d.com].
|
Re: Any Ormerod oners from Cape Town? August 25, 2017 02:55PM |
Registered: 10 years ago Posts: 1,230 |
Great job! - I like the handle on top, really the only sensible way to move the printer, but of cause only possible with the z-extrusion secured like you have done
..it also makes a lot of sense to move the duet enclosure out to the edge, will not ad to the width and makes room to ad hotend parts, fan deflector and better print cooling
The angled aluminium end parts looks great and solid (bet its bolted to the y-extrusion down under) and will make the adjustment of the smooth rods a once of - and also important, keep the y-motor axle square to the belt - and a perfect platform to mount a tray to support the cables (it never felt safe with those hanging down while moving the printer)
Did you hacksaw of the underside of the y-idler-bracket? - that's what I did at first, then printed a new one and "cut" of the lower part in the slicer
Very nicely done
Erik
..it also makes a lot of sense to move the duet enclosure out to the edge, will not ad to the width and makes room to ad hotend parts, fan deflector and better print cooling
The angled aluminium end parts looks great and solid (bet its bolted to the y-extrusion down under) and will make the adjustment of the smooth rods a once of - and also important, keep the y-motor axle square to the belt - and a perfect platform to mount a tray to support the cables (it never felt safe with those hanging down while moving the printer)
Did you hacksaw of the underside of the y-idler-bracket? - that's what I did at first, then printed a new one and "cut" of the lower part in the slicer

Very nicely done
Erik
|
Re: Any Ormerod oners from Cape Town? August 29, 2017 10:07AM |
Registered: 6 years ago Posts: 174 |
Thank you Erik
Since I carry my printer around nearly every day I had to get it as rigid as possible. The handle works a charm and it is also very well balanced.
I am still having a bit of play on the Z-Extrusion in the X-direction which I still need to figure out how I will arrest that movement.
Yes bolted to the undersides. They are mere 76x76x2mm extrusion which I had ripped down to size of 76x42 in order to work for me. But even at 2mm thickness they work really well and is more than sufficiently stiff. I wanted to have a piece of flat aluminium cut to size in order to support the cabling as they are far too exposed for my liking. The wiring on the back of the power supply also need a proper enclosure, but I will get to that later.
The y-idler I cut off with a hacksaw yes and then neatened it up with my Dremel Versatip.
Its funny, I find it easier to upgrade this machine and to fabricate the parts myself that to actually make a design and have the printer print it for me
I have added the two silicone diodes as suggested by dc42 and boosted the voltage up all the way to 14.7 volt but I haven't yet tested how it affects bed heating.
There was a question I kept forgetting to ask.
In slicers they give the option of controlling fan speed, but I see no variance in fan speed of the hotend fan. Does it always only blow at one speed?
How do you connect a separate parts cooling fan and is it able to control that fan speed?
Thanks
Michiel
Edited 1 time(s). Last edit at 08/29/2017 10:10AM by Karoo Klong.
|
Re: Any Ormerod oners from Cape Town? August 29, 2017 11:49AM |
Registered: 10 years ago Posts: 1,230 |
Quote
Karoo Klong
Its funny, I find it easier to upgrade this machine and to fabricate the parts myself that to actually make a design and have the printer print it for me
To be able to imagine and make stuff with your own hands and simple tools is a blessing in my book :-), not to belittle the joy of designing and printing things, but I'm very newbie in OpenScad and have much to learn before it will be faster than working with my hands and tools - and most of the material I use is recycled, it ads greatly to the joy of making things IMHO
Quote
I have added the two silicone diodes as suggested by dc42 and boosted the voltage up all the way to 14.7 volt but I haven't yet tested how it affects bed heating.
That is 3.7volt over what I got on the Duet in and should give you 13-14 Watt more to work with
Quote
There was a question I kept forgetting to ask.
In slicers they give the option of controlling fan speed, but I see no variance in fan speed of the hotend fan. Does it always only blow at one speed?
How do you connect a separate parts cooling fan and is it able to control that fan speed?
The hot end is designed to always run the fan at full speed to prevent hot end melt down - if you lower the speed the heat may work its way up and interfere with the flow of filament
If you wan't to install and be able to control a secondary print cooler fan you can connect it to the FAN0 pins, then it will respond to your slicer settings, you will find it at the lower right on the Duet 0.6

[reprappro.com]
Erik
|
Re: Any Ormerod oners from Cape Town? October 24, 2017 07:20PM |
Registered: 6 years ago Posts: 174 |
Hello everyone.
Please forgive me for being silent for so long. I had some crisis that I had to attend to and unfortunately 3D Printingting was way back in the line.
Thanks you for the kind words and advice Erik. I should also learn a design program.
I must say with the new powersupply and the voltage boost my printer bed has no trouble at all to get to 120°C
Since my last post I have installed Slic3r Prusa edition and also made my own mixup of Ludo's ABS settings and the Prusa ABS Speed settings. I must say It an quite pleased with the results and I can print a part that took me 2 hours to print, now in just over 20 minutes! The quality is quite good. Only problem is my inconsistent filament.
I have been needing to mens and replace several parts of which were the Z-Axis bearing holders, the Z Extrusion top cover and rod clamp, The Z-idler clamp and also the Y-axis bearing mounts.
I would really appreciate it if any of you could help me in finding the original design files for the Ormerod 1 Y-axis bearing clamps. The Ormerod 2 clamps are all I could find and they are completely different..
I wil eventually have to convert all these parts to aluminium. I am seriously considering printing them and then casting them in aluminium.
Furthermore I printed some pretty nice spool rokers from thingyverse so I could do away with my crapy looking and very bulky filament stand.
I am super excited as today I found a local supplier of filament! [www.uglymonkey.co.za] Their process are AMAZING! And service excellent! They are also just 15minutes drive from my head office! So I went down to them during lunch time and with the wife's input purchasrde the flourescent Green! The second one from the left in the picture.
I cant wait to print with my new filament but am afraid of just jumping into it. I would like some advice in what precedure one should run in order to properly calibrate your new filament in order to aquire the correct settings for it?
Then a technical probem that arose tonight.
I print ABS with the heatbed at 120°C straight through the print. It presents warping and I do use an enclosure. But for some strange reason the printbed red lede stopped working. The heat bed still works fine but I am unhappy and worries about the fact that it no linger works. Any tips or advice would greatly benefit appreciated!
PS. I am thinking of going all out aluminium with my printer and if so I will call it the AluMarod 1
|
Re: Any Ormerod oners from Cape Town? October 25, 2017 02:57AM |
Registered: 10 years ago Posts: 14,672 |
Regarding the LED, it probably couldn't handle 120C for long periods. It shouldn't be difficult to replace it. You could use a through-hole LED if you don't want to solder a SMD one.
Large delta printer [miscsolutions.wordpress.com], E3D tool changer, Robotdigg SCARA printer, Crane Quad and Ormerod
Disclosure: I design Duet electronics and work on RepRapFirmware, [duet3d.com].
Large delta printer [miscsolutions.wordpress.com], E3D tool changer, Robotdigg SCARA printer, Crane Quad and Ormerod
Disclosure: I design Duet electronics and work on RepRapFirmware, [duet3d.com].
|
Re: Any Ormerod oners from Cape Town? October 25, 2017 05:38AM |
Registered: 6 years ago Posts: 174 |
Quote
dc42
Regarding the LED, it probably couldn't handle 120C for long periods. It shouldn't be difficult to replace it. You could use a through-hole LED if you don't want to solder a SMD one.
Thank you dc42
If that is the case then my other componants are also in harms way?
Like my powersuply and the Duet board, motors and limit switches?
I do get very good bed adheasion at 120°C
Any other tips and advice, sould I rather drop the temperature and at what stage of the print.
PS I could not load any of the pictures since they exceed the allowed upload size.
|
Re: Any Ormerod oners from Cape Town? October 25, 2017 08:51AM |
Registered: 10 years ago Posts: 14,672 |
Although the bed is at 120C, the general temperature within your enclosure should be much lower. I recommend that you keep the Duet below 50C if possible. Ideally the PSU and Duet would be outside the enclosure.
Edited 1 time(s). Last edit at 10/25/2017 07:28PM by dc42.
Large delta printer [miscsolutions.wordpress.com], E3D tool changer, Robotdigg SCARA printer, Crane Quad and Ormerod
Disclosure: I design Duet electronics and work on RepRapFirmware, [duet3d.com].
Edited 1 time(s). Last edit at 10/25/2017 07:28PM by dc42.
Large delta printer [miscsolutions.wordpress.com], E3D tool changer, Robotdigg SCARA printer, Crane Quad and Ormerod
Disclosure: I design Duet electronics and work on RepRapFirmware, [duet3d.com].
|
Re: Any Ormerod oners from Cape Town? October 25, 2017 11:14AM |
Registered: 6 years ago Posts: 174 |
Quote
dc42
Although the bed is at 120C, the general temperature within your enclosure should be much lower. I recommend that you keep the Duet below 50C is possible. Ideally the PSU and Duet would be outside the enclosure.
I would have to resesign my enclosure then since the powersuply is part of the machine's structure and the duet is extended to next to the Y-axis motor.
Any ideas on where I can find the Y-Axis bearing clamps for the Ormerod 1 please, I fear the heat does not do them well and I keep mending them with my Dremel sodering iron. I have also resorted to glueing them to the LMUU Bearings.
|
Re: Any Ormerod oners from Cape Town? October 25, 2017 01:19PM |
Registered: 10 years ago Posts: 1,230 |
Quote
Karoo Klong
Any ideas on where I can find the Y-Axis bearing clamps for the Ormerod 1 please..
All the ormerod source files is downloadable from github in one zip, but I have attached the original ormerod1 383 and 384 y-bearing-clamp.stl ....and a modified stronger version with screws all the way though
[github.com]

BTW, to downsize pictures for posting I use the windows snipping tool (snipping tool.exe) located in windows\system directory, zoom in on any picture, snip and save
Erik
|
Re: Any Ormerod oners from Cape Town? November 01, 2017 03:59PM |
Registered: 6 years ago Posts: 174 |
FINALLY I CAN PRINT ABS PARTS!!!!
I am so happy!
The extrusion steps per mm was out by 7steps too much and the fact that I did not use extrusion factor of 1 but rather 0.75 made it worse.
Once I fixed the extrusion factor I still had the ugly test cubes. Then I changed the heat values from Ludo's-abs.ini from 251 and printed in decreasing increments of 5°C. Eventually the prints came put perfect at 210°C but I still get minor warping.
Last night I printed a replacement X-Motor spacer and it warped a slight bit.
Thereafter I changed the heated bed settings also. So now I don't just start the print at 120°C and the drop after the first layer to 100°C
I get insane bed adheasion in clean glass at 120°C and then keep it at 120°C throughout the print in the enclosed area.
After the print completes and the bed cools down to about 80°C you can hear loud poping noises. If jou touch the part it is loose and can be taken clean off.
I printed six parts in all today and they all had NO warping!!!
I want to replace all the parts on my printer with the green ABS.
Thank you very much for the links to the GIT Hub Erik. I found all the files I wanted.
All accept one that is.
My printer is still of the first RS branded ones and I can't find the RS logo .stl anywhere.
The Ormerod 1 stl files only have the Ormerod Reprap Logo.
Also thank you to dc42 for your continued support and advice!
Edited 1 time(s). Last edit at 11/02/2017 07:49PM by Karoo Klong.
|
Re: Any Ormerod oners from Cape Town? July 25, 2018 12:53PM |
Registered: 6 years ago Posts: 174 |
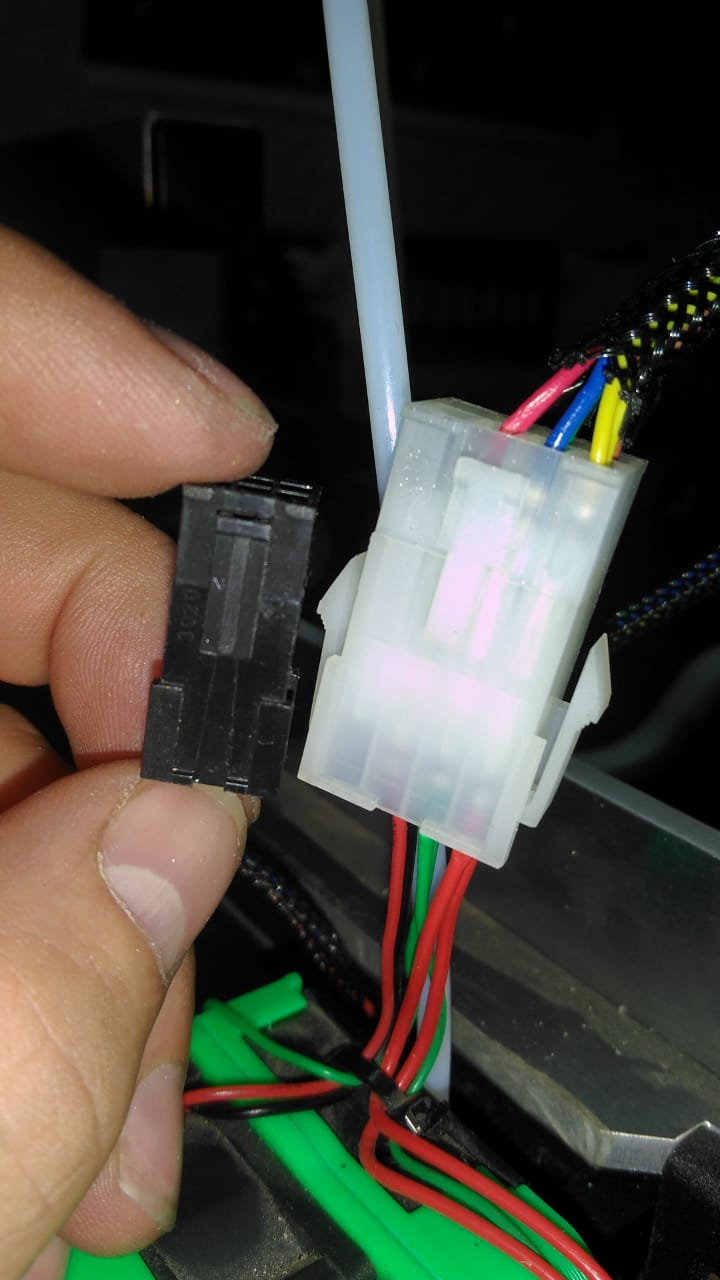
Some feedback
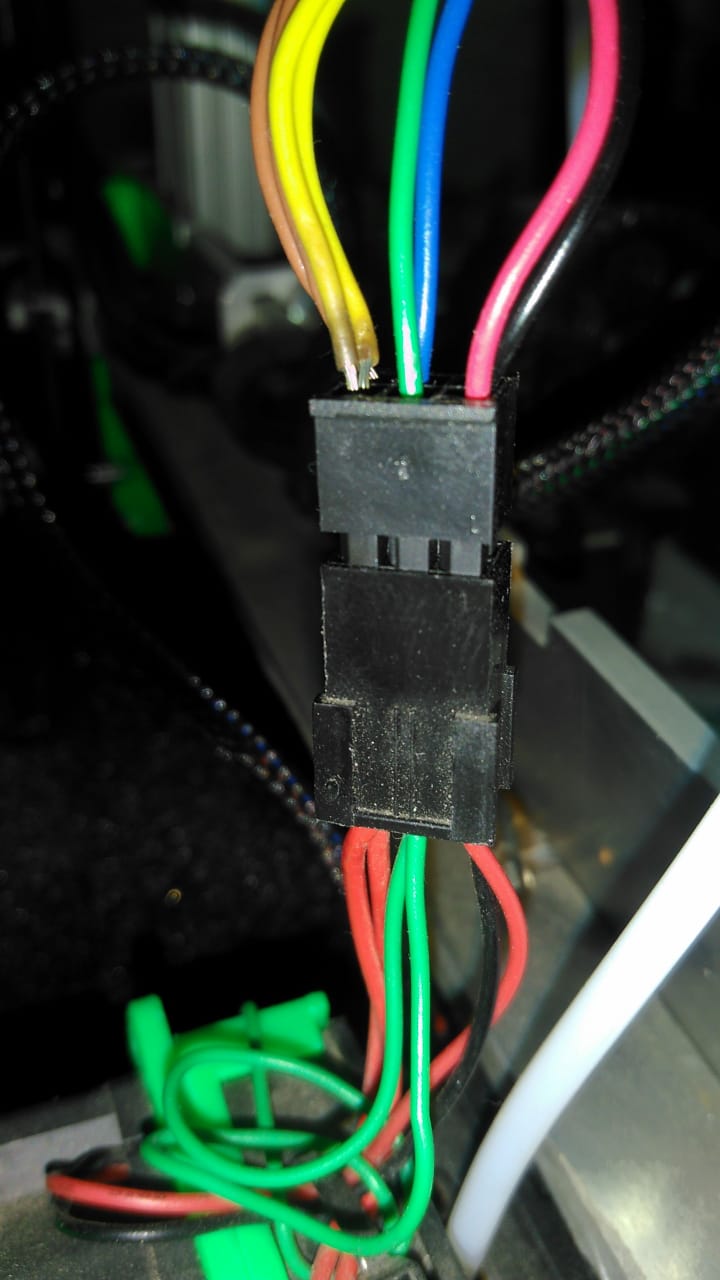
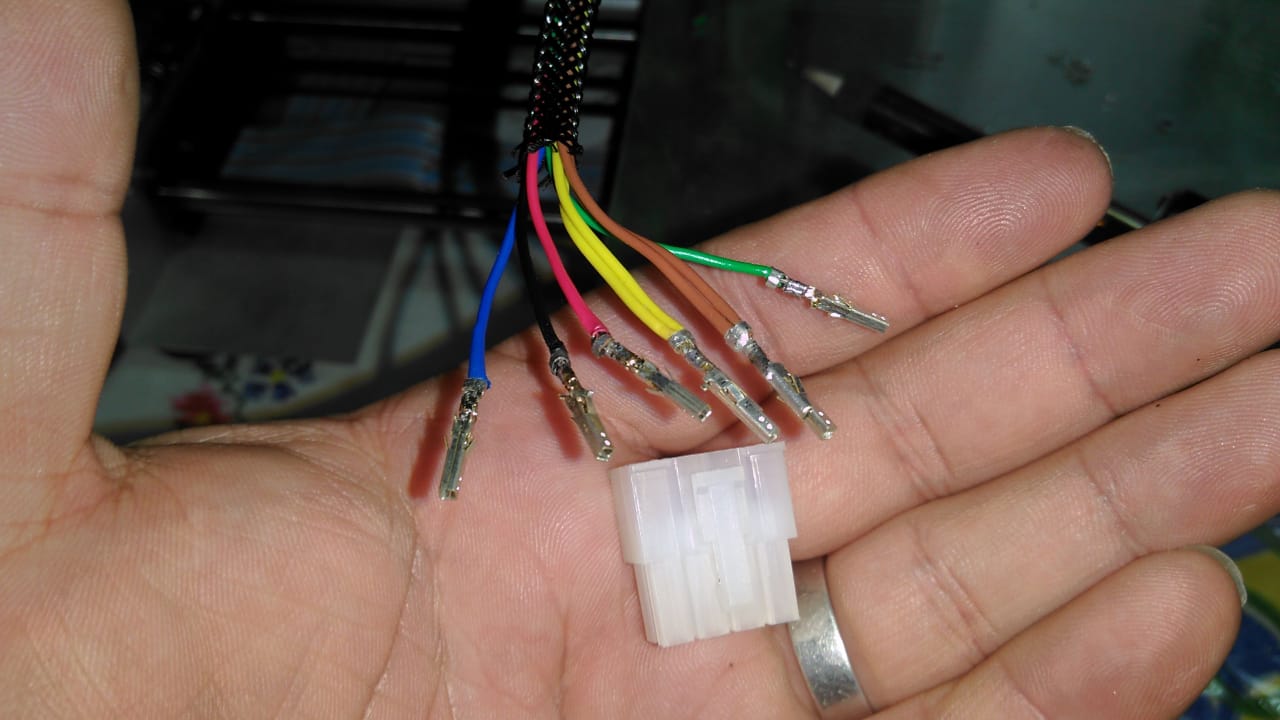
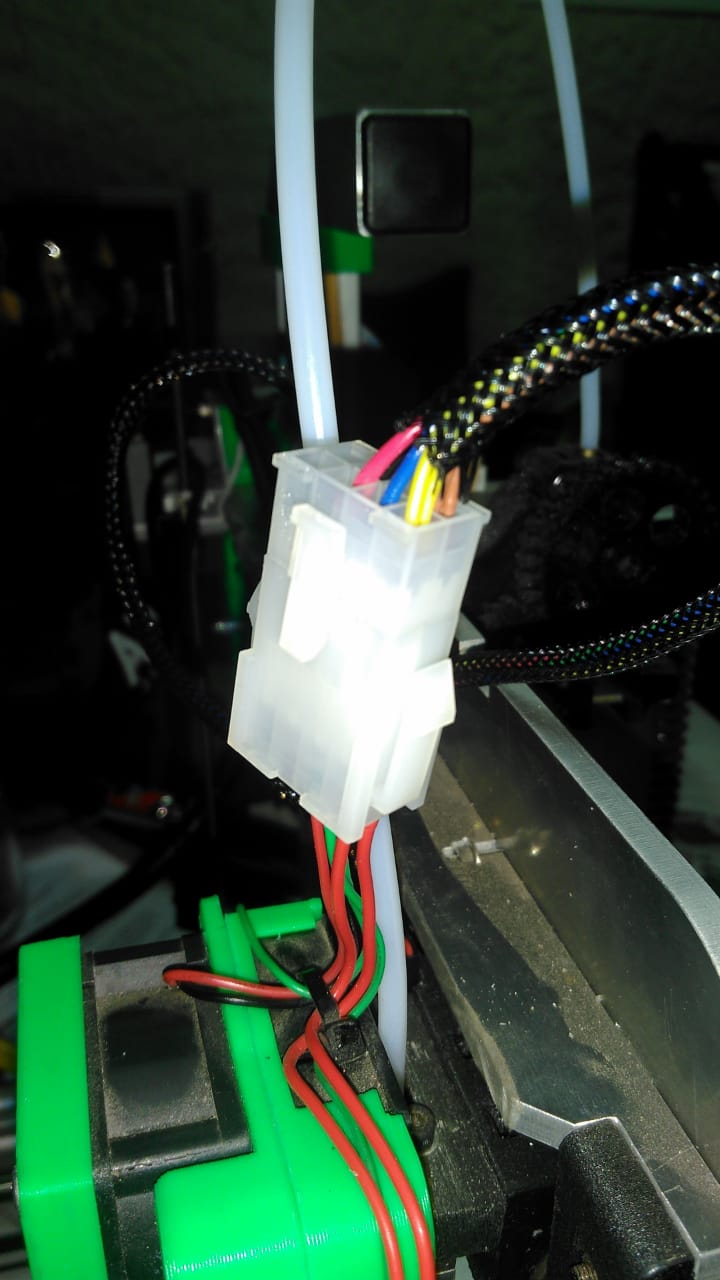
I finaly got to fixing the defective hotend plug that would cause the hotend cooling fan to cut out during prints and then cause heating related errors and cause my prints to terminate.
I could not find the same small six terminal plug and since I want to ad a part cooling fan to my printer I opted for a standard 8 terminal plug. |It looks huge but I will later design a retainer for it onto the hotend parts.
I started the printer up today, rand a couple of dry prints and no errors came up.
So I staeted printing two parts and they came out very satisfactory.
Now I nee to find a propper part cooling fan design so that I can start printing with PLA.
Also I need to redesign my hotbox enclose in order to get the powersuply and Duet out of the heated environment.
Regards
Michiel
Edited 1 time(s). Last edit at 07/25/2018 01:23PM by Karoo Klong.
I finaly got to fixing the defective hotend plug that would cause the hotend cooling fan to cut out during prints and then cause heating related errors and cause my prints to terminate.
I could not find the same small six terminal plug and since I want to ad a part cooling fan to my printer I opted for a standard 8 terminal plug. |It looks huge but I will later design a retainer for it onto the hotend parts.
I started the printer up today, rand a couple of dry prints and no errors came up.
So I staeted printing two parts and they came out very satisfactory.
Now I nee to find a propper part cooling fan design so that I can start printing with PLA.
Also I need to redesign my hotbox enclose in order to get the powersuply and Duet out of the heated environment.
Regards
Michiel


Edited 1 time(s). Last edit at 07/25/2018 01:23PM by Karoo Klong.
|
Re: Any Ormerod oners from Cape Town? November 14, 2018 05:39PM |
Registered: 5 years ago Posts: 1 |

Sorry, only registered users may post in this forum.