bridging
Posted by jamesf
|
Re: bridging July 22, 2017 07:42PM |
Registered: 10 years ago Posts: 1,230 |
Not Ormerod 2 but 1
Here's the settings that works for me
I too find speed makes no difference and if the bridge goes to the edge of the model the perimeters will be bridging at normal printing speed anyway
If drooping layers
Stretching the filament by reducing the bridging extrusion multiplier will help
Keep the extrusion width at auto (my setting is usually 1.5 x nozzle width)
Lots of cooling
Edit:cooling for first layer to make it solid and able to carry the next layers, next layers should fused with first but not make it sag so not cooled before the bridge is able to carry the downward force from filament squeezed out (same reason for choice of low extrusion width)
If layers fail to bond at the post
adding a bit more to the bridging overlap distance will help, 0 mm vs 2 mm
A failed bonding (if a small overlap) can also be caused by a worn nozzle, if the nozzle face is worn (the flat part around the nozzle hole get too big) the filament will tend to stick and drag it of the post again
Erik
Edited 1 time(s). Last edit at 07/23/2017 05:35AM by ormerod168.
Here's the settings that works for me

I too find speed makes no difference and if the bridge goes to the edge of the model the perimeters will be bridging at normal printing speed anyway
If drooping layers
Stretching the filament by reducing the bridging extrusion multiplier will help
Keep the extrusion width at auto (my setting is usually 1.5 x nozzle width)
Lots of cooling
Edit:cooling for first layer to make it solid and able to carry the next layers, next layers should fused with first but not make it sag so not cooled before the bridge is able to carry the downward force from filament squeezed out (same reason for choice of low extrusion width)
If layers fail to bond at the post
adding a bit more to the bridging overlap distance will help, 0 mm vs 2 mm


A failed bonding (if a small overlap) can also be caused by a worn nozzle, if the nozzle face is worn (the flat part around the nozzle hole get too big) the filament will tend to stick and drag it of the post again


Erik
Edited 1 time(s). Last edit at 07/23/2017 05:35AM by ormerod168.
|
Re: bridging July 23, 2017 08:45AM |
Registered: 9 years ago Posts: 92 |
Thanks Eric
What is your default extrusion speed ? (normal printing, not bridging )
I also saw that simplify 3D does not apply bridging settings to the perimeters. not sure if this is a bug or something that is hard to achieve ?
How often do you replace nozzles? I wouldnt think mine could be worn, but you never know, and the symptom is that the filament gets dragged if not supported.
I may just print these models with support, since they will work with it, but would be nice to get some decent bridging.
I notice it is also filament dependant. Grey Verbatim PLA gives me best bridging, but their black PLA is not as good. May be the colour additives?
Regards
James
|
Re: bridging July 23, 2017 01:15PM |
Registered: 10 years ago Posts: 1,230 |
Quote
jamesf
What is your default extrusion speed ? (normal printing, not bridging )
The bottleneck on my system is the extruder stepper so I don't really have any default printing speed, often adjust the speed depending on perimeter and infill extrusion width, layer hight and nozzle temperature - but 50mm/s seems to be a safe zone with my normal printing setting layer hight 0.25 and width 0.75 but always babysit the first few minutes of a new printed model ready to lower the speed or raise the temp if the extruder motor stalls (knocking sound) - really should get a stepper with a bit more torque, the spring loaded extruder keep grip just fine
Quote
I also saw that simplify 3D does not apply bridging settings to the perimeters. not sure if this is a bug or something that is hard to achieve ?
Maybe to avoid a visual difference in outer perimeters because of the speed change?
Quote
How often do you replace nozzles? I wouldnt think mine could be worn, but you never know, and the symptom is that the filament gets dragged if not supported.
A stainless steel nozzle will last a long time if handled properly, I used to clean the cold nozzle with a needle file, did not think it would dig in but suddenly it refused to bridge, the now nearly flat front of the nozzle did not let go of the filament when the nozzle was reversing from post to post
Had no extra nozzle so used a lathe to set the tip back in the original angle and it bridged like it did from the start, that was the original, changed it later for a new one, did not notice any difference in flow
You can measure the flat part of the nozzle with a caliber, should be around 1mm from new, 1.5mm prolly OK, mine was more like 4mm...
Quote
I notice it is also filament dependant. Grey Verbatim PLA gives me best bridging, but their black PLA is not as good. May be the colour additives?
Yes could be additives or difference in temperature as darker colors will absorb more radiant heat
Erik
|
Re: bridging July 24, 2017 07:23AM |
Registered: 10 years ago Posts: 2,472 |
|
Re: bridging July 25, 2017 09:18AM |
Registered: 10 years ago Posts: 1,230 |
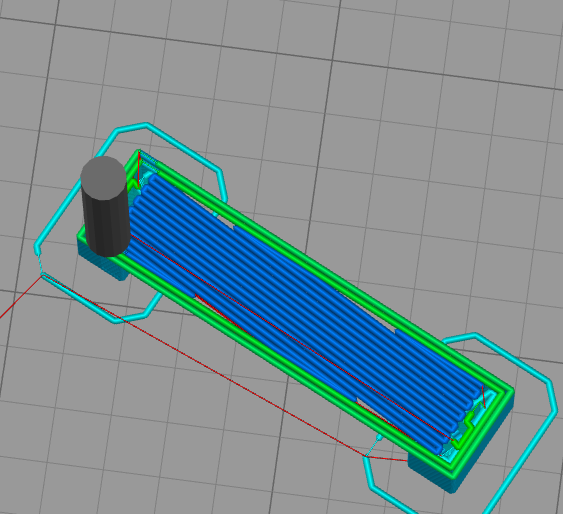
..and in the left corner we have...I just had to try if bridging corner to corner on the ormerod was possible, it ain't pretty but a 200mm bridge it is :-)
I attached a zip with set of stl files like the model I printed, bridging length 50 to 200mm, total length is + 30mm each - it's a simple model made in OpenScad, scad file attached
the food is a 20 x 20 x 1, post is 10 x 10 x10mm, so the bridge starts at hight 11mm and is 2mm high, e.g. print 8 layers in layer hight 0.25 or just make changes to the scad
As noted, the trick is to use a large overlap, reduce the flow a bit to stretch the filament and apply proper cooling to first bridging layer (if not, stop the print for a bit after first layer to allow it to cool down and buckle up before next layer)
Erik

I attached a zip with set of stl files like the model I printed, bridging length 50 to 200mm, total length is + 30mm each - it's a simple model made in OpenScad, scad file attached
the food is a 20 x 20 x 1, post is 10 x 10 x10mm, so the bridge starts at hight 11mm and is 2mm high, e.g. print 8 layers in layer hight 0.25 or just make changes to the scad

As noted, the trick is to use a large overlap, reduce the flow a bit to stretch the filament and apply proper cooling to first bridging layer (if not, stop the print for a bit after first layer to allow it to cool down and buckle up before next layer)

Erik
|
Re: bridging July 25, 2017 09:26AM |
Registered: 9 years ago Posts: 92 |
Thanks Eric, glad to know it can be done.
Was that with the same settings from your previous post?
What I did notice while watching the printer and the simulation on Simplify 3D, is that the direction of the infil of the bridge is not always directly parallel to the bridge direction. The printer is then at some point attempting to attach a bridged strand to the bridge perimeter, which is often where the process seems to fail.
Your corner to corner bridge is oriented at 45 degrees across the print bed. Would this work if the bridge was along the X or Y axis and the infill orientation was still 45 degrees?
EDIT: simulating it now, it appears that on X or Y axis its ok, but a slight angle on the bridge causes what I have described above. I suppose there is no way to really eliminate this unless the slicer detects a bridge and orients the direction of the infil of the supporting layer exactly in the direction of the bridge?
James
Edited 1 time(s). Last edit at 07/25/2017 09:32AM by jamesf.
|
Re: bridging July 25, 2017 09:41AM |
Registered: 9 years ago Posts: 92 |
|
Re: bridging July 26, 2017 05:18PM |
Registered: 10 years ago Posts: 1,230 |
Quote
jamesf
Thanks Eric, glad to know it can be done.
Was that with the same settings from your previous post?
I did ad 3mm the overlap so total 4mm just for safety but I don't think it was necessary, it fused just fine with no pullback
Quote
What I did notice while watching the printer and the simulation on Simplify 3D, is that the direction of the infil of the bridge is not always directly parallel to the bridge direction. The printer is then at some point attempting to attach a bridged strand to the bridge perimeter, which is often where the process seems to fail.
Yes LOL what a silly thing, I found that out while adjusting the model 5 degrees back to make room for the glass clips, when bridging it seems to flip-flop between 45 and 90 degrees but only if the model is positioned inside those number
Quote
Your corner to corner bridge is oriented at 45 degrees across the print bed. Would this work if the bridge was along the X or Y axis and the infill orientation was still 45 degrees?
Yes the first bridging layer will still be right
Quote
EDIT: simulating it now, it appears that on X or Y axis its ok, but a slight angle on the bridge causes what I have described above. I suppose there is no way to really eliminate this unless the slicer detects a bridge and orients the direction of the infil of the supporting layer exactly in the direction of the bridge?
More LOL - did not read your edit until down here, never mind :-)
Erik
|
Re: bridging July 26, 2017 05:20PM |
Registered: 10 years ago Posts: 1,230 |
|
Re: bridging July 26, 2017 06:29PM |
Registered: 10 years ago Posts: 1,230 |
Quote
ormerod168
Quote
jamesf
This is quite funny.
Just reading release notes on V4 of simplify 3d. They fixed the bridging perimeter speed and angle issues we were just dealing with.
Yes and it is released, lets see if they got it right
Erik
Not quite, still trying to turn in the middle of bridge, maybe this model is un-bridgeable, but a "need support" message would be nice, surely the software must know


Erik
|
Re: bridging July 28, 2017 01:08PM |
Registered: 9 years ago Posts: 638 |
|
Re: bridging July 29, 2017 06:08AM |
Registered: 10 years ago Posts: 1,230 |
Quote
Darathy
Even if it was bridgable it would be a pain to remove the bridging material later when it would be closed up.
Yes it would be impossible so I fixed that by placing a piece of flexible material (rubber) for the bridge to float on


Stopped the print and removed that with a pair of players, did not look pretty but was solid enough for the next layers to build on, so turned out alright

..and to be fair, Slic3r did not do any better

Erik
|
Re: bridging July 31, 2017 07:22AM |
Registered: 10 years ago Posts: 2,472 |
That part appears to be a case of something that was not designed for FFF construction (difficult to see how the designer expected it to be made in fact). A few simple changes would make it printable with no problem, yet still have the same outward appearance and the same functionality.
Dave
Dave
Sorry, only registered users may post in this forum.