Print quality and fine-tuning of settings
Posted by Karoo Klong
|
Print quality and fine-tuning of settings December 12, 2018 06:16AM |
Registered: 6 years ago Posts: 174 |
Problem: When printing infill the surface gets raised a little more than it should and forms little high spots. As the print head moves over these areas it gets knocked upwards. As it gets to printing the second or third solid layer this eventually seems to smooth out. It does however not give as smooth a finish as when printing top layers where no infill is used.
Calibration has been done and double checked on all axes and the extruder as well.
Does this mean I have to drop the extrusion multiplier?
I am using high quality ABS 1.75mm filament and there is practically zero deviation in diameter over a measured length of 1 meter of filament.
The thin wall print yielded results of 0.5 and 0.51 mm wall thickness for my 0.5 standard nozzle.
Any advice please. I want to start ironing out all these small annoying little problems.
Ps. My Afrikaans dictionary on my phone really messed up this post the first time around.
It almost looked like I was drunk texting.
Edited 1 time(s). Last edit at 12/13/2018 02:31AM by Karoo Klong.
|
Re: Print quality and fine-tuning of settings December 13, 2018 02:37AM |
Registered: 6 years ago Posts: 174 |
|
Re: Print quality and fine-tuning of settings December 17, 2018 07:22AM |
Registered: 6 years ago Posts: 174 |
|
Re: Print quality and fine-tuning of settings December 21, 2018 03:54PM |
Registered: 9 years ago Posts: 383 |
Evening,
A delay response but getting there eventually!
I've been focusing on trying to get a routine for dialling in the processing parameters as effectively as possible and as per usual plastic has proven itself again and again to be a weird material, and far from linear in terms of both resistancve to flow and change in properties with temperature, sometimes a few degress can change the character completely.
e-steps as you've mentioned is the first. I extrude 100mm lengths as much less and the error from measurement by eye becomes really significant. In a nutshell with your favourite processing temperature purge 10mm @ 1mm/sec extrusion rate, mark the filament at 120mm back from something solid (I've the z-top mount with the three holes that takes the filament guide, this is ideal. pull it back to take the slack out and mark it), extrude 100mm at 1mm/sec and then measure the how much has been extruded. At 1mm per minute you'll want your e-steps calibrated well enough to see 100mm +/-0.5mm.
Don't fettle the steps per mm for x/y. Leave these at the calculated values. Remember Ormerods use imperial belts rather than GT2. From the top of my mind th pitch is around 2.03mm.
After this you may wish to consider non-linear extrusion checking. As the volumetric rate through the nozzle increases the back pressure increases and the melt temperature drops slightly exacerbating the situation. With increased back pressure you get both more slipping on the extruder drive, and more compression of the filament. End result is as the extrusion rate increases the actual extruded volume can be 3-5% down as you start to hit 60mm/sec print speeds on 0.3mm layers with 0.5mm track width. Be aware with this that the firmware based non-linear correction (configured in g-code) is not applied when the head is not moving.
Next step I found was looking at retraction. There are retraction tower tests on thingiverse. If you are using firmware retraction you can change this at 5mm intervals and see the difference.
Then comes pressure advance. This helps reduce blobbing at the start and end of print vectors. Take care that while you increase this you aren't just watching the resulting changes on the fill lines, but also watch the detail on the prints. excessive retraction in my experience can round vertical edges.
Now we get onto the extrusion multiplier. I suggest forgetting about the single wall tests. I've found these unreliable at best. I printed a succession of simple 20*20*3mm coupons and decreased the extrusion multiplier until I could see gaps between the extrusions and then knocked it back up a bit to make the model water tight, but still obvious tracks. The way to thing of this is over extrusion causes big problems including excessive back pressure which tends to glob out too much material after jumps making small area extrusions look over extruded compared to larger areas. Printing to leave some porosity increases the margin of error that the machine can tolerate before it is extruding more material than there is room for. Temporary excess just results in a volume being nearer 100% density rather than over extruding. My multiplier is currently around 0.85.
Final for this post step is x/y size correction. The likely reduction in extruded volume is likely to leave your parts oversize. add a small amount here to correct for that. Pick a test and repeat it changing the x/y compensation until you are happy with the results. keep a close eye on build accuracy from here on as you may need to fettle the value in the future in order to keep things running well.
I've not covered picking your favoured material or bed temperature here.
|
Re: Print quality and fine-tuning of settings December 26, 2018 05:10PM |
Registered: 8 years ago Posts: 30 |
Roughness on the first and last layers could be caused when the tip of the hot end is not perfectly level and square with the bed. I have an Ormerod 2 and was never able to get the stock x-carriage to adjust the hot end tip to be level and square with the bed. When I installed dc42's Ormerod 2 hotend board I also went with chrishamm's x-carrige design for the Ormerod 1 Chrishamm's part allows the tip to be leveled properly and made a big difference with the first and last layers. If your bed is level and the tip is adjusted to be level and square then the roughness should be minimized.
|
Re: Print quality and fine-tuning of settings December 29, 2018 02:54AM |
Registered: 9 years ago Posts: 383 |
Cheers for the links. I'd reverse engineered the latest ormerod 2 x-carriage/bearing & belt clamp from the RepRapPro github and it has been very awkward to work with, particularly with the bearing running along the base ofthe x arm and its nut hidden. I'll have a look at them before a redesign.
|
Re: Print quality and fine-tuning of settings December 31, 2018 05:40AM |
Registered: 8 years ago Posts: 123 |
Wes,
I don't know if it'll be handy, I've been thinking of trying this out. Take a look at [www.thingiverse.com]
I like the way it locks to the bearing, and having the runner on the outside again, maybe you'll want to incorporate parts of its design into your redesign.
I don't know if it'll be handy, I've been thinking of trying this out. Take a look at [www.thingiverse.com]
I like the way it locks to the bearing, and having the runner on the outside again, maybe you'll want to incorporate parts of its design into your redesign.
|
Re: Print quality and fine-tuning of settings December 31, 2018 07:26AM |
Registered: 10 years ago Posts: 1,230 |
|
Re: Print quality and fine-tuning of settings January 01, 2019 04:38AM |
Registered: 10 years ago Posts: 1,230 |
Quote
ormerod168
Yes the runner on the outside is better, more leverage, smother surface to run on
Erik
Have to correct myself - only true if the x-axis-plate is straight, and I suppose the design change was made to take that out of the equation, a laser cut side will always will be a straight line and the acrylic rib can carry a lot of weight sideways without bending
..so it may be a better design after all
Erik
|
Re: Print quality and fine-tuning of settings January 01, 2019 10:10AM |
Registered: 8 years ago Posts: 123 |
I would agree with the acrylic rib, I'm currently unsure about my (unknown source, came with an ebay purchase) aluminium x rib.
It's one of the few things left in my mind that could be causing a wave on my Ormerod i.e. I suspect that the cut where the runner is running on, is not perfectly straight.
I put it all down for a couple of months recently (due to frustration and a lack of time)
I guess my next move will be to rebuild with the acrylic rib...
It's one of the few things left in my mind that could be causing a wave on my Ormerod i.e. I suspect that the cut where the runner is running on, is not perfectly straight.

I put it all down for a couple of months recently (due to frustration and a lack of time)
I guess my next move will be to rebuild with the acrylic rib...
|
Re: Print quality and fine-tuning of settings January 01, 2019 01:35PM |
Registered: 10 years ago Posts: 1,230 |
|
Re: Print quality and fine-tuning of settings January 01, 2019 03:45PM |
Registered: 8 years ago Posts: 123 |
Quote
ormerod168
Part of that could be pressure from the bowden cable pushing the nozzle down, try a calibration without the cable
Erik
I didn't mean to derail this thread, so I'll be brief and mention that in this thread you suggested that, and checked that (and a bunch of other things), and unfortunately it's not the bowden.
Edited 1 time(s). Last edit at 01/01/2019 03:46PM by cheeseandham.
|
Re: Print quality and fine-tuning of settings November 19, 2019 03:44AM |
Registered: 6 years ago Posts: 174 |
Hi Guys
I am hoping you can help me identify the settings that I need to change in order to rectify this problem.
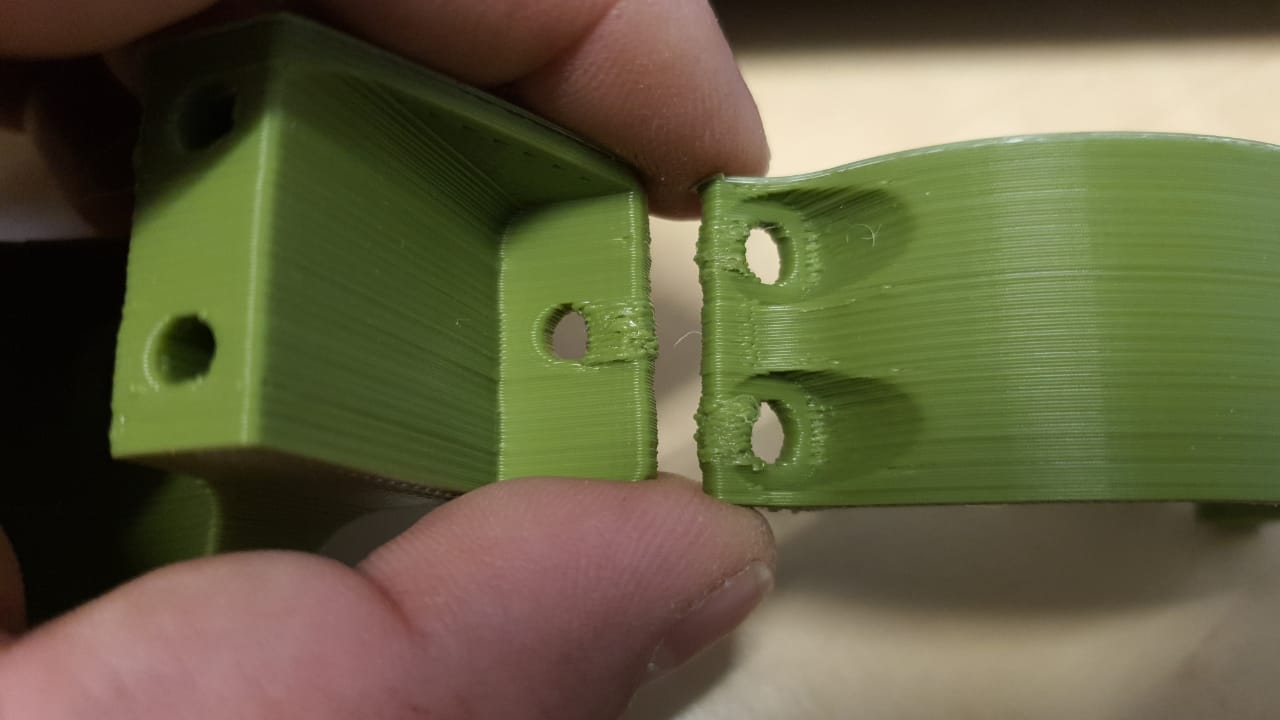
In general my print quality is quite good I think but I notice once printing small columns included in a print that I tend to get blobbing.
I think it must have something to do with the minimum layer time but since this forms part of a larger layer that setting will probably not solve my issue.
I use Simplify 3D as my go to slicer.
Printed in ABS - Blobbing at small columns in prints
I print mostly in ABS.
Thus using part cooling is not the solution here. The layer time for these small sections might be too little or it could be retraction, but my retraction is perfect anywhere else.
Edited 4 time(s). Last edit at 11/19/2019 05:19AM by Karoo Klong.
I am hoping you can help me identify the settings that I need to change in order to rectify this problem.
In general my print quality is quite good I think but I notice once printing small columns included in a print that I tend to get blobbing.
I think it must have something to do with the minimum layer time but since this forms part of a larger layer that setting will probably not solve my issue.
I use Simplify 3D as my go to slicer.
Printed in ABS - Blobbing at small columns in prints
I print mostly in ABS.
Thus using part cooling is not the solution here. The layer time for these small sections might be too little or it could be retraction, but my retraction is perfect anywhere else.
Edited 4 time(s). Last edit at 11/19/2019 05:19AM by Karoo Klong.
|
Re: Print quality and fine-tuning of settings November 19, 2019 03:58AM |
Registered: 9 years ago Posts: 383 |
It's getting too hot on the small sections. The areas you can look into are:
* Increasing base part cooling fan speed. For PLA I tend to run mine at 100% all the time and I have a radial blower rather than the axial fans that don't have much push in the face of any restriction.
* Decrease extrusion temperature.
* Work on a better part cooling duct.
It's difficult to compare extrusion temps unless you have exactly the same setup so don't get too hung up on what other people are using. If you are not struggling with severe under extrusion on your faster speeds, you are getting good layer thickness, and you have a consistant finish on the vertical surfaces of the part then you are running hot enough. If all these are ok if may be worth dropping temp until you see some issues then raising it again.
Down side of mucking about with temp that is things like retraction, pressure advance, and linear (& non linear) extrusion speed correction will need to be checked after you find a new favourite temp.
|
Re: Print quality and fine-tuning of settings November 19, 2019 05:16AM |
Registered: 6 years ago Posts: 174 |
|
Re: Print quality and fine-tuning of settings November 19, 2019 05:26AM |
Registered: 6 years ago Posts: 174 |
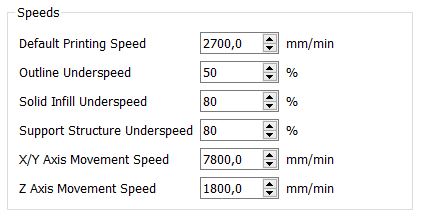
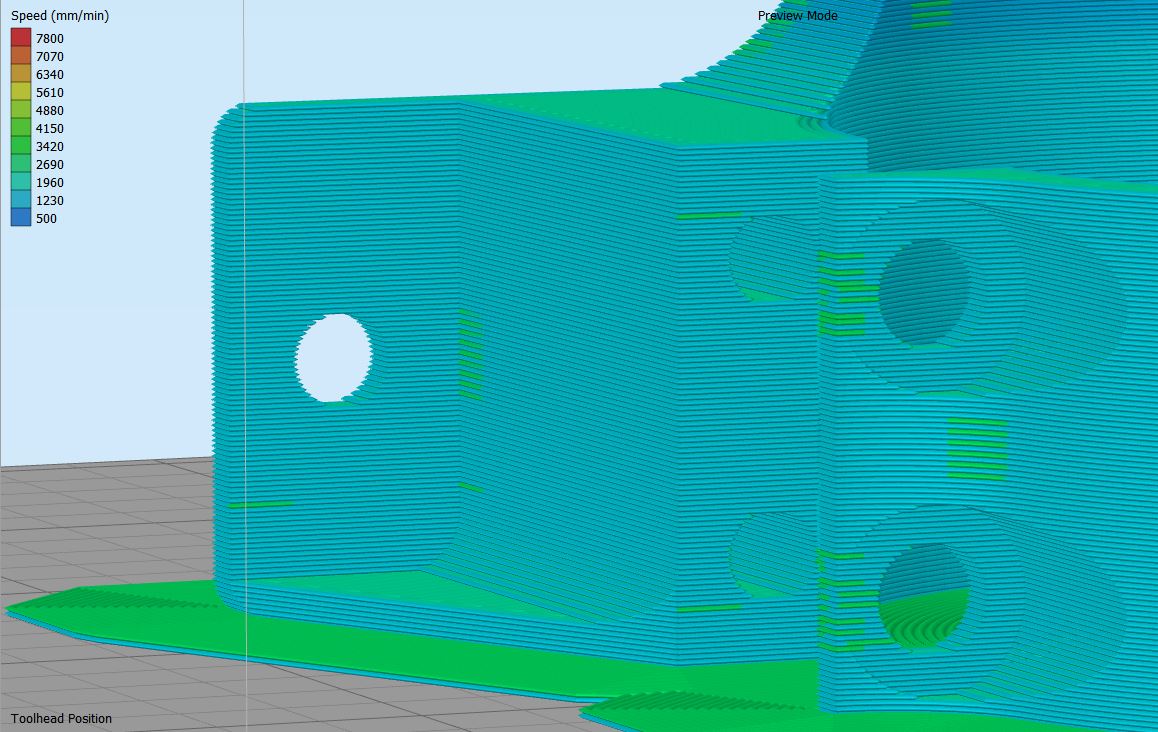
Thanks for the explanation, I did indeed change from 231 to 235 degrees for the ABS and I am running print speeds as shown below.
From the preview it seems that print speeds at the bolt holes are 1230mm/min and some spots up to 3420mm/min.
.
Edited 2 time(s). Last edit at 11/19/2019 05:31AM by Karoo Klong.

From the preview it seems that print speeds at the bolt holes are 1230mm/min and some spots up to 3420mm/min.
.
Edited 2 time(s). Last edit at 11/19/2019 05:31AM by Karoo Klong.
Sorry, only registered users may post in this forum.