Back again after 3 years
Posted by spiff
|
Back again after 3 years December 18, 2018 05:44AM |
Registered: 10 years ago Posts: 45 |
Hi all.
My Ormerod has been sitting on the shelf for almost 3 years, after we moved (and a lot of other projects around the new house took priority). Inspired by a few other posts on this forum, I decided to try and resurrect it again (as I did long time ago: [reprap.org] ).
I dusted it off yesterday and oiled a few parts, then powered it up.
I couldn't really remember what state the printer was in, so I decided to try printing something. Unfortunately the Z-probe calibration was off, so the print head messed up the kapton on the print bed. I have just replaced the kapton and will try a more gentle approach to bringing up the printer this time.
My current configuration:
@dc42 (if you are reading this): Any pointers on firmware and web interface upgrades? In this post [reprap.org] you say to look through the changes in upgrade notes of WHATS_NEW.md. Unfortunately the earliest version covered there is 1.12. Anything I need to be aware of coming from 1.09c-dc42?
Is this the recommended firmware: [github.com] ?
I also have a 12V 300W PSU that I plan to install instead of the ATX PSU that came with the printer (it is struggling a bit delivering 12V for the heated bed and hotend).
Best regards
Mikkel Holm Olsen
AKA Spaceman Spiff
My Ormerod has been sitting on the shelf for almost 3 years, after we moved (and a lot of other projects around the new house took priority). Inspired by a few other posts on this forum, I decided to try and resurrect it again (as I did long time ago: [reprap.org] ).
I dusted it off yesterday and oiled a few parts, then powered it up.
I couldn't really remember what state the printer was in, so I decided to try printing something. Unfortunately the Z-probe calibration was off, so the print head messed up the kapton on the print bed. I have just replaced the kapton and will try a more gentle approach to bringing up the printer this time.
My current configuration:
* Ormerod 1 with Duet v0.6
* RepRapFirmware 1.09c-dc42
* Web interface 1.06.
* Aluminum bed support from DD Metal Products
* Heated bed is 3mm aluminum PCB [www.reprap.me], with a layer of 200mm wide kapton, no glass plate
* DC42's differential Z-sensor/hotend board
* Brass long nut (on regular threaded rod)
* Aluminum X-arm kit
@dc42 (if you are reading this): Any pointers on firmware and web interface upgrades? In this post [reprap.org] you say to look through the changes in upgrade notes of WHATS_NEW.md. Unfortunately the earliest version covered there is 1.12. Anything I need to be aware of coming from 1.09c-dc42?
Is this the recommended firmware: [github.com] ?
I also have a 12V 300W PSU that I plan to install instead of the ATX PSU that came with the printer (it is struggling a bit delivering 12V for the heated bed and hotend).
Best regards
Mikkel Holm Olsen
AKA Spaceman Spiff
|
Re: Back again after 3 years December 18, 2018 01:54PM |
Registered: 10 years ago Posts: 14,672 |
Welcome back!
Yes that's the recommended firmware. Apart from the whatsnew file, the other things you need to check that I can think of are:
- Does the proximity sensor reading behave correctly? There was a wiring change a long time ago. I'm fairly sure it happened before firmware 1.09c-dc42 though.
- Does the X axis move the right way? The default movement direction changed at some point, and I can't remember in which firmware version that was. Check it after upgrading. If it moves the wrong way, either reverse the X motor connector (with power off!) or change S0 to S1 or vice versa in the M569 P0 command in config.g.
- You will need to add a M574 command to config.g but I think that's covered in the whatsnew file.
Most discussion of ReprapFirmware takes place on the forum at duet3d.com these days.
Edited 2 time(s). Last edit at 12/18/2018 01:55PM by dc42.
Large delta printer [miscsolutions.wordpress.com], E3D tool changer, Robotdigg SCARA printer, Crane Quad and Ormerod
Disclosure: I design Duet electronics and work on RepRapFirmware, [duet3d.com].
|
Re: Back again after 3 years December 18, 2018 01:56PM |
Registered: 10 years ago Posts: 466 |
|
Re: Back again after 3 years December 19, 2018 02:57AM |
Registered: 10 years ago Posts: 45 |
Thank you @dc42,
I will check the proximity sensor after upgrading FW.
I'm pretty sure I already reversed the X motor wiring at my last upgrade 3 years ago ;-)
What would be the best way to upgrade my old duet 0.6 firmware? I used bossac before, and I probably still have it installed on my PC. I am not sure if my old firmware has bootloader capabilities? The instructions I found regarding RepRapFirmware installation seem to be related to Duet 2 / WiFi (which I believe have a different MCU).
Edit: I am comfortable with installing and using SAM-BA as well (used it at work).
Best regards,
Edited 1 time(s). Last edit at 12/19/2018 03:03AM by spiff.
Mikkel Holm Olsen
AKA Spaceman Spiff
|
Re: Back again after 3 years December 19, 2018 03:01AM |
Registered: 10 years ago Posts: 14,672 |
If you are using Duet Web Control and there is an Upload button on the Settings/General page, try uploading the firmware through that. Otherwise, use Bossa or bossac.
Large delta printer [miscsolutions.wordpress.com], E3D tool changer, Robotdigg SCARA printer, Crane Quad and Ormerod
Disclosure: I design Duet electronics and work on RepRapFirmware, [duet3d.com].
Large delta printer [miscsolutions.wordpress.com], E3D tool changer, Robotdigg SCARA printer, Crane Quad and Ormerod
Disclosure: I design Duet electronics and work on RepRapFirmware, [duet3d.com].
|
Re: Back again after 3 years December 19, 2018 03:30AM |
Registered: 10 years ago Posts: 1,230 |
Quote
spiff
What would be the best way to upgrade my old duet 0.6 firmware? I used bossac before, and I probably still have it installed on my PC
This is how I flash on win7
connect usb to pc only (no main power)
press upper reset (near ethernet)
press lower reset
check device manager and insert COM port
bossac --port=COM6 -U true -e -w -v -b RepRapFirmware-1.19.bin -R
Erik
|
Re: Back again after 3 years December 19, 2018 08:50AM |
Registered: 10 years ago Posts: 45 |
Thank you Erik,
I managed to update the firmware (using bossac) and DWC (just copied the files tot he SD card):
Now I will try to power up and see what happens
Mikkel Holm Olsen
AKA Spaceman Spiff
I managed to update the firmware (using bossac) and DWC (just copied the files tot he SD card):
Firmware Name: 	        RepRapFirmware for Duet
Firmware Electronics: 	Duet 0.6
Firmware Version: 	1.22 (2018-07-26b2)
Web Interface Version: 	1.22.3
Now I will try to power up and see what happens
Mikkel Holm Olsen
AKA Spaceman Spiff
|
Re: Back again after 3 years December 19, 2018 09:14AM |
Registered: 10 years ago Posts: 45 |
Logged into the updated web interface, and tried to home X, i get the error message:
Error: G0/G1: insufficient axes homed
I probably missed some configuration update. Any pointers on how to proceed?
EDIT: I do have a Z-probe reading, so connection seems correct.
EDIT2: Just found this: [forum.duet3d.com] I think that solves my problem, will try it out a little later today.
Best regards,
Edited 2 time(s). Last edit at 12/19/2018 09:19AM by spiff.
Mikkel Holm Olsen
AKA Spaceman Spiff
|
Re: Back again after 3 years December 19, 2018 07:50PM |
Registered: 8 years ago Posts: 123 |
spiff,
Yes, moves require S2 before homing, so homing files require some minor changes.
You can use the Reprap Firmware configurator to generate new files for any firmware, or as I assisted an Ormerod 1 owner recently, this thread (and this particular message) may help, as well as the config bundle I generated for the Ormerod 1 which you can view the homex,y,z,all for yourself and check the changes required to help speed up your fix.
|
Re: Back again after 3 years December 19, 2018 07:54PM |
Registered: 8 years ago Posts: 123 |
also you can now use M303 to tune your heaters, get the parameters and use M500 to save the heater parameters in config-override.g and add the command M501 near the end of config.g to invoke config-override.g.
Tuning the heaters
First time autotuning… Questions[/quote]
Tuning the heaters
First time autotuning… Questions[/quote]
|
Re: Back again after 3 years January 02, 2019 11:51AM |
Registered: 10 years ago Posts: 45 |
Finally a little progress 
I generated new configuration files using the configurator [configurator.reprapfirmware.org] and then used WinMerge to compare them to the old ones.
And I had to reverse the X-axis in the config.
I noticed two problems (but I am still able to print, so I can fix them):
1. I am using Iamburney's Herringbone Z Gears, and I notice that the X-homing target (which I believe I printed from DC42's intelligent Z-probe installation guide) rubs against the Z-gears when at the lowest Z-positions. Where do I find the X-homing target, and is there an updated version that does not have this problem?
2. I find that some of the original printed parts are starting to delaminate somewhat. In particular the part that joins the horizontal and vertical alu extrusions (and holds the Z-stepper). I found the parts repository [github.com] , but I am not quite sure if part 437 [github.com] is the right one for Ormerod 1? Can anyone confirm, or tell if there is a better part to replace it?
Happy new year
Mikkel Holm Olsen
AKA Spaceman Spiff
|
Re: Back again after 3 years January 02, 2019 12:13PM |
Registered: 10 years ago Posts: 14,672 |
Regarding #1, the design is in my github repo at [github.com].
Regarding #2, somebody designed a chunkier version of that part. I think it's on thingiverse.
Large delta printer [miscsolutions.wordpress.com], E3D tool changer, Robotdigg SCARA printer, Crane Quad and Ormerod
Disclosure: I design Duet electronics and work on RepRapFirmware, [duet3d.com].
Regarding #2, somebody designed a chunkier version of that part. I think it's on thingiverse.
Large delta printer [miscsolutions.wordpress.com], E3D tool changer, Robotdigg SCARA printer, Crane Quad and Ormerod
Disclosure: I design Duet electronics and work on RepRapFirmware, [duet3d.com].
|
Re: Back again after 3 years January 02, 2019 04:04PM |
Registered: 10 years ago Posts: 45 |
Thanks again dc42, I pulled your homing-tab into openscad and modified it slightly (getting rid of the hole for the original homing tab, and instead making the arm less wide, to avoid the problems I encountered). Now I just need to print it
Regarding the lower Z mount, I found this thread [reprap.org] , which describes a version made for cap head screws instead of countersunk. I think the reason why my part is splitting may very well be due to the countersunk screws, so I will try that first.
I did find this one also [www.thingiverse.com] , which is probably the chunkier version you mentioned.
Once again, thanks to everyone pitching in. This forum is really outstanding.
Mikkel Holm Olsen
AKA Spaceman Spiff
|
Re: Back again after 3 years January 02, 2019 04:56PM |
Registered: 8 years ago Posts: 123 |
I've been through several of the lower z mount and have the chunky version now in PETG.
Spiff, if you're coming back after a while then let me plug my ormerod wiki .
Whilst Ormerod 2 focused, a skim may yield something helpful (and feel free to suggest anything decent you come across.)
Good hunting!
Spiff, if you're coming back after a while then let me plug my ormerod wiki .
Whilst Ormerod 2 focused, a skim may yield something helpful (and feel free to suggest anything decent you come across.)
Good hunting!
|
Re: Back again after 3 years January 03, 2019 02:56AM |
Registered: 10 years ago Posts: 1,230 |
Quote
spiff
Regarding the lower Z mount, I found this thread [reprap.org] , which describes a version made for cap head screws instead of countersunk. I think the reason why my part is splitting may very well be due to the countersunk screws, so I will try that first.
I did find this one also [www.thingiverse.com] , which is probably the chunkier version you mentioned.
Once again, thanks to everyone pitching in. This forum is really outstanding.
Yes countersunk screws with printed parts is not so great - attached is a version with cylinder head screws - and a bit more beef in z direction

Edit: fits right in


Erik
Edited 1 time(s). Last edit at 01/03/2019 06:38AM by ormerod168.
|
Re: Back again after 3 years January 03, 2019 08:39AM |
Registered: 10 years ago Posts: 45 |
|
Re: Back again after 3 years January 03, 2019 10:37AM |
Registered: 10 years ago Posts: 1,230 |
Yes its compatible with the original ormerod 1, the only difference is the holes for cylinder head screws and 3.14mm extra material added to the top (the downside when printing)
My y and z extrusion is bolted together with a single screw, so the plate was added to keep the z-axis from swinging, it runs up the front of the z-extrusion and is secured with t-nuts
Would have been better and simpler to use two screws as droftarts did in his mod
Tall-merod
[reprap.org]
..and talk about tall-merod
The Stupidly Tall-merod
[reprap.org]
Erik
My y and z extrusion is bolted together with a single screw, so the plate was added to keep the z-axis from swinging, it runs up the front of the z-extrusion and is secured with t-nuts

Would have been better and simpler to use two screws as droftarts did in his mod

Tall-merod
[reprap.org]
..and talk about tall-merod
The Stupidly Tall-merod
[reprap.org]
Erik
|
Re: Back again after 3 years January 03, 2019 12:00PM |
Registered: 8 years ago Posts: 123 |
If the Ormerod 1 is similar to the 2 in this matter, there is an upgraded Ormerod z-corner-bracket and z-foot
Rock solid and will not delaminate or break!
Parts:
Edited 1 time(s). Last edit at 01/03/2019 12:01PM by cheeseandham.
Rock solid and will not delaminate or break!
Parts:
- [uk.rs-online.com]
- [www.amazon.co.uk] - will need a tiny bit of work with a drill and a bit of oil to slightly increase the size of one of the holes.
Edited 1 time(s). Last edit at 01/03/2019 12:01PM by cheeseandham.
|
Re: Back again after 3 years January 07, 2019 02:12PM |
Registered: 10 years ago Posts: 45 |
Two cases of bad luck attempting to print the new bracket 
First one was yesterday. About an hour and a half into the print (and I was very satisfied with the print quality), suddenly the X-carriage slid off the bearing, and turned the whole thing into a mess. Maybe I need one of these as well: [www.thingiverse.com] , but so far I have tied a thin piece of wire around the x-carriage and into the groove on the bearing.
Then today I did a second attempt. Not quite sure what caused the problem this time. The print started out fine, but when I went to check on it after about an hour, it seems there had been a problem: The print head was moving around in the print like too much filament had been extruded (or the print head had not been lifted enough between layers). There had also been a bit of skipping in the Y-direction. Had to abort the print
Mikkel Holm Olsen
AKA Spaceman Spiff
|
Re: Back again after 3 years January 08, 2019 03:51AM |
Registered: 10 years ago Posts: 1,230 |
Quote
spiff
.. but so far I have tied a thin piece of wire around the x-carriage and into the groove on the bearing.
Yes that will fix it for sure - did that long ago

Quote
Then today I did a second attempt. Not quite sure what caused the problem this time. The print started out fine, but when I went to check on it after about an hour, it seems there had been a problem: The print head was moving around in the print like too much filament had been extruded (or the print head had not been lifted enough between layers). There had also been a bit of skipping in the Y-direction. Had to abort the print
Yes that's a bit strange, there should be no problems with curl-ups that early, only if the print itself lifted from the bed
The first print looks fine as far as it went but the picture seems to show a bit of curl-up at the pointy bit at the wall of the hole that could have grabbed the nozzle?, if so, more cooling to the print or/and a bit lower nozzle temp. would help
And no harm in raising the motor current settings a bit, standard was 800mA -
M906 X1000 Y1000 Z800 E1000 should be OK,

Erik
|
Re: Back again after 3 years January 08, 2019 05:21AM |
Registered: 10 years ago Posts: 45 |
Quote
ormerod168
Yes that's a bit strange, there should be no problems with curl-ups that early, only if the print itself lifted from the bed
No, the bottom 10-15 layers seem to have printed fine, and were firmly attached to the bed.
Quote
ormerod168
The first print looks fine as far as it went but the picture seems to show a bit of curl-up at the pointy bit at the wall of the hole that could have grabbed the nozzle?, if so, more cooling to the print or/and a bit lower nozzle temp. would help
I think there is an explanation for that; when the x-carriage slid off the bearing I quickly paused the print, and after sliding it on again i tried to continue, but the some steps had been missed (in X or Y direction), so printing did not resume in the correct place, and I had to abort it again. I think the artifact you are referring to may be where the print resumed (sorry the pictures are not that good).
Quote
ormerod168
And no harm in raising the motor current settings a bit, standard was 800mA -
M906 X1000 Y1000 Z800 E1000 should be OK
I think I already raised them, but I will confirm when I get home.
Mikkel Holm Olsen
AKA Spaceman Spiff
|
Re: Back again after 3 years January 12, 2019 02:20PM |
Registered: 10 years ago Posts: 45 |
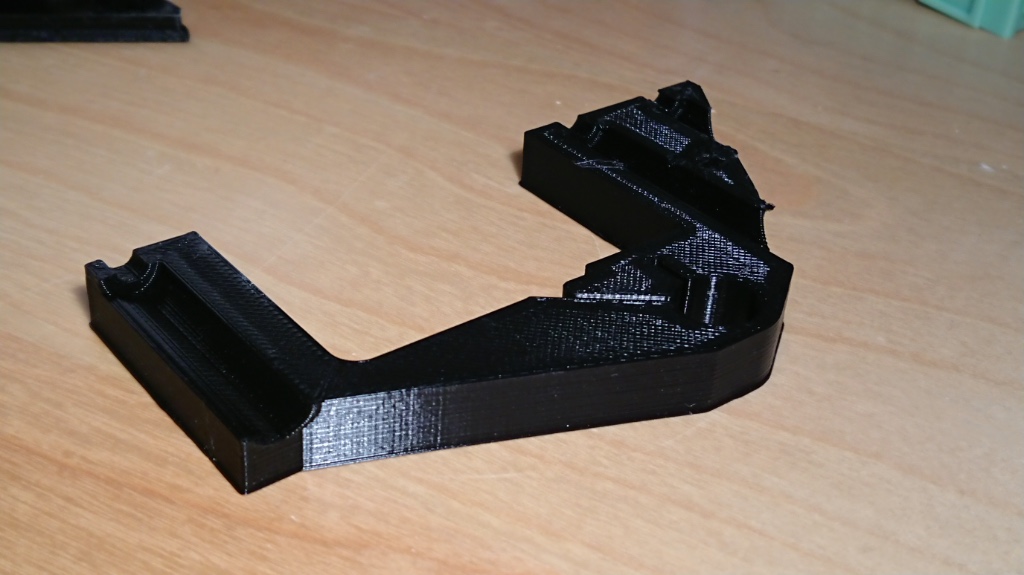
Third time lucky
I am very pleased with the quality. My only (minor) complaint is a little too much extrusion on the first layer, but then again, I think that is what gave me such good bed adhesion and smooth bottom surface.
Thank you all for your suggestions and support.
Best regards,
Edited 1 time(s). Last edit at 01/12/2019 02:22PM by spiff.
Mikkel Holm Olsen
AKA Spaceman Spiff
I am very pleased with the quality. My only (minor) complaint is a little too much extrusion on the first layer, but then again, I think that is what gave me such good bed adhesion and smooth bottom surface.
Thank you all for your suggestions and support.


Best regards,
Edited 1 time(s). Last edit at 01/12/2019 02:22PM by spiff.
Mikkel Holm Olsen
AKA Spaceman Spiff
Sorry, only registered users may post in this forum.