Smartrap - Cimbria - Wood frame project.
Posted by Cliff Mellangård
|
Smartrap - Cimbria - Wood frame project. April 14, 2014 08:31AM |
Registered: 10 years ago Posts: 148 |
Smartrap Cimbria Project!
( Made a complete redesign of the first page now when I have tinkercad to make my mockups with.
I wanted a cleaner page design. )
Please post pictures if you use my remix as I would love to see them and keeps me motivated to do more work on it.
I will not upload my remix to thingiverse until iam satisfied and it have bin tested!!!!!!
Iam sorry if I might upload wrong files or do any other error as you can see me like a nutty professor that have so many ideas that I even forget where I placed my underwear sometimes
To many things on my mind most of the time.
I do also highly recommend Tinkercad to model with as I dumped sketchup in the trashcan after testing it.
[tinkercad.com]
I use chrome to edit with and works great.
-------------------------------------------------------------------------------------------------------------------------------------------------------------------------------------------------------------------------------
- -
-------------------------------------------------------------------------------------------------------------------------------------------------------------------------------------------------------------------------------
The one and only original by smartfriendz this rework is completely based on.
[smartfriendz.com]
[www.thingiverse.com]
-------------------------------------------------------------------------------------------------------------------------------------------------------------------------------------------------------------------------------
- -
-------------------------------------------------------------------------------------------------------------------------------------------------------------------------------------------------------------------------------
And Here comes my playhouse of mockup models and trials
Here is wath I want with the cimbria remix of smartrap.
Keep in mind that you may have to scroll to my latest posts in this thread to get the latest files. (You don't seam to be able to edit the first post after awhile.)
When I make larger updates so will I compress the files to a bundle with them so each time always have the latest ones.
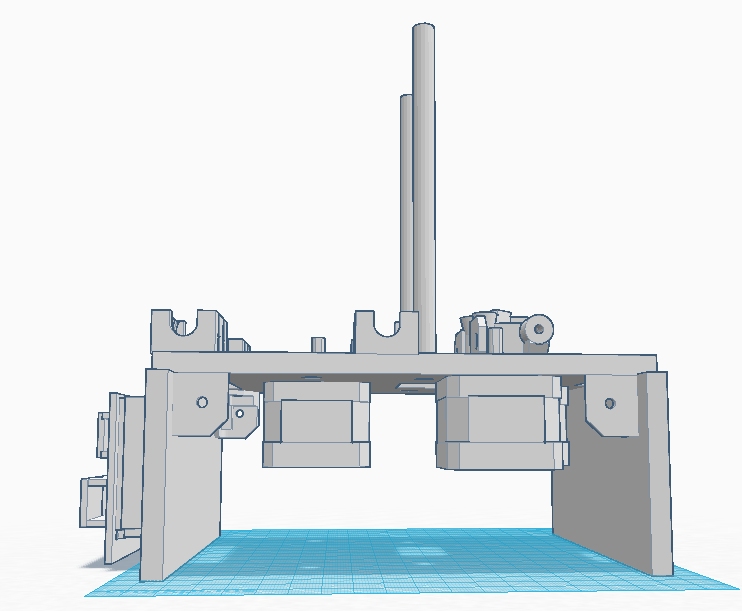
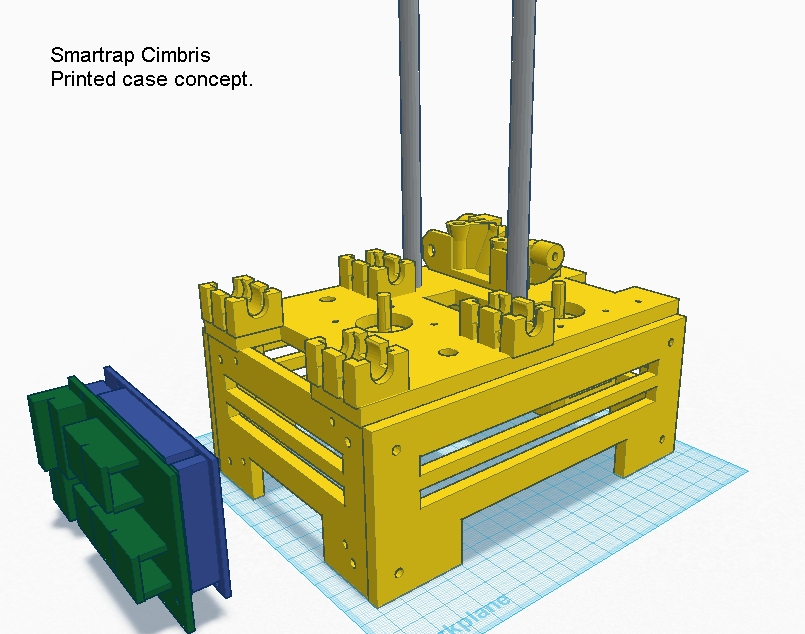
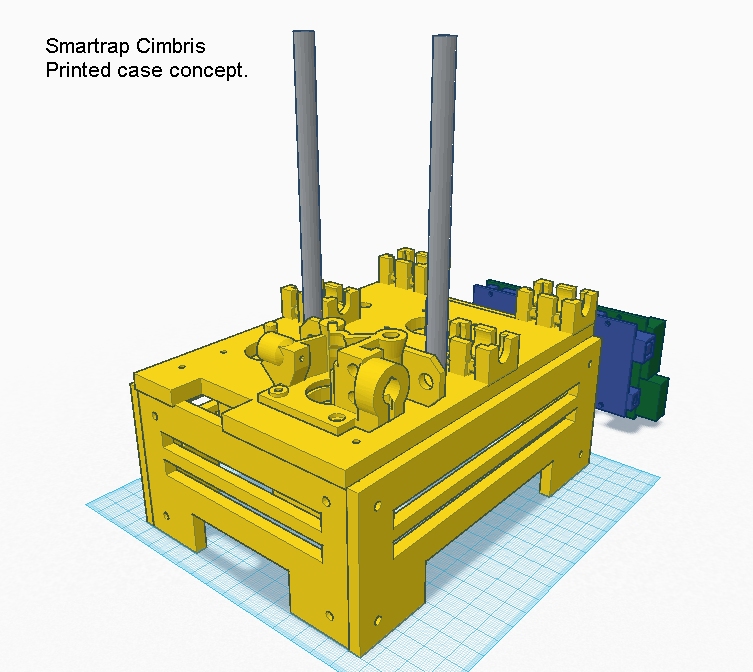
Here is a early preview of my printed case concept.
-------------------------------------------------------------------------------------------------------------------------------------------------------------------------------------------------------------------------------
- -
-------------------------------------------------------------------------------------------------------------------------------------------------------------------------------------------------------------------------------
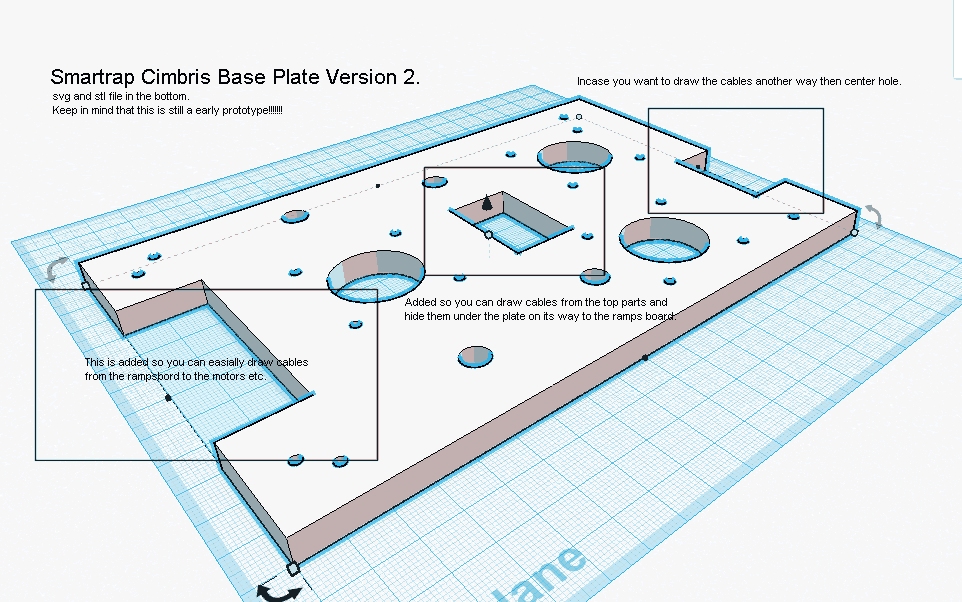
Current Base plate! ( You nead 1 )
Stl.
[forums.reprap.org]
Svg.
[forums.reprap.org]
This is how it looks.
The plate can also be printed and seam to hold up pretty well with the right settings.
4-6 perimeters.
3-4 bottom and top layers.
My mockups have infill density of 1 and bend slightly and I think it neads to be at least 2-3 to be stable?
Its more or less that you nead to experiment with your printer wath settings seam to work at its best.
And if you print it keep in mind that its awfull to get loose from the bed
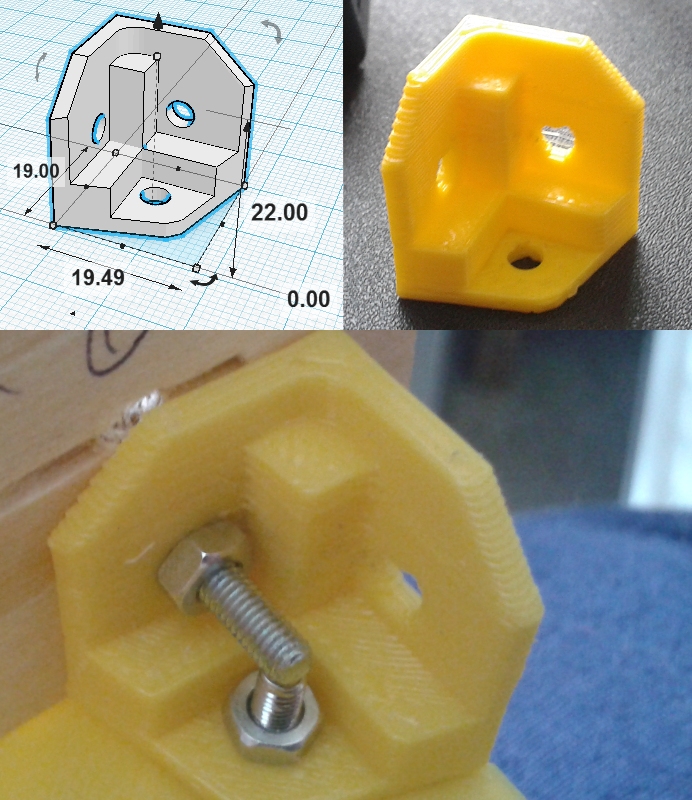
This is the corner piece to be used to attach legs and plate together.
Stl file here. ( You nead 4 )
[forums.reprap.org]
-------------------------------------------------------------------------------------------------------------------------------------------------------------------------------------------------------------------------------
- -
-------------------------------------------------------------------------------------------------------------------------------------------------------------------------------------------------------------------------------
Here comes also some of the thingiverse files iam using as I will update on things that exist that I will use for this build!
I found this one extremely usefull as it only uses a single screw to attch to the plate and could even be made so it can move a bit if the rods aint eaxactly straight and still print good.
[www.thingiverse.com]
-------------------------------------------------------------------------------------------------------------------------------------------------------------------------------------------------------------------------------
- -
-------------------------------------------------------------------------------------------------------------------------------------------------------------------------------------------------------------------------------
The design goals of the remix.
Simplier assembly.
You can use almost any extruder that is supposed to be mounted directly on a nema 17 motor.
You can cut the large parts in various materials like aluminium,wood and plastic etc.
The design will always attempt to also be printable for the ones that like that.
The design will use stl files that have bin tested and works from thingiverse.
Remix backstory!
Iam unemployed and have a lot of spare time and little money.
So I want to build a smartrap but don't have the funds.
I have a lot of time and the free version of Tinkercad and a finished prusa i3 wood frame printer.
So wath could I do with this combination ?
Use my wacked up mind and think about a even simplier and cheaper construction of the smartrap
I have followed the smartrap community for a while now and will try to add the improvements I have read about like gt belts instead of fishing lines for the ones that want that and also the classic design.
I will start this rework from the bottom and work my way up as I live in an apartement and don't have a workshop
This mean that all my modifications will work with the original files from smartfriendz the whole way thru.
And you wonder why do something like this???
This simple plate removes the nead for multiple parts and cut down construction time and things that could go wrong.
They are instead replaced by the plate and 2 legs in wood or another material,and the other parts with a lot smaller printed parts to speed up construction.
And I do have a history with love to retro games and tinkering with technology as you can see on my tube page.
[www.youtube.com]
-------------------------------------------------------------------------------------------------------------------------------------------------------------------------------------------------------------------------------
- -
-------------------------------------------------------------------------------------------------------------------------------------------------------------------------------------------------------------------------------
If anyone wants to pitch in so go ahead as I want the smartrap to be even cheaper and better as I simply love to tinkeraround with things.
Edited 22 time(s). Last edit at 04/15/2014 08:57PM by Cliff Mellangård.
( Made a complete redesign of the first page now when I have tinkercad to make my mockups with.
I wanted a cleaner page design. )
Please post pictures if you use my remix as I would love to see them and keeps me motivated to do more work on it.
I will not upload my remix to thingiverse until iam satisfied and it have bin tested!!!!!!
Iam sorry if I might upload wrong files or do any other error as you can see me like a nutty professor that have so many ideas that I even forget where I placed my underwear sometimes
To many things on my mind most of the time.
I do also highly recommend Tinkercad to model with as I dumped sketchup in the trashcan after testing it.
[tinkercad.com]
I use chrome to edit with and works great.
-------------------------------------------------------------------------------------------------------------------------------------------------------------------------------------------------------------------------------
- -
-------------------------------------------------------------------------------------------------------------------------------------------------------------------------------------------------------------------------------
The one and only original by smartfriendz this rework is completely based on.


[smartfriendz.com]
[www.thingiverse.com]
-------------------------------------------------------------------------------------------------------------------------------------------------------------------------------------------------------------------------------
- -
-------------------------------------------------------------------------------------------------------------------------------------------------------------------------------------------------------------------------------
And Here comes my playhouse of mockup models and trials
Here is wath I want with the cimbria remix of smartrap.


Keep in mind that you may have to scroll to my latest posts in this thread to get the latest files. (You don't seam to be able to edit the first post after awhile.)
When I make larger updates so will I compress the files to a bundle with them so each time always have the latest ones.
Here is a early preview of my printed case concept.


-------------------------------------------------------------------------------------------------------------------------------------------------------------------------------------------------------------------------------
- -
-------------------------------------------------------------------------------------------------------------------------------------------------------------------------------------------------------------------------------
Current Base plate! ( You nead 1 )
Stl.
[forums.reprap.org]
Svg.
[forums.reprap.org]
This is how it looks.

The plate can also be printed and seam to hold up pretty well with the right settings.
4-6 perimeters.
3-4 bottom and top layers.
My mockups have infill density of 1 and bend slightly and I think it neads to be at least 2-3 to be stable?
Its more or less that you nead to experiment with your printer wath settings seam to work at its best.
And if you print it keep in mind that its awfull to get loose from the bed
This is the corner piece to be used to attach legs and plate together.
Stl file here. ( You nead 4 )
[forums.reprap.org]

-------------------------------------------------------------------------------------------------------------------------------------------------------------------------------------------------------------------------------
- -
-------------------------------------------------------------------------------------------------------------------------------------------------------------------------------------------------------------------------------
Here comes also some of the thingiverse files iam using as I will update on things that exist that I will use for this build!
I found this one extremely usefull as it only uses a single screw to attch to the plate and could even be made so it can move a bit if the rods aint eaxactly straight and still print good.

[www.thingiverse.com]
-------------------------------------------------------------------------------------------------------------------------------------------------------------------------------------------------------------------------------
- -
-------------------------------------------------------------------------------------------------------------------------------------------------------------------------------------------------------------------------------
The design goals of the remix.
Simplier assembly.
You can use almost any extruder that is supposed to be mounted directly on a nema 17 motor.
You can cut the large parts in various materials like aluminium,wood and plastic etc.
The design will always attempt to also be printable for the ones that like that.
The design will use stl files that have bin tested and works from thingiverse.
Remix backstory!
Iam unemployed and have a lot of spare time and little money.
So I want to build a smartrap but don't have the funds.
I have a lot of time and the free version of Tinkercad and a finished prusa i3 wood frame printer.
So wath could I do with this combination ?
Use my wacked up mind and think about a even simplier and cheaper construction of the smartrap
I have followed the smartrap community for a while now and will try to add the improvements I have read about like gt belts instead of fishing lines for the ones that want that and also the classic design.
I will start this rework from the bottom and work my way up as I live in an apartement and don't have a workshop
This mean that all my modifications will work with the original files from smartfriendz the whole way thru.
And you wonder why do something like this???
This simple plate removes the nead for multiple parts and cut down construction time and things that could go wrong.


They are instead replaced by the plate and 2 legs in wood or another material,and the other parts with a lot smaller printed parts to speed up construction.
And I do have a history with love to retro games and tinkering with technology as you can see on my tube page.
[www.youtube.com]
-------------------------------------------------------------------------------------------------------------------------------------------------------------------------------------------------------------------------------
- -
-------------------------------------------------------------------------------------------------------------------------------------------------------------------------------------------------------------------------------
If anyone wants to pitch in so go ahead as I want the smartrap to be even cheaper and better as I simply love to tinkeraround with things.
Edited 22 time(s). Last edit at 04/15/2014 08:57PM by Cliff Mellangård.
Attachments:
open | download - newcorner.jpg (355.6 KB)
open | download - BaseCorner.stl (19.9 KB)
open | download - plate2.jpg (383.7 KB)
open | download - BasePlateV2.stl (127.3 KB)
open | download - BasePlateV2.svg (39.3 KB)
open | download - view1.jpg (222.1 KB)
open | download - view2.jpg (182.5 KB)
open | download - view3.jpg (96.5 KB)
open | download - view4.jpg (202.8 KB)
|
Re: Smartrap - Cimbria - Wood frame project. April 15, 2014 04:48AM |
Registered: 10 years ago Posts: 992 |
Hi cliff,
It's really great what you do there !
I was thinking lately to make a version with one big plate like you just did it's very cool to see it done.
I will try also.. it can lead to very more simple assembly time and less screws.. thank you
i will follow very close this work .
the Smartrap project
[smartfriendz.com]
[www.thingiverse.com]
[reprap.org]
[github.com]
doc assemblage: [reprap.org]
NEW: Forum smartfriendz: [smartraptalk.smartfriendz.com]
It's really great what you do there !
I was thinking lately to make a version with one big plate like you just did
it's very cool to see it done. I will try also.. it can lead to very more simple assembly time and less screws.. thank you
i will follow very close this work .
the Smartrap project
[smartfriendz.com]
[www.thingiverse.com]
[reprap.org]
[github.com]
doc assemblage: [reprap.org]
NEW: Forum smartfriendz: [smartraptalk.smartfriendz.com]
|
Re: Smartrap - Cimbria - Wood frame project. April 15, 2014 04:05PM |
Registered: 10 years ago Posts: 148 |
Thanks ! Nice to know that you have noiced me
Its the small things that make people improve your products for free
I waited to answer as the forum seam to only alowe you to edit the latest post and I whas not satisfied with how I made the first page until now
I cant wait to see wath skyrider is doing after the idea he got after my first mockup images whas posted.
Loved his idea to make the smartrap be able to be used as a cnc machine also with the extra strength.
But he is so secret with his design and will post a remix page on thingiverse he wrote.
|
Re: Smartrap - Cimbria - Wood frame project. April 15, 2014 06:11PM |
Registered: 10 years ago Posts: 814 |
|
Re: Smartrap - Cimbria - Wood frame project. April 15, 2014 06:26PM |
Registered: 10 years ago Posts: 148 |
This is a design in progress and the state it have will not have the z rods stableQuote
madmike8
The original design supports the Z rods at the top and the bottom of the stepper motors. Do you think your design is strong enough to hold the Z rods stable?
Iam currently working on the design but iam not ready to show wath I have done
Iam testing a few designs to keep it stable but as I can see it so would the best one be to have a part where a stabiliser for the rod and the lm8uu holder is combined in a stable part you screw on to the plate,and for simplicity so do I want the z rod to be tightened like a clamp with a screw for easy assembly.
The hard part is that if I do it to complicated so do I miss my goal and the design is not easy to assemble and more expensive then the original.
But I think you will like wath iam working on as it goes more to be printable completely and a more closed box shape.
The top and side plates will be 5 mm thick and stabilised by the side walls and front and back plate will be 7 mm thick.
But I still want the parts to be able to cut out of any 6-7 mm aluminium,wood or plastic at the same time.
Before I got unemployed so did I work for 20 years in an wood factory as a team leader where we manufactured pallets and other wood based packaging for the industrial market.
So iam trying to incorporate my knowledge from there where thin constructions could lift heavy equipement
keep your eyes pealed
|
Re: Smartrap - Cimbria - Wood frame project. April 15, 2014 08:54PM |
Registered: 10 years ago Posts: 148 |
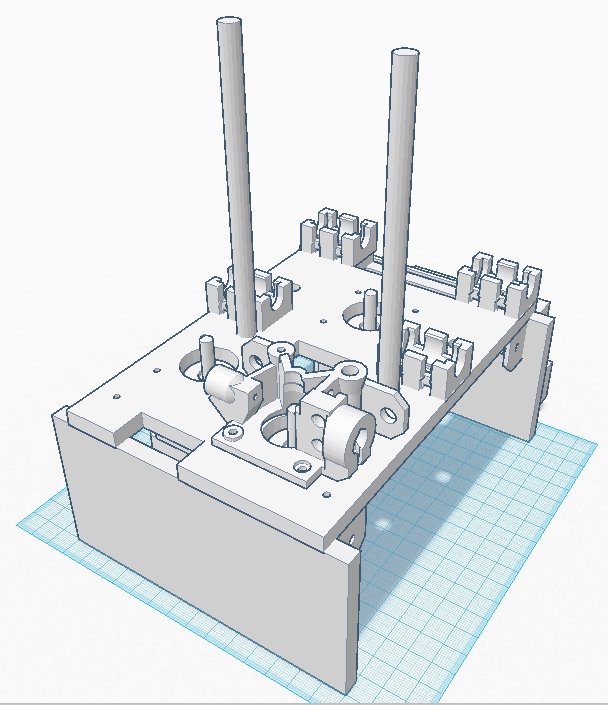
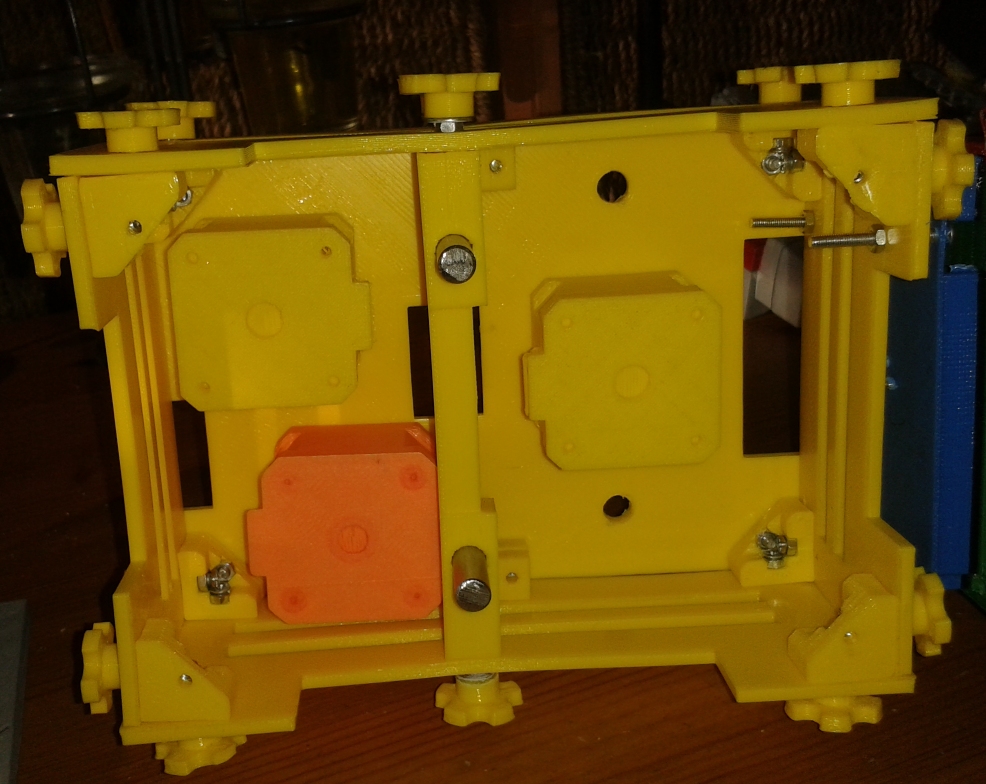
Here is a sneak peak of my tests with a printed case.
Everything in the design have a reason
The long cuts on the side is there so you can use stripes to fasten cables and to reduce print times when making the case.
The large openings is also there to cut down on print times and material.
All plates also have a simple solid version for the ones that simply wants to cut them in wood.
But this is far from finished as it depends on how difficult they endup printing?
I want the smartrap to be cheaper and stable and don't want to cut any corners.
Wath I can tell so will all plates be enough with a thickness of 5 mm when printed?
The base plate took my printer about 2.3 hours to print but this depends on how much more perimeters and infill density iam forced to use to get it right.
Ps.....
the sides are supposed to stick out like that to give a extra width for stability as I cant make the plate wider for printing issues.
Edited 2 time(s). Last edit at 04/15/2014 08:59PM by Cliff Mellangård.
|
Re: Smartrap - Cimbria - Wood frame project. April 16, 2014 05:14AM |
Registered: 10 years ago Posts: 992 |
you're welcome Cliff,
This project was really made for that. Trying to make a real viral project where everyone can easy build , hack , reproduce with simplicity in mind.
The first designs where in wood too
nice box !
skyrider is more focused on metal smartrap , or smartrap alu ? made with cnc , it's a great derivation, i'm curious too
the Smartrap project
[smartfriendz.com]
[www.thingiverse.com]
[reprap.org]
[github.com]
doc assemblage: [reprap.org]
NEW: Forum smartfriendz: [smartraptalk.smartfriendz.com]
|
Re: Smartrap - Cimbria - Wood frame project. April 16, 2014 05:44AM |
Registered: 10 years ago Posts: 148 |
Yes I saw the first one had the motors screwed to a wood plate in the bottom
Thanks as its pretty hard to do a design and constantly think of the print times and difficulty to get them manufactured and strength at the same time
I found my printer to print fast if the openings are squared and don't nead to travel to far with infills.
I will probably not design so much for the rest of this week more then release the files that have bin done and a small redesign of the corner to have the nuts inserted to them for easy assembly
We have excellent weather here in Sweden now so I have to get out in the sun
Or my girlfriend kills me
And I don't know until the 25 th if I have money to buy some parts to build my design ?
The motors are pretty much the first thing to get I belive as I have mega clone and ramps board on its way I ordered before I got unemployed
After that is it pretty much small things I can buy from time to time
|
Re: Smartrap - Cimbria - Wood frame project. April 16, 2014 02:58PM |
Registered: 10 years ago Posts: 18 |
Nice job Cliff.
It looks to incorporate some things that I have been looking for in the base.
I have also been thinking about relocating the extruder. If there was a way of putting it on top of the z axis, then it would shorten and straighten the bowden tube, thus making it easier to push filament and less play in extraction/retraction.
|
Re: Smartrap - Cimbria - Wood frame project. April 16, 2014 04:00PM |
Registered: 10 years ago Posts: 148 |
Thanks bootbuilder
Iam currently experimenting in wath thickness the sides should be etc?
Iam doing tests with 3 mm and 5 mm to reduce print times and still keep it solid.
Some ideas is to mix front and back panels 3mm and sides 5mm?
The base plate cant be any thinner I belive as it eventually would break during prints?
My current slicer settings are 4 perimeters 3 infill density and iam back to honeycomb infill ,I also turned of all extra settings to detect walls etc that slows things down.
The smaller plates takes about 1-1.3 hours to print and the base plate probably 2-3 hours,i haven't printed the side plates and cant really tell how long they take.
When everything is done so will I also include my slisc3er config file that have bin tested to print fast with good results for the plates.
And about the extruder so do I have ideas for a direct drive extruder on the top but that neads some strength and redesign
I will first finish the bottom of the printer
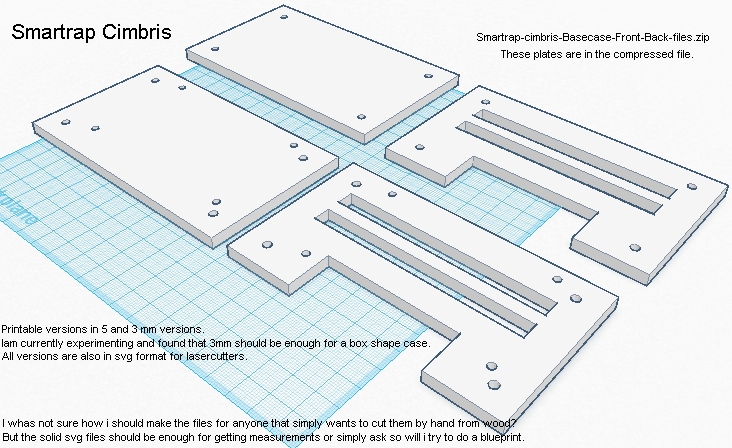
Anyway here comes the first bundle of files and I will release them like this until it have bin all tested and works.
[forums.reprap.org]
Update ----------------------------------------------------------------
After a lot of testing so do I belive I found the right combination on speed to print and strength.
Most people seam to use slic3er default setting so I also started to do my test prints with that and found that 4mm on the side,fron,back plates gives the best results.( I can stand on it without any problems when screwed together )
The front plate prints in exactly 1 hour for me and the back plate takes slightly less then a hour.
Anyone that wants to do wood cuts to sell the case can simply print the plates as drill templates or use prints to mark there wood pieces and sell them like that.
iam currently putting the finishing touches to the first release of the whole case together and will soon be released as a full beta case we all can improve as it goes on.
I will put a remix page on thingiverse so its easy to find aslo when all parts have bin finished.
The last parts before release are a improved corner piece,side plate and finished base plate.
I attached front back plates stl in 4mm here and simply print them with slic3ers default print settings and keep in mind that slic3er adds micro mm to make the holes smaller so they nead to be drilled up in the screw holes after printing.
When the case is done and anyone earn some bucks by selling it and wants to thank me so simply donate any steppsticks or other stuff for 3d printers you want , simply send a private message for my address
Update 2 ----------------------------------------------------------------------
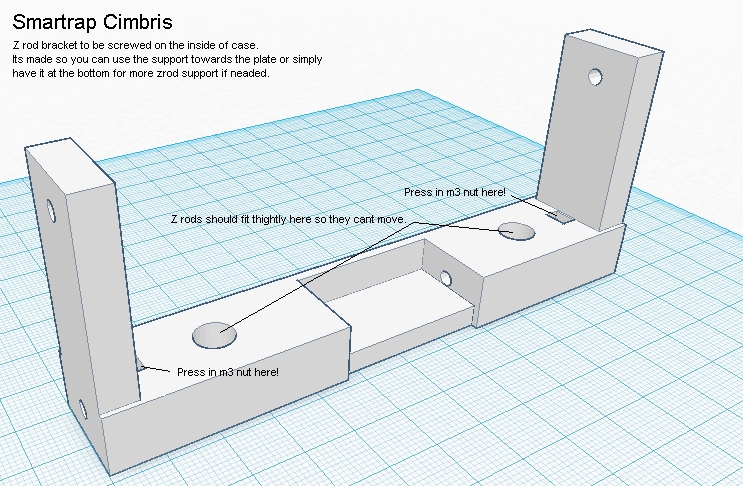
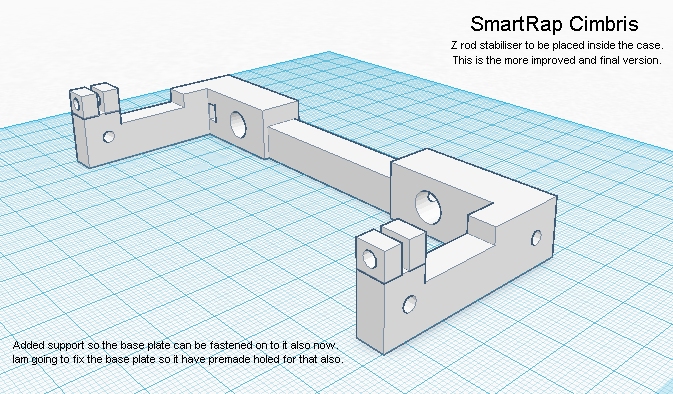
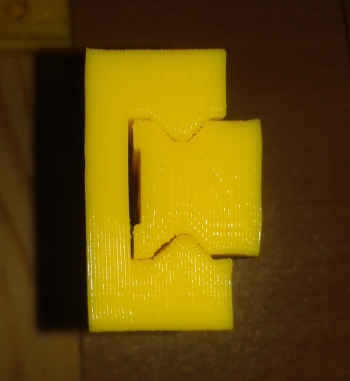
Her comes the z rod bracket right from the factory
Now do I only have the base plate and sides to be done so is there simply small adjustements to screw holes etc on all parts. (also a new corner piece )
When its done so will I release a compressed files with everything in it .
Update 3 -----------------------------------------------------------------------
Sorry for all messy updates but I found the old zrod stabiliser to be awfull to print and found things to improve.
But I will make a more clean update as soon as all parts have bin done for the base.
This new one are a lot faster to print more sturdy and have some mor functions like the base plate can be screwed on to make the case more solid.
This bracket will be in the next update with the base plate and sides.
Now when we can screw the base to this so can we also make the base slightly thinner so its faster to print.
Edited 6 time(s). Last edit at 04/17/2014 12:19PM by Cliff Mellangård.
Iam currently experimenting in wath thickness the sides should be etc?
Iam doing tests with 3 mm and 5 mm to reduce print times and still keep it solid.
Some ideas is to mix front and back panels 3mm and sides 5mm?
The base plate cant be any thinner I belive as it eventually would break during prints?
My current slicer settings are 4 perimeters 3 infill density and iam back to honeycomb infill ,I also turned of all extra settings to detect walls etc that slows things down.
The smaller plates takes about 1-1.3 hours to print and the base plate probably 2-3 hours,i haven't printed the side plates and cant really tell how long they take.
When everything is done so will I also include my slisc3er config file that have bin tested to print fast with good results for the plates.
And about the extruder so do I have ideas for a direct drive extruder on the top but that neads some strength and redesign
I will first finish the bottom of the printer
Anyway here comes the first bundle of files and I will release them like this until it have bin all tested and works.

[forums.reprap.org]
Update ----------------------------------------------------------------
After a lot of testing so do I belive I found the right combination on speed to print and strength.
Most people seam to use slic3er default setting so I also started to do my test prints with that and found that 4mm on the side,fron,back plates gives the best results.( I can stand on it without any problems when screwed together )
The front plate prints in exactly 1 hour for me and the back plate takes slightly less then a hour.
Anyone that wants to do wood cuts to sell the case can simply print the plates as drill templates or use prints to mark there wood pieces and sell them like that.
iam currently putting the finishing touches to the first release of the whole case together and will soon be released as a full beta case we all can improve as it goes on.
I will put a remix page on thingiverse so its easy to find aslo when all parts have bin finished.
The last parts before release are a improved corner piece,side plate and finished base plate.
I attached front back plates stl in 4mm here and simply print them with slic3ers default print settings and keep in mind that slic3er adds micro mm to make the holes smaller so they nead to be drilled up in the screw holes after printing.
When the case is done and anyone earn some bucks by selling it and wants to thank me so simply donate any steppsticks or other stuff for 3d printers you want , simply send a private message for my address
Update 2 ----------------------------------------------------------------------
Her comes the z rod bracket right from the factory

Now do I only have the base plate and sides to be done so is there simply small adjustements to screw holes etc on all parts. (also a new corner piece )
When its done so will I release a compressed files with everything in it .
Update 3 -----------------------------------------------------------------------
Sorry for all messy updates but I found the old zrod stabiliser to be awfull to print and found things to improve.
But I will make a more clean update as soon as all parts have bin done for the base.
This new one are a lot faster to print more sturdy and have some mor functions like the base plate can be screwed on to make the case more solid.
This bracket will be in the next update with the base plate and sides.

Now when we can screw the base to this so can we also make the base slightly thinner so its faster to print.
Edited 6 time(s). Last edit at 04/17/2014 12:19PM by Cliff Mellangård.
Attachments:
open | download - Smartrap-cimbris-Basecase-Front-Back-files.zip (24 KB)
open | download - FirstBundle.jpg (250.9 KB)
open | download - SRC BaseCase Print Back 4mm.stl (13.9 KB)
open | download - SRC BaseCase Print Front 4mm.stl (24.5 KB)
open | download - SRC BaseCase ZRodBracket.stl (38.9 KB)
open | download - Zrod bracket.jpg (294.1 KB)
open | download - Zrod bracket v2.jpg (250.5 KB)
|
Re: Smartrap - Cimbria - Wood frame project. April 20, 2014 12:56PM |
Registered: 10 years ago Posts: 148 |
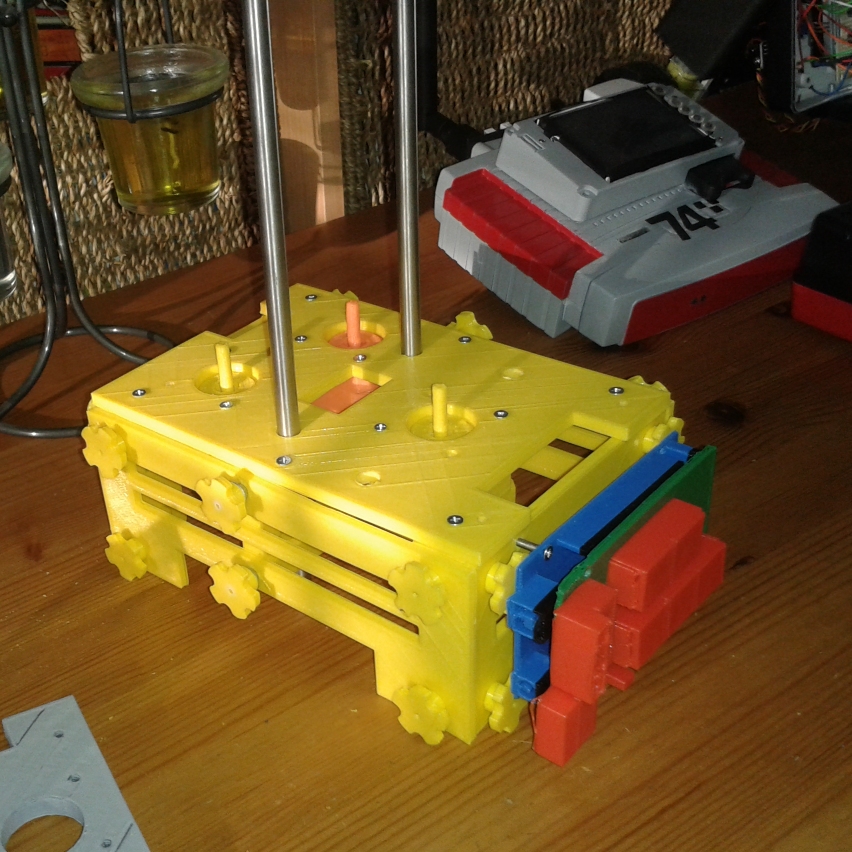
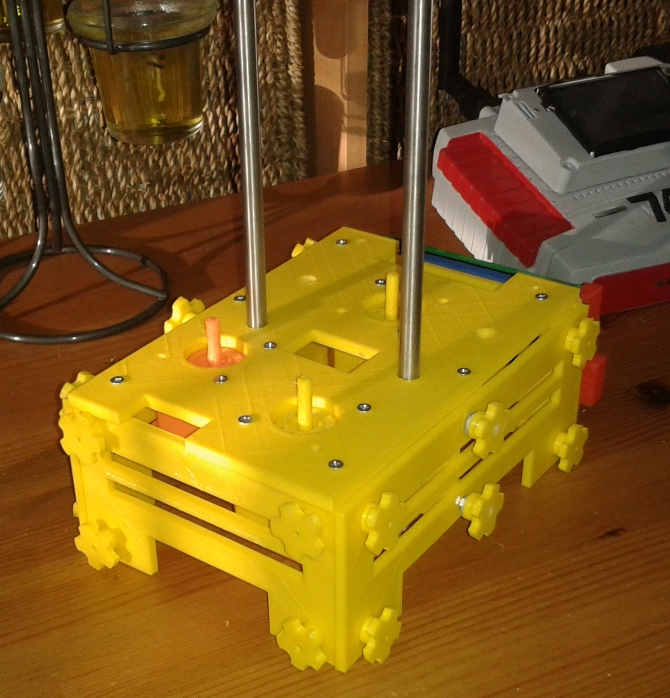
Ok so here is the current progress and iam getting there
I made a thumb screw experiment and that could be fun also to give your own printer a extra look.
And the case assembly hardly neads any tools this way,the case is very sturdy but I nead to test it running to find any weak spots.
To use thumb screws or not is more or less to the builder as it work either way.
Edited 2 time(s). Last edit at 04/20/2014 12:58PM by Cliff Mellangård.
I made a thumb screw experiment and that could be fun also to give your own printer a extra look.
And the case assembly hardly neads any tools this way,the case is very sturdy but I nead to test it running to find any weak spots.


To use thumb screws or not is more or less to the builder as it work either way.
Edited 2 time(s). Last edit at 04/20/2014 12:58PM by Cliff Mellangård.
|
Re: Smartrap - Cimbria - Wood frame project. April 20, 2014 06:06PM |
Registered: 10 years ago Posts: 992 |
i can just say : wow
What a great project here. I've never seen such printed cases. It looks huge on screen ? congrats cliff , i'm impressed !
I hope all will come fine while testing ?
I will try to print it this week .. it looks so fun
You make also me think i should have a base_plate and a plate_x.. that's it !
Thank you
the Smartrap project
[smartfriendz.com]
[www.thingiverse.com]
[reprap.org]
[github.com]
doc assemblage: [reprap.org]
NEW: Forum smartfriendz: [smartraptalk.smartfriendz.com]
|
Re: Smartrap - Cimbria - Wood frame project. April 21, 2014 06:07AM |
Registered: 10 years ago Posts: 148 |
Thanks
The size of the case and how its done is completely measured to get best results on even smaller printers and large ones,one of the reasons the base plate is 180 long and 120 mm wide is so it can be printed with good results on any printer that supports 200x200 on the xy axis.
The construction is done so you can replace many parts with cheaper wood or plastic plates cut of larger sheets.
The only hiccup is when you remove the large printed parts as they can get bent if not done right!
I remove them from my plate and place them on a flat surface and then place another flat piece on top and stands on it to always have them straight,But the printed parts don't mind if they are slightly bent after removing either.
The construction flattens them when you tighten the coinstruction on its corners.(the plates are now 4-5 mm thick that I found enough)
I will upload a compressed files with the printed current version here as soon as I go thru them again,i have made so many variations to get them right that I have to sort them before I upload them.
About the x axis so do I have some ideas I will get to when I have the money so I can order some nema 17 motors,i know next week when I payed my bills if I can order them when I also get my unemployement support.
But the good thing is that iam going to 2 job interviews this week and then can I order them sooner if it pans out right
Now when I have so good results with larger prints so do also think about having two printed pieces screwed on the plate to get the machine less wider but with larger print area?
Wath I mean is the same type of y carriage the prusa and mendel uses but slicker
I will upload the newest batch of files today I hope?
Ps.................
I have some ideas to make the base plate to 2 pieces that is being held together by one of the nema motors and the side plates,but don't have a good solution for that yet?
Edited..............................
Ok here comes my current beta files.
You still have to drill up the holes after printing the plates because I will fix there small size when everything is working.
If anyone do a build with these so let me know as these parts should not change ?
The only pieces are the corner and z rod bridge parts.
I nead the nuts to stay more tight in place on the corner piece.
The zrod bridge is intended that you use a glue gun to fasten the rod as they move lightly in to place now.
Let men know of any errors you might find as my printer could also be wrongly calibrated or something that could make some things off but I hope not
Included are laser cutter files also so let me know if anything is wrong as iam still developing it.
Edited 3 time(s). Last edit at 04/21/2014 07:04AM by Cliff Mellangård.
|
Re: Smartrap - Cimbria - Wood frame project. April 24, 2014 05:34PM |
Registered: 10 years ago Posts: 148 |
Yes!
Ordered some motors today so next week should I be able to put a working version in action
I got enough money left to be able to order 10 motors and should be able to do 2 versions to test ? ( wood and printed.) ( only 70£ with shipping from Germany)
Iam also doing some crazy stuff like completely printed rails for the y carriage,i got the idea from this one on thingiverse.
[www.thingiverse.com]
The weird part is that they are very silent and wath I know so is pla on pla very durable?
I only miss the hotend and extruder so I have to see how I will solve that one?
I have made a lot of changes to corner and zrod bridge that will be uploaded as soon as I can.
|
Re: Smartrap - Cimbria - Wood frame project. April 24, 2014 05:42PM |
Registered: 10 years ago Posts: 814 |
|
Re: Smartrap - Cimbria - Wood frame project. April 24, 2014 05:43PM |
Registered: 10 years ago Posts: 992 |
It's really cool job. Expecially on an angle i wouldn't go myself.. haha. it's great.
Very interesting also about the printed rails ? I thought about that this week. I did some little experiments with printed pal rails ( which are quiet straight in fact) and light felt with vaseline.. it's going smooth and quiet.. but need to test in real situation , moving and printing.
good to test anyway. It makes me dream about a cartesian all printed printer without big box to print . That would be a hit , no ?
the Smartrap project
[smartfriendz.com]
[www.thingiverse.com]
[reprap.org]
[github.com]
doc assemblage: [reprap.org]
NEW: Forum smartfriendz: [smartraptalk.smartfriendz.com]
|
Re: Smartrap - Cimbria - Wood frame project. April 24, 2014 05:58PM |
Registered: 10 years ago Posts: 148 |
Thanks guys
Iam currently printing my 180 mm long rail to be screwed on the bed so I can show you guys.
The way iam doing it so will you get 200x200 squared bed to print on but not take so much space in width
My first ever 3d printer does surprisingly do very good large prints ( its the prusa österlen build in the mendel prusa section )
You guys have well not missed skyriders cool concept

I like it a lot but I cant cut aluminium plates like he can
Iam currently printing my 180 mm long rail to be screwed on the bed so I can show you guys.
The way iam doing it so will you get 200x200 squared bed to print on but not take so much space in width
My first ever 3d printer does surprisingly do very good large prints
( its the prusa österlen build in the mendel prusa section )You guys have well not missed skyriders cool concept
I like it a lot but I cant cut aluminium plates like he can
|
Re: Smartrap - Cimbria - Wood frame project. April 24, 2014 06:52PM |
Registered: 10 years ago Posts: 349 |
|
Re: Smartrap - Cimbria - Wood frame project. April 26, 2014 10:18AM |
Registered: 10 years ago Posts: 148 |
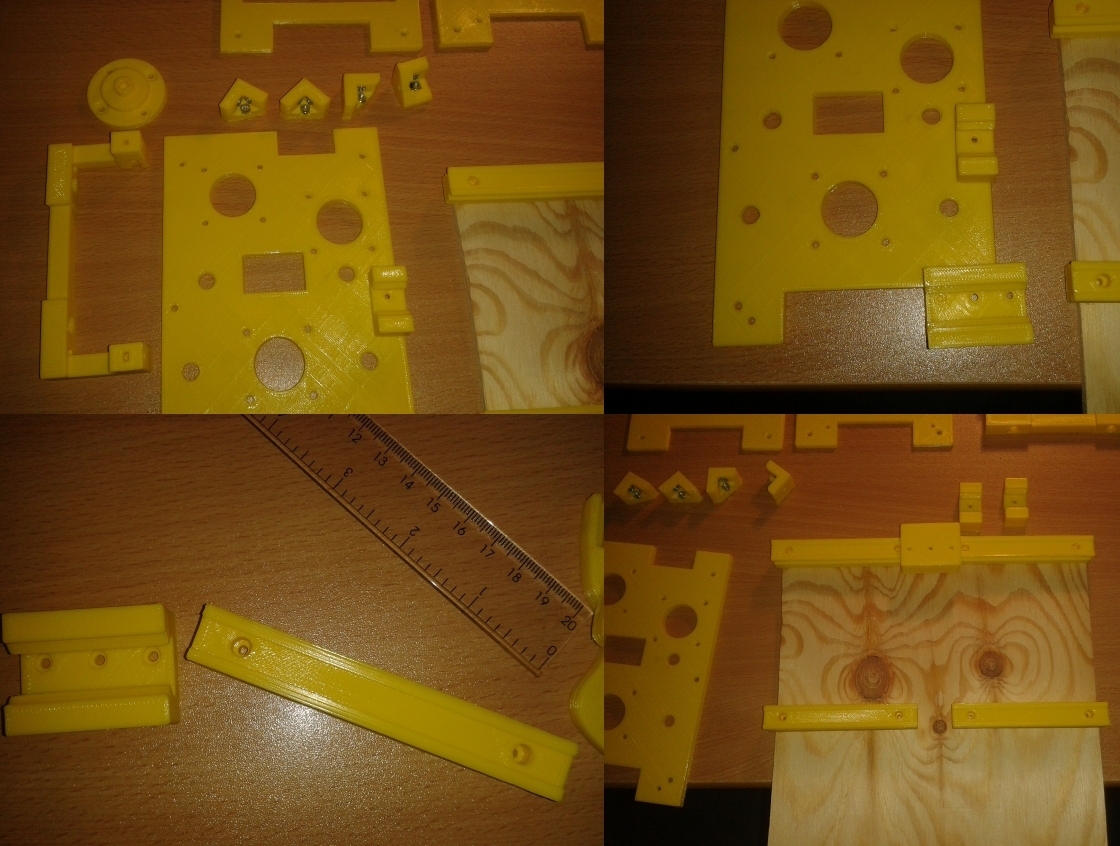
Here is wath I would mean with printed rails
This means we are back on a wood plate to make it simple.
I nead to test this with everything running now and see if its a good idea.
But the rail construction should make it very solid and still slide silently?
Pla on pla is very slider friendly if you test it on each other and very low wear.
And to get the bed rails straight do you simply have one of there sockets between them when drilling the holes.
When they are first printed so will you nead slight force to get them in to each other but after that so do they slide very well together.
I hope I can show you guys something in a video next week ??????
Edited 1 time(s). Last edit at 04/26/2014 10:19AM by Cliff Mellangård.
This means we are back on a wood plate to make it simple.
I nead to test this with everything running now and see if its a good idea.
But the rail construction should make it very solid and still slide silently?
Pla on pla is very slider friendly if you test it on each other and very low wear.
And to get the bed rails straight do you simply have one of there sockets between them when drilling the holes.
When they are first printed so will you nead slight force to get them in to each other but after that so do they slide very well together.
I hope I can show you guys something in a video next week ??????


Edited 1 time(s). Last edit at 04/26/2014 10:19AM by Cliff Mellangård.
|
Re: Smartrap - Cimbria - Wood frame project. April 26, 2014 12:38PM |
Registered: 10 years ago Posts: 814 |
|
Re: Smartrap - Cimbria - Wood frame project. April 29, 2014 06:46AM |
Registered: 10 years ago Posts: 148 |
Still waiting for my motors and got another idea I want to hear with you guys about ???
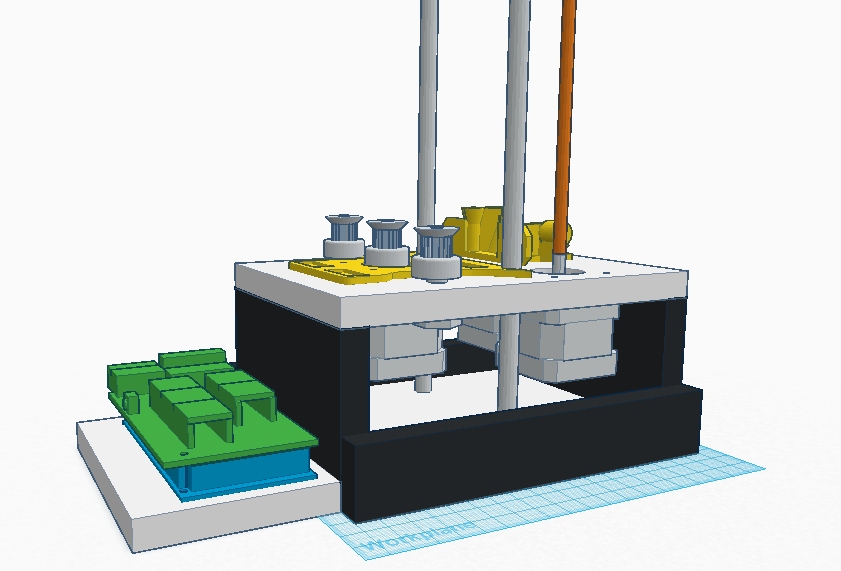
This is a very simple case with 12 mm mdf that is the same material I used for my prusa build that only would nead very simple wood screws and not so precise measurements.
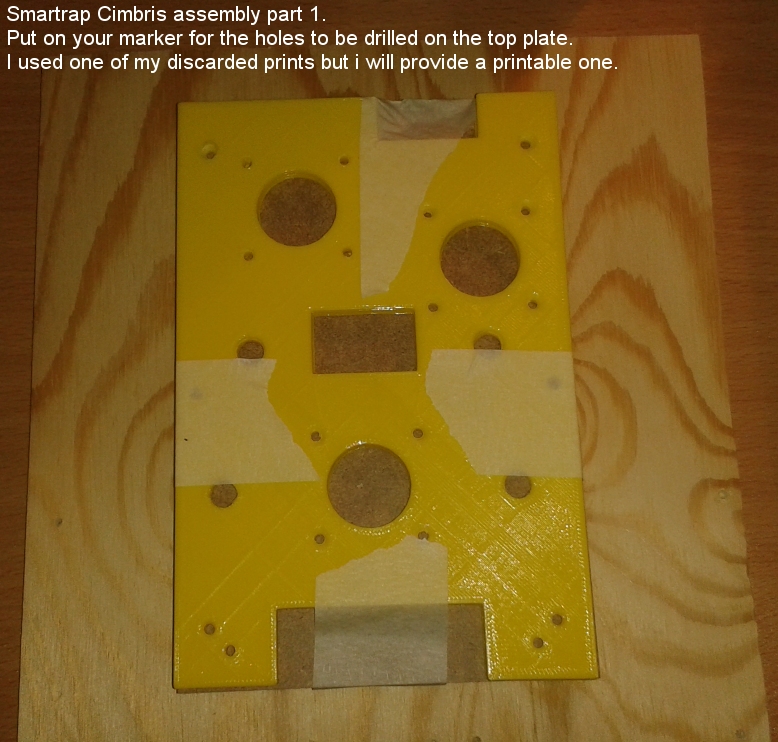
To get where to drill the holes do you simply print the svg file and tape it to the wood and then drill them out.
The only custom part is that you use the custom plate that is almost eaxactly like the old one and any extruder you want.
This would make a very stable case that is super easy to make.
This also means that you use all the original parts for the rest of the printer.
top plate is 180x120 mm.
bottom plate is 260x120 mm.
front back plates are 120x60.
side panels that is neaded to keep a good box stability 180x30 mm but I think my build would use 180x40 mm?
I have found that my original design uses to many small parts and that is not a good thing??????
The only printed parts here are yellow to show them.
I might be on and off with the project as I nead to give my indi game some love also as I do it with another guy I cant fail on
[www.youtube.com]
Edit...................
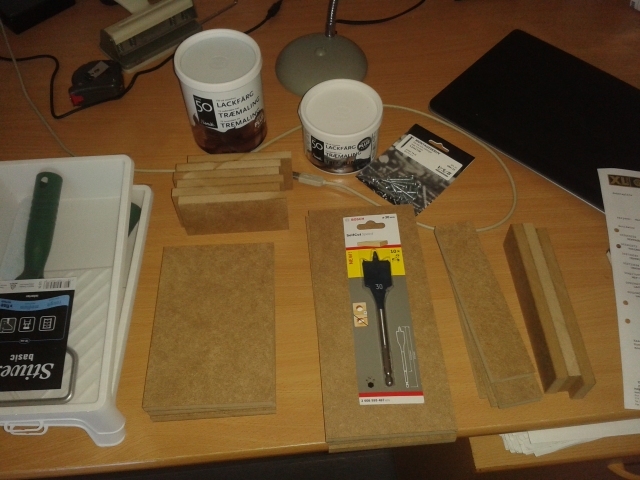
Ok! so now have I bought the wood I nead.
Cut and finished in right leghts so did it cost me 9-10 us dollars. (parts for 3 printers in case I do some mistakes.)
wood screws 1.2 us dollars.
Iam using mdf that neads to be painted to be protected from moist after being cut but is cheap and solid and easy to paint.
If iam right so would this construction be fast and cheap to do ????
And by the way plastic rails work but you cant print a length that is neaded and to use 4 parts for the 2 rails do ask for problems in assembly.
We are after easy assembly.
Edited 5 time(s). Last edit at 04/29/2014 08:43AM by Cliff Mellangård.
This is a very simple case with 12 mm mdf that is the same material I used for my prusa build that only would nead very simple wood screws and not so precise measurements.
To get where to drill the holes do you simply print the svg file and tape it to the wood and then drill them out.
The only custom part is that you use the custom plate that is almost eaxactly like the old one and any extruder you want.
This would make a very stable case that is super easy to make.
This also means that you use all the original parts for the rest of the printer.
top plate is 180x120 mm.
bottom plate is 260x120 mm.
front back plates are 120x60.
side panels that is neaded to keep a good box stability 180x30 mm but I think my build would use 180x40 mm?
I have found that my original design uses to many small parts and that is not a good thing??????
The only printed parts here are yellow to show them.


I might be on and off with the project as I nead to give my indi game some love also as I do it with another guy I cant fail on
[www.youtube.com]
Edit...................
Ok! so now have I bought the wood I nead.
Cut and finished in right leghts so did it cost me 9-10 us dollars. (parts for 3 printers in case I do some mistakes.)
wood screws 1.2 us dollars.
Iam using mdf that neads to be painted to be protected from moist after being cut but is cheap and solid and easy to paint.
If iam right so would this construction be fast and cheap to do ????
And by the way plastic rails work but you cant print a length that is neaded and to use 4 parts for the 2 rails do ask for problems in assembly.
We are after easy assembly.

Edited 5 time(s). Last edit at 04/29/2014 08:43AM by Cliff Mellangård.
|
Re: Smartrap - Cimbria - Wood frame project. April 29, 2014 10:08AM |
Registered: 10 years ago Posts: 349 |
|
Re: Smartrap - Cimbria - Wood frame project. April 29, 2014 10:42AM |
Registered: 10 years ago Posts: 814 |
|
Re: Smartrap - Cimbria - Wood frame project. April 29, 2014 02:45PM |
Registered: 10 years ago Posts: 148 |
I don't know how I would be able to make it precise enough ?Quote
BackEMF
What about wooden slides (hardwood rail and softwood slot)
PS C64, with a Power Cardridge or with a Final Cardridge?
If anything jangles even a slight bit so would it mess up prints.
If you mean my indi game so is I and Richard vanbeck old c64,atari and amiga nerds
I told him to do a retro intro for our game and I thought it where super cool
The game is for windows,android,ios,ouya and blackberry when its done but we only release our alpha versions for windows right now.
Richard and I work on the game when we get some time over and that is not often sadly.
Thanks mike and I also think it would be awesome to do a super cheap version with less printed parts.Quote
I like where your headed with this Cliff... I wonder if you could get it down to a minimum of printed parts. Basically be a Hardware Store Printer. Something you could build with access to a drill press and a saw. Use the jhead lite which is basically a hardware store hotend on it...
Printed parts cost time and money if you are supposed to earn money on them.
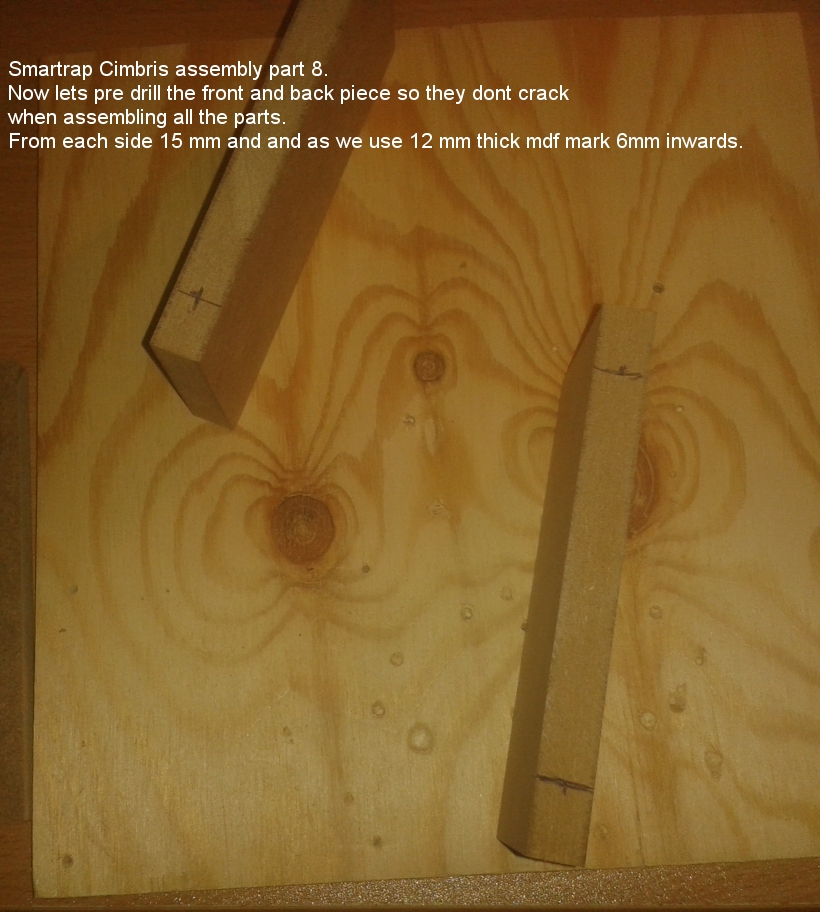
And wath I have noticed so far so is the last version super fast to manufacture and very solid,i only noticed that the small front and back piece easially crack if you not drill up there holes enough before assembly.
But thats also because of the type of mdf I bought I belive ?
I only nead to make a better drill sketch as I noticed that the smooth rod holes are off by 0.5-1 mm and is noticed when the z carriage is at the bottom.
But wath the heck this is a prototype.
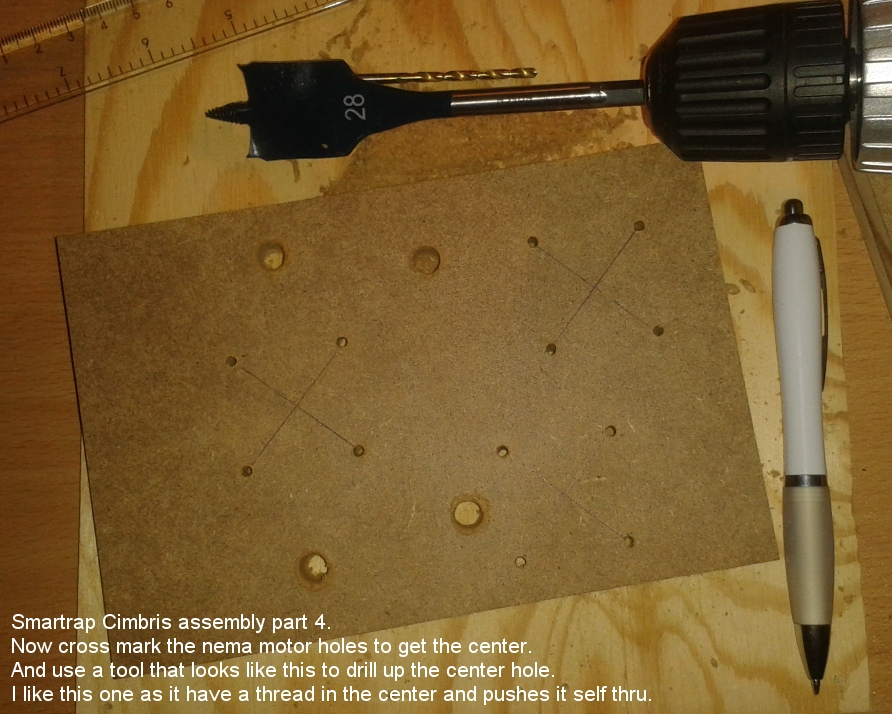
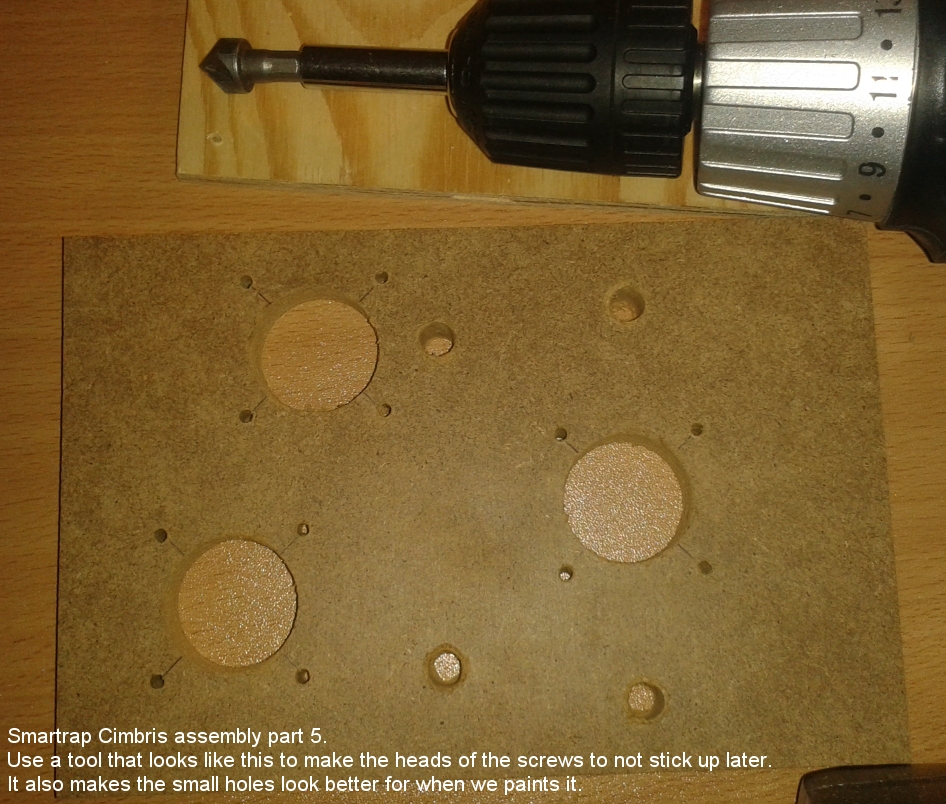
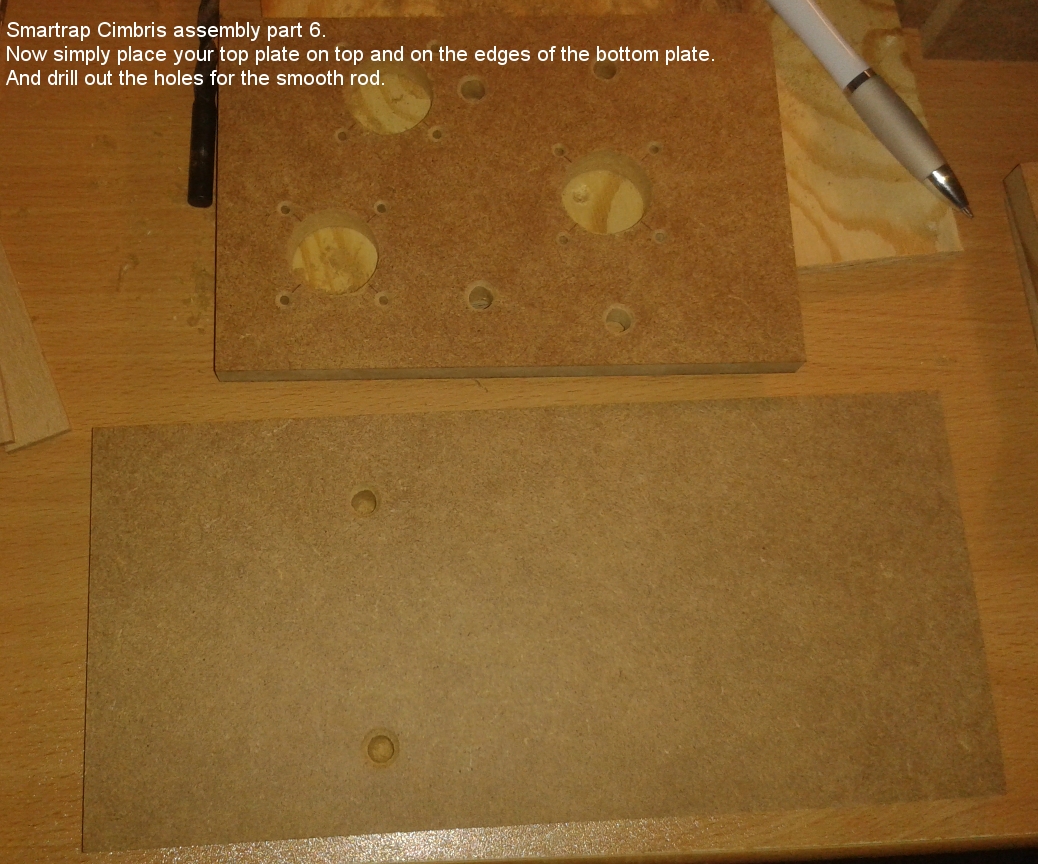
I started on the first assembly guide that I will improve as soon as all the parts gets better.
So far is it something like this.
Print this file on to a paper.
[forums.reprap.org]
If you open the svg file so should it open in a browser window where you can print it.


Edited 2 time(s). Last edit at 04/29/2014 03:40PM by Cliff Mellangård.
|
Re: Smartrap - Cimbria - Wood frame project. April 29, 2014 03:14PM |
Registered: 10 years ago Posts: 814 |
Make a template that can be printed on your lazer/inkjet printer for your drill holes including RAMPS mounting. Glue the paper to the bottom of the base. Screw the base section down to the upper section. With the Base Bottom up with the paper, Drill all the holes together to make sure they align to each other. It doesn't matter if there are a few extra holes in the base anyways. When you assemble the paper will be out of sight on the bottom...
|
Re: Smartrap - Cimbria - Wood frame project. April 29, 2014 03:37PM |
Registered: 10 years ago Posts: 148 |
The plan is to do a svg file as you can open them in any browser and print with an inkyet or ordinary printer
I noticed that I only wrote printer when we talk 3d printers also
You should get exact measurements with an printed svg file ?????
The build should be doable without wasting plastic on 3d printed templates I only used it as I already had one printed
This is the one I have done so far...........
If you click it so should it open in the browser so you can print it?????
svg files are simply a version of xml.
Edited...............................
I cant edit my posts after a while so I will update it like this when I add new stuff.
Work in progress assembly guide for smartrap cimbris wood version.
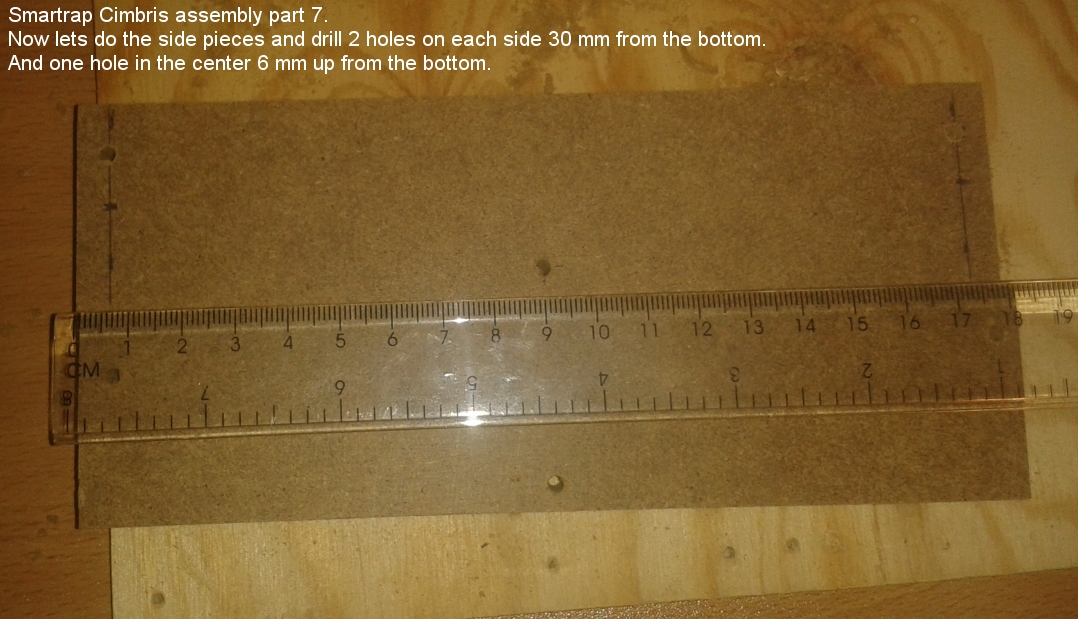
We use a 12 mm thick mdf wood so keep in mind that when you drill holes for screwes to be assembled on a plates side should be 6 mm half the thickness.
1 = 180x120 mm. (Top base plate)
1 = 260x120 mm. (base bottom)
2 = 120x60 mm. (front and back)
2 = 180x40 mm. (sides)
14 = 3.5X30 wood screws
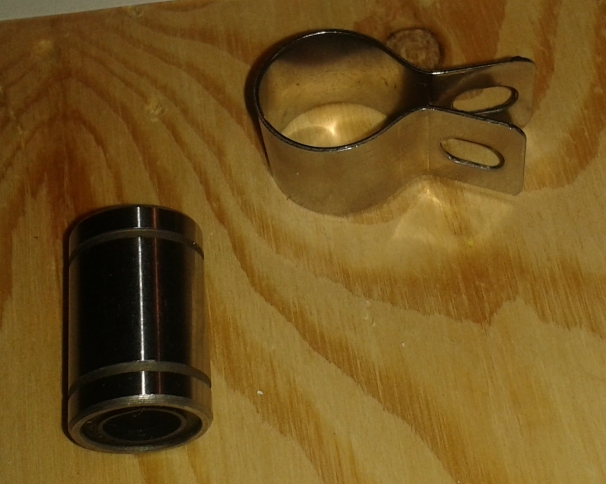
4 = Cable brackets with a inner diameter of 15 mm when closed. ( I don't know wath they are called in English but they are simple cable holders in metal.)
They should look like this.
If you ask your local hardware store so should they be able to help you as we nead these as lm8uu holders for the y carriage that are fastened with the same screws we fasten the motor.
And dont forget 4 washers for each one as they usually have larger holes then the heads of a m3 screw.
.
This guide is for this version.
The only printed parts here are yellow to show them.
Print this file on to a paper.
[forums.reprap.org]
If you open the svg file so should it open in a browser window where you can print it.
Print 2 of these as you could nead one for bottom and top plate.
This one do have marks for all neaded holes for top and bottom base plate..
Edited 6 time(s). Last edit at 04/30/2014 12:23PM by Cliff Mellangård.
I noticed that I only wrote printer when we talk 3d printers also
You should get exact measurements with an printed svg file ?????
The build should be doable without wasting plastic on 3d printed templates I only used it as I already had one printed
This is the one I have done so far...........
If you click it so should it open in the browser so you can print it?????
svg files are simply a version of xml.
Edited...............................
I cant edit my posts after a while so I will update it like this when I add new stuff.
Work in progress assembly guide for smartrap cimbris wood version.
We use a 12 mm thick mdf wood so keep in mind that when you drill holes for screwes to be assembled on a plates side should be 6 mm half the thickness.
1 = 180x120 mm. (Top base plate)
1 = 260x120 mm. (base bottom)
2 = 120x60 mm. (front and back)
2 = 180x40 mm. (sides)
14 = 3.5X30 wood screws
4 = Cable brackets with a inner diameter of 15 mm when closed. ( I don't know wath they are called in English but they are simple cable holders in metal.)
They should look like this.
If you ask your local hardware store so should they be able to help you as we nead these as lm8uu holders for the y carriage that are fastened with the same screws we fasten the motor.
And dont forget 4 washers for each one as they usually have larger holes then the heads of a m3 screw.
.


This guide is for this version.
The only printed parts here are yellow to show them.
Print this file on to a paper.
[forums.reprap.org]
If you open the svg file so should it open in a browser window where you can print it.
Print 2 of these as you could nead one for bottom and top plate.
This one do have marks for all neaded holes for top and bottom base plate..


Edited 6 time(s). Last edit at 04/30/2014 12:23PM by Cliff Mellangård.
Attachments:
open | download - drill_template_inkyet.svg (15 KB)
open | download - 7.jpg (428.9 KB)
open | download - 8.jpg (423.9 KB)
open | download - 9.jpg (388.3 KB)
open | download - 10.jpg (424 KB)
open | download - cable bracket 15 mm inner diam.jpg (163.2 KB)
open | download - 2cable bracket 15 mm inner diam.jpg (387.5 KB)
|
Re: Smartrap - Cimbria - Wood frame project. April 29, 2014 04:16PM |
Registered: 10 years ago Posts: 814 |
|
Re: Smartrap - Cimbria - Wood frame project. April 29, 2014 05:37PM |
Registered: 10 years ago Posts: 148 |
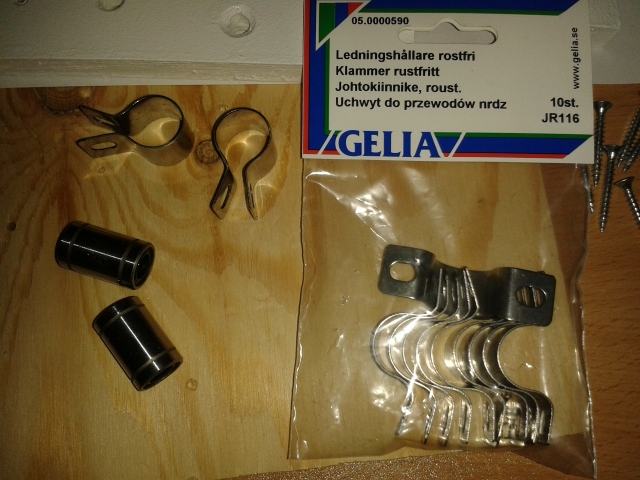
You wanted a hardware store version so here is wath I found so far
No plastic fantastic on the base now
I updated the post above also.
4 = Cable brackets with a inner diameter of 15 mm when closed. ( I don't know wath they are called in English but they are simple cable holders in metal.)
They should look like this.
If you ask your local hardware store so should they be able to help you as we nead these as lm8uu holders for the y carriage that are fastened with the same screws we fasten the motor.
And dont forget 4 washers for each one as they usually have larger holes then the heads of a m3 screw.
.
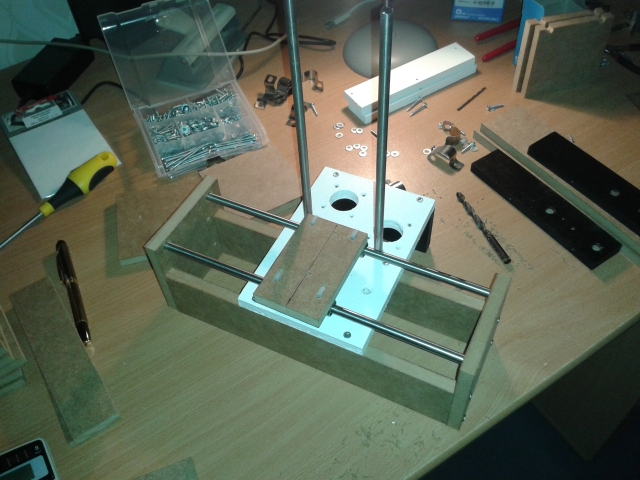
Here can you see how they will be used later on
No do I only nead the freakin motors
I cant do more on the build guide until I have them
But if I can continou this trend on the rest of the build so will it be the simpliest and cheapest reprap ever
with xy print size of 200x200 mm or larger
Edited 2 time(s). Last edit at 04/29/2014 05:43PM by Cliff Mellangård.
No plastic fantastic on the base now
I updated the post above also.
4 = Cable brackets with a inner diameter of 15 mm when closed. ( I don't know wath they are called in English but they are simple cable holders in metal.)
They should look like this.
If you ask your local hardware store so should they be able to help you as we nead these as lm8uu holders for the y carriage that are fastened with the same screws we fasten the motor.
And dont forget 4 washers for each one as they usually have larger holes then the heads of a m3 screw.
.
Here can you see how they will be used later on
No do I only nead the freakin motors
I cant do more on the build guide until I have them
But if I can continou this trend on the rest of the build so will it be the simpliest and cheapest reprap ever
with xy print size of 200x200 mm or larger
Edited 2 time(s). Last edit at 04/29/2014 05:43PM by Cliff Mellangård.
|
Re: Smartrap - Cimbria - Wood frame project. April 30, 2014 06:03PM |
Registered: 10 years ago Posts: 349 |
|
Re: Smartrap - Cimbria - Wood frame project. May 02, 2014 04:34PM |
Registered: 10 years ago Posts: 148 |
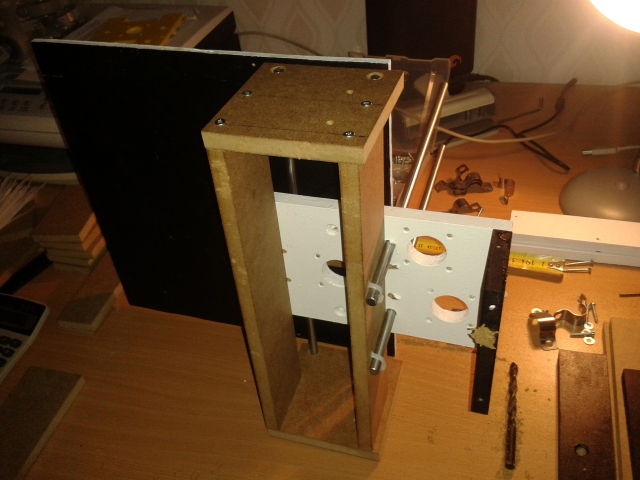
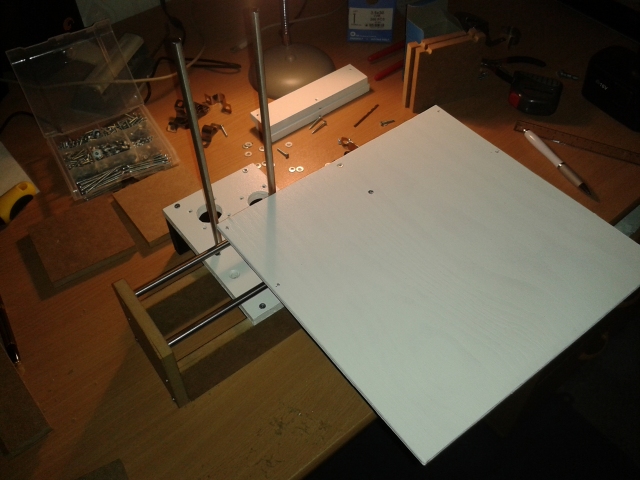
I ended up neading longer rods for the last design and as tinkering iam! did I end up with something very simple like this as the hardware store where closed so I couldt get any 400 mm long rods and only had 300 mm at home.
If I use this so do I nead to think about some better support in the front
The bed plate is 300x300 so its extremely oversized as it whas wath I had at home.
But this design is ever simplier then the last one and you get a print bed width of 220?
Iam still waiting for my motors
Edited 1 time(s). Last edit at 05/02/2014 04:36PM by Cliff Mellangård.
If I use this so do I nead to think about some better support in the front
The bed plate is 300x300 so its extremely oversized as it whas wath I had at home.
But this design is ever simplier then the last one and you get a print bed width of 220?
Iam still waiting for my motors


Edited 1 time(s). Last edit at 05/02/2014 04:36PM by Cliff Mellangård.

Sorry, only registered users may post in this forum.