Madmike8's Smartrap Core Laser Engraver Build
Posted by madmike8
|
Madmike8's Smartrap Core Laser Engraver Build March 15, 2015 12:29PM |
Registered: 10 years ago Posts: 814 |
I've had.plans of building a Laser Diode Engraver for a while now. I have a 450mm x 450mm x 150mm metal box to build it in. I just needed to figure out the best way to setup the axis. Then Serge released his SmartCore, Perfect! With the components sitting on top of the box I will have to make some adjustments for the lid. So last night I printed out parts for the Smartrap Core. You go to the SmartRap Core YouMagine link below and change it to the materials you want to use and download the STL.
Smartrap Core JSCAD Link
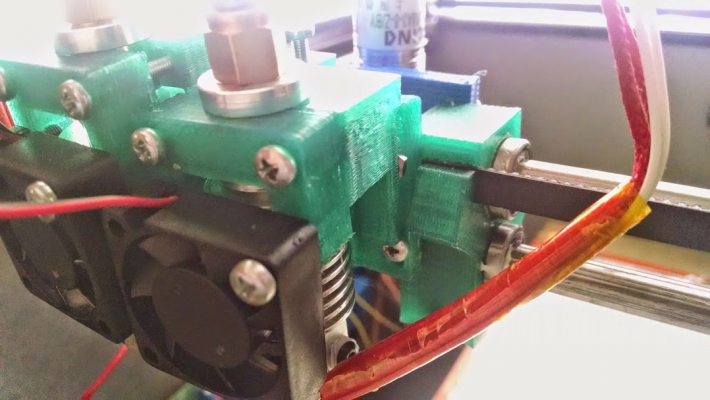
Here's My Parts
I won't be using the Z axis since I'm making a Laser Engraver and not a printer. I will make a Z adjustment that will be a part of the laser mount on the X Axis.
I will be using 8mm rods for the X and Y axis. I have a NDB7875 laser diode, and a 300mm x 300mm Laser protection glass to mount on the lid. I've still have a bit to figure out...
Smartrap Core JSCAD Link
Here's My Parts

I won't be using the Z axis since I'm making a Laser Engraver and not a printer. I will make a Z adjustment that will be a part of the laser mount on the X Axis.
I will be using 8mm rods for the X and Y axis. I have a NDB7875 laser diode, and a 300mm x 300mm Laser protection glass to mount on the lid. I've still have a bit to figure out...
|
Re: Madmike8's Smartrap Core Laser Engraver Build March 16, 2015 09:22AM |
Registered: 11 years ago Posts: 791 |
I have been working on one as well.
Here is a web page that explains what I have done so far.
web page
[regpye.com.au]
"Experience is the mother of all knowledge." --Leonardo da Vinci
Here is a web page that explains what I have done so far.
web page
[regpye.com.au]
"Experience is the mother of all knowledge." --Leonardo da Vinci
|
Re: Madmike8's Smartrap Core Laser Engraver Build March 16, 2015 03:48PM |
Registered: 10 years ago Posts: 814 |
|
Re: Madmike8's Smartrap Core Laser Engraver Build April 12, 2015 10:28PM |
Registered: 10 years ago Posts: 814 |
|
Re: Madmike8's Smartrap Core Laser Engraver Build April 13, 2015 12:06AM |
Registered: 9 years ago Posts: 178 |
|
Re: Madmike8's Smartrap Core Laser Engraver Build April 13, 2015 01:11AM |
Registered: 10 years ago Posts: 814 |
|
Re: Madmike8's Smartrap Core Laser Engraver Build April 13, 2015 01:58AM |
Registered: 9 years ago Posts: 178 |
Get me some demensions I'll have a go at it  If ya haven't heard...Autodesk 360 Fusion is now free, its pretty awesome. I've been playing around with it a bit this weekend and got to say I am really liking it. Whats even better you can send your files to a slicer of your choosing from the 3D Print menu. And you can import images to a work plane for tracing or building a model around, its so easy its almost stupid lol
If ya haven't heard...Autodesk 360 Fusion is now free, its pretty awesome. I've been playing around with it a bit this weekend and got to say I am really liking it. Whats even better you can send your files to a slicer of your choosing from the 3D Print menu. And you can import images to a work plane for tracing or building a model around, its so easy its almost stupid lol
|
Re: Madmike8's Smartrap Core Laser Engraver Build April 13, 2015 10:30AM |
Registered: 9 years ago Posts: 180 |
Check out this video starting about 01:45 into the video. Shows a 3D printer printing chocolate but the really neat part is that the entire hot end assembly is held in with magnets like you want to do.
[www.youtube.com]
[www.youtube.com]
|
Re: Madmike8's Smartrap Core Laser Engraver Build April 13, 2015 10:46AM |
Registered: 10 years ago Posts: 814 |
|
Re: Madmike8's Smartrap Core Laser Engraver Build April 13, 2015 11:41AM |
Registered: 9 years ago Posts: 178 |
|
Re: Madmike8's Smartrap Core Laser Engraver Build April 13, 2015 12:41PM |
Registered: 10 years ago Posts: 814 |
|
Re: Madmike8's Smartrap Core Laser Engraver Build April 13, 2015 05:46PM |
Registered: 9 years ago Posts: 178 |
Quote
madmike8
Hey Jerry,
Would you mind getting close up pics of the front and back of your X carriage... thinking of maybe making a front and back mount. Hotend to the front. Laser to the back.
I can do that...front will be easy...back might be a bit difficult and i have my sensor back there but give me a bit and I will post em up for you...im at 60mm spacing on mine too
|
Re: Madmike8's Smartrap Core Laser Engraver Build April 13, 2015 08:47PM |
Registered: 9 years ago Posts: 178 |


|
Re: Madmike8's Smartrap Core Laser Engraver Build April 13, 2015 09:11PM |
Registered: 10 years ago Posts: 814 |
|
Re: Madmike8's Smartrap Core Laser Engraver Build April 13, 2015 09:36PM |
Registered: 9 years ago Posts: 178 |
MEH, so it definately does what I set out to do with it, makes them adjustable and holds them pretty much vertical but the larger one has to be so much higher up it tends to want to move in the Y axis depending on pressure from the bowden and wiring, that and for some reason when i printed this last set the m3 holes for the screws were a tad larger so the threads didnt bite as well and the last time I started calibrating dual extrusion the right hand nozzle crashed a bit into a lifting layer and just stripped the threads right out...and it jammed up again so I gave up on that hot end until your heatbreak shows up. But I am ready now to order the e3d solution here anytime.....but I am torn between the chimera and the cyclops. Both have pro's and con's that don't compliment one or the other lol. But because most of my printing only requires single extrusion I think I am gonna settle on the chimera and just request the cyclops heatblock for christmas or something lol. I really like the cyclops for calibration but from what I hear if your not printing with both the unused filament tends to crystalize and create a mess in the cold end, so the solution is purge with high temp material and leave that in while printing...
|
Re: Madmike8's Smartrap Core Laser Engraver Build April 13, 2015 11:32PM |
Registered: 10 years ago Posts: 814 |
We scrapped out some old servers from work. So, I grabbed a bunch of Power Supply's.
Hipro HP-W500FF3 500W Server Power Supply
12v @ 41 Amps
5v @ 2 Amps
This has a slot style connection. With the Hipro label up the top of the blade left to right under the fan.
^ ^ ^ ^ ^ ^ |----------| |----------|
1 2 3 4 5 6 Gnd. 12V
3 Ps_On_Ctl
4 Ps_Kill
6 5vsb
Bottom side of the blade two larger pads are Gnd and 12v again
To turn on the power supply tie both Ps_On_Ctl and Ps_Kill to Gnd.
That ought to do her...
Hipro HP-W500FF3 500W Server Power Supply
12v @ 41 Amps
5v @ 2 Amps


This has a slot style connection. With the Hipro label up the top of the blade left to right under the fan.
^ ^ ^ ^ ^ ^ |----------| |----------|
1 2 3 4 5 6 Gnd. 12V
3 Ps_On_Ctl
4 Ps_Kill
6 5vsb
Bottom side of the blade two larger pads are Gnd and 12v again
To turn on the power supply tie both Ps_On_Ctl and Ps_Kill to Gnd.
That ought to do her...
|
Re: Madmike8's Smartrap Core Laser Engraver Build April 14, 2015 12:06AM |
Registered: 9 years ago Posts: 178 |
|
Re: Madmike8's Smartrap Core Laser Engraver Build April 17, 2015 10:02PM |
Registered: 10 years ago Posts: 814 |


|
Re: Madmike8's Smartrap Core Laser Engraver Build April 17, 2015 10:13PM |
Registered: 9 years ago Posts: 178 |
Yes that could definetly work for what I was thinking...although It eats up a lot of space, not sure if it would work in a real application as an "add-on" but a box built with that consideration in mind would be perfect. I might just still do what I was talking with a single motor in the back center with 2 wide z rails on each side, Just concerned with the twisting, maybe a belt system running 2 lead screws would be the best option, after all they would always be in time. Was thinking of open beams like the Makerbot i3 12" as well. Maybee I should just leave well enough alone lol
Thanks for taking the time to dig that out and share!!
Thanks for taking the time to dig that out and share!!
|
Re: Madmike8's Smartrap Core Laser Engraver Build April 17, 2015 10:21PM |
Registered: 10 years ago Posts: 814 |
What I had intended on doing was using spindle plates and using screws long enough to pass through both plates and wheel sets. Locking both sides together. Then mounting 2020 arms to the both spindle plates, and then a bed to those.
Of course, Maybe the Ordbot method with a belt between the side? I really would like to do that with my Ordbot...
Edited 1 time(s). Last edit at 04/17/2015 10:26PM by madmike8.
Of course, Maybe the Ordbot method with a belt between the side? I really would like to do that with my Ordbot...

Edited 1 time(s). Last edit at 04/17/2015 10:26PM by madmike8.
|
Re: Madmike8's Smartrap Core Laser Engraver Build June 04, 2015 08:58PM |
Registered: 10 years ago Posts: 814 |
Not wanting to make life easy on myself... I have to try something different... 
So... How about making a box with 3/4" / 19mm Square Aluminum Tubing for my SmartCore?
I made some of these corner connectors to fit it together.
Jerry's Motor mounts printed and test fitted.
Box will end up being 13.5" square when done.
Acrylic side will be fitted later...
So... How about making a box with 3/4" / 19mm Square Aluminum Tubing for my SmartCore?
I made some of these corner connectors to fit it together.

Jerry's Motor mounts printed and test fitted.

Box will end up being 13.5" square when done.
Acrylic side will be fitted later...
|
Re: Madmike8's Smartrap Core Laser Engraver Build June 05, 2015 05:15AM |
Registered: 9 years ago Posts: 95 |
|
Re: Madmike8's Smartrap Core Laser Engraver Build June 05, 2015 07:18PM |
Registered: 9 years ago Posts: 107 |
|
Re: Madmike8's Smartrap Core Laser Engraver Build June 11, 2015 10:39PM |
Registered: 10 years ago Posts: 814 |


|
Re: Madmike8's Smartrap Core Laser Engraver Build June 17, 2015 12:47AM |
Registered: 10 years ago Posts: 814 |


|
Re: Madmike8's Smartrap Core Laser Engraver Build June 18, 2015 03:06AM |
Registered: 10 years ago Posts: 814 |
Sorry, only registered users may post in this forum.