Madmike8's Funbot build #2
Posted by madmike8
|
Re: Madmike8's Funbot build #2 May 08, 2015 10:53AM |
Registered: 9 years ago Posts: 107 |
I knew I'd seen discussion about these mosfets before. Seems like they won a shootout a few years ago here: [reprap.org]
Seems like a sensible move and they're on my shopping list now.
Seems like a sensible move and they're on my shopping list now.
|
Re: Madmike8's Funbot build #2 May 08, 2015 10:54AM |
Registered: 9 years ago Posts: 156 |
|
Re: Madmike8's Funbot build #2 May 08, 2015 11:14AM |
Registered: 9 years ago Posts: 107 |
|
Re: Madmike8's Funbot build #2 May 08, 2015 11:47AM |
Registered: 9 years ago Posts: 178 |
Looks like I got more Mosfets to order along with some sort of terminal connection for the hotends, thermistors, and fans. Kinda think I want to be able to swap out my chimera for a j-head easily. Still have some testing to do on my knockoff and this makergeeks pla just hates me on the chimera
|
Re: Madmike8's Funbot build #2 May 12, 2015 09:00AM |
Registered: 9 years ago Posts: 35 |
|
Re: Madmike8's Funbot build #2 May 12, 2015 09:13AM |
Registered: 9 years ago Posts: 178 |
|
Re: Madmike8's Funbot build #2 May 12, 2015 09:52AM |
Registered: 10 years ago Posts: 814 |
Post up your ideas on quick change hotend, I'd be interested in that.
I'm using some Esun Silver PLA from Hobbyking.com in Funbot#1 right now. Seems to be working good @190C.
On the knockoff all metal hotends. I like the ones with the ptfe tube in the threaded nozzle, but you need to disassemble and check to make sure everything looks right and reassemble before use.
I'm using some Esun Silver PLA from Hobbyking.com in Funbot#1 right now. Seems to be working good @190C.
On the knockoff all metal hotends. I like the ones with the ptfe tube in the threaded nozzle, but you need to disassemble and check to make sure everything looks right and reassemble before use.
|
Re: Madmike8's Funbot build #2 May 12, 2015 09:54AM |
Registered: 9 years ago Posts: 180 |
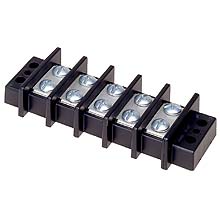
I will be using terminal blocks like this one pictured for all connections between the ramps board and devices. I am not sure about using it for the hot end connection.
|
Re: Madmike8's Funbot build #2 May 31, 2015 06:52AM |
Registered: 8 years ago Posts: 28 |
|
Re: Madmike8's Funbot build #2 May 31, 2015 09:42AM |
Registered: 10 years ago Posts: 814 |
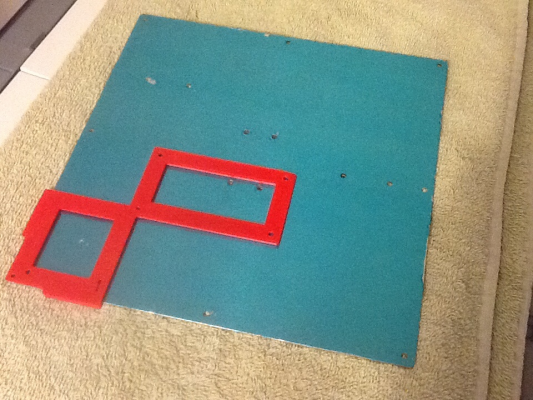
I bought one of the aluminum bed plates from folgertech on eBay. That was pre-drilled for the heatbed. Then used the Funbot Bed Drill Guide #1 to drill the mounting holes for the Funbot. That aligns it correctly for the Funbot. I had bought 12" x 3/8" K&S rods/tubes from eBay (you can usually get them at your local hobby store too). When I drilled my base with the paper base drill guide, I drilled all holes normally except the Y base mounts. I marked those with a pencil, and then used a straight edge ruler to Mark a line through them to both ends of the base plate. I measured from the outside edge to the mounting holes of each Y base mount. I then measured and marked the plate along the previous lines for the mounting holes. Then I drilled those holes. This allowed me to move the Y mounts to the very edge of the plate.
For the X axis. I mounted the X end pulley mount on the very end of the tubes. (Don't forget to slide on your X carriage bushings.) I then slid/tapped them into the Z carriage enough to get coverage of the print bed and tightened the X rods set screws. I use a level to make sure the rods are vertical before tightening the set screws completely. I then drill a slightly smaller then 3mm holes in the X end to tighten the rods there too with M3 screws that self tap into the plastic.
I hope that helps.
Mike
Edited 1 time(s). Last edit at 05/31/2015 05:37PM by madmike8.
|
Re: Madmike8's Funbot build #2 May 31, 2015 11:20AM |
Registered: 8 years ago Posts: 28 |
Thanks, it should indeed.
I ordered two of the pre-drilled bed plates from Aliexpress (as two gave a better price and I'm already planning the next printer, lol), and one MK3 aluminium heatbed.
But I have another question:
How do you mount the steppers? It seems that it is planned to use two of the stepper's own screws each, but the screws from my steppers come loose already when I unscrew them for a few millimeters, meaning they're much too short to mount the stepper to anything.
I can get short UNC 4-40 screws here (for PC use), but it's next to impossible to get long ones.
Any ideas?
|
Re: Madmike8's Funbot build #2 May 31, 2015 04:25PM |
Registered: 8 years ago Posts: 28 |
|
Re: Madmike8's Funbot build #2 May 31, 2015 05:40PM |
Registered: 10 years ago Posts: 814 |
|
Re: Madmike8's Funbot build #2 June 01, 2015 07:52AM |
Registered: 8 years ago Posts: 28 |
|
Re: Madmike8's Funbot build #2 June 01, 2015 08:04AM |
Registered: 8 years ago Posts: 28 |
p.s., how are the adjustment screws mounted?
Head of the screw on top, then the spring, then the aluminium plate with threads?
Or the other way around?
Or do you use threaded bolts in between?
Maybe a detailed picture of one screw would be nice.
Edited 1 time(s). Last edit at 06/01/2015 08:19AM by uhrheber.
Head of the screw on top, then the spring, then the aluminium plate with threads?
Or the other way around?
Or do you use threaded bolts in between?
Maybe a detailed picture of one screw would be nice.
Edited 1 time(s). Last edit at 06/01/2015 08:19AM by uhrheber.
|
Re: Madmike8's Funbot build #2 June 01, 2015 08:40AM |
Registered: 10 years ago Posts: 814 |
|
Re: Madmike8's Funbot build #2 June 01, 2015 10:02AM |
Registered: 8 years ago Posts: 28 |
|
Re: Madmike8's Funbot build #2 June 03, 2015 09:36AM |
Registered: 10 years ago Posts: 148 |
|
Re: Madmike8's Funbot build #2 June 03, 2015 10:00AM |
Registered: 10 years ago Posts: 814 |
|
Re: Madmike8's Funbot build #2 June 04, 2015 01:21AM |
Registered: 10 years ago Posts: 236 |
|
Re: Madmike8's Funbot build #2 June 04, 2015 06:11AM |
Registered: 10 years ago Posts: 148 |
|
Re: Madmike8's Funbot build #2 June 08, 2015 04:47AM |
Registered: 9 years ago Posts: 4 |
I have started my Funbot build but the holes in the Z axis base seem to small for the 3/8" solid aluminum rods that I purchased. So much that I have to hammer them in with a hammer. The first rod I tried is in about half way. Should I continue or back it back out and drill the holes out bigger? If I continue hammering the rod in do you think the plastic will split? I have chamford/beveled the rod ends but that didn't help.
|
Re: Madmike8's Funbot build #2 June 08, 2015 09:30AM |
Registered: 9 years ago Posts: 156 |
|
Re: Madmike8's Funbot build #2 June 08, 2015 10:07AM |
Registered: 10 years ago Posts: 814 |
I had to tap mine in. I set the base on a table and tapped them in from the top. You can take a smaller drill bit and just lightly ream around the holes to clean them up a bit. The taller new version base was a bit harder to get the rods in to though. I don't think it will split as long as your tapping down while it's on a hard surface, but if it does let me know and i'll print you another one...
|
Re: Madmike8's Funbot build #2 June 08, 2015 02:57PM |
Registered: 9 years ago Posts: 4 |
|
Re: Madmike8's Funbot build #2 June 11, 2015 05:30AM |
Registered: 8 years ago Posts: 28 |
|
Re: Madmike8's Funbot build #2 June 11, 2015 09:18AM |
Registered: 10 years ago Posts: 814 |
|
Re: Madmike8's Funbot build #2 June 17, 2015 08:12AM |
Registered: 10 years ago Posts: 148 |
|
Re: Madmike8's Funbot build #2 July 21, 2015 02:51PM |
Registered: 10 years ago Posts: 814 |
|
Re: Madmike8's Funbot build #2 July 21, 2015 03:26PM |
Registered: 10 years ago Posts: 148 |
Sorry, only registered users may post in this forum.


