Another Smart Rap Core build
Posted by Zlob
|
Another Smart Rap Core build May 13, 2015 11:01AM |
Registered: 8 years ago Posts: 65 |
HI all.
I'm trying to build my first 3D printer, after i found this one.
While i'm waiting for some parts come to me, and print the others, i was trying my arduino mega + ramps 1.4 + RepRapDiscount full Graphic Smart controller.
Just palyng around to learn what the parameters into firmware do.
The first thing i notice is tha the smartcard reader dosn't work.
Any fix for this ?
The second question is how to glue the box (i buy a 16mm MFD, to build a 250x250x250 mm print size).
I can't figure how i can glue it getting it perpendicular (yes, i'm not a carpenter !)... Any suggestion ?
The third is about motor. I can get 4 nema 11 0,06N/M 1,8 degree stepper motor for free, and the "free" part is the most interesting...
Are the powerful enough for the printer ?
Thanks for your help !
Edited 1 time(s). Last edit at 05/13/2015 11:07AM by Zlob.
I'm trying to build my first 3D printer, after i found this one.
While i'm waiting for some parts come to me, and print the others, i was trying my arduino mega + ramps 1.4 + RepRapDiscount full Graphic Smart controller.
Just palyng around to learn what the parameters into firmware do.
The first thing i notice is tha the smartcard reader dosn't work.
Any fix for this ?
The second question is how to glue the box (i buy a 16mm MFD, to build a 250x250x250 mm print size).
I can't figure how i can glue it getting it perpendicular (yes, i'm not a carpenter
 !)... Any suggestion ?
The third is about motor. I can get 4 nema 11 0,06N/M 1,8 degree stepper motor for free, and the "free" part is the most interesting...
Are the powerful enough for the printer ?
Thanks for your help !
Edited 1 time(s). Last edit at 05/13/2015 11:07AM by Zlob.
|
Re: Another Smart Rap Core build May 13, 2015 11:51AM |
Registered: 9 years ago Posts: 180 |
Welcome to the SmartRapCore family!
If you insert an SD card into the reader slot, select Print from SD from the LCD menu. If you have just folders on the SD card, you should see them listed. if you have .gcode files in them or in the root folder, you will see those listed as well. Do you see anything at all?
Since your box is 16mm, you should be able to drill some small holes and use either thin screws or nails to hold the sides of the box together while they glue. Go to your favorite hardware store and purchase a speed square (https://www.youtube.com/watch?v=yPL6jOa6AH8). With that you can ensure that the sides stay perpendicular. Another way is to temporarily nail strips of wood to the top of the sides between the sides and the back of the box to hold them in place once you set them using the speed square. Another way is to simply glue the sides to the back, make them perpendicular and use painter's tape to hold the sides to the back. Once all of those pieces are dry, you can glue the bottom on.
The 3D printed parts are meant for Nema 14 and Nema 17 motors. I believe the Nema 11 motors will be way to small for the motor mounts.
I hope this helps,
Jose
|
Re: Another Smart Rap Core build May 13, 2015 02:21PM |
Registered: 8 years ago Posts: 65 |
Thanks Jose.
For the way to glue i'm going to watch the video.
For SD card, when i push one time the rotary knob appears a menu that say "No SD card". If I enter into menu, i see nothing except the "go back" option.
Maybe there is a mistake into firmware compilation ?
(where i can download the firmware ready to go ?)
Another thing is that i have nothing connected to ramps except the display. I think it must work anyway, at least reading sdcard.
Or the display plus sd reader is defective ?
The card isn't as i can format it onto pc and of course is fat formatted !
Really sad for motor, but i think a give them a try.
If they don't work, i can always buy bigger ones.
|
Re: Another Smart Rap Core build May 13, 2015 03:26PM |
Registered: 9 years ago Posts: 40 |
I clamped a few straight pieces of 2x6 to my workbench to help server as a guide in keeping the boards on the same plane. I used a speed square to ensure they were square and pre-drilled holes and screwed the panels together once I glued. I worked one panel at a time and made sure they were all square with the base, then each other.
I bought some Nema 17 motors for $48 shipped. Their stats are pretty stout(76oz-in), should know how well they work this weekend.
[www.ebay.com]
I bought some Nema 17 motors for $48 shipped. Their stats are pretty stout(76oz-in), should know how well they work this weekend.
[www.ebay.com]
|
Re: Another Smart Rap Core build May 13, 2015 03:36PM |
Registered: 8 years ago Posts: 65 |
Thanks, sethmo.
The price is really good, but i'm scared about customs.
I live in itlay and here the customs are almos randomized (often i don't pay nothing, last time i must pay around 50% of the value of parcel!!!).
But it's a good start.
Nice suggestion for the wood.
And i have also a news about SD card. I found another one and that card work like a charme.
So is a SD fault not the reader or firmware.
Thanks all
|
Re: Another Smart Rap Core build May 13, 2015 03:44PM |
Registered: 9 years ago Posts: 156 |
|
Re: Another Smart Rap Core build May 14, 2015 01:28PM |
Registered: 8 years ago Posts: 65 |
Good suggestion, but flatbed scanners aren't so easy to find.
I'm going to buy 4 nema17 4,8Kg/cm stepper motors from Piece seller.
Today i start mounting bearings into slide Y.
They fit great but ... wich screw i must use ? I buy some M8x25 and some M8x35. The M8x35 look like to long, the M8x25 look like too short... I must buy some M8x30 ?
Another question about endstop: I need to solder them, and i guess if the must be "always close" or "always open" someone can help me ?
Same question about proxymity sensor: how must be connected ? As it works with 6V i bet i need a resistor: someone have already done ?
Lot of questions ... Thanks in advice.
|
Re: Another Smart Rap Core build May 14, 2015 01:38PM |
Registered: 9 years ago Posts: 156 |
|
Re: Another Smart Rap Core build May 14, 2015 03:09PM |
Registered: 9 years ago Posts: 180 |
Hi Ziob:
I use M8 x 25mm which are technically too short but they fit just fine without screwing in all the way into the plastic and the bearings are not going to come out. If you want to have the screw go into the plasticall the way, the V1.0.2 slides used M8 x 40mm
The endstop switches can be normally open or closed, that's up tp you. I prefer normally closed that way if there is a break in the wire, the endstop will get triggerd. Normally open will not detect shorts. The mechanical non PCB mounted ones are usually always normally open while the pcb mounted ones are normally closed. All you need to do is connect your Arduino/RAMPS to your pc once the endstops are installed. Use either pronterface or repetier to issue an M119 command. If the status of the endstops show TRIGGERED without the switch being engaged then you need to invert the endstop in the Marlin firmware. If they indicate otherwise, you are fine. Here is a video I made on how to set that up. It's for the SmartRap printer but the process is the same.
[www.youtube.com]
The inductive sensor has 3 wires, brown, black and blue. The brown wire is the power in. The blue the ground. The black is the signal out.
If your sensor operates at 6V DC or higher it will not get enough power from the 5V Z enstop pin on the RAMPS board. It will also output more than 5V DC on the black wire when activated and this will blow out your RAMPS board so the voltage out of the sensor needs to be reduced. You can do this with either a voltage divider made up of two resistors (https://www.youtube.com/watch?v=EcGFLwj0pnA) or use an LM7805 5V regulator which is what I am going to use.:
To power up a 6V DC or greater sensor:
Connect the brown wire to the + 12V power supply connector on the RAMPS
Connect the blue wire to the ground power supply connector on the RAMPS
Edited 1 time(s). Last edit at 05/14/2015 03:11PM by rcjoseb.
|
Re: Another Smart Rap Core build May 14, 2015 03:42PM |
Registered: 8 years ago Posts: 65 |
Thanks all ppl ...
As i finish printing parts, and get bearings shipped i will assemble all ...
Uhm just thinkg better, and evalute how you connect the 7805:
vin-signal out from sensor, gnd to gnd, out to ramps ?
Put some capacitor ?
Is the 7805 fast enought ?
Thanks again
Edited 1 time(s). Last edit at 05/14/2015 04:20PM by Zlob.
|
Re: Another Smart Rap Core build May 14, 2015 06:11PM |
Registered: 9 years ago Posts: 180 |
|
Re: Another Smart Rap Core build May 17, 2015 03:52AM |
Registered: 8 years ago Posts: 65 |
|
Re: Another Smart Rap Core build May 17, 2015 10:00PM |
Registered: 9 years ago Posts: 180 |
|
Re: Another Smart Rap Core build May 18, 2015 09:40AM |
Registered: 8 years ago Posts: 65 |
|
Re: Another Smart Rap Core build May 18, 2015 10:06AM |
Registered: 9 years ago Posts: 180 |
The left motor controls the X axis and the right the Y. Start with the right belt:
Here is a PDF I made showing how to build the X and Y axis and includes a section on the belts starting on page 44. It's easier than trying to explain it here :-)
[smartrapbuild.files.wordpress.com]
Jose
Here is a PDF I made showing how to build the X and Y axis and includes a section on the belts starting on page 44. It's easier than trying to explain it here :-)
[smartrapbuild.files.wordpress.com]
Jose
|
Re: Another Smart Rap Core build May 18, 2015 11:55AM |
Registered: 9 years ago Posts: 107 |
|
Re: Another Smart Rap Core build May 19, 2015 09:38AM |
Registered: 8 years ago Posts: 65 |
@rcjoseb and @smerret79: i understand how will be mount the belt.
Now i just wait for the parts come from post office...
Meanwhile i paint the box
#add 1
Today (20/05/2015) painted the box with an adhesion paint.
I will use a sticker to finish the box (my son choose the "cow" style !!!).
!!!).
At least after a week of searching i find the smooth rod. Looks like are almost unknown near my home, and totally unknown to hobby center too...
Next time i will post some pict.
Edited 1 time(s). Last edit at 05/20/2015 03:56PM by Zlob.
Now i just wait for the parts come from post office...
Meanwhile i paint the box

#add 1
Today (20/05/2015) painted the box with an adhesion paint.
I will use a sticker to finish the box (my son choose the "cow" style
 !!!).
!!!).At least after a week of searching i find the smooth rod. Looks like are almost unknown near my home, and totally unknown to hobby center too...
Next time i will post some pict.
Edited 1 time(s). Last edit at 05/20/2015 03:56PM by Zlob.
|
Re: Another Smart Rap Core build May 22, 2015 04:28PM |
Registered: 8 years ago Posts: 65 |
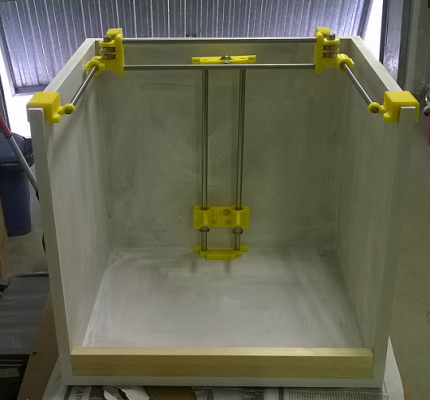
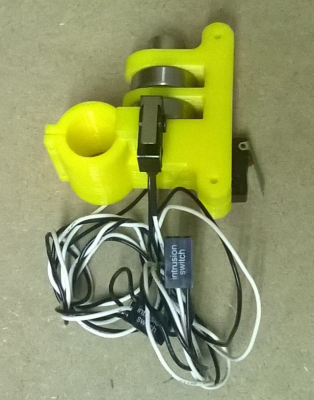
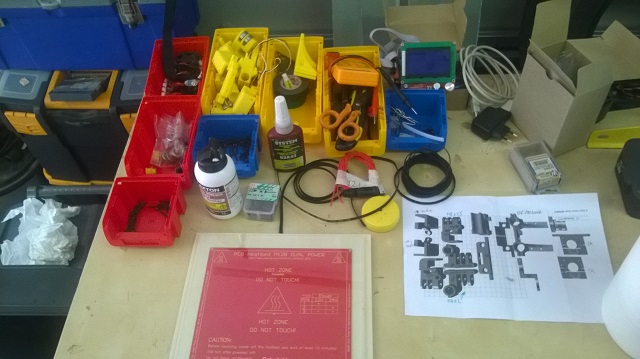
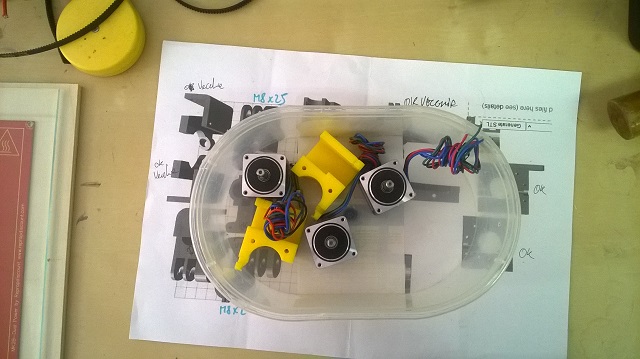
Some pictures on my work :
The box after first paint (i will use adhesive paper to finish)
The mechanical endstop
The work table with some stuff
The experimental part of project: Nema 11 motor with ad hoc motor support
Just want to see if the little NEMA 11 motor is powerful enough...
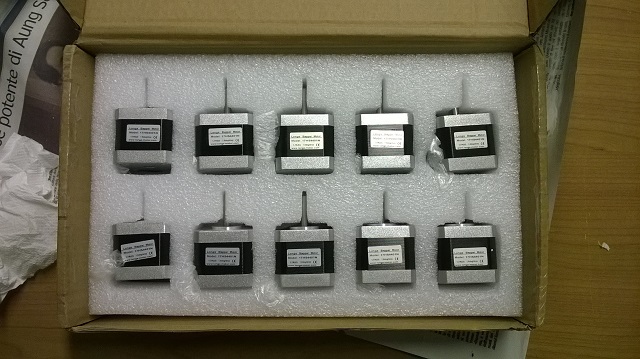
The NEMA 17 motor i bought on ebay: 10 motor for 89 euro, shipping included.
Working on an arduino program to check if they works all ...
Hope the other stuff comingquickly soon to mount and test ...
Edited 1 time(s). Last edit at 05/22/2015 04:30PM by Zlob.
The box after first paint (i will use adhesive paper to finish)
The mechanical endstop
The work table with some stuff
The experimental part of project: Nema 11 motor with ad hoc motor support
Just want to see if the little NEMA 11 motor is powerful enough...
The NEMA 17 motor i bought on ebay: 10 motor for 89 euro, shipping included.
Working on an arduino program to check if they works all ...
Hope the other stuff coming
Edited 1 time(s). Last edit at 05/22/2015 04:30PM by Zlob.
|
Re: Another Smart Rap Core build May 28, 2015 03:58PM |
Registered: 8 years ago Posts: 65 |
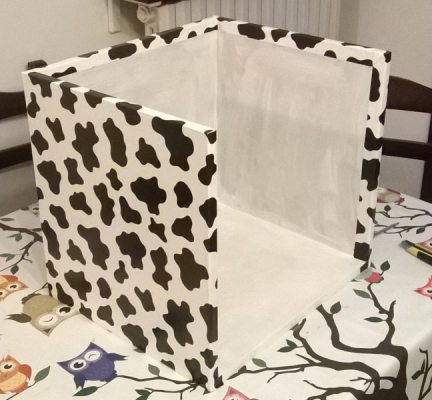
Quick update, just after put in place some adhesive paper:
Now waiting for belt, hotend and damn 3x16 screw (finally i ordered 3x18 i thought it's almost the same !)
It's really funny but the things that i thought were "easy" to find, are the most difficult ! (smooth rod, screw, wood ) !!!
Now waiting for belt, hotend and damn 3x16 screw (finally i ordered 3x18 i thought it's almost the same !)
It's really funny but the things that i thought were "easy" to find, are the most difficult ! (smooth rod, screw, wood ) !!!
|
Re: Another Smart Rap Core build May 29, 2015 02:06AM |
Registered: 10 years ago Posts: 992 |
It's going well 
I love the cow anyway.
I'm surprised the wood was hard to find ? but not the screws. M3 are not easy to find . I wish nema17 where all in M4 .
the Smartrap project
[smartfriendz.com]
[www.thingiverse.com]
[reprap.org]
[github.com]
doc assemblage: [reprap.org]
NEW: Forum smartfriendz: [smartraptalk.smartfriendz.com]
|
Re: Another Smart Rap Core build May 29, 2015 02:35PM |
Registered: 8 years ago Posts: 65 |
Quote
smartfriendz
I'm surprised the wood was hard to find ? but not the screws. M3 are not easy to find . I wish nema17 where all in M4 .
Well, the most hardest was the smooth rods. Near my home there was a lot of mechanical industries but they all use from 20 mm and upper.
Just b4 hitting buy onto reprapworld site, a friend of mine send me an adress where i found the rods.
The wood is funny: here just sell one big sheet of wood (MDF) eg. 2000*1500 and than they cut it for you.
After looking around i found a shop where sell cutted wood

(just brown MDF, not already painted!)
For the screw, i remeber a shop who sell screw for rc models too and find what i need except for the M3x16, that i must excange with M3x18 ...
Still waiting for some part (belts, cable extender, hotend) from china but in this case i know

Stay tuned for news in a while

OPS: Forgt to say that nema11 use M2,5 and this time is REALLY hard to find M2,5x30 screw ...
Edited 3 time(s). Last edit at 05/29/2015 04:16PM by Zlob.
|
Re: Another Smart Rap Core build June 02, 2015 07:01AM |
Registered: 8 years ago Posts: 65 |
Hi all.
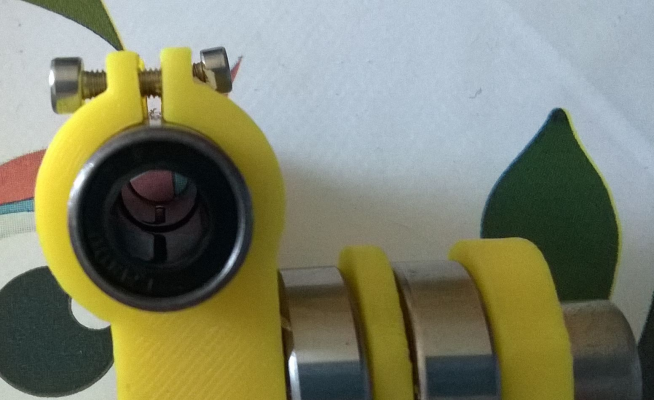
Today i'm mounting some stuff BUT i get this trouble:
As you can see there is no room for bolt or for the screw head!
The screw is a M3x10 and the print was taken from V1.01 with 8mm rods setting.
I would try to get M3x18 screw and try to use it with bolt but i'm not sure it works.
Any suggestion ?
Today i'm mounting some stuff BUT i get this trouble:
As you can see there is no room for bolt or for the screw head!
The screw is a M3x10 and the print was taken from V1.01 with 8mm rods setting.
I would try to get M3x18 screw and try to use it with bolt but i'm not sure it works.
Any suggestion ?
|
Re: Another Smart Rap Core build June 02, 2015 08:43AM |
Registered: 9 years ago Posts: 156 |
|
Re: Another Smart Rap Core build June 02, 2015 09:01AM |
Registered: 10 years ago Posts: 814 |
|
Re: Another Smart Rap Core build June 02, 2015 09:02AM |
Registered: 9 years ago Posts: 344 |
|
Re: Another Smart Rap Core build June 02, 2015 12:25PM |
Registered: 8 years ago Posts: 65 |
|
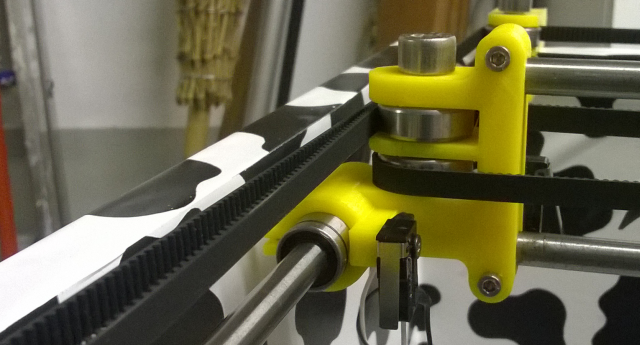
Re: Another Smart Rap Core build June 04, 2015 04:13AM |
Registered: 8 years ago Posts: 65 |
Work is going on fast !
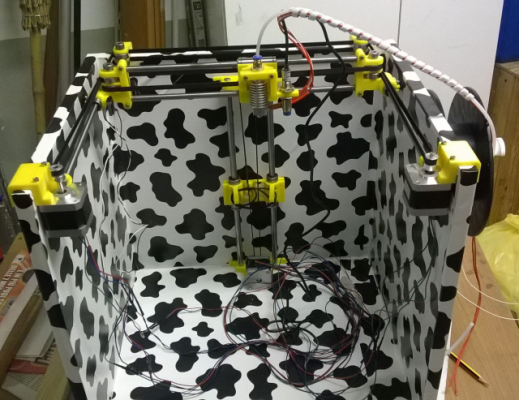
I got my belt and installed.
I have a doubt:
The belt are touching, at the bottom of the box.
This happen both side.
Is this correct ?
Edited 1 time(s). Last edit at 06/04/2015 04:43AM by Zlob.
I got my belt and installed.
I have a doubt:
The belt are touching, at the bottom of the box.
This happen both side.
Is this correct ?
Edited 1 time(s). Last edit at 06/04/2015 04:43AM by Zlob.
|
Re: Another Smart Rap Core build June 04, 2015 08:57AM |
Registered: 9 years ago Posts: 156 |
|
Re: Another Smart Rap Core build June 04, 2015 09:01AM |
Registered: 9 years ago Posts: 156 |
|
Re: Another Smart Rap Core build June 04, 2015 09:19AM |
Registered: 10 years ago Posts: 992 |
we just changed to X under head and Y on the right wall mount. It was bad you're right .
the Smartrap project
[smartfriendz.com]
[www.thingiverse.com]
[reprap.org]
[github.com]
doc assemblage: [reprap.org]
NEW: Forum smartfriendz: [smartraptalk.smartfriendz.com]
the Smartrap project
[smartfriendz.com]
[www.thingiverse.com]
[reprap.org]
[github.com]
doc assemblage: [reprap.org]
NEW: Forum smartfriendz: [smartraptalk.smartfriendz.com]
Sorry, only registered users may post in this forum.
