Smartrapcore alu build question
Posted by DjDemonD
|
Re: Smartrapcore alu build question February 13, 2016 03:57PM |
Registered: 8 years ago Posts: 3,525 |
|
Re: Smartrapcore alu build question February 14, 2016 09:46AM |
Registered: 9 years ago Posts: 101 |
Glad to hear you're printing! I should have mentioned that 210 is what I found to be successful with green pla for me as well.
I was a disappointed that it didn't come with the part fan already printed, here is the one from OnShape that mounts to the back of the x carriage. I was planning on starting with that.
I was a disappointed that it didn't come with the part fan already printed, here is the one from OnShape that mounts to the back of the x carriage. I was planning on starting with that.
|
Re: Smartrapcore alu build question February 14, 2016 01:43PM |
Registered: 8 years ago Posts: 3,525 |
Edit - found the hot end fan shroud I wanted eventually. Made a remix with a duct don't know if it'll print or work but will print one tonight. I'll post it on thingiverse if it works.
My cubes are getting better - still getting slightly upturned corners so it's maybe still over extruding (I am using esteps of 132 at moment), I've turned my xy jerk down to 16, perhaps it just needs a fan. Might try some abs later see if it makes a perfect cube.
Noticing my dimensions are slightly off I get 20.2mm x 20.1mm in x and y. I wonder how you adjust x relative to y, as altering the esteps affects the core xy kinematics?
Edited 1 time(s). Last edit at 02/15/2016 03:17AM by DjDemonD.
|
Re: Smartrapcore alu build question February 15, 2016 08:35AM |
Registered: 8 years ago Posts: 3,525 |
I've ordered a 0.9 deg stepper for the z axis as it seems like a logical thing to do and will improve resolution. I'm not sure if it needs it but again, seems sensible and worth experimenting with. The added steps shouldn't tax the controller too much as there isn't that much z movement, compared to x and y. So far I haven't found the z axis anything like as problematic as I thought I would. I haven't tried printing anything large or particularly near the edges of the bed yet though.
|
Re: Smartrapcore alu build question February 15, 2016 10:29AM |
Registered: 9 years ago Posts: 101 |
I upgraded to the 1.1 firmware this morning and the LCD did indeed start right up. Here's a funny one, you said your bed was MK2b? I pulled mine off and it is truly an MK3, probably just the wiring is terrible and responsible for the bad performance. I swapped it out for
another MK3 that I have laying around that has been tested and is wired properly. Smartfriendsz did finally write me back and said the LCD should work as their firmware was "pre-configured".
It's amazing how having expectations set properly when buying a kit is so helpful. When you expect half the things to need replacing or upgrading its not so bad.
|
Re: Smartrapcore alu build question February 15, 2016 03:58PM |
Registered: 8 years ago Posts: 3,525 |
This is the first printer I have built from a kit. I have an i3 which was preassembled badly, a Kossel Mini which was preassembled quite well but which I couldn't calibrate for toffee. To be fair the smart core alu has been a pleasure and I'm looking forward to honing it to perfection.
You got a mk3 bed with the full 3mm aluminium build plate surface on one side? I got a black pcb mk2b with a glass plate and 3 binder/bulldog clips (which I replaced with 4 low profile ones - I hate these things, it'll be mk3 and printbite for me as soon as possible).
You got a mk3 bed with the full 3mm aluminium build plate surface on one side? I got a black pcb mk2b with a glass plate and 3 binder/bulldog clips (which I replaced with 4 low profile ones - I hate these things, it'll be mk3 and printbite for me as soon as possible).
|
Re: Smartrapcore alu build question February 15, 2016 08:40PM |
Registered: 9 years ago Posts: 101 |
I got the glass plate as well but it is a real mk3 -although here's what the solder and wire job looks like so I'm not terribly surprised it didn't heat up well:

I had a moment of weakness: "i should really re-solder that" gave way to "lets put it on and see if it works"
Did you buy your i3 kit from china? I bought one off AliExpress. The stock printer never printed a box so I would agree this kit is pretty solid by comparison.
I ended up replacing every single component but I guess that's how you learn.
Ok, working on things here tonight; got a pretty good cube but started looking into calibration. I was all set to try the following(diagonal cube) when my extruder's heat caused a filiment jam in the extruder, it is mega hot!
Here is CoreXY config: [forums.reprap.org]
basically, print your config cube at a 45 angle, measure each side and adjust belt tension until equal. Then steps are done together... makes as much sense as anything.
Also, not sure what you came up with but I upped my extruder steps/mm to 180 that seems to have helped a little under-extrusion I was still having.
Busy attaching a fan to the front of my extruder now.
|
Re: Smartrapcore alu build question February 16, 2016 04:00AM |
Registered: 8 years ago Posts: 3,525 |
I was under the impression that a mk3 heatbed is this type (mk3 heated bed) with an aluminium backing. What I've got is a mk2b pcb heater. But yes I agree with the wiring, it looks naff but I suppose the logic is that someone made this kit and claims it works so might as well try it as it comes. I haven't rewired mine yet, figured I'd do it when these wires melt.
No I bought my i3 from a guy who was selling it on a local facebook trading group. It has undergone the same almost complete part by part replacement as yours by the sounds of it. Yes you learn but it is slow and frustrating.
My extruder gets quite hot I measured it at about 60 deg C on the side of the motor. Haven't had a jam yet. My esteps are only 132 and I'm sure mine is still over extruding. A fan on the extruder might be a good shout. I wonder if I might be able to turn the extruder stepper current down a bit more, none of my other motors are hot I've turned them all down from the supplied current level, but I kept the extruder higher as it needs a bit more power. I do have a nema 14 5:1 geared motor which might make a suitable replacement, it will provide much more torque by being geared down, with less current. Plus the heat will have to conduct through the gearbox to get to the filament.
Calibration by belt tension adjustment is all I came up with too. I am expecting a shipment of steel reinforced gt2 belt so will replace the stock belts then have a look at it. I suppose it's a case of tightening one side by a notch then printing and seeing what effect it has?
Edited 2 time(s). Last edit at 02/16/2016 04:05AM by DjDemonD.
|
Re: Smartrapcore alu build question February 16, 2016 10:28AM |
Registered: 9 years ago Posts: 101 |
Re-calibrating all the motor currents is my next step. I haven't done that before but it seems turn them all the way down and then up 25% as a starting point and work from there. I've also heard turn them all down to .4 or something as a starting point.
I picked up a pile of F624ZZ bearings with the plan of replacing all the plastic pulleys they should be here on Wednesday so I'll get into belt tuning then I suppose.You are correct about the MK3, my picture was of the backside which looks like the frontside of the mk2.
I picked up a pile of F624ZZ bearings with the plan of replacing all the plastic pulleys they should be here on Wednesday so I'll get into belt tuning then I suppose.You are correct about the MK3, my picture was of the backside which looks like the frontside of the mk2.
|
Re: Smartrapcore alu build question February 16, 2016 01:09PM |
Registered: 8 years ago Posts: 3,525 |
Id be very keen to hear how you get on with the flanged bearings, I am concerned since they are only flanged on one side that the belts might ride off the bearings. The printed pulleys are double flanged with angled flanges to reposition wayward belts. The belts do this on my kossel occasionally, at the idlers at the top of the towers (no flanges at all) if I have adjusted the belt tensioning screw too far which tilts the top frame by just a few fractions of a degree, I am planning to replace these with toothed, double flanged idlers for accuracy reasons as well as to keep the belts on. Given the belt paths on the smartcore alu involve belts entering idlers slightly off angle, maybe I'm being pessimistic and you don't know until you try - you could always add a large thin washer as a second flange if needed.
The stepper currents are shrouded by myth, the reality is as you said, turn the pots until the motors hum loudly, carry on until it stops humming. Mark them with a sharpie, this is the zero point. Go 1/4 turn past that and try a few movements, if they're hesitant give them some more current. Aim for the lowest current that still allows a reasonably fast move to happen without drama. I've got my x,y and z at about 40% or so and my extruder at about 60-70% (which is why it gets hot). Don't bother trying to read reference voltages, it might be useful but its fiddly to do it, you can short the drivers and you can feel/hear when they're about right and then trim them in use to find the optimum.
The stepper currents are shrouded by myth, the reality is as you said, turn the pots until the motors hum loudly, carry on until it stops humming. Mark them with a sharpie, this is the zero point. Go 1/4 turn past that and try a few movements, if they're hesitant give them some more current. Aim for the lowest current that still allows a reasonably fast move to happen without drama. I've got my x,y and z at about 40% or so and my extruder at about 60-70% (which is why it gets hot). Don't bother trying to read reference voltages, it might be useful but its fiddly to do it, you can short the drivers and you can feel/hear when they're about right and then trim them in use to find the optimum.
|
Re: Smartrapcore alu build question February 17, 2016 01:32AM |
Registered: 8 years ago Posts: 3,525 |
I wonder if might have shorted something on my ramps/arduino- it still works but I cannot seem to run it without usb attached. If i disconnect the LCD goes off. The D1 diode is present on the ramps so its capable of powering the arduino.
Rigged up my full graphic controller doesn't seem to be troubling it.
Edited 1 time(s). Last edit at 02/17/2016 01:44AM by DjDemonD.
Rigged up my full graphic controller doesn't seem to be troubling it.
Edited 1 time(s). Last edit at 02/17/2016 01:44AM by DjDemonD.
|
Re: Smartrapcore alu build question February 17, 2016 03:18AM |
Registered: 8 years ago Posts: 3,525 |
|
Re: Smartrapcore alu build question February 17, 2016 03:43AM |
Registered: 8 years ago Posts: 3,525 |
Turned up the x and y stepper current by a small amount as I got some skipped steps when printing.
Also I'm settling at around 124 e steps, which makes me wonder how we can be so widely different with this value, different filaments and temperatures shouldn't be giving a 50% variance on the same extruder, but if the prints come out okay then fair enough. How tight are your idler screws? Mine are as tight as I can turn them using moderate force with the long side of the supplied Allen key.
Edited 1 time(s). Last edit at 02/17/2016 07:27AM by DjDemonD.
|
Re: Smartrapcore alu build question February 17, 2016 10:21AM |
Registered: 9 years ago Posts: 101 |
Morning!
I printed a couple test cubes last night and re-adjusted the belt tension per the post Tuning Post I found earlier this week. Both sides of the cube are within .05mm of each other -on try needed here.
Here's my latest print cube

Issues I see:
- still a little club foot, I reduced first layer width from 200% -> 150% and this got better but tonight I'll give 120 a try
- still a corner or two warping, I keep cleaning the bed with alcohol after every print, it seems after a few prints the alu starts to grip better
- a hair of under-extrusion on the top? Not much just a tiny crack here and there
Is the uneven top surface due to the corners warping upward or is this a different issue?
Also, I put my eSteps back down to 140 as infill was looking really messy, I'm going to try something closer to your number tonight and see what happens. As for the eScews they are 2mm out of the housing -room to turn. I have not yet encountered any skipping, I did turn the power down just a hair on that motor, it didn't seem to make a difference. Voltage-wise the extruder is at .6 and the others at .4
I suspect there is still an extruder overheat problem to solve but I'll try a longer print soon to test that.
As for the LCD (discount smart controller) mine doesn't lightup with USB either. When you use your full-graphic does it work on just PS?
Where did you buy yours from, I think I might need to pick one up as well.
I printed a couple test cubes last night and re-adjusted the belt tension per the post Tuning Post I found earlier this week. Both sides of the cube are within .05mm of each other -on try needed here.
Here's my latest print cube
Issues I see:
- still a little club foot, I reduced first layer width from 200% -> 150% and this got better but tonight I'll give 120 a try
- still a corner or two warping, I keep cleaning the bed with alcohol after every print, it seems after a few prints the alu starts to grip better
- a hair of under-extrusion on the top? Not much just a tiny crack here and there
Is the uneven top surface due to the corners warping upward or is this a different issue?
Also, I put my eSteps back down to 140 as infill was looking really messy, I'm going to try something closer to your number tonight and see what happens. As for the eScews they are 2mm out of the housing -room to turn. I have not yet encountered any skipping, I did turn the power down just a hair on that motor, it didn't seem to make a difference. Voltage-wise the extruder is at .6 and the others at .4
I suspect there is still an extruder overheat problem to solve but I'll try a longer print soon to test that.
As for the LCD (discount smart controller) mine doesn't lightup with USB either. When you use your full-graphic does it work on just PS?
Where did you buy yours from, I think I might need to pick one up as well.
|
Re: Smartrapcore alu build question February 17, 2016 10:26AM |
Registered: 9 years ago Posts: 101 |
|
Re: Smartrapcore alu build question February 17, 2016 01:35PM |
Registered: 8 years ago Posts: 3,525 |
My only gripe at the moment is the corners curling up a bit - it got better and better as I reduced the esteps but its still happening on one corner. Slightly better with seams set to random in slic3r, as the most curled corner on mine is the back right one, where the seam is, but then the sides end up looking dimpled.
I might try the belt tensioning routine once I replace the belts. I bought some steel reinforced gt2 belt from Germany it's tough stuff, so given the very long belt runs it might help. Threaded the z belt, even more of a b#stard than before these belts are unyielding! Also fitted a 0.9 deg stepper to z, so running 160 z steps per mm, and much more current - it's a longer motor. Probably won't make any difference unless I get to testing with 0.1mm or 0.05mm layer height, being used to leadscrews, belts seem an imprecise way of moving the z axis, but that's what the kossel uses.
I think the extruder needs a chunkier motor, these short motors are going to get hot on z and e where the force and current need to be fairly high.
I can't run the machine on power supply only or sd card only at all, if the USB isn't powering the arduino the Lcd is off and for all I know the arduino is too. I tried feeding it 5v through the dc power jack, from a 5v regulator but this didn't solve the problem. I wonder if the d1 diode is backwards? Without it the arduino doesn't get power from the ramps. I'm inferring that the Lcd is 5v and powered from the arduino.
I got my controller here link
The part fan I'm using isn't very powerful, IMHO most people go way overboard with part cooling fans. I've babystepped the z axis to a very good level and am getting reasonable first layers. I'm using 210 for 1st layer and 195 for subsequent layers. I do wonder if the sharp profile on the nozzle isn't helping with first layers or curling corners I could imagine it drags across the already laid filament. I might see if I have a nozzle lying around. Or maybe just file the sharp edges off this one.
Edited 3 time(s). Last edit at 02/17/2016 02:12PM by DjDemonD.
|
Re: Smartrapcore alu build question February 17, 2016 05:37PM |
Registered: 8 years ago Posts: 3,525 |
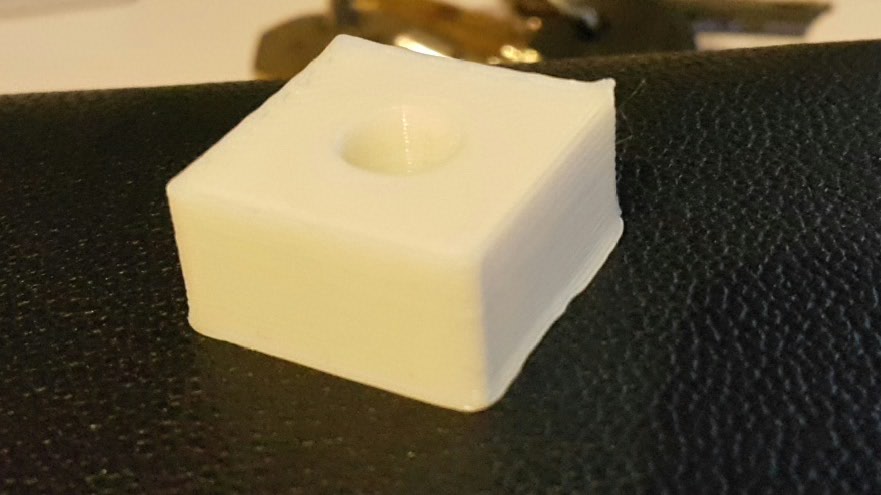
Heres the latest cube, nearly satisfied with it dimensions are 20.12x20.14x9.98 so I will take that. Sorry about the photo - tricky colour to capture well.
The back right corner, as it sits on the build plate still curls upwards a little. This is where the seam is positioned, so maybe if I chose random seams or reduced the esteps a tiny bit more, I might get a "perfect" cube. I've replaced my belts with the steel versions and checked they are both equally tensioned. I also took a fine file to the supplied nozzle and rounded the edges off which seems to have helped a lot. Some resonance artefacts on the sides but no z-wobble or anything like that.
I tightened the large bolts which hold the back pulleys, as they were a little loose and generating quite a bit of the noise this printer makes.
So I'd say in this respect its certainly capable. Now to see if my retraction settings are up to the job.
Edited 1 time(s). Last edit at 02/17/2016 05:40PM by DjDemonD.
|
Re: Smartrapcore alu build question February 17, 2016 08:08PM |
Registered: 9 years ago Posts: 101 |
|
Re: Smartrapcore alu build question February 18, 2016 02:08AM |
Registered: 8 years ago Posts: 3,525 |
I don't know. I've been saving eeprom settings after babystepping, but it's not easy to tell if it worked on the next print, it's too subtle.
Managed to print an actual part (a copy of the part fan I modded) it came out quite nice.
So if this machine is going to replace my i3 its now a case of looking at enclosing it, or at least its build area so that I can print well in ABS.
I am also going to try to reduce the noise and resonance, which seems a lot to do with the x and y motors, which I am now having to run at a lot higher current after getting some skipped steps. The motors can almost certainly be swapped for slightly larger ones, an probably better quality also. I think I'll also slightly redesign the brackets holding them to the frame to bring the motor just a millimetre further from the frame, then use cork gaskets between the motor and bracket.
Edited 2 time(s). Last edit at 02/18/2016 03:53AM by DjDemonD.
|
Re: Smartrapcore alu build question February 18, 2016 03:27PM |
Registered: 8 years ago Posts: 3,525 |
I was wondering whether the simplest solution for the wobbly z axis would be a duplicate of the current axis placed on the opposing/front side, driven via a shaft between the two z lifts, which could be connected to a motor with belts/gears (it could be geared down to improve resolution, torque and holding) neater and simpler would be to use a dual shaft motor, in place of the current motor, with one shaft driving the existing pulley and the other coupled to a 5mm diameter rod driving the pulley on the new z lift the other side which would have a bearing and pulley.
The motor should have enough torque to drive it. It might be only a little heavier than the current setup, with perhaps a little more friction from the two additional linear bearings. I was also thinking about a counter weight system for the current setup to allow the z motor to be run at lower current.
Whilst it would be no more accurate than the current z axis it would be much less wobbly, cheap and easy to put together with almost no disassembly and wouldn't need to be perfectly aligned to work since there are manual bed levelling screws anyway. So in this sense it's a lot cheaper than a leadscrew/ballscrews z axis and far fewer alignment problems.
I am quite satisfied with the 0.9 degree stepper for the z axis so now I just need to find a similar power dual shaft motor. I expect I could remove and replace the shaft in the one I have but its probably easier to just buy one.
Edited 1 time(s). Last edit at 02/18/2016 03:30PM by DjDemonD.
|
Re: Smartrapcore alu build question February 18, 2016 06:49PM |
Registered: 9 years ago Posts: 101 |
I'll let you know - I plan to switch mine over to a single leadscrew over the weekend and perhaps a double as I happen to have 2 laying around from my p3 rebuild.
I agree, the platform is wobbly but it seems to print just fine... I've had no issues with it myself.
I ordered a full-graphic display and will probably start cleaning things up this weekend too; running wires, mounting the RAMPs in a nicer box, and adding a filament mount. I know you hard wired the extruder and print fan but in case you are ever wondering the
switchable fan connections are between the hotend and print bed. These can switch 12v using M106(on and M107(off)
I plan to install the print fan tonight as well.
Only probably is that its nearing 70 degrees here in Boulder so staying inside will be difficult this weekend.
|
Re: Smartrapcore alu build question February 19, 2016 10:23AM |
Registered: 8 years ago Posts: 3,525 |
|
Re: Smartrapcore alu build question February 19, 2016 11:08AM |
Registered: 8 years ago Posts: 3,525 |
Been trying to quiet the machine down a bit. I printed the x and y motor brackets that hold the motors to the frame. By default the motor is in contact with the frame this is causing a lot of noise. I just added 2mm to the bracket so the motor is couple of mm from the frame. One of these pieces was the only one I broke assembling it, turns out the screws were the longer 16mm type not the 10mm the rest of the parts use. Might also add some cork gaskets or o rings too between the motor and bracket, and adjust the pulleys up the shaft a small way
|
Re: Smartrapcore alu build question February 20, 2016 05:36AM |
Registered: 8 years ago Posts: 3,525 |
Switched to a mk8 extruder and getting far better prints. Also the mk8 has a slightly bigger motor which is not even getting hot. The only motors which are hot now are the x and y motors which I haven't changed yet - but I am going to. I have to conclude the motors supplied with the kit are under-specified.
|
Re: Smartrapcore alu build question February 20, 2016 06:01AM |
Registered: 8 years ago Posts: 3,525 |
|
Re: Smartrapcore alu build question February 20, 2016 07:16AM |
Registered: 8 years ago Posts: 3,525 |
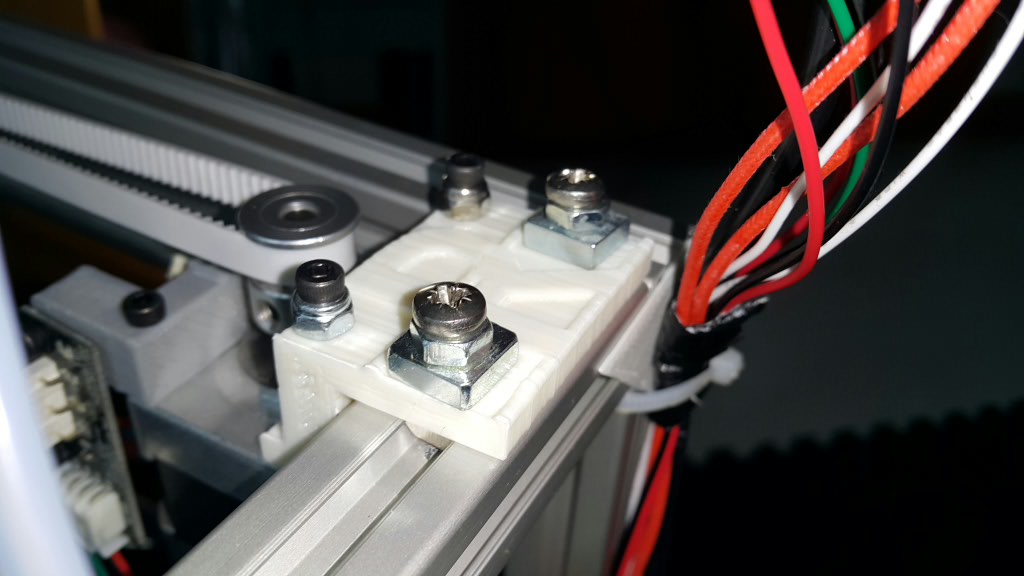
Amazing what you miss. So the reason I've been getting consistently one curled corner is that not only are the m4 bolts that hold the R motor part to the frame too long, so are the m3 bolts that hold the motor (photo enclosed). As a result my whole corexy gantry was lower by 3-4mm at the front right.
Back to what I was saying before about preassembled modules - unless you are certain they're built perfectly you almost have to dismantle them all and start again.
Edited 2 time(s). Last edit at 02/20/2016 08:23AM by DjDemonD.
Back to what I was saying before about preassembled modules - unless you are certain they're built perfectly you almost have to dismantle them all and start again.
Edited 2 time(s). Last edit at 02/20/2016 08:23AM by DjDemonD.
|
Re: Smartrapcore alu build question February 20, 2016 05:48PM |
Registered: 9 years ago Posts: 101 |
I re-examined my mounts and while they are cracking and don't look very healthy I don't see any problems, a level on the axis shows that everything looks level.
However, I too has having trouble sticking in the front-left, hoping that your travel adjustment does the trick. I chicken'd out on changing the z-axis... I think I'm going to keep looking for ideas.
On your LCD, is the contrast sort of crappy? I moved the jumper so my light is on all the time but the screen would look a lot nicer if the contract was darker than the pot can achieve.
I read that this is the norm and people often solder a diode onto the pot to resolve this... just wondering if you are dealing/dealt with this yet?
Cheers!
|
Re: Smartrapcore alu build question February 20, 2016 05:56PM |
Registered: 8 years ago Posts: 3,525 |
Well certainly getting better prints almost perfect cubes now. The LCD is okay so real issues there.
I have had an odd situation where just as a print starts, after autolevelling and just as the hot end reaches a stable temperature the bed drops. But I have been messing about with stepper currents again. I have added some thin washers under the pulley assemblies for x and y as the lower pulley was rubbing on the bracket holding it and not turning freely. Also I'm getting a nasty rattle somewhere near the right rear pulley assembly, cant track it down at all.
Speaking to some motor manufacturers about getting a dual shaft 0.9 degree stepper for the z axis, seriously considering a dual z axis using their design.
|
Re: Smartrapcore alu build question February 21, 2016 06:48AM |
Registered: 8 years ago Posts: 3,525 |
Okay so i replaced the x and y motors with similar but slightly longer Casun units from some mk8 extruders I had lying around. The difference is unbelievable almost silent. The hot end fan makesmore noise than the motors and thy are barely warm. video my little one is noiser and hes 3 rooms away.
Edited 1 time(s). Last edit at 02/21/2016 07:32AM by DjDemonD.
Edited 1 time(s). Last edit at 02/21/2016 07:32AM by DjDemonD.
|
Re: Smartrapcore alu build question February 25, 2016 08:47AM |
Registered: 9 years ago Posts: 101 |
Wow, that's quiet! You're a bit ahead of me I'm afraid. Mines still pretty loud, lots of rattling from the pulleys as well and my z-axis makes some horrible ratcheting sound every once in a while. On my todo list is:
- install printbite; I tested yesterday and I wasn't having any trouble getting the induction sensor to read through it (5mm ALU heatbed underneath)
- change out extruder; I too have an MK8 laying around although truth be told I haven't had a single issue with mine other than the overheating
- install the E3d lite hotend
- re-tighten the z-axis belt; seems very difficult to get this to a point it stays tight
For the steel GT2 belts, did you order from ebay? Seems like the following are easy to find:
[www.ebay.com]
I'll try and push up some pictures or vid in the next couple days.
Cheers!


Sorry, only registered users may post in this forum.