Feedback needed for a Smartrapcore-compatible X Carriage (with symmetric/balanced tensioning mechanism) design
Posted by realthor
|
Feedback needed for a Smartrapcore-compatible X Carriage (with symmetric/balanced tensioning mechanism) design April 20, 2016 03:51PM |
Registered: 9 years ago Posts: 1,035 |
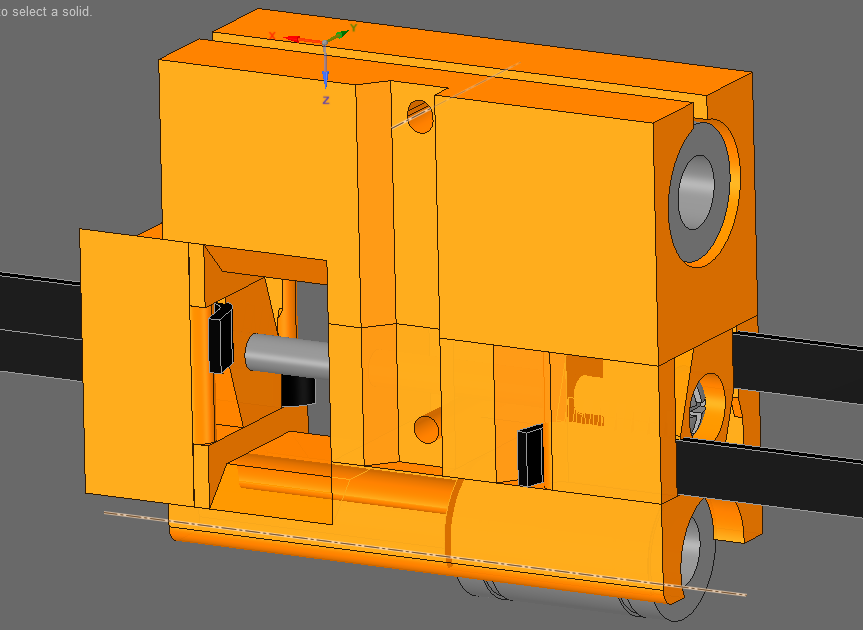
Hi guys, I want to post this to get some feedback on a X carriage I have previously designed and have re-designed now to allow symmetrical belt tension adjustment in addition to the previous iteration that had gotten rid of the external ""in-the-way" ears for belt gripping.
I had to embed the tensioning mechanism in the X Carriage itself because I had no other way to do it with a simple method and you can't get any simpler than a bolt tensioning for both belts and in a symmetrical fashion on top of that.
Below you can see the result, still in WIP but very promising unless I find a fatal flaw or someone else points me to one, for which reason I am showing it here.
Feel free to head over at thingiverse (http://www.thingiverse.com/thing:1505842) where the X Carriage design is hosted. Also you can view it in 3D on Sketchfab @ [is.gd] .
I am also interested if you have found any tilting/rocking of the carriage in this "vertical X rods stack" arrangement, as compared with the horizontal X rods type.
Thanks.
Edited 1 time(s). Last edit at 04/20/2016 04:01PM by realthor.
RepRap Lander concept on Concept Forge
RepRap Lander concept on RepRap Forums
My Things, mostly experimental stuff
I had to embed the tensioning mechanism in the X Carriage itself because I had no other way to do it with a simple method and you can't get any simpler than a bolt tensioning for both belts and in a symmetrical fashion on top of that.
Below you can see the result, still in WIP but very promising unless I find a fatal flaw or someone else points me to one, for which reason I am showing it here.
Feel free to head over at thingiverse (http://www.thingiverse.com/thing:1505842) where the X Carriage design is hosted. Also you can view it in 3D on Sketchfab @ [is.gd] .

I am also interested if you have found any tilting/rocking of the carriage in this "vertical X rods stack" arrangement, as compared with the horizontal X rods type.
Thanks.
Edited 1 time(s). Last edit at 04/20/2016 04:01PM by realthor.
RepRap Lander concept on Concept Forge
RepRap Lander concept on RepRap Forums
My Things, mostly experimental stuff
|
Re: Feedback needed for a Smartrapcore-compatible X Carriage (with symmetric/balanced tensioning mechanism) design April 27, 2016 06:32AM |
Registered: 8 years ago Posts: 3,525 |
Hi looks interesting. But one comment - the belt clips on the scalu are very easy to use and tension, compared to any other printer I've used so I really like them. Re-engineering this part seems to me to be possibly a waste of energy and an increase in complexity unless your design tensions all four belt fixing points at the same time, this would be a real improvement.
The vertical rod arrangement seems fine the standard 40cm rods are quite stiff compared to the i3 with longer rods. I am curious - would vertical versus horizontal make any difference to the stability of the carriage? I could see the logic of using thicker rods or linear slides. I'm embarking on increasing the x dimension by 10cm to allow a 30x20 bed and planning on doing this the simplest way possible at first with just 4 longer 2020 extrusions and 2x50cm 8mm smooth rods.
Edited 1 time(s). Last edit at 04/27/2016 06:34AM by DjDemonD.
Simon Khoury
Co-founder of [www.precisionpiezo.co.uk] Accurate, repeatable, versatile Z-Probes
Published:Inventions
|
Re: Feedback needed for a Smartrapcore-compatible X Carriage (with symmetric/balanced tensioning mechanism) design April 27, 2016 08:37AM |
Registered: 9 years ago Posts: 1,035 |
For me the scalu clips were in the way of designing the printhead to attach to the carriage. I wanted by all means to have them inside the body of the carriage, to be as unobtrusive as possible.
I am not sure I understand your question but I believe this design conforms to your request as it only uses a single slider to tension the whole corexy stage. Many people prefer though two screws for individually adjusting the two belts to match the "pitch" when pinching them like a guitar string but if the frame is square and the belts are equal in length then a single tensioning mechanism should do the job without trying to have the two belts equally tensioned.
Edited 1 time(s). Last edit at 04/27/2016 08:38AM by realthor.
RepRap Lander concept on Concept Forge
RepRap Lander concept on RepRap Forums
My Things, mostly experimental stuff
|
Re: Feedback needed for a Smartrapcore-compatible X Carriage (with symmetric/balanced tensioning mechanism) design April 27, 2016 10:13AM |
Registered: 8 years ago Posts: 3,525 |
That's really what I'm getting at, getting the two belts equally tensioned is a bit of a fiddle and this mechanism should encouraged both belts to naturally be at the same tension. So if that is the case I like it.
Simon Khoury
Co-founder of [www.precisionpiezo.co.uk] Accurate, repeatable, versatile Z-Probes
Published:Inventions
Simon Khoury
Co-founder of [www.precisionpiezo.co.uk] Accurate, repeatable, versatile Z-Probes
Published:Inventions
|
Re: Feedback needed for a Smartrapcore-compatible X Carriage (with symmetric/balanced tensioning mechanism) design April 27, 2016 10:50AM |
Registered: 8 years ago Posts: 3,525 |
Been looking at the design more closely, if the left and right belt tensioners are connected to the carriage by one long bolt - what stops the carriage slewing left and right as the belts change direction, let's say on a pure x move, assuming the tensioner are not at full tension and the bolt is not fully tightened?
Edit - okay I asked a silly question, now that I'm looking at the STL. Printing it now so will give it a try when I rebuild the machine.
Edited 1 time(s). Last edit at 04/27/2016 04:24PM by DjDemonD.
Simon Khoury
Co-founder of [www.precisionpiezo.co.uk] Accurate, repeatable, versatile Z-Probes
Published:Inventions
|
Re: Feedback needed for a Smartrapcore-compatible X Carriage (with symmetric/balanced tensioning mechanism) design April 27, 2016 03:58PM |
Registered: 9 years ago Posts: 1,035 |
I'm sorry english isn't my first language I'm not getting what you're saying...
Edit: ohh.. I think i got it: On the right-side the belt clips are fixed to the carriage, so the bolt is fixed to the carriage itself, the only slide is the one on the left. Because the belts go round the plane, on one side you get one end of both belts, hence you are tensioning both belts at the same time.
Edited 2 time(s). Last edit at 04/27/2016 04:12PM by realthor.
RepRap Lander concept on Concept Forge
RepRap Lander concept on RepRap Forums
My Things, mostly experimental stuff
|
Re: Feedback needed for a Smartrapcore-compatible X Carriage (with symmetric/balanced tensioning mechanism) design April 27, 2016 04:25PM |
Registered: 8 years ago Posts: 3,525 |
See edit above. My mistake.
Simon Khoury
Co-founder of [www.precisionpiezo.co.uk] Accurate, repeatable, versatile Z-Probes
Published:Inventions
Simon Khoury
Co-founder of [www.precisionpiezo.co.uk] Accurate, repeatable, versatile Z-Probes
Published:Inventions
|
Re: Feedback needed for a Smartrapcore-compatible X Carriage (with symmetric/balanced tensioning mechanism) design April 27, 2016 05:05PM |
Registered: 9 years ago Posts: 1,035 |
Quote
DjDemonD
Printing it now so will give it a try when I rebuild the machine.
Fingers crossed
 ... I didn't think anybody will print it before I do and post some pictures of it. I am unsure about the LM8UUs snap inside their locations...well... you'll let me know whatever changes you notice that are needed and I will modify the design accordingly.
RepRap Lander concept on Concept Forge
RepRap Lander concept on RepRap Forums
My Things, mostly experimental stuff
|
Re: Feedback needed for a Smartrapcore-compatible X Carriage (with symmetric/balanced tensioning mechanism) design April 27, 2016 05:18PM |
Registered: 8 years ago Posts: 3,525 |
I had to run the model through netfabb online as there were some unconnected areas but it fixed it very easily.
I printed the tensioner so far.
The only issue is that the lower edges are very thin so have a very small contact area with the bed, initially they were being knocked off the bed before they were joined to the main body of the part, so I cut approximately 0.5mm off the lower edge, to allow for slightly more contact. The belt grip seems to have printed well and does hold a belt nicely.
I haven't the time to print the carriage body now although I'd really like to, but its academic as I am not able to fit it to the machine for at least a week or two.
I am sure it will be greatly appreciated its a good design improvement on the original part.
Simon Khoury
Co-founder of [www.precisionpiezo.co.uk] Accurate, repeatable, versatile Z-Probes
Published:Inventions
I printed the tensioner so far.

The only issue is that the lower edges are very thin so have a very small contact area with the bed, initially they were being knocked off the bed before they were joined to the main body of the part, so I cut approximately 0.5mm off the lower edge, to allow for slightly more contact. The belt grip seems to have printed well and does hold a belt nicely.
I haven't the time to print the carriage body now although I'd really like to, but its academic as I am not able to fit it to the machine for at least a week or two.
I am sure it will be greatly appreciated its a good design improvement on the original part.
Simon Khoury
Co-founder of [www.precisionpiezo.co.uk] Accurate, repeatable, versatile Z-Probes
Published:Inventions
|
Re: Feedback needed for a Smartrapcore-compatible X Carriage (with symmetric/balanced tensioning mechanism) design April 27, 2016 05:25PM |
Registered: 9 years ago Posts: 1,035 |
I would have printed that with a brim but 0.5mm cut off is no big deal. Good news it came out nicely. The Nut should be heat-pressed though.
Regarding the body give me until next week to double-triple check it and make the necessary -if needed- adjustments, especially with the tolerances and clearance between the slide and the carriage, but also with the snap-fit of the lower bearings. These days it's Easter around here and being an important Holyday we're kind of caught in other specific activities, so I will have more time next week to check that.
So I guess I'll have to release about all the parts connecting to the carriage itself. That will be a challenge because I don't exactly know what you guys use as I have designed the hotend mount for two hotends. But if you tell me what you need I am sure I can put something together.
Edited 1 time(s). Last edit at 04/27/2016 05:29PM by realthor.
RepRap Lander concept on Concept Forge
RepRap Lander concept on RepRap Forums
My Things, mostly experimental stuff
|
Re: Feedback needed for a Smartrapcore-compatible X Carriage (with symmetric/balanced tensioning mechanism) design April 27, 2016 05:32PM |
Registered: 8 years ago Posts: 3,525 |
I did print it with a brim but I'm using a 0.3mm nozzle, so the first layer essentially just one 0.3mm width of filament, is too small in ABS not to be snapped off by torsion as the head fills in the layers above it. It think it would help to rotate the infill 45 degrees to reduce the moment on the first layer.
Simon Khoury
Co-founder of [www.precisionpiezo.co.uk] Accurate, repeatable, versatile Z-Probes
Published:Inventions
Simon Khoury
Co-founder of [www.precisionpiezo.co.uk] Accurate, repeatable, versatile Z-Probes
Published:Inventions
|
Re: Feedback needed for a Smartrapcore-compatible X Carriage (with symmetric/balanced tensioning mechanism) design April 27, 2016 05:37PM |
Registered: 8 years ago Posts: 3,525 |
The hot end mount should be reasonably easy. I've done a number of modifications to the Smartfriendz hot end mounts as they are a little weak, so adapting something to fit through the mounting holes you have placed in the carriage body should be easy enough. This is the basic part I modified [www.thingiverse.com].
Simon Khoury
Co-founder of [www.precisionpiezo.co.uk] Accurate, repeatable, versatile Z-Probes
Published:Inventions
Simon Khoury
Co-founder of [www.precisionpiezo.co.uk] Accurate, repeatable, versatile Z-Probes
Published:Inventions
|
Re: Feedback needed for a Smartrapcore-compatible X Carriage (with symmetric/balanced tensioning mechanism) design April 27, 2016 05:39PM |
Registered: 9 years ago Posts: 1,035 |
Quote
DjDemonD
I had to run the model through netfabb online as there were some unconnected areas but it fixed it very easily.
I keep the model in separate pieces in CAD so I can easily modify so running it through a STL cleaning service is needed so it "glues" everything together. I will make a note on thingiverse in case any other daring soul wants to print it
.RepRap Lander concept on Concept Forge
RepRap Lander concept on RepRap Forums
My Things, mostly experimental stuff
|
Re: Feedback needed for a Smartrapcore-compatible X Carriage (with symmetric/balanced tensioning mechanism) design April 28, 2016 06:23PM |
Registered: 8 years ago Posts: 3,525 |
Okay printed it with slic3r 0.2mm layer height with overhang threshold 5 for support, so fairly minimal. Printed just fine.
Will try it as soon as I get chance. Need some LM8UU bearings, as the smartrapcore uses the longer type.
Simon Khoury
Co-founder of [www.precisionpiezo.co.uk] Accurate, repeatable, versatile Z-Probes
Published:Inventions
Will try it as soon as I get chance. Need some LM8UU bearings, as the smartrapcore uses the longer type.

Simon Khoury
Co-founder of [www.precisionpiezo.co.uk] Accurate, repeatable, versatile Z-Probes
Published:Inventions
|
Re: Feedback needed for a Smartrapcore-compatible X Carriage (with symmetric/balanced tensioning mechanism) design April 29, 2016 03:51AM |
Registered: 9 years ago Posts: 1,035 |
Looks good... I hope the bearings will snap into place easily, otherwise you might need to shave off some ABS (or sand) until they do.
Looking forward to seing it installed
RepRap Lander concept on Concept Forge
RepRap Lander concept on RepRap Forums
My Things, mostly experimental stuff
Looking forward to seing it installed
RepRap Lander concept on Concept Forge
RepRap Lander concept on RepRap Forums
My Things, mostly experimental stuff
|
Re: Feedback needed for a Smartrapcore-compatible X Carriage (with symmetric/balanced tensioning mechanism) design May 01, 2016 06:49AM |
Registered: 8 years ago Posts: 3,525 |
Okay so reading this thread [forums.reprap.org] I would agree that trying to keep the belts to the x carriage parallel is the right thing to do. There are more practical reasons as I said above, on the SCALU the belts will rub the x carriage ends using your version. They need to be 30mm apart as this is the OD of the bearing pulley sleeves.
I did a quick and dirty mashup in tinkercad (attached) to show you how it would need to be laid out if I wanted to just swap it into the SCALU.
Its obviously nowhere near as neat, but unless we resigned the x carriage ends and used much narrower pulley bearings (the spacing between the belts in your carriage is only 13.5mm) then the belts will not run parallel.
Simon Khoury
Co-founder of [www.precisionpiezo.co.uk] Accurate, repeatable, versatile Z-Probes
Published:Inventions
I did a quick and dirty mashup in tinkercad (attached) to show you how it would need to be laid out if I wanted to just swap it into the SCALU.
Its obviously nowhere near as neat, but unless we resigned the x carriage ends and used much narrower pulley bearings (the spacing between the belts in your carriage is only 13.5mm) then the belts will not run parallel.

Simon Khoury
Co-founder of [www.precisionpiezo.co.uk] Accurate, repeatable, versatile Z-Probes
Published:Inventions
|
Re: Feedback needed for a Smartrapcore-compatible X Carriage (with symmetric/balanced tensioning mechanism) design May 01, 2016 01:24PM |
Registered: 9 years ago Posts: 1,035 |
The only belts that need to be parallel are the ones going to/exiting the X carriage. The belt side going from motor to idler can be arbitrarily routed. Of course the belts from the Y carriage to the X carriage need to be parallel as well.
I can have a SCALU-ready version by next week, maybe Tuesday or Wednesday uploaded to thingiverse. It won't be too much trouble, It was initially a 608 bearings version just as the smartrapcore uses but I designed it for bare 608, no sleeve, so 22mm-ish. I can easily buff that up to 30mm.
Gimme some time.
Edited 2 time(s). Last edit at 05/01/2016 01:29PM by realthor.
RepRap Lander concept on Concept Forge
RepRap Lander concept on RepRap Forums
My Things, mostly experimental stuff
|
Re: Feedback needed for a Smartrapcore-compatible X Carriage (with symmetric/balanced tensioning mechanism) design May 01, 2016 01:31PM |
Registered: 8 years ago Posts: 3,525 |
That's good I've been tinkering with the y slides to cut a bit away to allow conversion to f608zz I think s0me has done this with his.
I tried it once before but they fouled the y slide uprights and would have created an angle in the x section of the belts.
I'm reprinting all my parts in abs as an enclosure is on the cards once I've done my enlargement to 30x20 bed, so building in a few upgrades at this point makes sense. I really like the dual side balanced tensioning idea, as long as both belts are equal length it should work.
Edited 1 time(s). Last edit at 05/01/2016 01:36PM by DjDemonD.
Simon Khoury
Co-founder of [www.precisionpiezo.co.uk] Accurate, repeatable, versatile Z-Probes
Published:Inventions
|
Re: Feedback needed for a Smartrapcore-compatible X Carriage (with symmetric/balanced tensioning mechanism) design May 02, 2016 08:37AM |
Registered: 9 years ago Posts: 1,035 |
Did a quick edit on the current design. Let me know how you find it. I haven't worked much on the appearance side... mostly functional for now. I managed to limit the widening of the whole thing by having the belts insert into the toothed side from the outside so I guess the impact on the size is minimal.
Edit: new pic and STL uploaded (improved design to accept the Dual-Bowden Mount of SCOUTcorexy, narrow tolerances for bearings holes -now all holes have the same tolerances).
Edited 3 time(s). Last edit at 05/04/2016 05:04AM by realthor.
RepRap Lander concept on Concept Forge
RepRap Lander concept on RepRap Forums
My Things, mostly experimental stuff
|
Re: Feedback needed for a Smartrapcore-compatible X Carriage (with symmetric/balanced tensioning mechanism) design May 03, 2016 03:52AM |
Registered: 8 years ago Posts: 3,525 |
Looks good will certainly give it a try soon.
Simon Khoury
Co-founder of [www.precisionpiezo.co.uk] Accurate, repeatable, versatile Z-Probes
Published:Inventions
Simon Khoury
Co-founder of [www.precisionpiezo.co.uk] Accurate, repeatable, versatile Z-Probes
Published:Inventions
|
Re: Feedback needed for a Smartrapcore-compatible X Carriage (with symmetric/balanced tensioning mechanism) design May 03, 2016 03:57AM |
Registered: 9 years ago Posts: 1,035 |
Quote
DjDemonD
Looks good will certainly give it a try soon.
Make sure you run it through netfabb or Co because I exported the STL from individual modules I use to quickly access and modify.
Let us know how it works out.
RepRap Lander concept on Concept Forge
RepRap Lander concept on RepRap Forums
My Things, mostly experimental stuff
|
Re: Feedback needed for a Smartrapcore-compatible X Carriage (with symmetric/balanced tensioning mechanism) design May 03, 2016 04:06AM |
Registered: 8 years ago Posts: 3,525 |
I think you can autofix from Thingiverse now, they introduced a new app plugin.
Simon Khoury
Co-founder of [www.precisionpiezo.co.uk] Accurate, repeatable, versatile Z-Probes
Published:Inventions
Simon Khoury
Co-founder of [www.precisionpiezo.co.uk] Accurate, repeatable, versatile Z-Probes
Published:Inventions
|
Re: Feedback needed for a Smartrapcore-compatible X Carriage (with symmetric/balanced tensioning mechanism) design May 03, 2016 09:58AM |
Registered: 9 years ago Posts: 1,035 |
Quote
DjDemonD
I think you can autofix from Thingiverse now, they introduced a new app plugin.
Yes it seems so. I haven't noticed it before
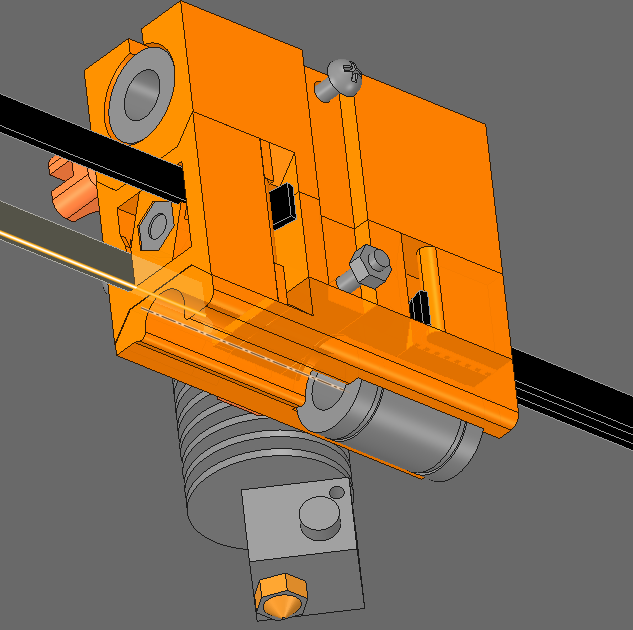
.On a not-very-unrelated-note, I have uploaded to thingiverse the dual hotend mount that goes with this X Carriage (has the back rail that gors into the carriage's groove/etc) and also the second half that clamps the hotends together. This second half ca be re-designed at will to be whatever shape you need it to be. I have uploaded a version that holds a 12mm probe. Check it out at: http://www.thingiverse.com/thing:1536588

Oh, BTW your pictures are on thingiverse, thanks for allowing me to post them (http://www.thingiverse.com/thing:1505842)
Also I have EDITED my above post with new pic and new STL (slightly modified - I brought it inline with my current design so that if I change something the change is reflected to the 30mm wide version too). It can also accommodate the Dual-Bowden setup that my current design uses, without having the extra wide sides interfere with the hotends:

Edited 5 time(s). Last edit at 05/03/2016 12:41PM by realthor.
RepRap Lander concept on Concept Forge
RepRap Lander concept on RepRap Forums
My Things, mostly experimental stuff
|
Re: Feedback needed for a Smartrapcore-compatible X Carriage (with symmetric/balanced tensioning mechanism) design May 15, 2016 01:11PM |
Registered: 9 years ago Posts: 1,035 |
@DjDemonD: your request to have symmetric (modular) X Carriage is a tough one. I have sacrificed one bearing in order to be able to squeeze in the slider/tensioner. Having a similar approach in the other side of the carriage is proving more challenging that I have thought...
I'll come back if I have a good idea (for now the solution would be to raise up both belts but that would screw up my whole SCOUTcorexy design -as I want to maintain compatibility). I also believe that raising the belts up (lowering them in your case I think, as you have the carriage with the single bearing at the top) would screw your arrangement too.
RepRap Lander concept on Concept Forge
RepRap Lander concept on RepRap Forums
My Things, mostly experimental stuff
|
Re: Feedback needed for a Smartrapcore-compatible X Carriage (with symmetric/balanced tensioning mechanism) design May 15, 2016 01:13PM |
Registered: 8 years ago Posts: 3,525 |
Okay thats fine as long as there are a few versions with different widths between the belts that work for different corexy versions. I might get chance tonight to fit the part to my Scalu printer. I haven't printed a hot end mount yet but I can do so soon.
Can at least see how well the tensioning works, I've made sure my two belts are exactly the same length to make assembling it easy.
Edited 1 time(s). Last edit at 05/15/2016 01:14PM by DjDemonD.
Simon Khoury
Co-founder of [www.precisionpiezo.co.uk] Accurate, repeatable, versatile Z-Probes
Published:Inventions
|
Re: Feedback needed for a Smartrapcore-compatible X Carriage (with symmetric/balanced tensioning mechanism) design May 15, 2016 01:39PM |
Registered: 9 years ago Posts: 1,035 |
Frankly the smaller the bearings on the Y axis the better actually ... so I would only go from 608s downwards.
You say you use 608s which means that the belts are not parallel going into the inner slot (which is tailored for F604ZZ). You should actually print my current design (http://www.thingiverse.com/thing:1505842) because that one is 608 size on the outside and F604ZZ on the inside slots.
I don't know how many sizes are there but I believe these two sizes are pretty much enough (+ the one i did at your request, which is for the sleeved 608s). Please let me know what size do you think are needed and I can check if I can accommodate.
Edit: your request actually got me thinking harder and I just might find a way to have a symmetrical design (both sides modular) and recover the lost space for the 4th bearing. This might be a win-win.
BTW it would be interesting to see how it performs with three bearings compared to 4 on the same printer...
Edited 1 time(s). Last edit at 05/15/2016 01:55PM by realthor.
RepRap Lander concept on Concept Forge
RepRap Lander concept on RepRap Forums
My Things, mostly experimental stuff
|
Re: Feedback needed for a Smartrapcore-compatible X Carriage (with symmetric/balanced tensioning mechanism) design May 15, 2016 02:34PM |
Registered: 8 years ago Posts: 3,525 |
Modular both sides might work with a captive nut somewhere in the middle to prevent the belt clips moving within the carriage.
Simon Khoury
Co-founder of [www.precisionpiezo.co.uk] Accurate, repeatable, versatile Z-Probes
Published:Inventions
Simon Khoury
Co-founder of [www.precisionpiezo.co.uk] Accurate, repeatable, versatile Z-Probes
Published:Inventions
|
Re: Feedback needed for a Smartrapcore-compatible X Carriage (with symmetric/balanced tensioning mechanism) design May 15, 2016 03:51PM |
Registered: 9 years ago Posts: 1,035 |
Done. Actually I have cleaned a lot of the previous inconsistencies, + re-gained the 4th bearing. The only worry I have is that it can be too thin at the bearing block wall to hold them properly when snapped in:
The belt grippers are perfectly symmetrical so it will be easy for me to modify it to requested widths. I will print one of them in the same piece with the carriage body as I only need one slider, but I've put a nut recess so that if you want to print them independently you can fix one to the carriage's body as explained before.
Attached the STL with both variants. I can provide the CAD too (format RSDOC - DesignSpark Mechanical).
Let me know what you think.
Edited 1 time(s). Last edit at 05/15/2016 03:54PM by realthor.
RepRap Lander concept on Concept Forge
RepRap Lander concept on RepRap Forums
My Things, mostly experimental stuff
|
Re: Feedback needed for a Smartrapcore-compatible X Carriage (with symmetric/balanced tensioning mechanism) design May 15, 2016 04:26PM |
Registered: 8 years ago Posts: 3,525 |
That looks really good just have to find the time to print it and try it.
Simon Khoury
Co-founder of [www.precisionpiezo.co.uk] Accurate, repeatable, versatile Z-Probes
Published:Inventions
Simon Khoury
Co-founder of [www.precisionpiezo.co.uk] Accurate, repeatable, versatile Z-Probes
Published:Inventions
|
Re: Feedback needed for a Smartrapcore-compatible X Carriage (with symmetric/balanced tensioning mechanism) design May 16, 2016 02:02AM |
Registered: 9 years ago Posts: 1,035 |
Design uploaded to thingiverse: [www.thingiverse.com]
Also included the 30mm @Smartrapcore ALU module.
Edited 1 time(s). Last edit at 05/16/2016 03:22AM by realthor.
RepRap Lander concept on Concept Forge
RepRap Lander concept on RepRap Forums
My Things, mostly experimental stuff
Also included the 30mm @Smartrapcore ALU module.
Edited 1 time(s). Last edit at 05/16/2016 03:22AM by realthor.
RepRap Lander concept on Concept Forge
RepRap Lander concept on RepRap Forums
My Things, mostly experimental stuff
Sorry, only registered users may post in this forum.