Home
>
RepRap User Groups
>
Europe
>
Italy RepRap User Group - Gruppo RepRap Italia
>
Problemi e qualità di stampa
>
Topic
LCD full graphic reprapdiscount schermo blu
Posted by Powerthbe
|
LCD full graphic reprapdiscount schermo blu February 13, 2016 11:37AM |
Registered: 8 years ago Posts: 15 |
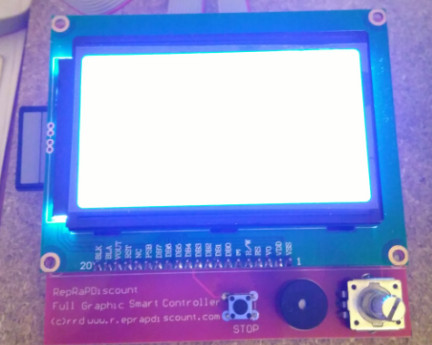
Buongiorno ragazzi, vi scrivo per un problema con lo schermo LCD full graphic di reprap discount che ho appena preso.
Premetto che ho cercato sul forum soluzione al mio problema ma non l'ho trovata.
Ho una prusa R2 by NicolaP con firmware marlinkimbra preconfigurato per driver DRV8825 scaricato dal suo configuratore.
Ho appena preso lo schermo LCD full graphic di reprap discount, appena installato e connesso mi ha fatto un suono acuto tipo allarme di macchina cosi ho spento e scambiato i due connettori in dotazione e non ha più fatto tale suono. Poi ho aperto arduino, caricato la libreria U8glib, aperto il firmware marlin, ed incluso la libreria appena caricata. Poi sono andato nelle impostazioni del configuration.h e ho commentato la riga
//#define G3D_PANEL
e decommentato quella
#define REPRAP_DISCOUNT_FULL_GRAPHIC_SMART_CONTROLLER
oltre che
#define SDSUPPORT // Enable SD Card Support in Hardware Console
ed infine caricato il tutto. Non mi ha dato problemi ma ho lo schermo tutto blu. Inoltre ho letto che ci dovrebbe essere un potenziometro se fosse solo un problema di contrasto ma non ho trovato nulla.
Mi potete aiutare?
allego una foto dello schermo ed il configuration.h, e di un errore del repetier
#include #ifndef CONFIGURATION_H #define CONFIGURATION_H // This configuration file contains basic settings. Select your: // - board type // - Mechanism type (cartesian-corexy-delta-scara) // - temperature sensor type // // Mechanisms-settings can be found in configuration_xxxxxx.h // Advanced settings can be found in Configuration_adv.h #include "boards.h" // Choose your board type. // Either an numeric ID or name defined in boards.h is valid. // See: [github.com] #define MOTHERBOARD BOARD_RAMPS_13_HFB // User-specified version info of this build to display in [Pronterface, etc] terminal window during // startup. Implementation of an idea by Prof Braino to inform user that any changes made to this // build by the user have been successfully uploaded into firmware. #define STRING_VERSION "4.1.2" #define STRING_URL "reprap.org" #define STRING_VERSION_CONFIG_H __DATE__ " " __TIME__ // build date and time #define STRING_CONFIG_H_AUTHOR "(none, default config)" // Who made the changes. #define STRING_SPLASH_LINE1 "v" STRING_VERSION // will be shown during bootup in line 1 #define STRING_SPLASH_LINE2 STRING_VERSION_CONFIG_H // will be shown during bootup in line 2 // SERIAL PORT selects which serial port should be used for communication with the host. // This allows the connection of wireless adapters (for instance) to non-default port pins. // Serial port 0 is still used by the Arduino bootloader regardless of this setting. #define SERIAL_PORT 0 // This determines the communication speed of the printer // 115200 - 250000 #define BAUDRATE 250000 // This enables the serial port associated to the Bluetooth interface on AT90USB devices //#define BTENABLED // Define this to set a unique identifier for this printer, (Used by some programs to differentiate between machines) // You can use an online service to generate a random UUID. (eg [www.uuidgenerator.net]) //#define MACHINE_UUID "00000000-0000-0000-0000-000000000000" // If you want test the firmware uncomment below. Use Serial arduino monitor... //#define FIRMWARE_TEST // ONLY BAUDRATE 115200 //=========================================================================== //============================ User Interfaces ============================== //=========================================================================== //==============================LCD and SD support============================= // Choose ONE of these 3 charsets. This has to match your hardware. Ignored for full graphic display. // To find out what type you have - compile with (test) - upload - click to get the menu. You'll see two typical lines from the upper half of the charset. // See also documentation/LCDLanguageFont.md #define DISPLAY_CHARSET_HD44780_JAPAN // this is the most common hardware //#define DISPLAY_CHARSET_HD44780_WESTERN //#define DISPLAY_CHARSET_HD44780_CYRILLIC //#define ULTRA_LCD //general LCD support, also 16x2 //#define DOGLCD // Support for SPI LCD 128x64 (Controller ST7565R graphic Display Family) #define SDSUPPORT // Enable SD Card Support in Hardware Console //#define SDSLOW // Use slower SD transfer mode (not normally needed - uncomment if you're getting volume init error) //#define SD_CHECK_AND_RETRY // Use CRC checks and retries on the SD communication //#define ENCODER_PULSES_PER_STEP 1 // Increase if you have a high resolution encoder //#define ENCODER_STEPS_PER_MENU_ITEM 5 // Set according to ENCODER_PULSES_PER_STEP or your liking //#define ULTIMAKERCONTROLLER //as available from the Ultimaker online store. //#define ULTIPANEL //the UltiPanel as on Thingiverse //#define LCD_FEEDBACK_FREQUENCY_DURATION_MS 100 // the duration the buzzer plays the UI feedback sound. ie Screen Click //#define LCD_FEEDBACK_FREQUENCY_HZ 1000 // this is the tone frequency the buzzer plays when on UI feedback. ie Screen Click // 0 to disable buzzer feedback. Test with M300 S P // PanelOne from T3P3 (via RAMPS 1.4 AUX2/AUX3) // [reprap.org] //#define PANEL_ONE // The MaKr3d Makr-Panel with graphic controller and SD support // [reprap.org] //#define MAKRPANEL // The Panucatt Devices Viki 2.0 and mini Viki with Graphic LCD // [panucatt.com] // ==> REMEMBER TO INSTALL U8glib to your ARDUINO library folder: [code.google.com] //#define VIKI2 //#define miniVIKI // The RepRapDiscount Smart Controller (white PC// [reprap.org] //#define REPRAP_DISCOUNT_SMART_CONTROLLER // The GADGETS3D G3D LCD/SD Controller (blue PC
|
Re: LCD full graphic reprapdiscount schermo blu February 21, 2016 02:09PM |
Registered: 8 years ago Posts: 15 |

|
Re: LCD full graphic reprapdiscount schermo blu February 23, 2016 03:03AM |
Registered: 10 years ago Posts: 6,409 |
Problemi di cavi.. Non vede la sd e non vede il display, mi viene da pensare cavi invertiti...
COMPRA ITALIANO - sostieni le nostre aziende - sostieni la nostra gente - sostieni il tuo popolo - sosterrai te stesso.
Alberto C. felice possessore di una Kossel K2
My Blog - My Thingiverse
COMPRA ITALIANO - sostieni le nostre aziende - sostieni la nostra gente - sostieni il tuo popolo - sosterrai te stesso.
Alberto C. felice possessore di una Kossel K2
My Blog - My Thingiverse
|
Re: LCD full graphic reprapdiscount schermo blu March 27, 2016 06:47PM |
Registered: 8 years ago Posts: 1 |
|
Re: LCD full graphic reprapdiscount schermo blu April 11, 2016 11:00AM |
Registered: 8 years ago Posts: 1 |
|
Re: LCD full graphic reprapdiscount schermo blu May 02, 2016 01:05PM |
Registered: 8 years ago Posts: 1 |
Un cordialissimo saluto a tutti gli hobbysti del CNC.
dea90 dice:
per risolvere il problema bisogna tagliare via il dentino sul connettore e collegarli al contrario
Se avessi un euro per ogni persona che ha il problema del: non vedo niente e fischia soltanto- sarei un milionario.
Anche io sono nella lista del non vedo niente.
Hardware in mio possesso Arduino mega 2560 + Ultimaker 1.5.7 con cavetti e connettori + full graphic smart controller.
Ho caricato diversi firmware marlin, senza ottenere nulla, ho caricato il firmware in formato HEX, quindi
già compilato, così da poter escludere anche gli errori dovuti a compilazione sbagliata.
TOTALE: niente di niente.
Ora, in base a ciò che propone dea90, vorrei sapere a quanti, questo sistema, ha funzionato.
Se funziona, mi chiedo il perché la casa produttrice ha cablato i connettori a rovescio e perché la stessa
casa costruttrice non si è preoccupata di avvisare gli utenti indirizzandoli verso questa semplicissima soluzione.
Ora rimango in attesa di qualcuno che sapendone più di me abbia la disponibilità a sviscerare questo penoso argomento.
Un grazie di cuore a quanti vorranno scrivere qualche appunto anche se non si tratta di una soluzione totale.
Un generoso abbraccione a tutti voi + una stritolata di metacarpo e falangi.
Maurizio alias miomao
|
Re: LCD full graphic reprapdiscount schermo blu March 09, 2018 02:05AM |
Registered: 6 years ago Posts: 31 |
finalmente sono riuscito a far funzionare il mio lcd su una scheda MKS gen L v1.0 grazie a dea90 . Per Powerthbe , prova a deccomentare la riga:
#define DISPLAY_CHARSET_HD44780_JAPAN . Poi bisogna limare il dentino sui due connettori ed inserirli al contrario sulla scheda. Dimenticavo io uso il firmware marlin originale.Comunque ho deccomentato come tutti le solite righe.
#define SDSUPPORT
#define ULTRA_LCD
#define DOGLCD
#define SDSUPPORT
#define REPRAP_DISCOUNT_FULL_GRAPHIC_SMART_CONTROLLER
poi per la lingua in italiano:
#define LCD_LANGUAGE it
Edited 4 time(s). Last edit at 03/09/2018 02:12AM by obelix58.
Sorry, only registered users may post in this forum.