Home
>
RepRap User Groups
>
Europe
>
Italy RepRap User Group - Gruppo RepRap Italia
>
GCODE, Software e Firmware
>
Topic
prima installazione mk4duo su i3 pro w
Posted by jagger75
|
prima installazione mk4duo su i3 pro w April 25, 2020 06:16PM |
Registered: 4 years ago Posts: 29 |
eccomi qui fresco fresco della mia prima compilazione online del mio (forse)mk4duo
allora ho scelto versione v.4.4.0 compilato tutto quanto tramite vecchio configuration.h del vecchio marlin 1.1.9
scaricato /decompresso/
installato adruino ide 1.8.12
eseguito warning posizionato in nessuno nella pagina impostazioni
aprto il file mk4duo.ino
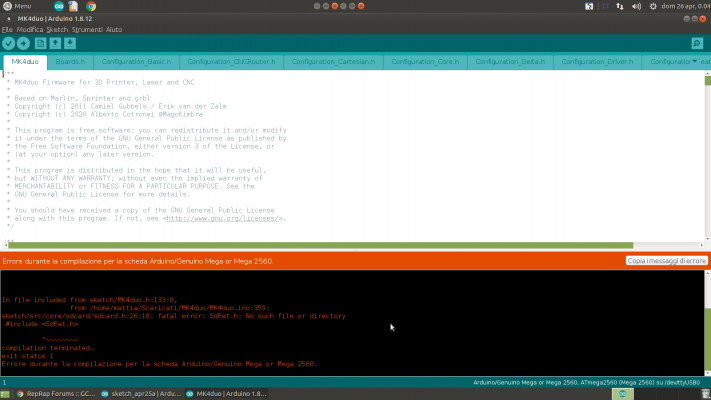
varifica = primo problema mi dice
come scheda in arduini ide ho messo "arduino/genuino mega or mega 2560"
come processore atmega2560
come programmatore avisp mkll
insomma tutto come se dovessi caricare qualsiais firmware
ho letto da qualche parte su qui che un utente con lo stesso problema ha dovuto ipostare come scheda la ultimaker se non sbgalio ma impostarla in arduino o nel configuratore online?oppure nn centra nulla?
anche perche impostando ultimaker dovrebbe sballare tutti i sensori o sbaglio?
|
Re: prima installazione mk4duo su i3 pro w April 25, 2020 06:56PM |
Registered: 10 years ago Posts: 6,409 |
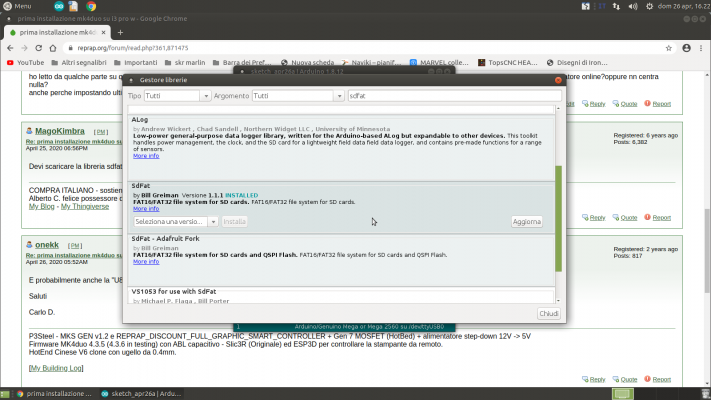
Devi scaricare la libreria sdfat come c'è scritto sul configuratore a destra dell'opzione SD.
COMPRA ITALIANO - sostieni le nostre aziende - sostieni la nostra gente - sostieni il tuo popolo - sosterrai te stesso.
Alberto C. felice possessore di una Kossel K2
My Blog - My Thingiverse
COMPRA ITALIANO - sostieni le nostre aziende - sostieni la nostra gente - sostieni il tuo popolo - sosterrai te stesso.
Alberto C. felice possessore di una Kossel K2
My Blog - My Thingiverse
|
Re: prima installazione mk4duo su i3 pro w April 26, 2020 05:52AM |
Registered: 6 years ago Posts: 1,059 |
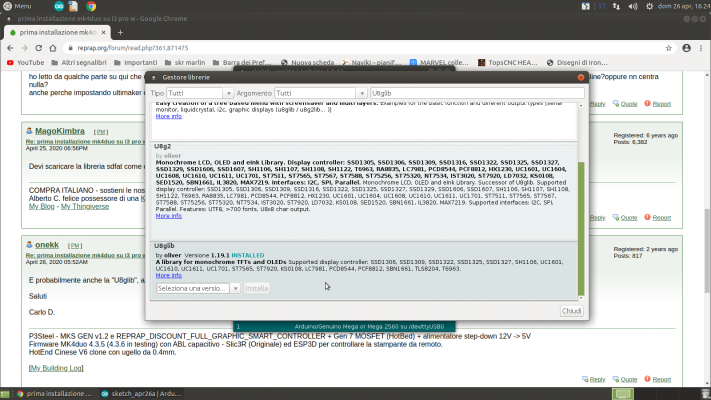
E probabilmente anche la "U8glib", altrimenti non compila, ho provato ieri con un arduino "fresco di installazione", e mi ha richiesto anche quella.
Saluti
Carlo D.
P3Steel - MKS GEN v1.2 e REPRAP_DISCOUNT_FULL_GRAPHIC_SMART_CONTROLLER + Gen 7 MOSFET (HotBed) + alimentatore step-down 12V -> 5V
Firmware MK4duo 4.3.6 con ABL induttivo con LJ18A3 - Slic3R (Originale) ed ESP3D per controllare la stampante da remoto.
HotEnd Cinese V6 clone con ugello da 0.4mm.
[My Building Log]
|
Re: prima installazione mk4duo su i3 pro w April 26, 2020 10:33AM |
Registered: 4 years ago Posts: 29 |
salve
intendevate queste di librerie vero?
infatti mi ha chiesto anche la seconda
potreste farmi capire cortesemente dove devo leggere di specifico quello che mi chiede
adesso mi da questo errore e non capisco cosa dovrei capire
grazie per la pzienza
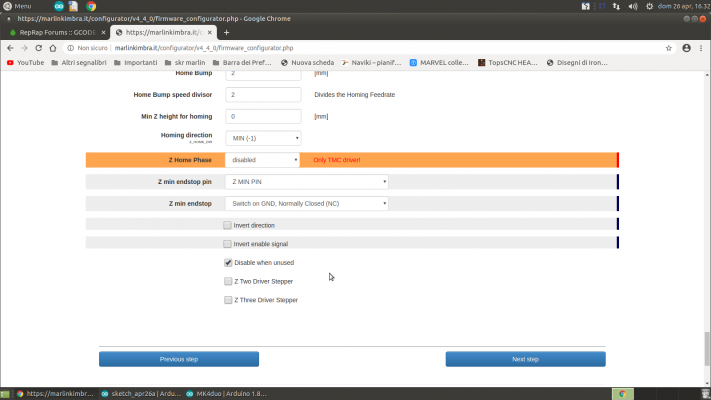
ultima domanda non so se ho sbagliato ma quando ho compilato online riguardo step ecc dell asse z dovevo dirgli che erano due motori?intendo qui dovevo fleggare two driver stepper ?o no?come fa a sapere che sono 2 i motori su z?
ho capito che è qualcos a che riguarda l m408 nella compilazione ma ho solo un flag da mettere ed era gia impostato
Edited 1 time(s). Last edit at 04/26/2020 10:46AM by jagger75.
intendevate queste di librerie vero?
infatti mi ha chiesto anche la seconda
potreste farmi capire cortesemente dove devo leggere di specifico quello che mi chiede
adesso mi da questo errore e non capisco cosa dovrei capire

Quote
Arduino:1.8.12 (Linux), Scheda:"Arduino/Genuino Mega or Mega 2560, ATmega2560 (Mega 2560)"
In file included from sketch/src/commands/../../src/platform/platform.h:35:0,
from sketch/src/commands/../../MK4duo.h:116,
from sketch/src/commands/commands.cpp:29:
sketch/src/commands/gcode/host/m408.h: In function 'void gcode_M408()':
sketch/src/commands/gcode/host/m408.h:146:37: error: 'i' was not declared in this scope
SERIAL_MV("{\"number\":", i + 1);
^
sketch/src/commands/../../src/platform/common/communication/communication.h:96:91: note: in definition of macro 'SERIAL_OUT'
if (Com::serial_port_index == -1 || Com::serial_port_index == 0) (void)MKSERIAL1.WHAT(V); \
^
sketch/src/commands/../../src/platform/common/communication/communication.h:122:61: note: in expansion of macro 'SERIAL_VAL'
#define SERIAL_MV(msg,val,V...) do{ SERIAL_MSG(msg); SERIAL_VAL(val, ##V); }while(0)
^~~~~~~~~~
sketch/src/commands/gcode/host/m408.h:146:11: note: in expansion of macro 'SERIAL_MV'
SERIAL_MV("{\"number\":", i + 1);
^~~~~~~~~
sketch/src/commands/gcode/host/m408.h:146:37: error: 'i' was not declared in this scope
SERIAL_MV("{\"number\":", i + 1);
^
sketch/src/commands/../../src/platform/common/communication/communication.h:97:91: note: in definition of macro 'SERIAL_OUT'
if (Com::serial_port_index == -1 || Com::serial_port_index == 1) (void)MKSERIAL2.WHAT(V); \
^
sketch/src/commands/../../src/platform/common/communication/communication.h:122:61: note: in expansion of macro 'SERIAL_VAL'
#define SERIAL_MV(msg,val,V...) do{ SERIAL_MSG(msg); SERIAL_VAL(val, ##V); }while(0)
^~~~~~~~~~
sketch/src/commands/gcode/host/m408.h:146:11: note: in expansion of macro 'SERIAL_MV'
SERIAL_MV("{\"number\":", i + 1);
^~~~~~~~~
In file included from sketch/src/commands/gcode/gcode.h:150:0,
from sketch/src/commands/commands.cpp:30:
sketch/src/commands/gcode/host/m408.h:153:24: error: 'i' was not declared in this scope
if (driver.e[i]) {
^
In file included from sketch/src/commands/../../src/platform/platform.h:35:0,
from sketch/src/commands/../../MK4duo.h:116,
from sketch/src/commands/commands.cpp:29:
sketch/src/commands/gcode/host/m408.h:176:57: error: 'class ToolManager' has no member named 'flow_percentage'
SERIAL_VAL(mechanics.position.e * toolManager.flow_percentage[e]);
^
sketch/src/commands/../../src/platform/common/communication/communication.h:96:91: note: in definition of macro 'SERIAL_OUT'
if (Com::serial_port_index == -1 || Com::serial_port_index == 0) (void)MKSERIAL1.WHAT(V); \
^
sketch/src/commands/gcode/host/m408.h:176:11: note: in expansion of macro 'SERIAL_VAL'
SERIAL_VAL(mechanics.position.e * toolManager.flow_percentage[e]);
^~~~~~~~~~
sketch/src/commands/gcode/host/m408.h:176:57: error: 'class ToolManager' has no member named 'flow_percentage'
SERIAL_VAL(mechanics.position.e * toolManager.flow_percentage[e]);
^
sketch/src/commands/../../src/platform/common/communication/communication.h:97:91: note: in definition of macro 'SERIAL_OUT'
if (Com::serial_port_index == -1 || Com::serial_port_index == 1) (void)MKSERIAL2.WHAT(V); \
^
sketch/src/commands/gcode/host/m408.h:176:11: note: in expansion of macro 'SERIAL_VAL'
SERIAL_VAL(mechanics.position.e * toolManager.flow_percentage[e]);
^~~~~~~~~~
sketch/src/commands/gcode/host/m408.h:274:32: error: 'e' was not declared in this scope
SERIAL_VAL(extruders[e]->data.max_feedrate_mm_s);
^
sketch/src/commands/../../src/platform/common/communication/communication.h:96:91: note: in definition of macro 'SERIAL_OUT'
if (Com::serial_port_index == -1 || Com::serial_port_index == 0) (void)MKSERIAL1.WHAT(V); \
^
sketch/src/commands/gcode/host/m408.h:274:11: note: in expansion of macro 'SERIAL_VAL'
SERIAL_VAL(extruders[e]->data.max_feedrate_mm_s);
^~~~~~~~~~
sketch/src/commands/gcode/host/m408.h:274:32: error: 'e' was not declared in this scope
SERIAL_VAL(extruders[e]->data.max_feedrate_mm_s);
^
sketch/src/commands/../../src/platform/common/communication/communication.h:97:91: note: in definition of macro 'SERIAL_OUT'
if (Com::serial_port_index == -1 || Com::serial_port_index == 1) (void)MKSERIAL2.WHAT(V); \
^
sketch/src/commands/gcode/host/m408.h:274:11: note: in expansion of macro 'SERIAL_VAL'
SERIAL_VAL(extruders[e]->data.max_feedrate_mm_s);
^~~~~~~~~~
In file included from sketch/src/commands/gcode/gcode.h:150:0,
from sketch/src/commands/commands.cpp:30:
sketch/src/commands/gcode/host/m408.h:277:9: error: break statement not within loop or switch
break;
^~~~~
In file included from sketch/src/commands/../../src/platform/platform.h:35:0,
from sketch/src/commands/../../MK4duo.h:116,
from sketch/src/commands/commands.cpp:29:
sketch/src/commands/gcode/host/m408.h: At global scope:
sketch/src/commands/../../src/platform/common/communication/communication.h:95:33: error: expected unqualified-id before 'do'
#define SERIAL_OUT(WHAT,V...) do{ \
^
sketch/src/commands/../../src/platform/common/communication/communication.h:109:39: note: in expansion of macro 'SERIAL_OUT'
#define SERIAL_CHR(c) SERIAL_OUT(write, c)
^~~~~~~~~~
sketch/src/commands/gcode/host/m408.h:279:5: note: in expansion of macro 'SERIAL_CHR'
SERIAL_CHR('}');
^~~~~~~~~~
sketch/src/commands/../../src/platform/common/communication/communication.h:98:4: error: expected unqualified-id before 'while'
}while(0)
^
sketch/src/commands/../../src/platform/common/communication/communication.h:109:39: note: in expansion of macro 'SERIAL_OUT'
#define SERIAL_CHR(c) SERIAL_OUT(write, c)
^~~~~~~~~~
sketch/src/commands/gcode/host/m408.h:279:5: note: in expansion of macro 'SERIAL_CHR'
SERIAL_CHR('}');
^~~~~~~~~~
sketch/src/commands/../../src/platform/common/communication/communication.h:95:33: error: expected unqualified-id before 'do'
#define SERIAL_OUT(WHAT,V...) do{ \
^
sketch/src/commands/../../src/platform/common/communication/communication.h:109:39: note: in expansion of macro 'SERIAL_OUT'
#define SERIAL_CHR(c) SERIAL_OUT(write, c)
^~~~~~~~~~
sketch/src/commands/../../src/platform/common/communication/communication.h:110:39: note: in expansion of macro 'SERIAL_CHR'
#define SERIAL_EOL() SERIAL_CHR('\n')
^~~~~~~~~~
sketch/src/commands/gcode/host/m408.h:280:5: note: in expansion of macro 'SERIAL_EOL'
SERIAL_EOL();
^~~~~~~~~~
sketch/src/commands/../../src/platform/common/communication/communication.h:98:4: error: expected unqualified-id before 'while'
}while(0)
^
sketch/src/commands/../../src/platform/common/communication/communication.h:109:39: note: in expansion of macro 'SERIAL_OUT'
#define SERIAL_CHR(c) SERIAL_OUT(write, c)
^~~~~~~~~~
sketch/src/commands/../../src/platform/common/communication/communication.h:110:39: note: in expansion of macro 'SERIAL_CHR'
#define SERIAL_EOL() SERIAL_CHR('\n')
^~~~~~~~~~
sketch/src/commands/gcode/host/m408.h:280:5: note: in expansion of macro 'SERIAL_EOL'
SERIAL_EOL();
^~~~~~~~~~
In file included from sketch/src/commands/gcode/gcode.h:150:0,
from sketch/src/commands/commands.cpp:30:
sketch/src/commands/gcode/host/m408.h:281:3: error: expected declaration before '}' token
}
^
exit status 1
Errore durante la compilazione per la scheda Arduino/Genuino Mega or Mega 2560.
Questo report potrebbe essere più ricco di informazioni abilitando l'opzione
"
grazie per la pzienza
ultima domanda non so se ho sbagliato ma quando ho compilato online riguardo step ecc dell asse z dovevo dirgli che erano due motori?intendo qui dovevo fleggare two driver stepper ?o no?come fa a sapere che sono 2 i motori su z?
ho capito che è qualcos a che riguarda l m408 nella compilazione ma ho solo un flag da mettere ed era gia impostato
Edited 1 time(s). Last edit at 04/26/2020 10:46AM by jagger75.
|
Re: prima installazione mk4duo su i3 pro w April 26, 2020 12:33PM |
Registered: 10 years ago Posts: 6,409 |
M408 toglilo non serve...
Se hai due driver devi dire che hai due driver su Z, ma se hai due motori sullo stesso driver non devi dire nulla, sono in parallelo al fw non frega nulla...
COMPRA ITALIANO - sostieni le nostre aziende - sostieni la nostra gente - sostieni il tuo popolo - sosterrai te stesso.
Alberto C. felice possessore di una Kossel K2
My Blog - My Thingiverse
|
Re: prima installazione mk4duo su i3 pro w April 26, 2020 12:50PM |
Registered: 4 years ago Posts: 29 |
ottimo ottimo
verificato e caricato unico peroblema che finschia di scontinuo il buzzer ma credo di aver letto un post a riguardo ora controllo se posso risolvo e faccio tutte le rpove dovute
domanda: al primo avviamento parte e via oppure mi fa fare tutte le regolazioni dei pid automaticamente o le posso fare dopo ?
scusate non ritrovo il post sopra descritto
in pratica accendo la stampante e fischia di continuo
Edited 1 time(s). Last edit at 04/26/2020 01:20PM by jagger75.
|
Re: prima installazione mk4duo su i3 pro w April 26, 2020 04:15PM |
Registered: 4 years ago Posts: 29 |
eccomi qui dopo un po di prove in bianco sulla scheda ed lcd
ho due problemi fondamentali
1 appena si accende lcd parte un suono continuo per sempre
2 volevo mettere in silezioso o mute nel menu lcd ma non ho nessun modo di salvare non esiste salva in eeprom o qualsiasi cosa del genere
ho sbagliato qualcosa nella configurazione nella partr eeprom?
o cosa?
nel configuratore online non avevo abilitato eeprom basta quello oppure anche eeprom chitchat?cosa cambia l uno dall altro?
Edited 1 time(s). Last edit at 04/26/2020 04:19PM by jagger75.
|
Re: prima installazione mk4duo su i3 pro w April 26, 2020 04:41PM |
Registered: 4 years ago Posts: 29 |
|
Re: prima installazione mk4duo su i3 pro w April 26, 2020 04:44PM |
Registered: 4 years ago Posts: 29 |
ho letto questa discussione
[reprap.org]
possibile che debba cambiare scheda con una che non sia la mia?mi sembra strano che dite?
edit
allora ho reimpostato la mia scheda e tolto la spunta ad eeprom
lcd funziona di nuovo tutto nei movmenti
il suono persiste per sempre
mi manca la riga dove salvare le impostazioni es. salva in eeprom o simile
riedit
scusate i tanti edit ma aggionro contniuamnete durante delle prove
abilitata solo eeprom senza eeprom chitchat
lcd funziona tutto ok
riga salva impostazioni apparsa percio ok
rimane solo suono prolungato appena si accende lcd non smette mai di suonare
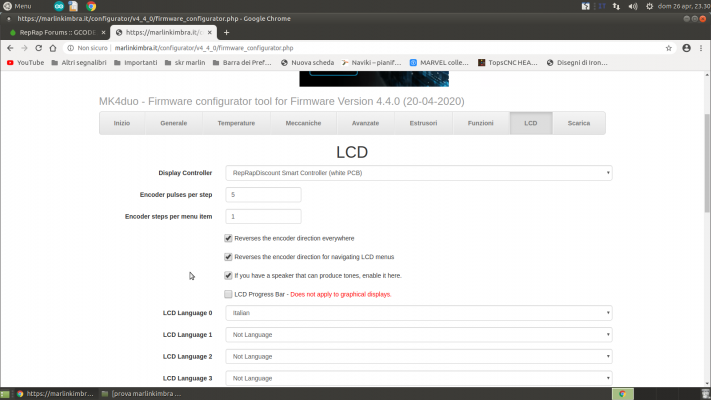
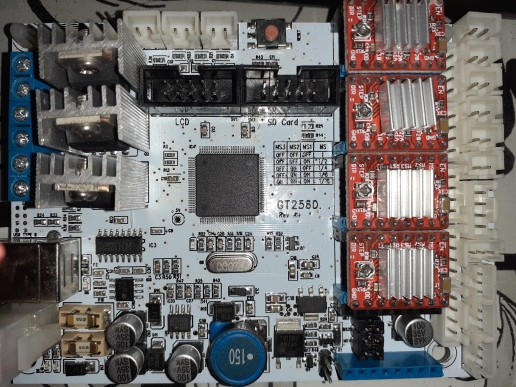
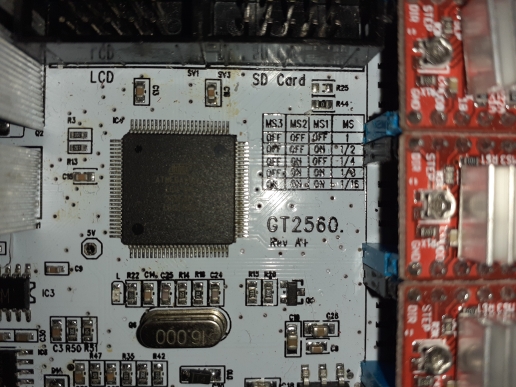
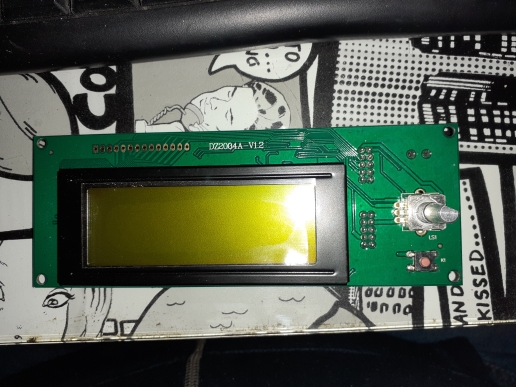
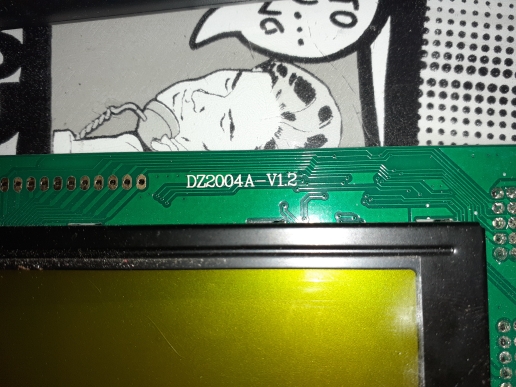
ho letto che poteva essere incompatibilità tra lcd e scheda ma è impossibile è tutta l elettronica della i3 pro w prima funzionava scheda gt2560 A+(percio impostato gt2560 A plus) e lcd 2004 della geetech percio impostato come da foto
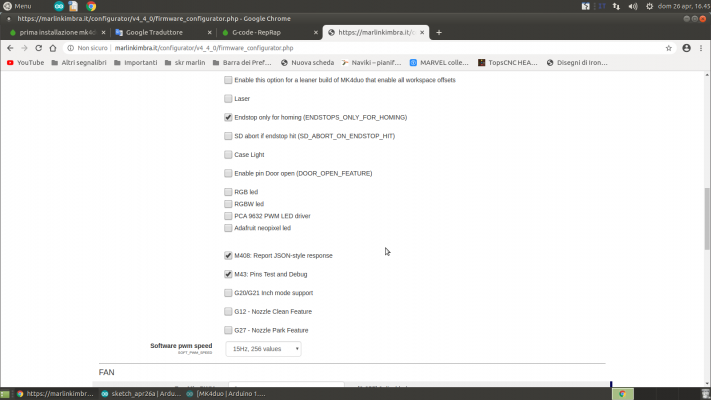
unico dubbio sul fleg in basso nella foto "If you have a speaker that can produce tones, enable it here."lo lascio fleggato?
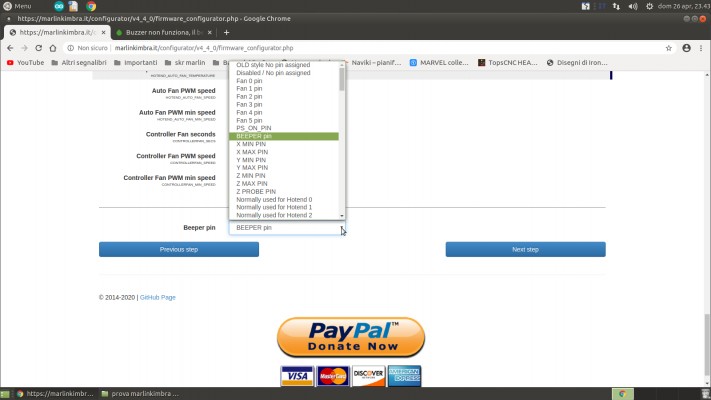
ultimo edit secondo questo pin beeeper dve rimanere o metto disablitato_?puo essere colpa sua?
Edited 3 time(s). Last edit at 04/26/2020 05:45PM by jagger75.
|
Re: prima installazione mk4duo su i3 pro w April 26, 2020 06:20PM |
Registered: 6 years ago Posts: 1,059 |
BEEPER = Buzzer piezo
Speaker è una cosa diversa, la scheda dovrebbe avere un BEEPER (per lo meno dalle definizioni delle board in boards 74 -75 -76 -86 dovrebbero essere quelle per le GT2560).
Saluti
Carlo D.
P3Steel - MKS GEN v1.2 e REPRAP_DISCOUNT_FULL_GRAPHIC_SMART_CONTROLLER + Gen 7 MOSFET (HotBed) + alimentatore step-down 12V -> 5V
Firmware MK4duo 4.3.6 con ABL induttivo con LJ18A3 - Slic3R (Originale) ed ESP3D per controllare la stampante da remoto.
HotEnd Cinese V6 clone con ugello da 0.4mm.
[My Building Log]
|
Re: prima installazione mk4duo su i3 pro w April 27, 2020 09:33AM |
Registered: 4 years ago Posts: 29 |
ehmm
scusa non ho capito bene
percio in teoria dovrei avere un beeper e percio su beeper pin metto "diasibiltato / no pin assegned" giusto?
oppure ho capito male?
vabbe provo e aggiorno il risultato
ecco messo beeper pin in disabilitato ma il fischio continua e viene dall lcd non dalla scheda cosi per info
idee al riguardo?
Edited 1 time(s). Last edit at 04/27/2020 09:47AM by jagger75.
scusa non ho capito bene
percio in teoria dovrei avere un beeper e percio su beeper pin metto "diasibiltato / no pin assegned" giusto?
oppure ho capito male?
vabbe provo e aggiorno il risultato

ecco messo beeper pin in disabilitato ma il fischio continua e viene dall lcd non dalla scheda cosi per info
idee al riguardo?
Edited 1 time(s). Last edit at 04/27/2020 09:47AM by jagger75.
|
Re: prima installazione mk4duo su i3 pro w April 27, 2020 11:37AM |
Registered: 6 years ago Posts: 1,059 |
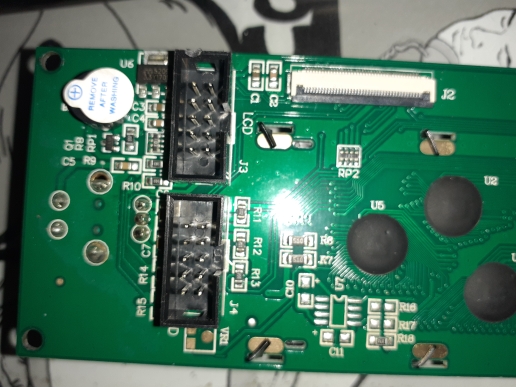
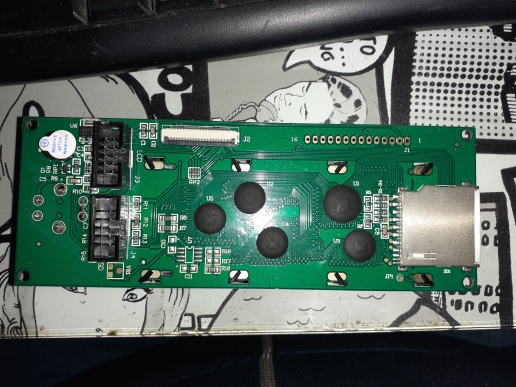
Che display, se puoi allega una foto e scrivi il modello?
Che scheda hai?
Non riesco a vedere queste informazioni, se ci sono sono un po' nascoste.
Il problema potrebbe essere che alcuni display sono progettati per funzionare con alcune schede anche se usando un connettore che "assomiglia ad altre", tipo i due connettori da 5+5 pin dei display RRD:
questo:
RRD Smart controller
ma anche questo:
MKS Oled
o il più diffuso:
https://reprap.org/wiki/RepRapDiscount_Full_Graphic_Smart_Controller
però la piedinatura è diversa e vanno configurati correttamente.
Il tuo è probabilmente uno di questi casi, alcuni produttori hanno display molto simili tra loro, ma hanno remixato le assegnazioni del connettore per motivi loro, e a volte un display non va bene con una scheda.
In genere le piedinature più diffuse che si trovano in giro sono quelle per il "RepRapDiscount Full Graphic Smart Controller", ma si vedono in giro schede che hanno già la su sulla mainboard e che ovviamente non hanno la necessità di averne una seconda sul display, e quasi altrettando ovviamente anche usando due connettori 5+5 usando connessioni proprietarie per il display, perciò o usi il loro o ti fai un adattatore, mettendo i fili al posto giusto.
Geetech
Qui dice che in teoria è compatibile con il 12864 però 12864 è genericamente il formato del dispaly (128x64 pixel) per cui vediamo.
Se mandi qualche info magari cerchiamo di risolvere.
Saluti
Carlo D.
Edited 1 time(s). Last edit at 04/27/2020 11:41AM by onekk.
P3Steel - MKS GEN v1.2 e REPRAP_DISCOUNT_FULL_GRAPHIC_SMART_CONTROLLER + Gen 7 MOSFET (HotBed) + alimentatore step-down 12V -> 5V
Firmware MK4duo 4.3.6 con ABL induttivo con LJ18A3 - Slic3R (Originale) ed ESP3D per controllare la stampante da remoto.
HotEnd Cinese V6 clone con ugello da 0.4mm.
[My Building Log]
|
Re: prima installazione mk4duo su i3 pro w April 27, 2020 12:29PM |
Registered: 4 years ago Posts: 29 |
anche tu hai ragione
ripeto funziona tutto (almeno credo finche non finisco di cablare i motori) unico problema rimasto suono continuo appena si accende il display e anche mentre navigo nel menu
ho provato amettere silenzioso e muto e salvare impostazioni ma niente ho tolto speaker(anche se non centra nulla ) ma niente
ho tolto beeper pin e messo disabilitato ma niente
tutto qui
presumo nella mia ignoranza anche io che dipenda da qualche pin perche se carico marlin non lo fa (ho fatto una prova)
Edited 1 time(s). Last edit at 04/27/2020 12:30PM by jagger75.
|
Re: prima installazione mk4duo su i3 pro w April 27, 2020 01:53PM |
Registered: 6 years ago Posts: 1,059 |
Il marlin è quello orginale della scheda?
Dal display non si capisce bene non si vedono marcature ma sembra quello:
RepRap discount smart controller
In fondo alla pagina trovi le impostazioni per il Marlin vecchio ma mi pare che siano le stesse in MK4Duo.
Prova a postare questa parte del tuo Configuration_Overall.h che vediamo come sono impostate dal configuratore
Nel caso anche il Configuration_Pins.h
che poi è il secondo file dove MK4Duo scrive le modifiche (un segreto ben custodito)
Ad occhio mi pare che bisogna fare una piccola modifica ma vediamo sembra manchi il
Nella definzione della scheda c'è ma è nella "Stanza" riservata al display grafico che non viene attivata dal define ULTIPANEL.
Saluti
Carlo D.
P3Steel - MKS GEN v1.2 e REPRAP_DISCOUNT_FULL_GRAPHIC_SMART_CONTROLLER + Gen 7 MOSFET (HotBed) + alimentatore step-down 12V -> 5V
Firmware MK4duo 4.3.6 con ABL induttivo con LJ18A3 - Slic3R (Originale) ed ESP3D per controllare la stampante da remoto.
HotEnd Cinese V6 clone con ugello da 0.4mm.
[My Building Log]
Dal display non si capisce bene non si vedono marcature ma sembra quello:
RepRap discount smart controller
In fondo alla pagina trovi le impostazioni per il Marlin vecchio ma mi pare che siano le stesse in MK4Duo.
#define ULTIPANEL
and
#define NEWPANEL //enable this if you have a click-encoder panel

Also change the value on define MOTHERBOARD to 33

in "pins.h" go to section for RAMPS configuration (search for MOTHERBOARD == 33)

 //STOP / KILL button
#define KILL_PIN 41 //[RAMPS14-SMART-ADAPTER]

 //lcd pins
#define LCD_PINS_RS 16 //[RAMPS14-SMART-ADAPTER]
#define LCD_PINS_ENABLE 17 //[RAMPS14-SMART-ADAPTER]
#define LCD_PINS_D4 23 //[RAMPS14-SMART-ADAPTER]
#define LCD_PINS_D5 25 //[RAMPS14-SMART-ADAPTER]
#define LCD_PINS_D6 27 //[RAMPS14-SMART-ADAPTER]
#define LCD_PINS_D7 29 //[RAMPS14-SMART-ADAPTER]

 //encoder pins
#define BTN_EN1 31 //[RAMPS14-SMART-ADAPTER]
#define BTN_EN2 33 //[RAMPS14-SMART-ADAPTER]
#define BTN_ENC 35 //[RAMPS14-SMART-ADAPTER]

 //beeper
#define BEEPER 37 //[RAMPS14-SMART-ADAPTER] / 37 = enabled; -1 = dissabled / (if you don't like the beep sound ;-)

 //SD card detect pin
#define SDCARDDETECT 49 //[RAMPS14-SMART-ADAPTER]
Prova a postare questa parte del tuo Configuration_Overall.h che vediamo come sono impostate dal configuratore
Nel caso anche il Configuration_Pins.h
che poi è il secondo file dove MK4Duo scrive le modifiche (un segreto ben custodito)
/*************************
 *   Configuration_LCD   *
 *************************/
#define LCD_LANGUAGE it
#define LCD_LANGUAGE_1 NO_LANGUAGE
#define LCD_LANGUAGE_2 NO_LANGUAGE
#define LCD_LANGUAGE_3 NO_LANGUAGE
#define LCD_LANGUAGE_4 NO_LANGUAGE
#define LCD_CHARSET_HD44780 JAPANESE
#define LCD_INFO_SCREEN_STYLE 0
//#define REPRAP_DISCOUNT_SMART_CONTROLLER
//#define ULTIMAKERCONTROLLER
//#define ULTIPANEL
//#define PANEL_ONE
//#define G3D_PANEL
//#define RIGIDBOT_PANEL
//#define MAKEBOARD_MINI_2_LINE_DISPLAY_1602
//#define ZONESTAR_LCD            // Requires ADC_KEYPAD_PIN to be assigned to an analog pin.
//#define ULTRA_LCD
//#define RA_CONTROL_PANEL
//#define LCD_SAINSMART_I2C_1602
//#define LCD_SAINSMART_I2C_2004
//#define LCM1602
//#define LCD_I2C_PANELOLU2
//#define LCD_I2C_VIKI
//#define RADDS_DISPLAY
//#define SAV_3DLCD
#define REPRAP_DISCOUNT_FULL_GRAPHIC_SMART_CONTROLLER // Questo è il mio display
//#define REPRAPWORLD_GRAPHICAL_LCD
//#define VIKI2
//#define miniVIKI
//#define MINIPANEL
//#define MAKRPANEL
Ad occhio mi pare che bisogna fare una piccola modifica ma vediamo sembra manchi il
#define NEWPANELnelle definizioni in Configuration_Overall.h
Nella definzione della scheda c'è ma è nella "Stanza" riservata al display grafico che non viene attivata dal define ULTIPANEL.
Saluti
Carlo D.
P3Steel - MKS GEN v1.2 e REPRAP_DISCOUNT_FULL_GRAPHIC_SMART_CONTROLLER + Gen 7 MOSFET (HotBed) + alimentatore step-down 12V -> 5V
Firmware MK4duo 4.3.6 con ABL induttivo con LJ18A3 - Slic3R (Originale) ed ESP3D per controllare la stampante da remoto.
HotEnd Cinese V6 clone con ugello da 0.4mm.
[My Building Log]
|
Re: prima installazione mk4duo su i3 pro w April 27, 2020 03:43PM |
Registered: 4 years ago Posts: 29 |
allora nel configuration.overall.h riguardo all lcd cè tutto questo
ma non vedo la configurazione dei pin veramente che hai postato nella prima schermata
e nel configuration.pins nemmeno nulla che parli di lcd
configuration.pins.h
questo invece la parte riguardo lcd del marlin che ho provato cioè marlin 1.1.9 bugfix
grazie per la pazienza
cmq da almeno quello che dice la scritta lcd dovrebbe essere 2004 anche come nella foto una sigla strana
ma non vedo la configurazione dei pin veramente che hai postato nella prima schermata
e nel configuration.pins nemmeno nulla che parli di lcd
Quote
*************************
* Configuration_LCD *
*************************/
#define LCD_LANGUAGE it
#define LCD_LANGUAGE_1 NO_LANGUAGE
#define LCD_LANGUAGE_2 NO_LANGUAGE
#define LCD_LANGUAGE_3 NO_LANGUAGE
#define LCD_LANGUAGE_4 NO_LANGUAGE
#define LCD_CHARSET_HD44780 JAPANESE
#define LCD_INFO_SCREEN_STYLE 0
#define REPRAP_DISCOUNT_SMART_CONTROLLER
//#define ULTIMAKERCONTROLLER
//#define ULTIPANEL
//#define PANEL_ONE
//#define G3D_PANEL
//#define RIGIDBOT_PANEL
//#define MAKEBOARD_MINI_2_LINE_DISPLAY_1602
//#define ZONESTAR_LCD // Requires ADC_KEYPAD_PIN to be assigned to an analog pin.
//#define ULTRA_LCD
//#define RA_CONTROL_PANEL
//#define LCD_SAINSMART_I2C_1602
//#define LCD_SAINSMART_I2C_2004
//#define LCM1602
//#define LCD_I2C_PANELOLU2
//#define LCD_I2C_VIKI
//#define RADDS_DISPLAY
//#define SAV_3DLCD
//#define REPRAP_DISCOUNT_FULL_GRAPHIC_SMART_CONTROLLER
//#define REPRAPWORLD_GRAPHICAL_LCD
//#define VIKI2
//#define miniVIKI
//#define MINIPANEL
//#define MAKRPANEL
//#define ELB_FULL_GRAPHIC_CONTROLLER
//#define BQ_LCD_SMART_CONTROLLER
//#define WANHAO_D6_OLED
//#define CARTESIO_UI
//#define LCD_FOR_MELZI
//#define U8GLIB_SSD1306
//#define SAV_3DGLCD
//#define U8GLIB_SSD1306
//#define U8GLIB_SH1106
//#define ULTI_CONTROLLER
//#define OLED_PANEL_TINYBOY2
//#define MKS_MINI_12864
//#define FYSETC_MINI_12864
//#define CR10_STOCKDISPLAY
//#define ANET_FULL_GRAPHICS_LCD // Anet 128x64 full graphics lcd with rotary encoder as used on Anet A6
//#define MKS_12864OLED // Uses the SH1106 controller (default)
//#define MKS_12864OLED_SSD1306 // Uses the SSD1306 controller
//#define AZSMZ_12864
//#define SILVER_GATE_GLCD_CONTROLLER
//#define NEXTION
#define NEXTION_SERIAL 1
#define NEXTION_BAUDRATE 57600
#define NEXTION_MAX_MESSAGE_LENGTH 30
//#define NEXTION_GFX
#define NEXTION_FIRMWARE_FILE "mk4duo.tft"
#define SHOW_BOOTSCREEN
#define BOOTSCREEN_TIMEOUT 2500
#define BOOTSCREEN_MKLOGO_HIGH // Show a hight MK4duo logo on the Boot Screen (disable it saving 399 bytes of flash)
//#define BOOTSCREEN_MKLOGO_ANIMATED // Animated MK4duo logo. Costs ~3260 (or ~940) bytes of PROGMEM.
//#define SHOW_CUSTOM_BOOTSCREEN
//#define CUSTOM_STATUS_SCREEN_IMAGE
#define XYZ_HOLLOW_FRAME
#define MENU_HOLLOW_FRAME
//#define USE_BIG_EDIT_FONT
//#define USE_SMALL_INFOFONT
//#define DOGM_SPI_DELAY_US 5
//#define OVERLAY_GFX_REVERSE
//#define STATUS_HOTEND_NUMBERLESS // Use plain hotend icons instead of numbered ones (with 2+ hotends)
#define STATUS_HOTEND_INVERTED // Show solid nozzle bitmaps when heating (Requires STATUS_HOTEND_ANIM)
#define STATUS_HOTEND_ANIM // Use a second bitmap to indicate hotend heating
#define STATUS_BED_ANIM // Use a second bitmap to indicate bed heating
#define STATUS_CHAMBER_ANIM // Use a second bitmap to indicate chamber heating
//#define STATUS_ALT_BED_BITMAP // Use the alternative bed bitmap
//#define STATUS_ALT_FAN_BITMAP // Use the alternative fan bitmap
//#define STATUS_FAN_FRAMES 3 // :[0,1,2,3,4] Number of fan animation frames
//#define STATUS_HEAT_PERCENT // Show heating in a progress bar
//#define GAME_BRICKOUT
//#define GAME_INVADERS
//#define GAME_SNAKE
//#define NO_LCD_MENUS
//#define SLIM_LCD_MENUS
//#define ST7920_DELAY_1 DELAY_NS(0)
//#define ST7920_DELAY_2 DELAY_NS(0)
//#define ST7920_DELAY_3 DELAY_NS(64)
#define ENCODER_PULSES_PER_STEP 5
#define ENCODER_STEPS_PER_MENU_ITEM 1
//#define LCD_SCREEN_ROT_90 // Rotate screen orientation for graphics display by 90 degree clockwise
//#define LCD_SCREEN_ROT_180 // Rotate screen orientation for graphics display by 180 degree clockwise
//#define LCD_SCREEN_ROT_270 // Rotate screen orientation for graphics display by 270 degree clockwise
//#define INVERT_CLICK_BUTTON // Option for invert encoder button logic
//#define INVERT_BACK_BUTTON // Option for invert back button logic if avaible
#define REVERSE_ENCODER_DIRECTION
#define REVERSE_MENU_DIRECTION
//#define REVERSE_SELECT_DIRECTION
#define ENCODER_RATE_MULTIPLIER // If defined, certain menu edit operations automatically multiply the steps when the encoder is moved quickly
#define ENCODER_10X_STEPS_PER_SEC 75 // If the encoder steps per sec exceeds this value, multiply steps moved x10 to quickly advance the value
#define ENCODER_100X_STEPS_PER_SEC 160 // If the encoder steps per sec exceeds this value, multiply steps moved x100 to really quickly advance the value
#define ULTIPANEL_FEEDMULTIPLY
#define SPEAKER
//#define LCD_FEEDBACK_FREQUENCY_DURATION_MS 2
//#define LCD_FEEDBACK_FREQUENCY_HZ 5000
#define LCD_ALLIGATOR_VOLTAGE_LEVEL 1
#define LCD_INFO_MENU
//#define STATUS_MESSAGE_SCROLLING
//#define LCD_DECIMAL_SMALL_XY
//#define LCD_TIMEOUT_TO_STATUS 15000
//#define LED_CONTROL_MENU
//#define LED_COLOR_PRESETS // Enable the Preset Color menu option
//#define LED_USER_PRESET_STARTUP // Have the printer display the user preset color on startup
#define LED_USER_PRESET_RED 255 // User defined RED value
#define LED_USER_PRESET_GREEN 255 // User defined GREEN value
#define LED_USER_PRESET_BLUE 255 // User defined BLUE value
#define LED_USER_PRESET_WHITE 255 // User defined WHITE value
#define LED_USER_PRESET_BRIGHTNESS 255 // User defined intensity
//#define LCD_PROGRESS_BAR
#define PROGRESS_BAR_BAR_TIME 5000U
#define PROGRESS_BAR_MSG_TIME 1500U
#define PROGRESS_MSG_EXPIRE 0
//#define PROGRESS_MSG_ONCE
//#define LCD_PROGRESS_BAR_TEST
//#define CUSTOM_USER_MENUS
#define USER_SCRIPT_DONE "M117 User Script Done"
#define USER_DESC_1 "Home & ABL"
#define USER_GCODE_1 "G28\nG29"
//#define USER_DESC_2 "Preheat for " PREHEAT_1_LABEL
//#define USER_GCODE_2 "M140 S" STRINGIFY(PREHEAT_1_TEMP_BED) "\nM104 S" STRINGIFY(PREHEAT_1_TEMP_HOTEND)
//#define USER_DESC_3 "Preheat for " PREHEAT_2_LABEL
//#define USER_GCODE_3 "M140 S" STRINGIFY(PREHEAT_2_TEMP_BED) "\nM104 S" STRINGIFY(PREHEAT_2_TEMP_HOTEND)
//#define USER_DESC_4 "Preheat for " PREHEAT_3_LABEL
//#define USER_GCODE_4 "M140 S" STRINGIFY(PREHEAT_3_TEMP_BED) "\nM104 S" STRINGIFY(PREHEAT_3_TEMP_HOTEND)
//#define USER_DESC_5 "Heat Bed/Home/Level"
//#define USER_GCODE_5 "M140 S" STRINGIFY(PREHEAT_2_TEMP_BED) "\nG28\nG29"
//#define USER_DESC_6 "Home & Info"
//#define USER_GCODE_6 "G28\nM503"
configuration.pins.h
Quote
* MK4duo Firmware for 3D Printer, Laser and CNC
*
* Based on Marlin, Sprinter and grbl
* Copyright (c) 2011 Camiel Gubbels / Erik van der Zalm
* Copyright (c) 2019 Alberto Cotronei @MagoKimbra
*
* This program is free software: you can redistribute it and/or modify
* it under the terms of the GNU General Public License as published by
* the Free Software Foundation, either version 3 of the License, or
* (at your option) any later version.
*
* This program is distributed in the hope that it will be useful,
* but WITHOUT ANY WARRANTY; without even the implied warranty of
* MERCHANTABILITY or FITNESS FOR A PARTICULAR PURPOSE. See the
* GNU General Public License for more details.
*
* You should have received a copy of the GNU General Public License
* along with this program. If not, see [url]http://www.gnu.org/licenses/[/url].
*
*/
#pragma once
/**
* Configuration_Pins.h
*
* This configuration file contains all Pins.
*
*/
//=================================== BASIC ==================================
// X axis pins
#define X_STEP_PIN ORIG_X_STEP_PIN
#define X_DIR_PIN ORIG_X_DIR_PIN
#define X_ENABLE_PIN ORIG_X_ENABLE_PIN
#define X_CS_PIN ORIG_X_CS_PIN
// X2 axis pins
#if ENABLED(DUAL_X_CARRIAGE) || ENABLED(X_TWO_STEPPER_DRIVERS)
#define X2_STEP_PIN ORIG_E1_STEP_PIN
#define X2_DIR_PIN ORIG_E1_DIR_PIN
#define X2_ENABLE_PIN ORIG_E1_ENABLE_PIN
#define X2_CS_PIN ORIG_E1_CS_PIN
#endif
// Y axis pins
#define Y_STEP_PIN ORIG_Y_STEP_PIN
#define Y_DIR_PIN ORIG_Y_DIR_PIN
#define Y_ENABLE_PIN ORIG_Y_ENABLE_PIN
#define Y_CS_PIN ORIG_Y_CS_PIN
// Y2 axis pins
#if ENABLED(Y_TWO_STEPPER_DRIVERS)
#define Y2_STEP_PIN ORIG_E1_STEP_PIN
#define Y2_DIR_PIN ORIG_E1_DIR_PIN
#define Y2_ENABLE_PIN ORIG_E1_ENABLE_PIN
#define Y2_CS_PIN ORIG_E1_CS_PIN
#endif
// Z axis pins
#define Z_STEP_PIN ORIG_Z_STEP_PIN
#define Z_DIR_PIN ORIG_Z_DIR_PIN
#define Z_ENABLE_PIN ORIG_Z_ENABLE_PIN
#define Z_CS_PIN ORIG_Z_CS_PIN
// Z2 axis pins
#if (ENABLED(Z_TWO_STEPPER_DRIVERS) || ENABLED(Z_THREE_STEPPER_DRIVERS))
#define Z2_STEP_PIN ORIG_E1_STEP_PIN
#define Z2_DIR_PIN ORIG_E1_DIR_PIN
#define Z2_ENABLE_PIN ORIG_E1_ENABLE_PIN
#define Z2_CS_PIN ORIG_E1_CS_PIN
#endif
// Z3 axis pins
#if ENABLED(Z_THREE_STEPPER_DRIVERS)
#define Z3_STEP_PIN ORIG_E2_STEP_PIN
#define Z3_DIR_PIN ORIG_E2_DIR_PIN
#define Z3_ENABLE_PIN ORIG_E2_ENABLE_PIN
#define Z3_CS_PIN ORIG_E2_CS_PIN
#endif
// E0 axis pins
#define E0_STEP_PIN ORIG_E0_STEP_PIN
#define E0_DIR_PIN ORIG_E0_DIR_PIN
#define E0_ENABLE_PIN ORIG_E0_ENABLE_PIN
#define E0_CS_PIN ORIG_E0_CS_PIN
#define SOL0_PIN ORIG_SOL0_PIN
// E1 axis pins
#define E1_STEP_PIN ORIG_E1_STEP_PIN
#define E1_DIR_PIN ORIG_E1_DIR_PIN
#define E1_ENABLE_PIN ORIG_E1_ENABLE_PIN
#define E1_CS_PIN ORIG_E1_CS_PIN
#define SOL1_PIN ORIG_SOL1_PIN
// E2 axis pins
#define E2_STEP_PIN ORIG_E2_STEP_PIN
#define E2_DIR_PIN ORIG_E2_DIR_PIN
#define E2_ENABLE_PIN ORIG_E2_ENABLE_PIN
#define E2_CS_PIN ORIG_E2_CS_PIN
#define SOL2_PIN ORIG_SOL2_PIN
// E3 axis pins
#define E3_STEP_PIN ORIG_E3_STEP_PIN
#define E3_DIR_PIN ORIG_E3_DIR_PIN
#define E3_ENABLE_PIN ORIG_E3_ENABLE_PIN
#define E3_CS_PIN ORIG_E3_CS_PIN
#define SOL3_PIN ORIG_SOL3_PIN
// E4 axis pins
#define E4_STEP_PIN ORIG_E4_STEP_PIN
#define E4_DIR_PIN ORIG_E4_DIR_PIN
#define E4_ENABLE_PIN ORIG_E4_ENABLE_PIN
#define E4_CS_PIN ORIG_E4_CS_PIN
#define SOL4_PIN ORIG_SOL4_PIN
// E5 axis pins
#define E5_STEP_PIN ORIG_E5_STEP_PIN
#define E5_DIR_PIN ORIG_E5_DIR_PIN
#define E5_ENABLE_PIN ORIG_E5_ENABLE_PIN
#define E5_CS_PIN ORIG_E5_CS_PIN
#define SOL5_PIN ORIG_SOL5_PIN
// ENDSTOP pins
#define X_MIN_PIN ORIG_X_MIN_PIN
#define X_MAX_PIN ORIG_X_MAX_PIN
#define Y_MIN_PIN ORIG_Y_MIN_PIN
#define Y_MAX_PIN ORIG_Y_MAX_PIN
#define Z_MIN_PIN ORIG_Z_MIN_PIN
#define Z_MAX_PIN ORIG_Z_MAX_PIN
#define X2_MIN_PIN NoPin
#define Y2_MIN_PIN NoPin
#define Z2_MIN_PIN NoPin
#define Z3_MIN_PIN NoPin
#define X2_MAX_PIN NoPin
#define Y2_MAX_PIN NoPin
#define Z2_MAX_PIN NoPin
#define Z3_MAX_PIN NoPin
#define Z_PROBE_PIN NoPin
// HEATERS pins
#define HEATER_HE0_PIN ORIG_HEATER_HE0_PIN
#define HEATER_HE1_PIN ORIG_HEATER_HE1_PIN
#define HEATER_HE2_PIN ORIG_HEATER_HE2_PIN
#define HEATER_HE3_PIN ORIG_HEATER_HE3_PIN
#define HEATER_HE4_PIN ORIG_HEATER_HE4_PIN
#define HEATER_HE5_PIN ORIG_HEATER_HE5_PIN
#define HEATER_BED0_PIN ORIG_HEATER_BED0_PIN
#define HEATER_BED1_PIN ORIG_HEATER_BED1_PIN
#define HEATER_BED2_PIN ORIG_HEATER_BED2_PIN
#define HEATER_BED3_PIN ORIG_HEATER_BED3_PIN
#define HEATER_CHAMBER0_PIN NoPin
#define HEATER_CHAMBER1_PIN NoPin
#define HEATER_CHAMBER2_PIN NoPin
#define HEATER_CHAMBER3_PIN NoPin
#define HEATER_COOLER_PIN NoPin
// TEMP pins
#define TEMP_HE0_PIN ORIG_TEMP_HE0_PIN
#define TEMP_HE1_PIN ORIG_TEMP_HE1_PIN
#define TEMP_HE2_PIN ORIG_TEMP_HE2_PIN
#define TEMP_HE3_PIN ORIG_TEMP_HE3_PIN
#define TEMP_HE4_PIN ORIG_TEMP_HE4_PIN
#define TEMP_HE5_PIN ORIG_TEMP_HE5_PIN
#define TEMP_BED0_PIN ORIG_TEMP_BED0_PIN
#define TEMP_BED1_PIN ORIG_TEMP_BED1_PIN
#define TEMP_BED2_PIN ORIG_TEMP_BED2_PIN
#define TEMP_BED3_PIN ORIG_TEMP_BED3_PIN
#define TEMP_CHAMBER0_PIN NoPin
#define TEMP_CHAMBER1_PIN NoPin
#define TEMP_CHAMBER2_PIN NoPin
#define TEMP_CHAMBER3_PIN NoPin
#define TEMP_COOLER_PIN NoPin
// FAN pins
#define FAN0_PIN ORIG_FAN0_PIN
#define FAN1_PIN ORIG_FAN1_PIN
#define FAN2_PIN ORIG_FAN2_PIN
#define FAN3_PIN ORIG_FAN3_PIN
#define FAN4_PIN ORIG_FAN4_PIN
#define FAN5_PIN ORIG_FAN5_PIN
// PS ON pin
#define PS_ON_PIN ORIG_PS_ON_PIN
// BEEPER pin
#define BEEPER_PIN ORIG_BEEPER_PIN
//============================================================================
//================================= FEATURE ==================================
#if ENABLED(TACHOMETRIC)
#define TACHO0_PIN NoPin
#define TACHO1_PIN NoPin
#define TACHO2_PIN NoPin
#define TACHO3_PIN NoPin
#define TACHO4_PIN NoPin
#define TACHO5_PIN NoPin
#endif
#if ENABLED(MKR4)
#define E0E1_CHOICE_PIN -1
#define E0E2_CHOICE_PIN -1
#define E1E3_CHOICE_PIN -1
#elif ENABLED(MKR6) || ENABLED(MKR12)
#define EX1_CHOICE_PIN -1
#define EX2_CHOICE_PIN -1
#endif
#if ENABLED(PRUSA_MMU2)
#define MMU2_RST_PIN -1
#endif
#if ENABLED(LASER)
#define LASER_PWR_PIN ORIG_LASER_PWR_PIN
#define LASER_PWM_PIN ORIG_LASER_PWM_PIN
#if ENABLED(LASER_PERIPHERALS)
#define LASER_PERIPHERALS_PIN NoPin
#define LASER_PERIPHERALS_STATUS_PIN NoPin
#endif
#endif
#if ENABLED(CNCROUTER)
#define CNCROUTER_PIN NoPin
#endif
#if ENABLED(FILAMENT_RUNOUT_SENSOR)
#define FIL_RUNOUT_0_PIN NoPin
#define FIL_RUNOUT_1_PIN NoPin
#define FIL_RUNOUT_2_PIN NoPin
#define FIL_RUNOUT_3_PIN NoPin
#define FIL_RUNOUT_4_PIN NoPin
#define FIL_RUNOUT_5_PIN NoPin
#define FIL_RUNOUT_DAV_PIN NoPin
#endif
#if ENABLED(FILAMENT_WIDTH_SENSOR)
#define FILWIDTH_PIN NoPin
#endif
#if ENABLED(FLOWMETER_SENSOR)
#define FLOWMETER_PIN
#endif
#if ENABLED(POWER_CONSUMPTION)
#define POWER_CONSUMPTION_PIN NoPin
#endif
#if ENABLED(PHOTO_GCODE)
#define PHOTOGRAPH_PIN NoPin
#define CHDK_PIN NoPin
#endif
#if ENABLED(CASE_LIGHT)
#define CASE_LIGHT_PIN NoPin
#endif
#if ENABLED(DOOR_OPEN_FEATURE)
#define DOOR_OPEN_PIN NoPin
#endif
#if ENABLED(POWER_CHECK)
#define POWER_CHECK_PIN NoPin
#endif
#if ENABLED(PROBE_SLED)
#define SLED_PIN NoPin
#endif
#if ENABLED(PROBE_SMART_EFFECTOR)
#define SMART_EFFECTOR_PIN NoPin
#endif
#if ENABLED(RGB_LED) || ENABLED(RGBW_LED)
#define RGB_LED_R_PIN NoPin
#define RGB_LED_G_PIN NoPin
#define RGB_LED_B_PIN NoPin
#define RGB_LED_W_PIN NoPin
#endif
#if ENABLED(NEOPIXEL_LED)
#define NEOPIXEL_PIN NoPin
#endif
#if ENABLED(DHT_SENSOR)
#define DHT_DATA_PIN NoPin
#endif
#if HAS_TRINAMIC && ENABLED(TMC_USE_SW_SPI)
#define TMC_SW_MOSI 51
#define TMC_SW_MISO 50
#define TMC_SW_SCK 52
#endif
//============================================================================
questo invece la parte riguardo lcd del marlin che ho provato cioè marlin 1.1.9 bugfix
Quote
//=============================================================================
//============================= LCD and SD support ============================
//=============================================================================
// @section lcd
/**
* LCD LANGUAGE
*
* Select the language to display on the LCD. These languages are available:
*
* en, an, bg, ca, cn, cz, cz_utf8, de, el, el-gr, es, es_utf8, eu, fi, fr, fr_utf8,
* gl, hr, it, kana, kana_utf8, nl, pl, pt, pt_utf8, pt-br, pt-br_utf8, ru, sk_utf8,
* tr, uk, zh_CN, zh_TW, test
*
* :{ 'en':'English', 'an':'Aragonese', 'bg':'Bulgarian', 'ca':'Catalan', 'cn':'Chinese', 'cz':'Czech', 'cz_utf8':'Czech (UTF8)', 'de':'German', 'el':'Greek', 'el-gr':'Greek (Greece)', 'es':'Spanish', 'es_utf8':'Spanish (UTF8)', 'eu':'Basque-Euskera', 'fi':'Finnish', 'fr':'French', 'fr_utf8':'French (UTF8)', 'gl':'Galician', 'hr':'Croatian', 'it':'Italian', 'kana':'Japanese', 'kana_utf8':'Japanese (UTF8)', 'nl':'Dutch', 'pl':'Polish', 'pt':'Portuguese', 'pt-br':'Portuguese (Brazilian)', 'pt-br_utf8':'Portuguese (Brazilian UTF8)', 'pt_utf8':'Portuguese (UTF8)', 'ru':'Russian', 'sk_utf8':'Slovak (UTF8)', 'tr':'Turkish', 'uk':'Ukrainian', 'zh_CN':'Chinese (Simplified)', 'zh_TW':'Chinese (Taiwan)', test':'TEST' }
*/
#define LCD_LANGUAGE it
/**
* LCD Character Set
*
* Note: This option is NOT applicable to Graphical Displays.
*
* All character-based LCDs provide ASCII plus one of these
* language extensions:
*
* - JAPANESE ... the most common
* - WESTERN ... with more accented characters
* - CYRILLIC ... for the Russian language
*
* To determine the language extension installed on your controller:
*
* - Compile and upload with LCD_LANGUAGE set to 'test'
* - Click the controller to view the LCD menu
* - The LCD will display Japanese, Western, or Cyrillic text
*
* See [url]http://marlinfw.org/docs/development/lcd_language.html[/url]
*
* :['JAPANESE', 'WESTERN', 'CYRILLIC']
*/
#define DISPLAY_CHARSET_HD44780 JAPANESE
/**
* LCD TYPE
*
* Enable ULTRA_LCD for a 16x2, 16x4, 20x2, or 20x4 character-based LCD.
* Enable DOGLCD for a 128x64 (ST7565R) Full Graphical Display.
* (These options will be enabled automatically for most displays.)
*
* IMPORTANT: The U8glib library is required for Full Graphic Display!
* [url]https://github.com/olikraus/U8glib_Arduino[/url]
*/
//#define ULTRA_LCD // Character based
//#define DOGLCD // Full graphics display
/**
* SD CARD
*
* SD Card support is disabled by default. If your controller has an SD slot,
* you must uncomment the following option or it won't work.
*
*/
#define SDSUPPORT
/**
* SD CARD: SPI SPEED
*
* Enable one of the following items for a slower SPI transfer speed.
* This may be required to resolve "volume init" errors.
*/
//#define SPI_SPEED SPI_HALF_SPEED
//#define SPI_SPEED SPI_QUARTER_SPEED
//#define SPI_SPEED SPI_EIGHTH_SPEED
/**
* SD CARD: ENABLE CRC
*
* Use CRC checks and retries on the SD communication.
*/
//#define SD_CHECK_AND_RETRY
/**
* LCD Menu Items
*
* Disable all menus and only display the Status Screen, or
* just remove some extraneous menu items to recover space.
*/
//#define NO_LCD_MENUS
//#define SLIM_LCD_MENUS
//
// ENCODER SETTINGS
//
// This option overrides the default number of encoder pulses needed to
// produce one step. Should be increased for high-resolution encoders.
//
//#define ENCODER_PULSES_PER_STEP 4
//
// Use this option to override the number of step signals required to
// move between next/prev menu items.
//
//#define ENCODER_STEPS_PER_MENU_ITEM 1
/**
* Encoder Direction Options
*
* Test your encoder's behavior first with both options disabled.
*
* Reversed Value Edit and Menu Nav? Enable REVERSE_ENCODER_DIRECTION.
* Reversed Menu Navigation only? Enable REVERSE_MENU_DIRECTION.
* Reversed Value Editing only? Enable BOTH options.
*/
//
// This option reverses the encoder direction everywhere.
//
// Set this option if CLOCKWISE causes values to DECREASE
//
//#define REVERSE_ENCODER_DIRECTION
//
// This option reverses the encoder direction for navigating LCD menus.
//
// If CLOCKWISE normally moves DOWN this makes it go UP.
// If CLOCKWISE normally moves UP this makes it go DOWN.
//
//#define REVERSE_MENU_DIRECTION
//
// Individual Axis Homing
//
// Add individual axis homing items (Home X, Home Y, and Home Z) to the LCD menu.
//
//#define INDIVIDUAL_AXIS_HOMING_MENU
//
// SPEAKER/BUZZER
//
// If you have a speaker that can produce tones, enable it here.
// By default Marlin assumes you have a buzzer with a fixed frequency.
//
//#define SPEAKER
//
// The duration and frequency for the UI feedback sound.
// Set these to 0 to disable audio feedback in the LCD menus.
//
// Note: Test audio output with the G-Code:
// M300 S P
//
#define LCD_FEEDBACK_FREQUENCY_DURATION_MS 2
#define LCD_FEEDBACK_FREQUENCY_HZ 5000
//
// CONTROLLER TYPE: Standard
//
// Marlin supports a wide variety of controllers.
// Enable one of the following options to specify your controller.
//
//
// ULTIMAKER Controller.
//
//#define ULTIMAKERCONTROLLER
//
// ULTIPANEL as seen on Thingiverse.
//
//#define ULTIPANEL
//
// PanelOne from T3P3 (via RAMPS 1.4 AUX2/AUX3)
// [url]http://reprap.org/wiki/PanelOne[/url]
//
//#define PANEL_ONE
//
// MaKr3d Makr-Panel with graphic controller and SD support.
// [url]http://reprap.org/wiki/MaKr3d_MaKrPanel[/url]
//
//#define MAKRPANEL
//
// ReprapWorld Graphical LCD
// [url]https://reprapworld.com/?products_details&products_id/1218[/url]
//
//#define REPRAPWORLD_GRAPHICAL_LCD
//
// Activate one of these if you have a Panucatt Devices
// Viki 2.0 or mini Viki with Graphic LCD
// [url]http://panucatt.com[/url]
//
//#define VIKI2
//#define miniVIKI
//
// Adafruit ST7565 Full Graphic Controller.
// [url]https://github.com/eboston/Adafruit-ST7565-Full-Graphic-Controller/[/url]
//
//#define ELB_FULL_GRAPHIC_CONTROLLER
//
// RepRapDiscount Smart Controller.
// [url]http://reprap.org/wiki/RepRapDiscount_Smart_Controller[/url]
//
// Note: Usually sold with a white PCB.
//
#define REPRAP_DISCOUNT_SMART_CONTROLLER
//
// GADGETS3D G3D LCD/SD Controller
// [url]http://reprap.org/wiki/RAMPS_1.3/1.4_GADGETS3D_Shield_with_Panel[/url]
//
// Note: Usually sold with a blue PCB.
//
//#define G3D_PANEL
//
// RepRapDiscount FULL GRAPHIC Smart Controller
// [url]http://reprap.org/wiki/RepRapDiscount_Full_Graphic_Smart_Controller[/url]
//
//#define REPRAP_DISCOUNT_FULL_GRAPHIC_SMART_CONTROLLER
//
// MakerLab Mini Panel with graphic
// controller and SD support - [url]http://reprap.org/wiki/Mini_panel[/url]
//
//#define MINIPANEL
//
// RepRapWorld REPRAPWORLD_KEYPAD v1.1
// [url]http://reprapworld.com/?products_details&products_id=202&cPath=1591_1626[/url]
//
// REPRAPWORLD_KEYPAD_MOVE_STEP sets how much should the robot move when a key
// is pressed, a value of 10.0 means 10mm per click.
//
//#define REPRAPWORLD_KEYPAD
//#define REPRAPWORLD_KEYPAD_MOVE_STEP 1.0
//
// RigidBot Panel V1.0
// [url]http://www.inventapart.com/[/url]
//
//#define RIGIDBOT_PANEL
//
// BQ LCD Smart Controller shipped by
// default with the BQ Hephestos 2 and Witbox 2.
//
//#define BQ_LCD_SMART_CONTROLLER
//
// Cartesio UI
// [url]http://mauk.cc/webshop/cartesio-shop/electronics/user-interface[/url]
//
//#define CARTESIO_UI
//
// ANET and Tronxy Controller supported displays.
//
//#define ZONESTAR_LCD // Requires ADC_KEYPAD_PIN to be assigned to an analog pin.
// This LCD is known to be susceptible to electrical interference
// which scrambles the display. Pressing any button clears it up.
// This is a LCD2004 display with 5 analog buttons.
//#define ANET_FULL_GRAPHICS_LCD // Anet 128x64 full graphics lcd with rotary encoder as used on Anet A6
// A clone of the RepRapDiscount full graphics display but with
// different pins/wiring (see pins_ANET_10.h).
//
// LCD for Melzi Card with Graphical LCD
//
//#define LCD_FOR_MELZI
//
// LCD for Malyan M200 printers.
// This requires SDSUPPORT to be enabled
//
//#define MALYAN_LCD
//
// CONTROLLER TYPE: I2C
//
// Note: These controllers require the installation of Arduino's LiquidCrystal_I2C
// library. For more info: [url]https://github.com/kiyoshigawa/LiquidCrystal_I2C[/url]
//
//
// Elefu RA Board Control Panel
// [url]http://www.elefu.com/index.php?route=product/product&product_id=53[/url]
//
//#define RA_CONTROL_PANEL
//
// Sainsmart (YwRobot) LCD Displays
//
// These require F.Malpartida's LiquidCrystal_I2C library
// [url]https://bitbucket.org/fmalpartida/new-liquidcrystal/wiki/Home[/url]
//
//#define LCD_SAINSMART_I2C_1602
//#define LCD_SAINSMART_I2C_2004
//
// Generic LCM1602 LCD adapter
//
//#define LCM1602
//
// PANELOLU2 LCD with status LEDs,
// separate encoder and click inputs.
//
// Note: This controller requires Arduino's LiquidTWI2 library v1.2.3 or later.
// For more info: [url]https://github.com/lincomatic/LiquidTWI2[/url]
//
// Note: The PANELOLU2 encoder click input can either be directly connected to
// a pin (if BTN_ENC defined to != -1) or read through I2C (when BTN_ENC == -1).
//
//#define LCD_I2C_PANELOLU2
//
// Panucatt VIKI LCD with status LEDs,
// integrated click & L/R/U/D buttons, separate encoder inputs.
//
//#define LCD_I2C_VIKI
//
// SSD1306 OLED full graphics generic display
//
//#define U8GLIB_SSD1306
//
// SAV OLEd LCD module support using either SSD1306 or SH1106 based LCD modules
//
//#define SAV_3DGLCD
#if ENABLED(SAV_3DGLCD)
//#define U8GLIB_SSD1306
#define U8GLIB_SH1106
#endif
//
// Original Ulticontroller from Ultimaker 2 printer with SSD1309 I2C display and encoder
// [url]https://github.com/Ultimaker/Ultimaker2/tree/master/1249_Ulticontroller_Board_(x1[/url])
//
//#define ULTI_CONTROLLER
//
// CONTROLLER TYPE: Shift register panels
//
// 2 wire Non-latching LCD SR from [url]https://goo.gl/aJJ4sH[/url]
// LCD configuration: [url]http://reprap.org/wiki/SAV_3D_LCD[/url]
//
//#define SAV_3DLCD
//
// TinyBoy2 128x64 OLED / Encoder Panel
//
//#define OLED_PANEL_TINYBOY2
//
// Makeboard 3D Printer Parts 3D Printer Mini Display 1602 Mini Controller
// [url]https://www.aliexpress.com/item/Micromake-Makeboard-3D-Printer-Parts-3D-Printer-Mini-Display-1602-Mini-Controller-Compatible-with-Ramps-1/32765887917.html[/url]
//
//#define MAKEBOARD_MINI_2_LINE_DISPLAY_1602
//
// MKS MINI12864 with graphic controller and SD support
// [url]http://reprap.org/wiki/MKS_MINI_12864[/url]
//
//#define MKS_MINI_12864
//
// Factory display for Creality CR-10
// [url]https://www.aliexpress.com/item/Universal-LCD-12864-3D-Printer-Display-Screen-With-Encoder-For-CR-10-CR-7-Model/32833148327.html[/url]
//
// This is RAMPS-compatible using a single 10-pin connector.
// (For CR-10 owners who want to replace the Melzi Creality board but retain the display)
//
//#define CR10_STOCKDISPLAY
//
// MKS OLED 1.3" 128 × 64 FULL GRAPHICS CONTROLLER
// [url]http://reprap.org/wiki/MKS_12864OLED[/url]
//
// Tiny, but very sharp OLED display
//
//#define MKS_12864OLED // Uses the SH1106 controller (default)
//#define MKS_12864OLED_SSD1306 // Uses the SSD1306 controller
//
// Silvergate GLCD controller
// [url]http://github.com/android444/Silvergate[/url]
//
//#define SILVER_GATE_GLCD_CONTROLLER
grazie per la pazienza
cmq da almeno quello che dice la scritta lcd dovrebbe essere 2004 anche come nella foto una sigla strana
|
Re: prima installazione mk4duo su i3 pro w April 27, 2020 03:47PM |
Registered: 4 years ago Posts: 29 |
nemmeno nel configuration.lcd.h ci sta niente rigurado hai pin pero ho notato da ignorante giustamente che in tutti i configuration cè molta roba commentata riguardo al nextion non è che per caso ho sbagliato versione nel configuratore online?la e la v.4.4.0 è fatta per il cablaggio del nextion_?oppure ho detto una ca++ata?
Sorry, only registered users may post in this forum.
