3D Delata Printer D16_EBOT
Posted by evandene
|
3D Delata Printer D16_EBOT February 27, 2016 03:24PM |
Registered: 8 years ago Posts: 58 |
Hi,
As from 2014 I started to develop and build my own 3D Delta printer. At this moment my little guy is doing exactly where he was build for, printing nice objects and it let me test all kind of new things I like to develop.
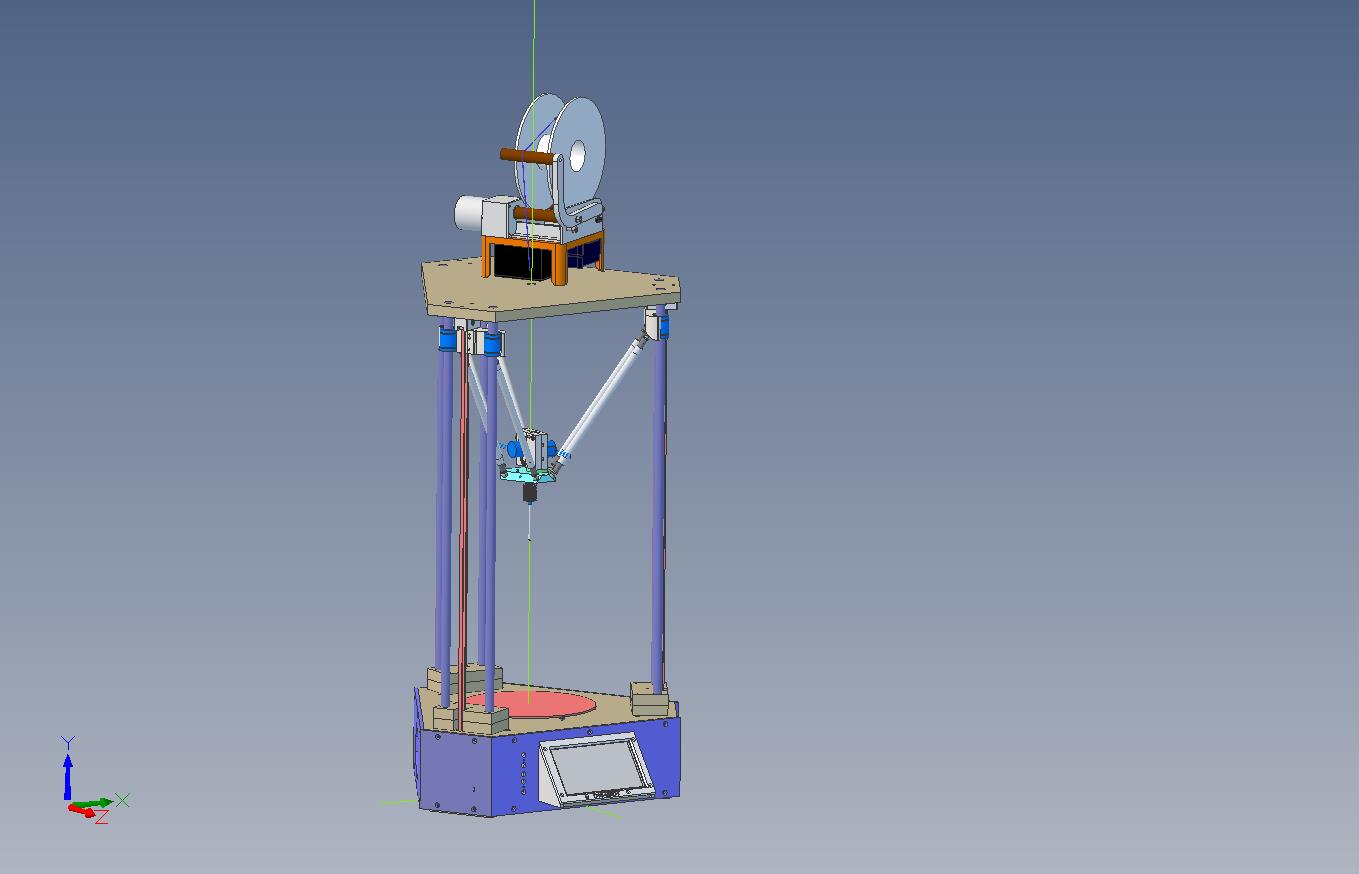
I named the printer D16_Ebot. see attachment as a picture and also the 3D pdf file. (Double click in the picture and you will be enabled to lookup the printer from all directions as well as with the help of the parts list tree, hiding and un-hiding parts and sub assy's.)
A video with the D16_Ebot in action: see Video D16_EBOT
The D16_Ebot has a heated bed of 230 mm whereof 200 mm in use; the print height is 230 mm but is in fact only limited by the length of the used poles.
In the video I do show an inductive heated bed what is still under development and not part of the Delta printer design project.
For the electronics I have used a BeagleBone Black rev.C and a controller board BeBoPr++
Because I was used to the software LinuxCNC that is around for many years including a huge user group, I did used also this time LinuxCNC (Machinekit)
If I build again a printer, and I will, I will use a smoothieboard.
The maximum speed tested for still decent prints is 80mm/sec for 1.75mm filament. More tests will follow.
The poles are "Silver-steel D=16mm"
The base and the top is 18mm MDF
The effector and vertical slider blocks are Nylon
The 6 aluminum parallel arms have a diameter of 12 and are 296 long center to center with 10mm balls
A pull spring keeps all together in the D=10mm joints like your own elbows are hold together; 100% backlash free.
Magnets will do the job too but at a crash with your hot end, all arms will fly around. A magnet will loose all forces after 1 mm detach, a pull spring does increase his force, trying to keep all in place, again like your own elbow.
The heated bed on 3 Points and a tempered glass plate or an aluminum Alcoa casted plate. A aluminum cold rolled plate doesn't work, .. no that's the problem, ... it works all the time.
If you keep yourself strict to the theory of how to positioning a plane and respect elongation factors for aluminum in you design, an aluminum plate is the way to go. There is no need for an auto leveling system at all. That honors also my advice, "do things right the first time"; it eliminates a fix like a leveling system.
Talk to you later where I will go in detail and will post all basic drawings and parts list.
Have a good one
Edited 7 time(s). Last edit at 02/27/2016 03:59PM by evandene.
As from 2014 I started to develop and build my own 3D Delta printer. At this moment my little guy is doing exactly where he was build for, printing nice objects and it let me test all kind of new things I like to develop.
I named the printer D16_Ebot. see attachment as a picture and also the 3D pdf file. (Double click in the picture and you will be enabled to lookup the printer from all directions as well as with the help of the parts list tree, hiding and un-hiding parts and sub assy's.)
A video with the D16_Ebot in action: see Video D16_EBOT
The D16_Ebot has a heated bed of 230 mm whereof 200 mm in use; the print height is 230 mm but is in fact only limited by the length of the used poles.
In the video I do show an inductive heated bed what is still under development and not part of the Delta printer design project.
For the electronics I have used a BeagleBone Black rev.C and a controller board BeBoPr++
Because I was used to the software LinuxCNC that is around for many years including a huge user group, I did used also this time LinuxCNC (Machinekit)
If I build again a printer, and I will, I will use a smoothieboard.
The maximum speed tested for still decent prints is 80mm/sec for 1.75mm filament. More tests will follow.
The poles are "Silver-steel D=16mm"
The base and the top is 18mm MDF
The effector and vertical slider blocks are Nylon
The 6 aluminum parallel arms have a diameter of 12 and are 296 long center to center with 10mm balls
A pull spring keeps all together in the D=10mm joints like your own elbows are hold together; 100% backlash free.
Magnets will do the job too but at a crash with your hot end, all arms will fly around. A magnet will loose all forces after 1 mm detach, a pull spring does increase his force, trying to keep all in place, again like your own elbow.
The heated bed on 3 Points and a tempered glass plate or an aluminum Alcoa casted plate. A aluminum cold rolled plate doesn't work, .. no that's the problem, ... it works all the time.
If you keep yourself strict to the theory of how to positioning a plane and respect elongation factors for aluminum in you design, an aluminum plate is the way to go. There is no need for an auto leveling system at all. That honors also my advice, "do things right the first time"; it eliminates a fix like a leveling system.
Talk to you later where I will go in detail and will post all basic drawings and parts list.
Have a good one
Edited 7 time(s). Last edit at 02/27/2016 03:59PM by evandene.
|
Re: 3D Delata Printer D16_EBOT February 28, 2016 03:33AM |
Registered: 8 years ago Posts: 58 |
So I figured out that not all free picture upload/share websites are for free but "postimage.org" should work, so now I can show you my D16_Ebot printer in this blog.
But I see I do need to work on the quality. (Some tips could bring me up to speed here)
I will describe the build here and for those who do need the step files, please let me know.
The base is a sandwich of two 18mm MDF plates. The MDF material available in Belgium has a very poor quality and low pressure.
When machining it keeps on showing the fibers on sharp edges no matter how sharp your tools are. Also the binding material used is causing your tools wearing out very quickly. So keep an eye on the quality of your MDF.
This sandwich construction gives a solid stable base for the printer suitable for hiding the motors and electronics in a safe place. And yes, I admit that it is not the cheapest way but with my experiences of 40 years building machines is that stability and quality in your base pays off at the end 100 times.
At the top a third same shaped plate with the same hole pattern is used to make a closed loop of the design. The silver-steel pools used are perfectly aligned by the CNC machined holes in all the plates. This assures no alignment effort needed and later the movement of the parallel arms will be as the algorithm expect it is and that creates the highest precision possible for a Delta printer. Doing things the first time right pays off all the time.
The vertical covers, mounted against the sandwiched base do carry an ATX 300 watt power supply with the fan nicely outside, at the front a 7" touch screen, and at the right side an extra 12 volt fan for extra cooling of the electronics. The front plate with the 7" touch screen can be removed and ALL electronics including connection do move out too.
My first post has a 3D pdf attachment were you can manipulate the assembly by double clicking in the picture and using the part tree switching on and of parts and sub assy's in order for you to examine the design.
Have fun and talk to you later at my next post.
Edited 2 time(s). Last edit at 02/28/2016 04:06AM by evandene.
But I see I do need to work on the quality. (Some tips could bring me up to speed here)

I will describe the build here and for those who do need the step files, please let me know.
The base is a sandwich of two 18mm MDF plates. The MDF material available in Belgium has a very poor quality and low pressure.
When machining it keeps on showing the fibers on sharp edges no matter how sharp your tools are. Also the binding material used is causing your tools wearing out very quickly. So keep an eye on the quality of your MDF.
This sandwich construction gives a solid stable base for the printer suitable for hiding the motors and electronics in a safe place. And yes, I admit that it is not the cheapest way but with my experiences of 40 years building machines is that stability and quality in your base pays off at the end 100 times.
At the top a third same shaped plate with the same hole pattern is used to make a closed loop of the design. The silver-steel pools used are perfectly aligned by the CNC machined holes in all the plates. This assures no alignment effort needed and later the movement of the parallel arms will be as the algorithm expect it is and that creates the highest precision possible for a Delta printer. Doing things the first time right pays off all the time.
The vertical covers, mounted against the sandwiched base do carry an ATX 300 watt power supply with the fan nicely outside, at the front a 7" touch screen, and at the right side an extra 12 volt fan for extra cooling of the electronics. The front plate with the 7" touch screen can be removed and ALL electronics including connection do move out too.

My first post has a 3D pdf attachment were you can manipulate the assembly by double clicking in the picture and using the part tree switching on and of parts and sub assy's in order for you to examine the design.
Have fun and talk to you later at my next post.
Edited 2 time(s). Last edit at 02/28/2016 04:06AM by evandene.
|
Re: 3D Delata Printer D16_EBOT February 28, 2016 05:19AM |
Registered: 10 years ago Posts: 550 |
 Good luck with the build!
|
Re: 3D Delata Printer D16_EBOT February 28, 2016 05:47AM |
Registered: 8 years ago Posts: 58 |
Sorry, only registered users may post in this forum.