CoreXY Tunning.
Posted by vichuics
|
CoreXY Tunning. July 08, 2015 03:21AM |
Registered: 8 years ago Posts: 1 |
Hello everyone,
I have just built my corexy machine and found the scale of X, Y has some problem. Searching a lot and still cannot find a piece of information for turning the machine. After studying the equation again and again, doing a lot of trial and error, resulting my steps to tunning my corexy machine and could like have a share (Sorry for my poor English, it isn't my first language). Please correct me it anything I made wrong.
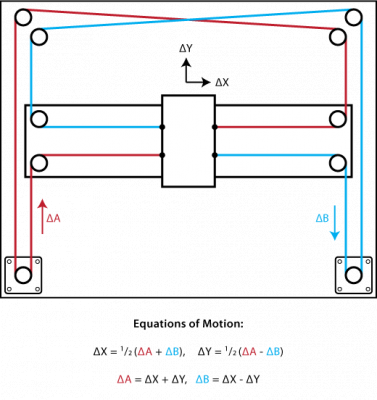
Looked back to the corexy.com's reference, it made a hint of turning the machine. Let's do some maths first.
Why I need do such maths?
The reason is we have ΔA and ΔB: When we tune ΔA, we need zeroized the effect on ΔB and the reverse is same.
Therefore:-
ΔX = 1/2(ΔA+ΔB ) , ΔY = 1/2(ΔA - ΔB )
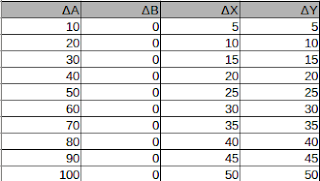
1. ΔA=20mm , ΔB= 0mm
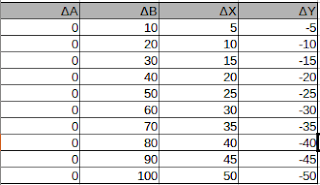
2. ΔA = 0mm , ΔB= 20mm
Concluded from 1 and 2, we can find that if we only move ΔA, the direction will be 45 degrees forward and if move ΔB the direction will be -45 degrees forward.
This is the theory behind my tuning steps.
To tunning the X, Y axis, there involves 3 steps and 2 sections to tuning.
The 2 section for tuning are
1. The elastic of ΔA and ΔB's belt
2. The Steps per unit of X, Y in the firmware
Steps to tune
1. Test Cube printing
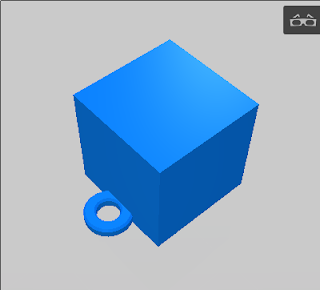
Before we can tune, we need to know the current printing result. To know the current print result, we can print a cube.
I am using this one download from Thingiverse:
[www.thingiverse.com]
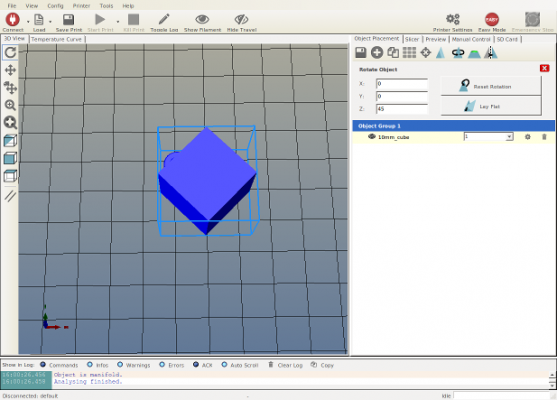
Remember, we need rotate the cube to 45 degrees when print it.
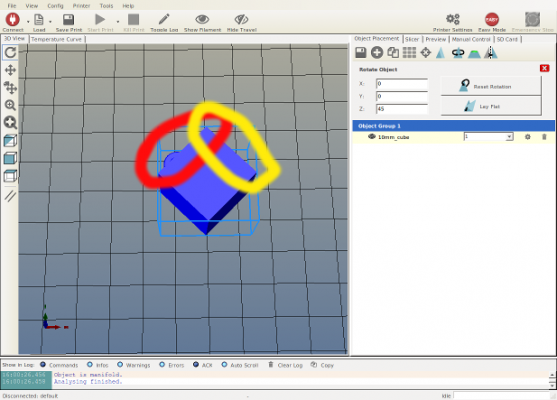
When the printing completed, we should measure the red and yellow side marked at below picture
2. Fine tune the scale of X and Y
If the scale perfect, ΔA(Red) and ΔB(Yellow) should be in same mm. if not, we need to adjust the loose or tight to the belts.
if ΔA > ΔB, it means the belt of ΔA is much tightened than the belt of ΔB, so we made the belt of ΔB more tight or made the belt of ΔA a bit loose.
if ΔA < ΔB, just do it in opposite.
Repeat these two steps until the result is acceptable, for me, means the different less than 0.05mm.
3. Calculate fine tuned step per unit
When the scale is corrected, we can start tuned step per unit, It just same as an other Cartesian machine.
The difference is we just need measure 1 side (In theory, X and Y's value of step per unit should be the same).
e.g. Model 10mm, print out 11mm
new value = 10/11 * 80 (normal GT2 belt + 20theeth + A4988) = 72.23
Input GCode: M92 X72.23 Y72.23
Print the cube again to get the result, and repeat steps until the result is satisfied.
Edited 1 time(s). Last edit at 07/08/2015 03:22AM by vichuics.
|
Re: CoreXY Tunning. December 15, 2018 06:55AM |
Registered: 7 years ago Posts: 4 |
|
Re: CoreXY Tunning. December 15, 2018 07:53AM |
Registered: 11 years ago Posts: 5,780 |
You might find some useful info here: [drmrehorst.blogspot.com]
Setting X and Y steps per mm is done using X and Y coordinates- the motor plugged into the X output on the controller isn't the motor that makes the mechanism move in X. Both motors move for X and Y movements, and the design of the mechanism is symmetrical, so they should both be set to the same value. Your config file tells the controller that you are using a corexy mechanism, so all the math is taken care of by the controller. Just print a cube with sides parallel to X and Y axes and measure (if you must). The steps/mm is a function of the motor usteps per rev, the drive pulley tooth count, and the belt pitch. A 200 step per rev motor, 16:1 ustepping, 2mm pitch belt, and a 16 tooth drive pulley should get you 100 steps/mm. The real value in printing a calibration cube is to check alignment of the X and Y axes.
A 10 mm cube is too small to calibrate anything, as is the more common 20 mm cube. I don't know where that idea originated, but it's as wrong as putting "leveling" screws at the 4 corners of the bed. Most of the time, when you print a 20 mm cube by itself, the corners will come out looking pretty bad because the printer keeps laying hot plastic down on top of still hot plastic. You should print as large an object as you can measure accurately. If you have a 6"/150 mm caliper, print a square that is 100x100 mm. That will let you measure the diagonals which should be the same if the X and Y axis are square. The problem with a tiny cube is that there is always some error in your measurement that will get included in your calibration. If you calibrate with a 10 mm cube and then print something larger, the error will be multiplied. If you calibrate with a 100 mm cube/square and print smaller objects, the absolute error will get divided. Error percent will be constant, but when printing parts that must fit together, absolute error is what counts.
Ultra MegaMax Dominator 3D printer: [drmrehorst.blogspot.com]
|
Re: CoreXY Tunning. December 15, 2018 03:59PM |
Registered: 5 years ago Posts: 61 |
@ the_digital_dentist I quite like the stepped calibration pieces because it lets you quite easily work out your tolerances for fits and also classify exact what is an axis scaling error and what is not.
[www.thingiverse.com]
[www.thingiverse.com]
|
Re: CoreXY Tunning. December 15, 2018 09:14PM |
Registered: 6 years ago Posts: 134 |
I should add that calibration cube pressision is not only function of X-Y alignment but also a function of how well Z and extruder are calibrated. Thickeness of the layer depends on Z calibration and extruder calibration. With 0.4mm layer width it is easy to have 0.2-0.3mm discrepancy in resulting print. So printing larger object like 500x500mm will give more precise answer. I do agree with the_digital_dentist that with belted system you need to count teeth of the pulley and look for error in other places like belts beeing not parallel or gantry being not square.
Sorry, only registered users may post in this forum.
