Compact CoreXY Build
Posted by rcengr
|
Compact CoreXY Build October 10, 2014 06:28PM |
Registered: 9 years ago Posts: 23 |
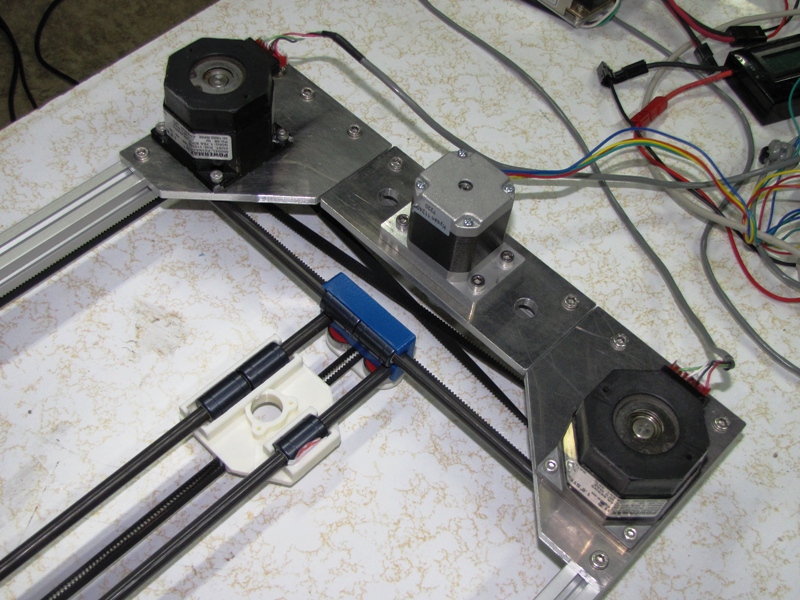
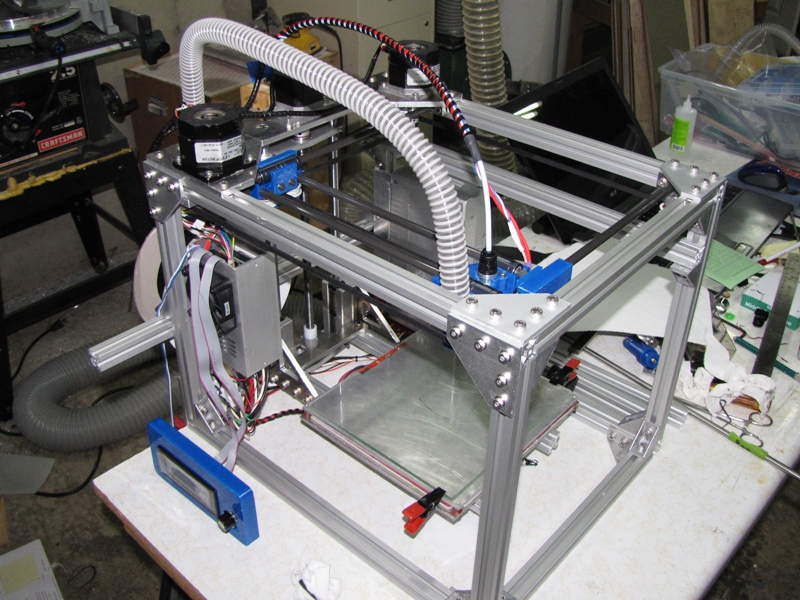
I've started building my CoreXY printer, using a modified arrangement of the belts. My goal with this printer was to get a 200x200 print area, with all the components inside the frame so that I could have a heated build chamber. I also wanted to use all 305mm long 20x20 aluminum extrusions. Ultimately I ended up using 305mm extrusions with 435mm extrusions to get the desired print area.
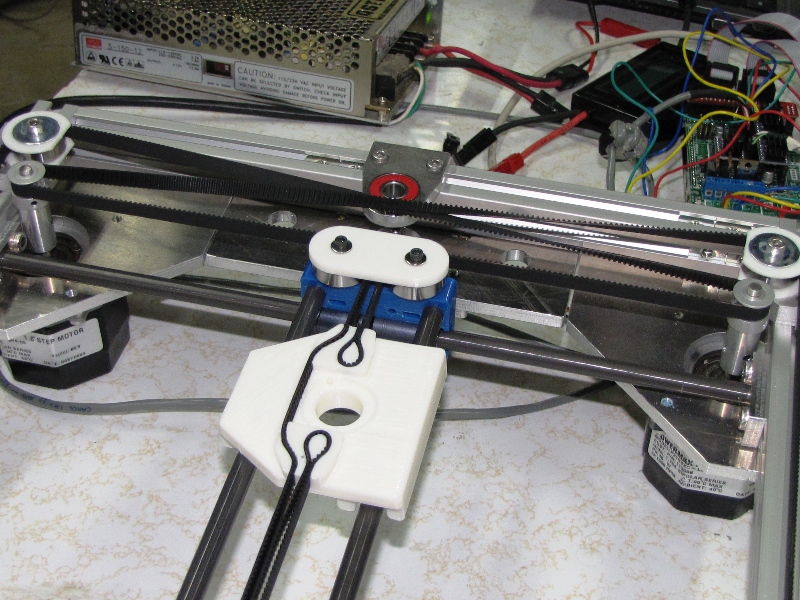
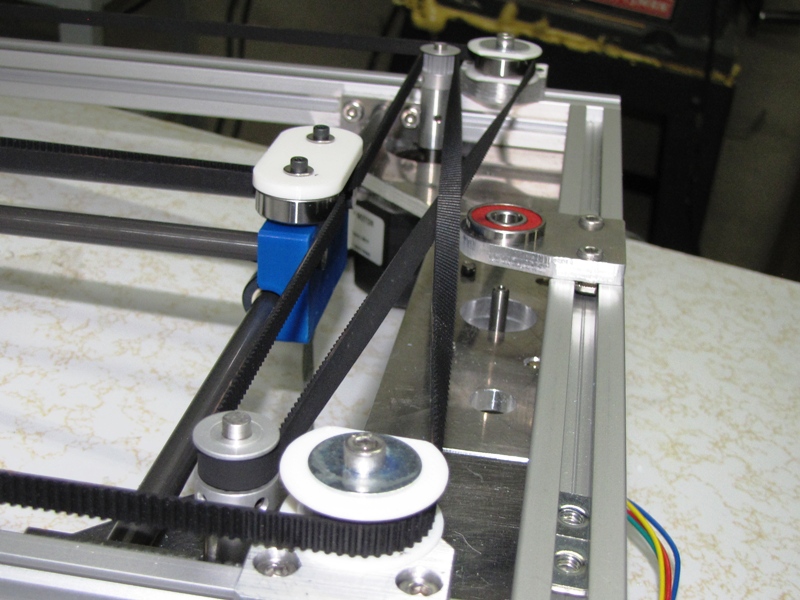
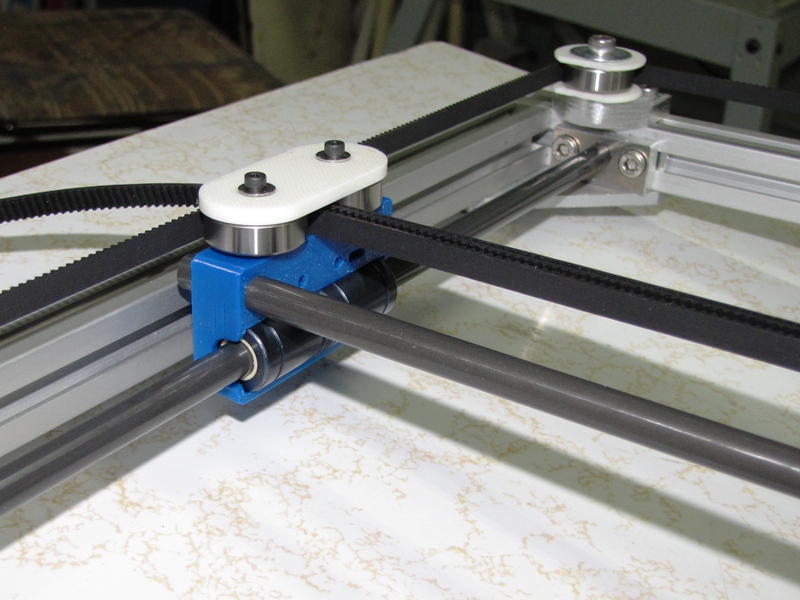
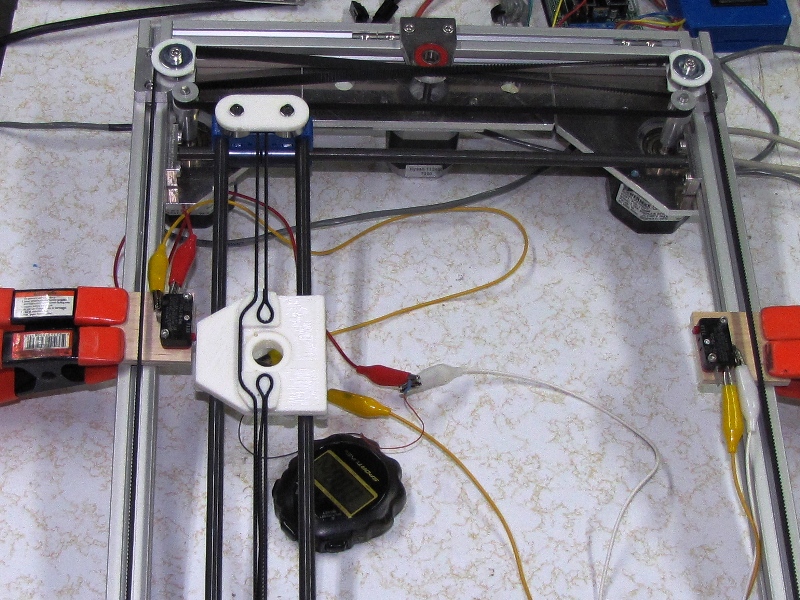
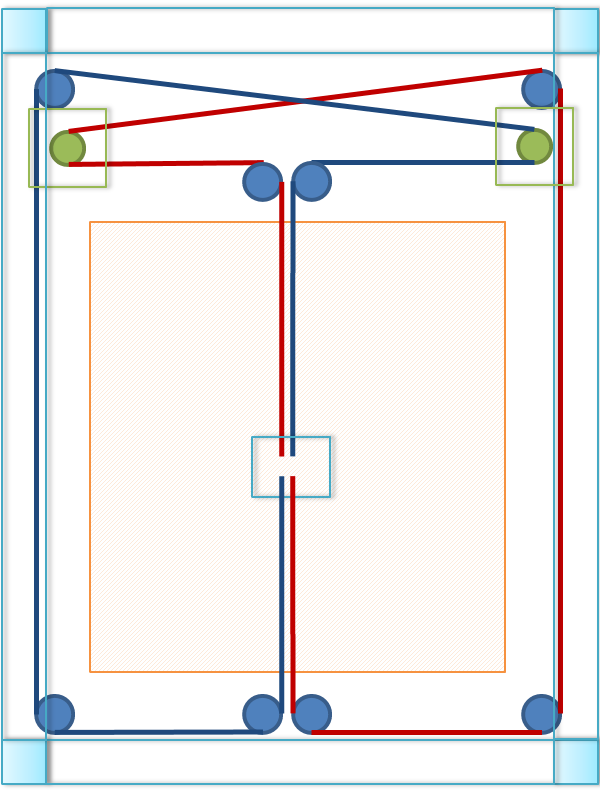
To make the arrangement more compact, I rotated the motors 90 degrees to the side and then rotated the belt crossing 90 degrees to the same side. Additionally, I rotated the belts 180 degrees where they crossed, so they don't interfere with each other. Crossing the belts also eliminates the need for any GT2 idlers - only the back of the belts ride on the idlers. To tension the belts, the two idlers at the top of the Y axis are moved along the extrusions.
I'm using 8mm IGUS rods and linear bearings. Initially I had a lot of trouble getting these to run smoothly, but they seem to be working OK now. For stepper motors, I used two surplus NEMA 23 motors left over from my CNC mill.
At this point, I have the X-Y stage done and have completed initial tests. I will say that I'm impressed with the speed. With minimal tuning and 12 volts (24 volts planned) I was able to command feed rates of 670 mm/s. Compared to my Taig CNC mill, my current 3D printer, which runs at a maximum of 25 mm/s, that's smokin'.
Next I need to wire up endpoint switches and finish designing the z-axis.
|
Re: Compact CoreXY Build October 11, 2014 07:45PM |
Registered: 9 years ago Posts: 113 |
|
Re: Compact CoreXY Build October 11, 2014 10:51PM |
Registered: 12 years ago Posts: 809 |
Great work with the belts! The carriage belt termination is very nice as well.
Looking forward to seeing the finished machine.
- akhlut
Just remember - Iterate, Iterate, Iterate!
[myhomelessmind.blogspot.com]
Looking forward to seeing the finished machine.
- akhlut
Just remember - Iterate, Iterate, Iterate!
[myhomelessmind.blogspot.com]
|
Re: Compact CoreXY Build October 13, 2014 04:28PM |
Registered: 9 years ago Posts: 135 |
That does look pretty awesome, but I wonder if you'll run into problems at that intersection. It looks like the belts are rubbing against each other. While the effects of that are minimized since it's the smooth side of the belts that are touching, it still seems like they might wear on each other over time or introduce artifacts with one belt tugging on the other slightly as it moves.
If it does cause trouble, it doesn't look like it would be too much trouble to move one belt up a few mm and the other down a few mm to get a little bit of separation between them where they cross.
If it does cause trouble, it doesn't look like it would be too much trouble to move one belt up a few mm and the other down a few mm to get a little bit of separation between them where they cross.
|
Re: Compact CoreXY Build October 13, 2014 06:41PM |
Admin Registered: 11 years ago Posts: 3,096 |
Quote
Feign
That does look pretty awesome, but I wonder if you'll run into problems at that intersection. It looks like the belts are rubbing against each other. While the effects of that are minimized since it's the smooth side of the belts that are touching, it still seems like they might wear on each other over time or introduce artifacts with one belt tugging on the other slightly as it moves.
If it does cause trouble, it doesn't look like it would be too much trouble to move one belt up a few mm and the other down a few mm to get a little bit of separation between them where they cross.
I was thinking the same. But what if you would print a PLA guide that slips in between the belts and acts as a sliding guide so the belts don't touch each other?
PLA has a good friction coefficient, at least way better than rubber-ish materials.
http://www.marinusdebeer.nl/
|
Re: Compact CoreXY Build October 13, 2014 08:15PM |
Registered: 9 years ago Posts: 23 |
The belts do touch each other where they cross, so there is a potential for some problems. I don't think it will affect the print, there just isn't enough friction to cause the printer to hesitate or tug. I do think there is possibility of excessive wear. Once I get some prints going, I'll measure the temperature of the belts to see if it goes up because of the friction. I think a small piece of nylon or even just some PLA filament between the pieces would solve any problems.
I hooked up two micro switches to a stopwatch to get an idea of how fast the printer was moving. I put the carriage in the middle, moved it over to hit the first switch and then over to the second switch, a distance of 199mm. At a feed rate of 670 mm/s, it traversed the distance in 0.53 seconds, for an average speed of 375 mm/s. Since that speed includes the acceleration from zero and deceleration to zero, I'm pretty pleased.
I like having the CNC mill, I've had it for almost 10 years now. I cut most of the parts out of aluminum because it is faster (for simple parts at least) than printing, aluminum is cheaper than ABS filament, and I don't have to worry about the parts melting in the heated chamber.
|
Re: Compact CoreXY Build October 13, 2014 09:21PM |
Registered: 10 years ago Posts: 553 |
Awesome design! I might convert my large format printer to this layout just to save on space and make wire management/maintenance easier.
If the crossover becomes a problem, you can always run the belts at 2 different heights. That's what I've got going right now and it's working great.
greghoge.com
HUGE 3D PRINTER PARTS SALE!!!
If the crossover becomes a problem, you can always run the belts at 2 different heights. That's what I've got going right now and it's working great.
greghoge.com
HUGE 3D PRINTER PARTS SALE!!!
|
Re: Compact CoreXY Build October 14, 2014 09:02AM |
Registered: 9 years ago Posts: 113 |

|
Re: Compact CoreXY Build October 15, 2014 02:40PM |
Registered: 9 years ago Posts: 135 |
It probably wouldn't be too hard to make something that separates the belts, I would just make that to ease my mind if nothing else.
Weather or not it's enough to affect printing though is up to experimentation then, the proof is in the printing. Though I agree you ought to keep an eye on the heat in the belts as well.
Edited 2 time(s). Last edit at 10/15/2014 02:56PM by Feign.
Weather or not it's enough to affect printing though is up to experimentation then, the proof is in the printing. Though I agree you ought to keep an eye on the heat in the belts as well.
Edited 2 time(s). Last edit at 10/15/2014 02:56PM by Feign.
|
Re: Compact CoreXY Build October 15, 2014 06:02PM |
Admin Registered: 11 years ago Posts: 3,096 |
Quote
Feign
It probably wouldn't be too hard to make something that separates the belts, I would just make that to ease my mind if nothing else.
Weather or not it's enough to affect printing though is up to experimentation then, the proof is in the printing. Though I agree you ought to keep an eye on the heat in the belts as well.
I think that wear might occur even without significant heat production.. Of course, if it gets hot, you're sure that your belts won't last long. But even without them heating up, wear can be a very serious problem.
http://www.marinusdebeer.nl/
|
Re: Compact CoreXY Build October 15, 2014 09:14PM |
Registered: 9 years ago Posts: 23 |
I do plan to share the BOM and files when I get a little closer to being done.
The last couple of nights I've been making flanges to fit over the bearings. The stationary guides that I started with worked, but the belts will run better with the flanges on the bearings.
Edited 1 time(s). Last edit at 10/15/2014 09:15PM by rcengr.
The last couple of nights I've been making flanges to fit over the bearings. The stationary guides that I started with worked, but the belts will run better with the flanges on the bearings.

Edited 1 time(s). Last edit at 10/15/2014 09:15PM by rcengr.
|
Re: Compact CoreXY Build October 15, 2014 09:38PM |
Registered: 9 years ago Posts: 23 |
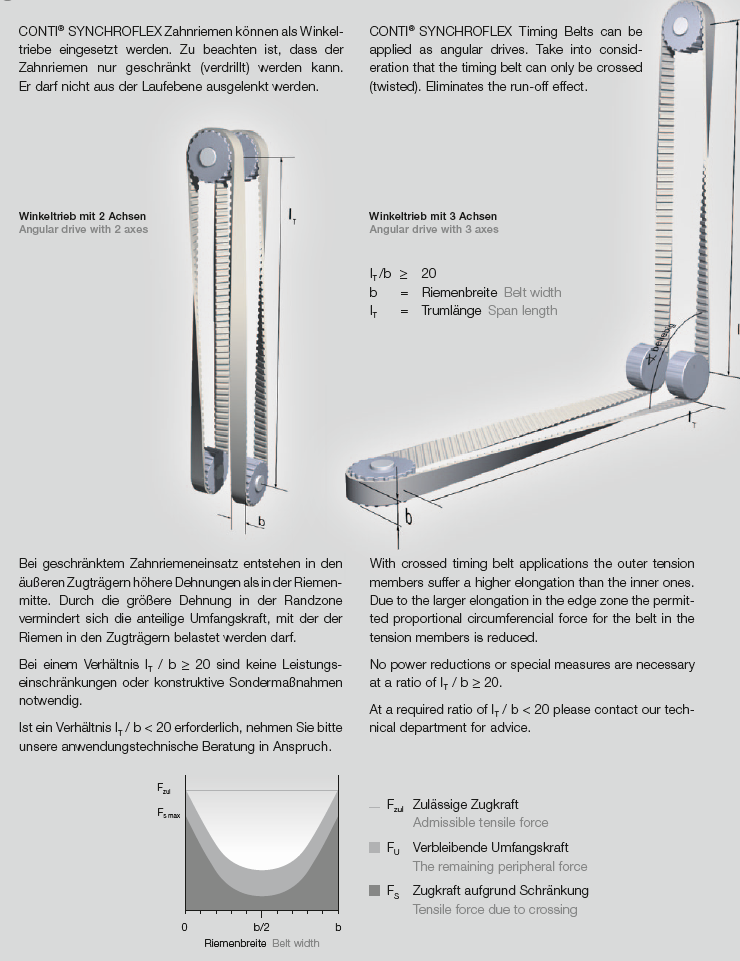
One of the reasons that I went with crossed belts is that I was able to find some design data for twisting the belts. As shown in the attached Continental catalog page, twisting the belts is OK if the ratio of the belt width to the span is greater than 20. Since the picture is showing a 90 degree twist, I figured that a ration of over 40 would be fine for a 180 degree twist. Using a 6mm belt requires at least a 240mm span and my machine has about a 280mm span.
|
Re: Compact CoreXY Build October 17, 2014 04:07AM |
Registered: 9 years ago Posts: 42 |
Any idea how that length ratio varies with belt speed? I was hoping to make some shorter belt twists (100mm) but on a very slowly moving Z belt, hoping that its lack of motion would imply a lack of damage from the twist. Also planning on having the twist between smooth/rear-surface pulleys and therefore with no nicking of the tooth corners as the belt enters/leaves a cog at an angle.
I also note from reading a GT2 reference that your typical reprap grossly overloads its belts both in terms of static and operating tension.
I also note from reading a GT2 reference that your typical reprap grossly overloads its belts both in terms of static and operating tension.
|
Re: Compact CoreXY Build November 11, 2014 09:36PM |
Registered: 9 years ago Posts: 23 |
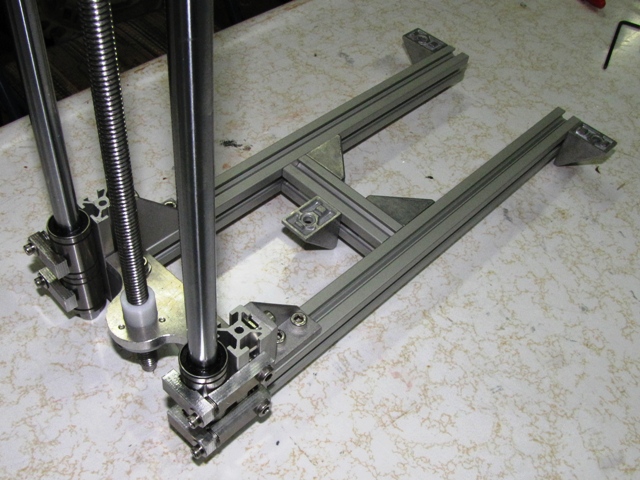
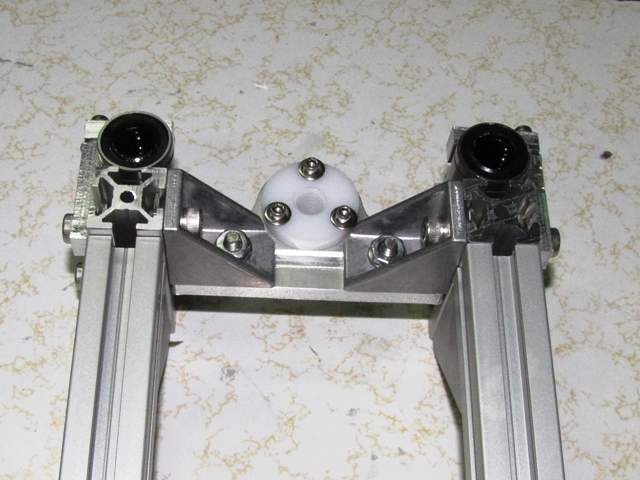
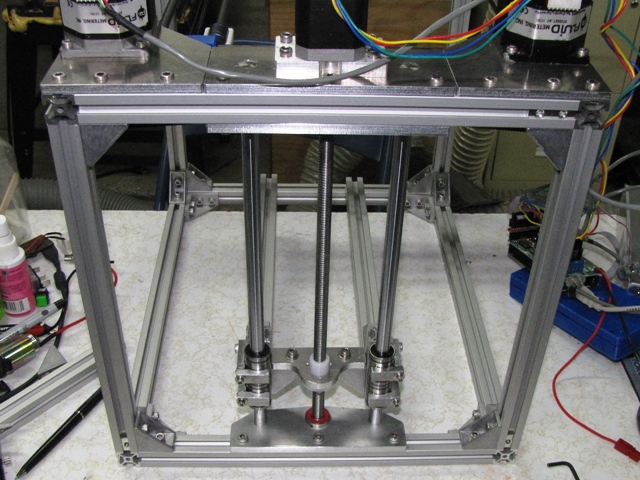
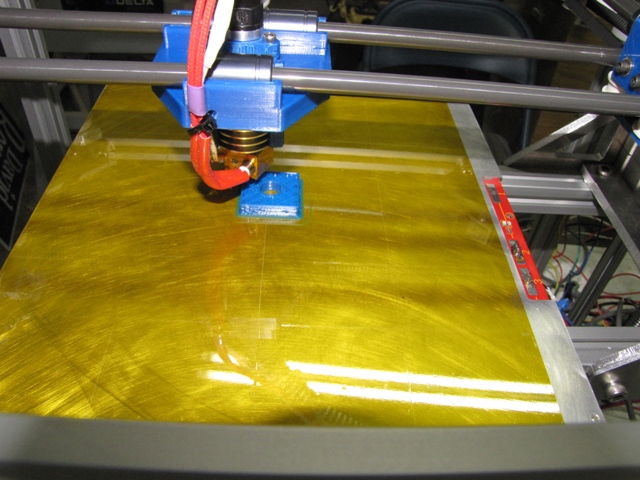
After a couple of false starts, I finally made progress getting my z axis together. It's a cantilever design riding on two 12mm hardened rods and linear bearings from VBX. The leadscrew is a 10mm screw from Ultibots.com.
|
Re: Compact CoreXY Build November 12, 2014 10:44PM |
Registered: 9 years ago Posts: 23 |
I got the z axis installed in the frame and aligned. The leadscrew is very smooth and easy to turn, so I'm very happy. Right now I have 215mm of travel. That might be reduced a little, depending on how the hot end and heated bed stack up, but it's right where I wanted it for now.
|
Re: Compact CoreXY Build November 28, 2014 07:45PM |
Registered: 9 years ago Posts: 23 |
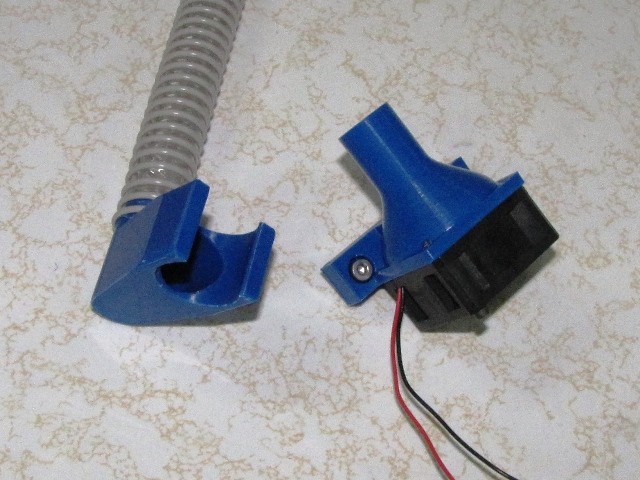
I printed out the parts for my remote fan for the E3D hotend. This uses a hose from a CPAP machine to move the air into the enclosure so that its always cool. I also upped the fan size from a 30mm to a 40mm, which should be able to move enough air to compensate for going through the hose.
I know there are several discussions regarding cooling a hotend inside an enclosed printer, so this setup should give everyone something to experiment with. The 3D files are posted here: http://www.thingiverse.com/thing:569044 I've put in files for both the v5 and v6, but I've only printed and fit the v5 version.
I know there are several discussions regarding cooling a hotend inside an enclosed printer, so this setup should give everyone something to experiment with. The 3D files are posted here: http://www.thingiverse.com/thing:569044 I've put in files for both the v5 and v6, but I've only printed and fit the v5 version.
|
Re: Compact CoreXY Build November 29, 2014 04:47PM |
Admin Registered: 11 years ago Posts: 3,096 |
It's so nice to see all the work you're putting into the project! A shame I can't continue my build at this time, I have a thesis to write for my studies, but when it's finished I can't wait to get back in the saddle January 2015!
http://www.marinusdebeer.nl/
http://www.marinusdebeer.nl/
|
Re: Compact CoreXY Build December 16, 2014 09:55PM |
Registered: 11 years ago Posts: 364 |
|
Re: Compact CoreXY Build December 17, 2014 12:43AM |
Registered: 10 years ago Posts: 102 |
|
Re: Compact CoreXY Build December 17, 2014 06:17AM |
Registered: 9 years ago Posts: 23 |
|
Re: Compact CoreXY Build December 19, 2014 11:37AM |
Registered: 9 years ago Posts: 83 |
|
Re: Compact CoreXY Build December 19, 2014 04:58PM |
Registered: 9 years ago Posts: 23 |
My current printer uses leadscrews on all axis, so I don't have first hand experience on the type and magnitude of the print errors. There are numerous threads on the forums that indicate replacing the smooth idlers improves the print. A review of some of these threads would give you a better idea of whether it would be important to you.
|
Re: Compact CoreXY Build December 19, 2014 05:19PM |
Registered: 9 years ago Posts: 23 |
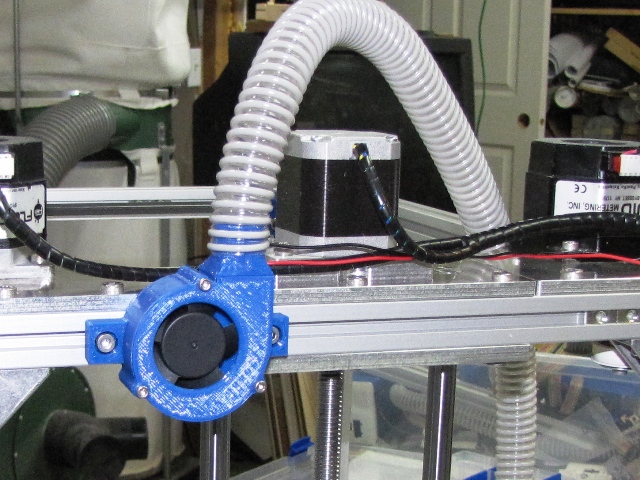
I been making slight progress towards finishing my machine. New side and center carriages have been printed to account for the change in alignment when I added the idlers to the bearings. I also have the power supply mounted and a box for the 2560/RAMPS done. Now I'm working on version 3 of the z-axis.
I also re-worked the remote fan to give a little more airflow. By pulling the fan out of housing and putting it in a centrifugal housing, the airflow increased appreciably. Updated STLs have been posted on Thingiverse.
I also re-worked the remote fan to give a little more airflow. By pulling the fan out of housing and putting it in a centrifugal housing, the airflow increased appreciably. Updated STLs have been posted on Thingiverse.
|
Re: Compact CoreXY Build December 19, 2014 05:32PM |
Registered: 9 years ago Posts: 23 |

|
Re: Compact CoreXY Build January 05, 2015 07:42PM |
Registered: 9 years ago Posts: 23 |
I finally made more progress on my printer. As I'm typing right now, the third print is underway. I finished the third version of the z axis. I'm much happier with this version, although through a miscalculation of the hot end stackup it only has about 180mm travel instead of the 200 I wanted. Oh well, I can get some of it back later.
After leveling the bed and calibrating the thermistors, it was ready to print. I have to tune the retract settings to get rid of some blobbing, but the dimensions are right on. After using my mill to print for the last 9 months, it is very exciting to see rapids at 500 mm/s instead of 25 mm/s and infill is going at 100 mm/s instead of 20 mm/s. Next is figuring out the end stops and then taming my rat's nest of wires.
After leveling the bed and calibrating the thermistors, it was ready to print. I have to tune the retract settings to get rid of some blobbing, but the dimensions are right on. After using my mill to print for the last 9 months, it is very exciting to see rapids at 500 mm/s instead of 25 mm/s and infill is going at 100 mm/s instead of 20 mm/s. Next is figuring out the end stops and then taming my rat's nest of wires.
|
Re: Compact CoreXY Build February 27, 2015 08:28PM |
Registered: 9 years ago Posts: 23 |
Here's an update on my build. At this point, I've got about 60 hours of printing on it with very few problems. I've got the wiring cleaned up, but I still need to get my sides on.
The crossed belts are working fine, but there is some visible wear. After about 30 hours of printing I did a partial tear down and examined the belts. They were slightly shiny along the edges and there was a very fine black dust around the bearings. So there is definitely wear, but I don't expect it to cause problems for a while. If I have to replace the belts after every 200 hours or so it will be OK. I think I might put some silicone grease on the back of the belts and see if that reduces wear.
The speed is just phenomenal. Just running some basic moves with gcode, the printer was easily able to move at 500mm/s without the motors stalling. However, when printing files I was having problems with it missing steps randomly throughout the file. I think the 500mm/s was outpacing either the processing or the buffer in the Marlin software and causing the missed steps, since it didn't seem to be a mechanical problem. I dropped the rapid speeds down to 250mm/s with 125mm/s fill and 80mm/s perimeters for very reliable printing. Also very interesting is that the printer runs reliably with the jerk set to 100mm/s. After running some acceleration calculations, I decided that I really didn't need the 100mm/s and dropped the jerk to 50mm/s to reduce stress on the machine. It still does short back and forth fills so fast that it looks like a sewing machine.
I do have an issue with z-banding. I had the z axis screw supported with bearings at both ends to start, so I knew I would probably have a problem. Unfortunately, even though I changed the screw to free up the bottom end and added some set screws to better anchor the 12mm rods, the problem has just gotten worse.
I've been very happy with the IGUS bearings and aluminum rods. They are very smooth and quiet. I was surprised that if the carriage was slightly cocked that they would jam. But the pull from the CoreXY system is so even that there was never a problem once the belts were on. I would not try and use these bearings for an H-bot setup though. I think the aluminum rods are bending a little too much, causing the carriage to dip when it is in the center. I should have gone with 10mm rods instead of 8mm. The 10mm rods would have had similar stiffness to 8mm steel rods and still would have weighed less.
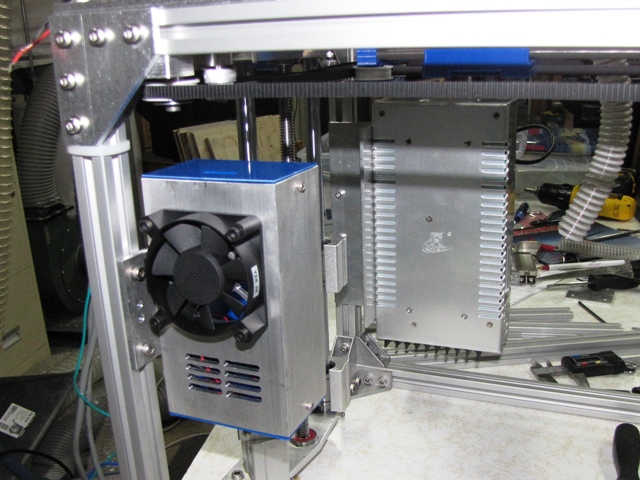
The remote fan on the hot end is working OK. I think I need a little more flow, the two lowest fins on the E3D are too hot to hold my fingers on. The top of the heat sink is still cool to the touch. So while I've done as long as a 7 hour print in ABS with no problems, I suspect that it would not work for PLA.
Edited 1 time(s). Last edit at 02/27/2015 08:32PM by rcengr.
The crossed belts are working fine, but there is some visible wear. After about 30 hours of printing I did a partial tear down and examined the belts. They were slightly shiny along the edges and there was a very fine black dust around the bearings. So there is definitely wear, but I don't expect it to cause problems for a while. If I have to replace the belts after every 200 hours or so it will be OK. I think I might put some silicone grease on the back of the belts and see if that reduces wear.
The speed is just phenomenal. Just running some basic moves with gcode, the printer was easily able to move at 500mm/s without the motors stalling. However, when printing files I was having problems with it missing steps randomly throughout the file. I think the 500mm/s was outpacing either the processing or the buffer in the Marlin software and causing the missed steps, since it didn't seem to be a mechanical problem. I dropped the rapid speeds down to 250mm/s with 125mm/s fill and 80mm/s perimeters for very reliable printing. Also very interesting is that the printer runs reliably with the jerk set to 100mm/s. After running some acceleration calculations, I decided that I really didn't need the 100mm/s and dropped the jerk to 50mm/s to reduce stress on the machine. It still does short back and forth fills so fast that it looks like a sewing machine.
I do have an issue with z-banding. I had the z axis screw supported with bearings at both ends to start, so I knew I would probably have a problem. Unfortunately, even though I changed the screw to free up the bottom end and added some set screws to better anchor the 12mm rods, the problem has just gotten worse.
I've been very happy with the IGUS bearings and aluminum rods. They are very smooth and quiet. I was surprised that if the carriage was slightly cocked that they would jam. But the pull from the CoreXY system is so even that there was never a problem once the belts were on. I would not try and use these bearings for an H-bot setup though. I think the aluminum rods are bending a little too much, causing the carriage to dip when it is in the center. I should have gone with 10mm rods instead of 8mm. The 10mm rods would have had similar stiffness to 8mm steel rods and still would have weighed less.
The remote fan on the hot end is working OK. I think I need a little more flow, the two lowest fins on the E3D are too hot to hold my fingers on. The top of the heat sink is still cool to the touch. So while I've done as long as a 7 hour print in ABS with no problems, I suspect that it would not work for PLA.
Edited 1 time(s). Last edit at 02/27/2015 08:32PM by rcengr.
|
Re: Compact CoreXY Build February 27, 2015 09:29PM |
Registered: 9 years ago Posts: 113 |
|
Re: Compact CoreXY Build February 27, 2015 09:48PM |
Registered: 9 years ago Posts: 23 |
The build area is about 210 wide x 200 deep x 190 high. I need to move the hot end air hose from the side of the carriage to the center to pick up another 10-15 mm of build area. The biggest part I have printed so far is 203mm x 60mm x 50mm, about 50m of filament and it took 7 hours. It did split, which is why I need to finish the sides to make the heated chamber.
|
Re: Compact CoreXY Build February 28, 2015 10:36AM |
Registered: 9 years ago Posts: 1,011 |
Very nice machine. Is it Igus rods or any aluminium tubing ? I use Igus Drylin bearings on hardened steel rods and it works nice and smooth with no play. I love them. There's a way to don't twist the belts and reduce the wear, see attached pic. Use pulleys on the timing side of the belt, and bearings on the smooth side. A pulley is mounted properly on an axis supported buy two bearings. Pulleys and bearings are cheap. It's no big deal. 
Collective intelligence emerges when a group of people work together effectively. Prusa i3 Folger (A lot of the parts are wrong, boring !)
Collective intelligence emerges when a group of people work together effectively. Prusa i3 Folger (A lot of the parts are wrong, boring !)
|
Re: Compact CoreXY Build March 01, 2015 05:10AM |
Registered: 9 years ago Posts: 23 |

Sorry, only registered users may post in this forum.