My CoreXY Build
Posted by Rectangled
|
My CoreXY Build December 29, 2014 06:51PM |
Registered: 9 years ago Posts: 11 |
Hello all,
I have just started to design my very first 3D printer and I just felt it was at a good point in time to share my CAD to get people's feedback to make sure I am not doing anything horribly wrong or offensive. Plus it will help influence my design for the better and will share all solidworks files once done.
I have creeped the forum and wiki quite a bit and defiantly like the coreXY style because it is basically like a CNC router and could lend itself to that in the future, its also how the pros do it. They are not the cheapest but I do want to build something that will last, print larger and I could use for work.
This is the basic XY frame with carriages and obviously is still in progress.
Some criteria I was going by:
-XY build area around 1.5', but possibly be able to expand it in the future by using longer extrusions and belts.
-Try to eliminate gaps everywhere to reduce tolerance gap stack-up.
-Remain somewhat withing the 80/20 frame for protection, handling and to better lend itself to Z framing mounting.
Custom brackets would be waterjet cut from 6mm steel or alu, then just drilled, tapped, or reamed areas that require higher precision. Therefore, the bearing holes will be cut slightly smaller, reamed to the exact size then heated to fit the bearing.
Some specs:
Frame: 2020 x 2' from 80/20
Motors: Nemas 17
Controller: sanguinololu 1.3a
Belting: Gates GT2 2mm Pitch x 7mm
Everything else still in the air.
One thing that is still bothering me is whether to configure the belts on different level like gforce1 has shown (click) or the conventional crossed way. I am guessing there is no real difference, except stacking two pivots on top of each other could be a trickier and thicker setup.
Thanks and keep on making pancakes,
-B
Edited 1 time(s). Last edit at 12/29/2014 06:57PM by Rectangled.
I have just started to design my very first 3D printer and I just felt it was at a good point in time to share my CAD to get people's feedback to make sure I am not doing anything horribly wrong or offensive. Plus it will help influence my design for the better and will share all solidworks files once done.
I have creeped the forum and wiki quite a bit and defiantly like the coreXY style because it is basically like a CNC router and could lend itself to that in the future, its also how the pros do it. They are not the cheapest but I do want to build something that will last, print larger and I could use for work.
This is the basic XY frame with carriages and obviously is still in progress.
Some criteria I was going by:
-XY build area around 1.5', but possibly be able to expand it in the future by using longer extrusions and belts.
-Try to eliminate gaps everywhere to reduce tolerance gap stack-up.
-Remain somewhat withing the 80/20 frame for protection, handling and to better lend itself to Z framing mounting.
Custom brackets would be waterjet cut from 6mm steel or alu, then just drilled, tapped, or reamed areas that require higher precision. Therefore, the bearing holes will be cut slightly smaller, reamed to the exact size then heated to fit the bearing.
Some specs:
Frame: 2020 x 2' from 80/20
Motors: Nemas 17
Controller: sanguinololu 1.3a
Belting: Gates GT2 2mm Pitch x 7mm
Everything else still in the air.
One thing that is still bothering me is whether to configure the belts on different level like gforce1 has shown (click) or the conventional crossed way. I am guessing there is no real difference, except stacking two pivots on top of each other could be a trickier and thicker setup.


Thanks and keep on making pancakes,
-B
Edited 1 time(s). Last edit at 12/29/2014 06:57PM by Rectangled.
|
Re: My CoreXY Build December 30, 2014 09:17PM |
Registered: 10 years ago Posts: 102 |
Very nice CAD drawings. What did you use to render those? I am actually going with a kind of hybrid between the two options of crossing vs. not crossing (well, more just the stacked pulleys). I am stacking the pulleys but crossing the belts so I can have the the motors at the same z position.
I'll be keeping an eye on this thread. Looks great.
JTT
I'll be keeping an eye on this thread. Looks great.
JTT
|
Re: My CoreXY Build December 31, 2014 08:24AM |
Registered: 10 years ago Posts: 770 |
|
Re: My CoreXY Build January 02, 2015 10:28PM |
Registered: 9 years ago Posts: 11 |
Thanks guys!
jtoombs:
The the images are done in keyshot 5. The program is incredibly user friendly and creates impressive studio images within minutes and minimal rendering knowledge. It doesn't have GI capabilities like vray, but after all it is designed for product rendering. It also integrates well with just about any CAD package, (solidworks, catia, creo, sketchup, rhino, etc). Check it out: here
Floyd:
Yeah I too like the idea of separating the framing structure from the linear motion. Having one piece act as the overall structure, and another just service linear motion in my mind will generate lest binding or 'sticktion'; similar to the requirement for crowns and axles on suspension forks to keep linear motion consistent.
I have updated my design and will post picture soon. Opted for crossed belt pattern actually.
|
Re: My CoreXY Build January 02, 2015 11:16PM |
Registered: 10 years ago Posts: 770 |
|
Re: My CoreXY Build January 04, 2015 12:04AM |
Registered: 10 years ago Posts: 102 |
|
Re: My CoreXY Build January 11, 2015 11:52PM |
Registered: 9 years ago Posts: 11 |
Hey Guys,
Thanks again for the feedback!
Hey Floyd, always nice to meet another fellow designer. Currently, I am using (and learning at the same) time Creo at my work which is proE. It is a pretty neat piece of software especially the Style feature. If you are solidworks native you should defiantly check it out.
Here is my CAD update.
One of the issues I had with my previous design was everything was too too overbuilt and clunky. I had 12mm and 10mm linear rods, 4 giant pillow block on each carriage and thick sheet metal structure that I feel would have made a really heavy printer. And we all know too heavy is too much inertia, vibration and satisfactory prints. In my mind the demand for lightness and accuracy of parts outweighed shear brute stiffness to create a locked down printer.
Some new things:
-Purchased Hiwin mini rails because they are light more accurate and integrated into the design better. Plus I love how they bolt down every 20mm, just love it.
-6mm to 4mm thick material.
-Y Carriage structure I opted for 2040 extrusion over flat metal. This seemed stiffer and more compact. Plus I can nicely run one Hiwin rail down the center and upside-down Just like makerbot does.
-The corners now use the same plates on top, bottom and opposing corners to decrease the lot cost quote from the vendor. (i.e. this means motor corner plates are same on each side and Idler corner plates are the same on each side).
Aligning belt idler directly on top of each other required too much complicated bearing work, especially since I want to use little ball bearings everywhere possible.
Next:
-How to clamp the timing belts nicely?
-How to mount the hot end (and work in the bowden extruder), there is two cuts on the X carriage that is the beginning of this.
-Z axis, but I am not too worried about this just yet.
I do a lot of CAD waffling back and forth between ideas, which is poor practice and why this is taking so darn long with nothing physical to show for it. I know it is a lot of theorizing and 'what ifs' with no tangible proof, but I am that guy who has to CAD every last detail before the execute. Hopefully, the next post will be the start of construction!
Thanks again for the feedback!
Hey Floyd, always nice to meet another fellow designer. Currently, I am using (and learning at the same) time Creo at my work which is proE. It is a pretty neat piece of software especially the Style feature. If you are solidworks native you should defiantly check it out.
Here is my CAD update.


One of the issues I had with my previous design was everything was too too overbuilt and clunky. I had 12mm and 10mm linear rods, 4 giant pillow block on each carriage and thick sheet metal structure that I feel would have made a really heavy printer. And we all know too heavy is too much inertia, vibration and satisfactory prints. In my mind the demand for lightness and accuracy of parts outweighed shear brute stiffness to create a locked down printer.
Some new things:
-Purchased Hiwin mini rails because they are light more accurate and integrated into the design better. Plus I love how they bolt down every 20mm, just love it.
-6mm to 4mm thick material.
-Y Carriage structure I opted for 2040 extrusion over flat metal. This seemed stiffer and more compact. Plus I can nicely run one Hiwin rail down the center and upside-down Just like makerbot does.
-The corners now use the same plates on top, bottom and opposing corners to decrease the lot cost quote from the vendor. (i.e. this means motor corner plates are same on each side and Idler corner plates are the same on each side).
Aligning belt idler directly on top of each other required too much complicated bearing work, especially since I want to use little ball bearings everywhere possible.
Next:
-How to clamp the timing belts nicely?
-How to mount the hot end (and work in the bowden extruder), there is two cuts on the X carriage that is the beginning of this.
-Z axis, but I am not too worried about this just yet.
I do a lot of CAD waffling back and forth between ideas, which is poor practice and why this is taking so darn long with nothing physical to show for it. I know it is a lot of theorizing and 'what ifs' with no tangible proof, but I am that guy who has to CAD every last detail before the execute. Hopefully, the next post will be the start of construction!
|
Re: My CoreXY Build January 13, 2015 08:33AM |
Registered: 10 years ago Posts: 770 |
|
Re: My CoreXY Build January 14, 2015 09:59AM |
Registered: 11 years ago Posts: 1,807 |
Hi Rectangled ,
you are a CAD Master, very cool.
I have had an Idea to make a solution for the advantage of an Ultimaker mechanic and a Core x/y advantage for a 2/1 gear and lover Vibrations/better Prints ( 2 Motors everytime)...
It is only an Idea and you need only two more Hiwin mini rails ...
I can not design it (no deep cad expiriance and only sketchup, freecad or openscad beginer ..))
On the aluminum profiles each 2 HIWIN guides, the guide rollers on y and again deflected over solid rollers on the outer race cars of the X guides. Thus, the tensile forces on the outer trolley, similar to the Ultimaker then push the middle crossed HIWIN guides. By taking advantage of the Core x / y kinematics but that would have to be the maas of things. The disadvantage of the longer belt could be compensated with wider. Would that even an idea for you?
Sorry for my very bad english :-)
Angelo
Mein Club: [hackerspace-ffm.de]
RADDS-Shield -> Commercial [max3dshop.org]
you are a CAD Master, very cool.
I have had an Idea to make a solution for the advantage of an Ultimaker mechanic and a Core x/y advantage for a 2/1 gear and lover Vibrations/better Prints ( 2 Motors everytime)...
It is only an Idea and you need only two more Hiwin mini rails ...

I can not design it (no deep cad expiriance and only sketchup, freecad or openscad beginer ..))
On the aluminum profiles each 2 HIWIN guides, the guide rollers on y and again deflected over solid rollers on the outer race cars of the X guides. Thus, the tensile forces on the outer trolley, similar to the Ultimaker then push the middle crossed HIWIN guides. By taking advantage of the Core x / y kinematics but that would have to be the maas of things. The disadvantage of the longer belt could be compensated with wider. Would that even an idea for you?
Sorry for my very bad english :-)
Angelo
Mein Club: [hackerspace-ffm.de]
RADDS-Shield -> Commercial [max3dshop.org]
|
Re: My CoreXY Build January 15, 2015 06:49AM |
Registered: 11 years ago Posts: 1,865 |
Hi Angelo and others,
these are my possible ideas.
Enrico
[www.dapa3dservice.it] [www.studiodapa.it]
repstrap dApA, Ramps 1.4, MarlinKimbra / scanner 3D Cubify Sense / Formlabs Form 2
these are my possible ideas.
Enrico
[www.dapa3dservice.it] [www.studiodapa.it]
repstrap dApA, Ramps 1.4, MarlinKimbra / scanner 3D Cubify Sense / Formlabs Form 2
|
Re: My CoreXY Build March 14, 2015 02:30PM |
Registered: 9 years ago Posts: 11 |
Finalized CAD
(grayscale)
First Assembly of XY mech (no Y, just X right now)
It has been a while since my last post, but this has been kinda my back-burner project. This is a quick post, and I will try to address the comments above in a later post (regarding your belting suggestions).


(grayscale)

First Assembly of XY mech (no Y, just X right now)


It has been a while since my last post, but this has been kinda my back-burner project. This is a quick post, and I will try to address the comments above in a later post (regarding your belting suggestions).
|
Re: My CoreXY Build March 14, 2015 09:46PM |
Registered: 10 years ago Posts: 770 |
|
Re: My CoreXY Build March 30, 2015 11:18AM |
Registered: 9 years ago Posts: 2 |
|
Re: My CoreXY Build March 31, 2015 07:17PM |
Registered: 9 years ago Posts: 48 |
|
Re: My CoreXY Build May 22, 2015 01:13AM |
Registered: 8 years ago Posts: 1 |

|
Re: My CoreXY Build May 22, 2015 02:08AM |
Registered: 9 years ago Posts: 1,159 |
|
Re: My CoreXY Build May 22, 2015 05:00AM |
Registered: 11 years ago Posts: 1,865 |
www.marlinkimbra.it
online configuration tool for Marlin.
Enrico
[www.dapa3dservice.it] [www.studiodapa.it]
repstrap dApA, Ramps 1.4, MarlinKimbra / scanner 3D Cubify Sense / Formlabs Form 2
online configuration tool for Marlin.
Enrico
[www.dapa3dservice.it] [www.studiodapa.it]
repstrap dApA, Ramps 1.4, MarlinKimbra / scanner 3D Cubify Sense / Formlabs Form 2
|
Re: My CoreXY Build May 31, 2015 02:59PM |
Registered: 9 years ago Posts: 11 |


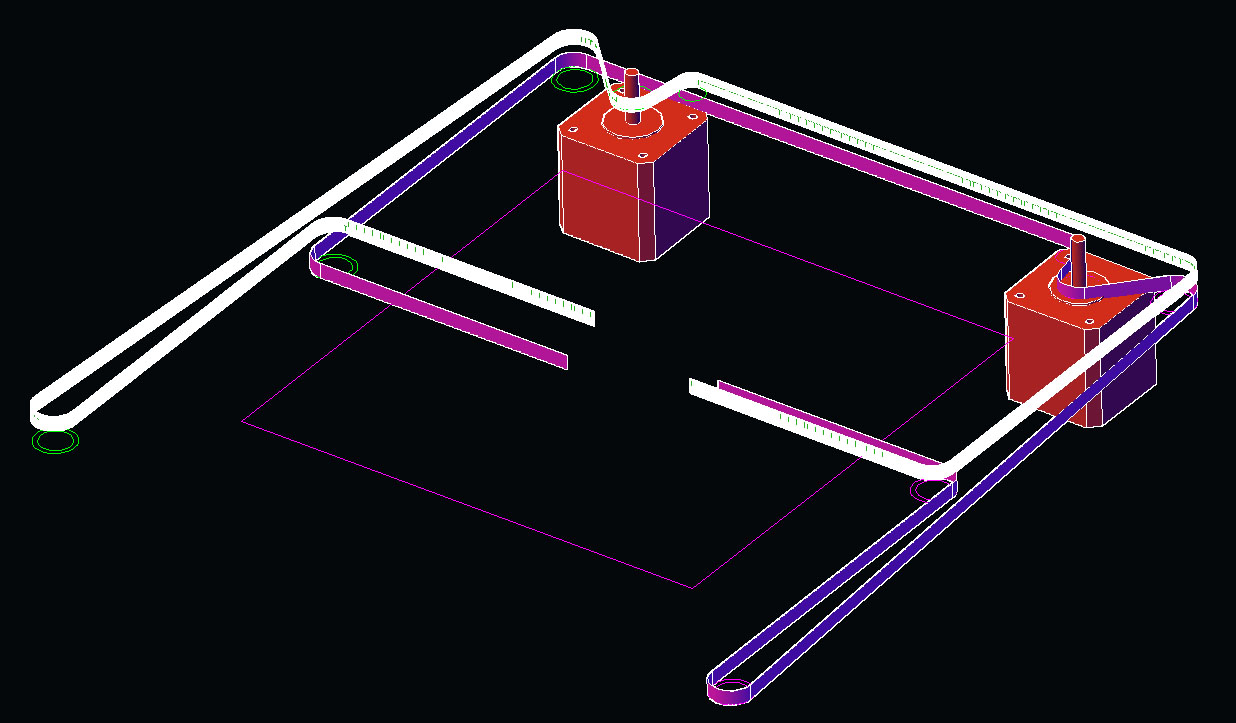
Belts and secondary Y motion finally installed.
I kind of expected that once I got into the assembly I would learn a lot and already there are things that I need to go back and change in CAD. Particularly, the order in which things came together was not heavily considered and I had to do a lot of cutting, filing and swearing to get things to fit.
Belt motion feels good. Having abec-7 bearings on every axis defiantly contributes to the buttery feel. I will try and fire it up sometime to get it dancing.
I plan to fully build this coreXY as intended then make changes afterward. Particularly the Acrylic brackets need to be a better material as Acrylic is a terrible plastic.
I can share CAD files with the community if people would like. Though keep in mind there are these assembly errors that I would like to fix first. I can do another quick rev. on the CAD and share it then? Or I can share what I have right now, whatever you guys prefer? Also, any suggestions for the best and safest way to share large size CAD files, dropbox?
Regards
Edited 1 time(s). Last edit at 05/31/2015 02:59PM by Rectangled.
|
Re: My CoreXY Build June 01, 2015 07:50AM |
Registered: 9 years ago Posts: 269 |
|
Re: My CoreXY Build June 03, 2015 03:35AM |
Registered: 8 years ago Posts: 6 |
|
Re: My CoreXY Build June 04, 2015 08:45AM |
Registered: 9 years ago Posts: 2 |
|
Re: My CoreXY Build March 02, 2016 12:08AM |
Registered: 8 years ago Posts: 112 |
yes please share
Makerparts.ca
Your Canadian source for V-Slot Extrusion, CNC and 3D Printing Parts and Accessories.
we are proud to be an official Openbuilds distributor.
Makerparts.ca
Your Canadian source for V-Slot Extrusion, CNC and 3D Printing Parts and Accessories.
we are proud to be an official Openbuilds distributor.
|
Re: My CoreXY Build May 26, 2016 08:39AM |
Registered: 8 years ago Posts: 11 |
|
Re: My CoreXY Build May 26, 2016 01:58PM |
Registered: 11 years ago Posts: 1,049 |
Excellent work!!
Black parts -- acrylic --- Lexan, plexiglass
Why? Easy machining?
Are you doing all the machining?
Why do guide rails go all the way to end? (trolley can't go there)
Is it really necessary to bolt rails every hole?
How many endstops are you going to use?
What will be your controller electronics?
Thank you
|
Re: My CoreXY Build May 29, 2016 01:41PM |
Registered: 8 years ago Posts: 3,525 |
It's beautifully designed and made. What size is the top gantry frame shown in the images above? My thinking would be that you want the frame very heavy duty but the axes as lightweight as possible. I think the x axis is over-built, you said earlier that you wanted something less heavy than a previous version. There's a lot of mass moving on the y axis so high speed printing might be less easy to achieve. This might be impossible to lighten more as I can't really tell how big it is.
Edited 1 time(s). Last edit at 05/29/2016 01:44PM by DjDemonD.
Simon Khoury
Co-founder of [www.precisionpiezo.co.uk] Accurate, repeatable, versatile Z-Probes
Published:Inventions
Edited 1 time(s). Last edit at 05/29/2016 01:44PM by DjDemonD.
Simon Khoury
Co-founder of [www.precisionpiezo.co.uk] Accurate, repeatable, versatile Z-Probes
Published:Inventions
|
Re: My CoreXY Build July 23, 2016 07:13PM |
Registered: 9 years ago Posts: 11 |
Hello,
This is long overdue, but here are the CAD files for this project
I am really sorry about the delay. I noticed that a lot of people where requesting the files and I have basically been totally absent on the forum for about a year now! Now that school is finished I can resume this project and after thinking more about it, I might move to a Kossel design.
Some notes on the CAD:
-It is NOT a complete and finalized printer! So please don't blindly build this design as it is NOT proven. I would hate for someone to spend money to try and build this and become frustrated that is doesn't run correctly.
-I am sharing the CAD because maybe someone can build off of it? Or use elements of its design. And so that the work done can have some further purpose.
I am happy to answer questions the best I can about the CAD, and let me know if there is troubles with the files or opening them.
All the best,
-b
|
Re: My CoreXY Build August 01, 2016 04:40PM |
Registered: 11 years ago Posts: 156 |
|
Re: My CoreXY Build August 20, 2016 03:26AM |
Registered: 7 years ago Posts: 17 |
So I'm digging into this design and seeing if I can build it into something useful. Just beautiful work Rectangled. From the comments I'm assuming the OP is no longer working on this project? I'm still really new to 3d printer design, so if you are still open to some questions, it would be a great help to me.
I measured the bed to be very large... 600mmx600mm I think. Much larger than my min target. One thing I haven't been able to figure out is how to determine how much of the bed is actually usable. I don't fully understand how far the x and y carriage can extend. I want to restrict it to no larger than 500mmx500mm (the convenient size for bed heaters and Printbite). I'm not sure how to exactly determine what range the current design is actually limited too.
As far as I can tell, no space has been allotted for electronics or other printer elements (such as where to mount the spool. I'm thinking either extending the extrusions to one side, or making the vertical extrusions taller to give space below the bed for electronics. Is there a preferred method. I am thinking to the side makes for easier access, while underneath is better for keeping the overall footprint down (the design is already quite large). Any thoughts?
Any help would be appreciated!
|
Re: My CoreXY Build January 01, 2017 08:18PM |
Registered: 8 years ago Posts: 16 |
|
Re: My CoreXY Build January 14, 2017 09:31PM |
Registered: 9 years ago Posts: 11 |
wbwing:
Hi. I can answer questions as best I can if you have any. But yes I am currently not active on this project.
-Yes I believe the bed is around 600x600. Which is pretty big.
-I also had not considered electronics or spooling. But I guess I had figured these features where not mechanically integral to performance and can be added later.
The design is quite large, but I don't see any reason why it cannot be scaled down? The concept around how the corners are executed is probably of the most interest. I bet you could adapt the corners to work with shorted straight sections?
Regards,
-B
Edited 3 time(s). Last edit at 01/14/2017 09:32PM by Rectangled.
Sorry, only registered users may post in this forum.