CoreXY / First build
Posted by tpra
|
CoreXY / First build January 13, 2015 02:56AM |
Registered: 9 years ago Posts: 56 |
Hi 
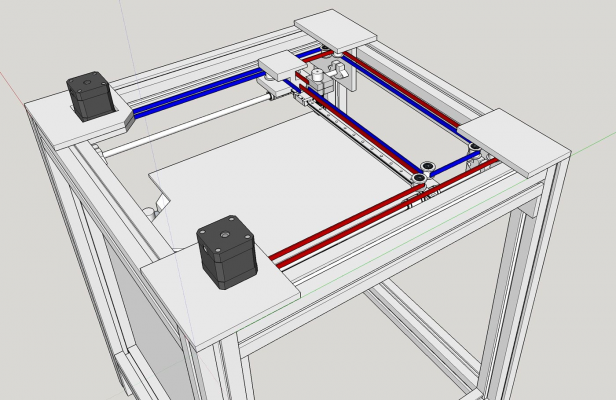
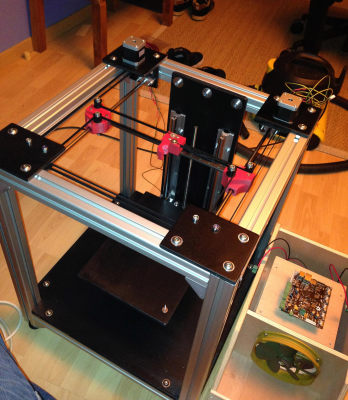
I've been a bit further in my 3D printer project, i thought i'd post a few pics to get advises !
Of course it's still 'WIP'. A lot of work to do on the head carriage !
So, that's my first 3D printer, and i really want to build it myself, that's part of my pleasure.
After studying different geometries, i decided to go for a coreXY implementation (because it looks such a simple and efficient solution).
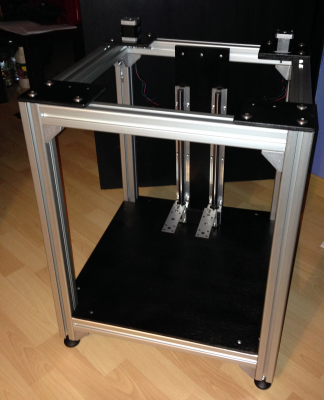
The "cube" is made of 40mm square aluminium extrusion (about 1.6"), and 10mm (2/5") plywood.
- Basically the whole motors/belt/pulley system is attached to the top plywood plate.
- The "Y" rails are 8mm rods, held on the aluminum extrusions using SHF8 brackets (the flange mounted ones - not shown on my cads). This should allow to square everything perfectly.
- The "X" rail is an Hiwin MGN9 rail/bearing block. At the beginning i thinked i would use 2 rails, but they are actually so stiff that only one will be needed.
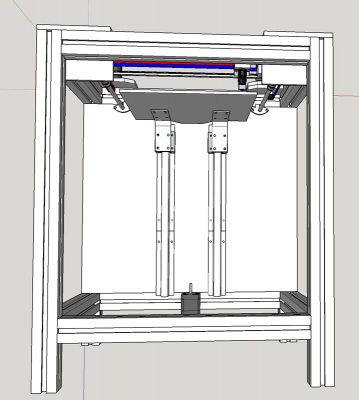
- Z will get an 8mm trapezoidal screw + delrin anti-backlash nut
- Belts are GT2 (not on CADs)
- Belt pulleys are RC helicopter parts.
- I bought a smoothieBoard to drive it.
Dimensions are 50cm x 50cm x 60cm (20"x20"x24") for a printing volume of 21x21x33cm.
Not efficient at all about dimensions anyway ^^
I plan to print PLA only.
Any advise appreciated !
PS. please forgive my english mistakes, it's not my mother-language

I've been a bit further in my 3D printer project, i thought i'd post a few pics to get advises !
Of course it's still 'WIP'. A lot of work to do on the head carriage !
So, that's my first 3D printer, and i really want to build it myself, that's part of my pleasure.
After studying different geometries, i decided to go for a coreXY implementation (because it looks such a simple and efficient solution).
The "cube" is made of 40mm square aluminium extrusion (about 1.6"), and 10mm (2/5") plywood.
- Basically the whole motors/belt/pulley system is attached to the top plywood plate.
- The "Y" rails are 8mm rods, held on the aluminum extrusions using SHF8 brackets (the flange mounted ones - not shown on my cads). This should allow to square everything perfectly.
- The "X" rail is an Hiwin MGN9 rail/bearing block. At the beginning i thinked i would use 2 rails, but they are actually so stiff that only one will be needed.
- Z will get an 8mm trapezoidal screw + delrin anti-backlash nut
- Belts are GT2 (not on CADs)
- Belt pulleys are RC helicopter parts.
- I bought a smoothieBoard to drive it.
Dimensions are 50cm x 50cm x 60cm (20"x20"x24") for a printing volume of 21x21x33cm.
Not efficient at all about dimensions
 anyway ^^
I plan to print PLA only.
Any advise appreciated !

PS. please forgive my english mistakes, it's not my mother-language

|
Re: CoreXY / First build January 17, 2015 06:04PM |
Registered: 9 years ago Posts: 56 |
Hi,
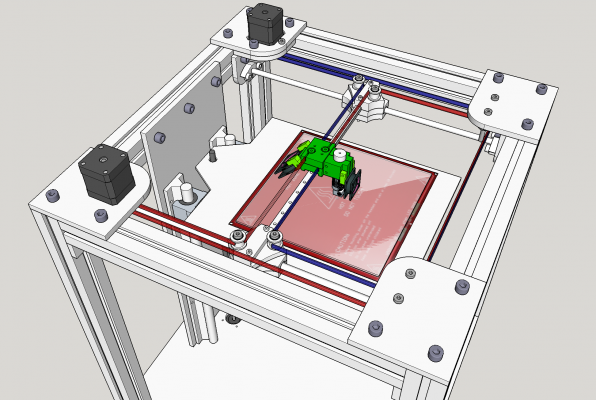
I updated the design, thanks to the belt path posted by gforce1
It's a lot better now (well, i think at least everything's straight)
Waiting for my aluminium extrusions, i'll post some pictures of the build (next week i hope).
Edited 1 time(s). Last edit at 01/17/2015 06:06PM by tpra.
I updated the design, thanks to the belt path posted by gforce1

It's a lot better now (well, i think
 at least everything's straight)
Waiting for my aluminium extrusions, i'll post some pictures of the build (next week i hope).
Edited 1 time(s). Last edit at 01/17/2015 06:06PM by tpra.
|
Re: CoreXY / First build January 18, 2015 06:28AM |
Registered: 10 years ago Posts: 344 |
|
Re: CoreXY / First build January 19, 2015 07:09PM |
Registered: 9 years ago Posts: 56 |
Hi,
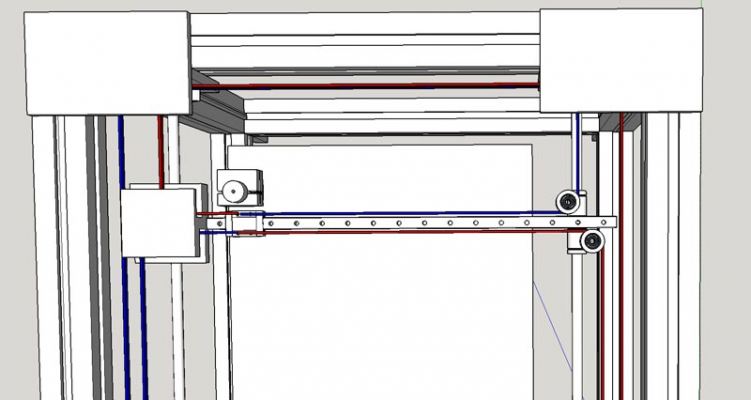
I just finished the work on plastic parts. Hope they will be printable !
Actually except for the Bowden and filament placement, everything's setup now in the CAD file
View from top :
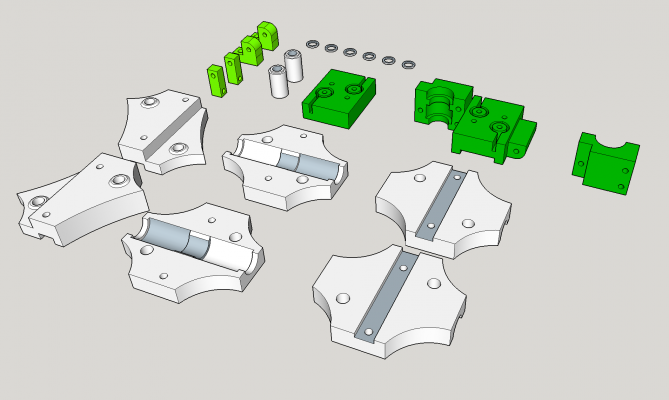
Printed parts :
I just finished the work on plastic parts. Hope they will be printable !
Actually except for the Bowden and filament placement, everything's setup now in the CAD file
View from top :
Printed parts :
|
Re: CoreXY / First build January 28, 2015 02:31PM |
Registered: 9 years ago Posts: 56 |
Hi,
Work still in progress (i'm slow…)
The geometry is very good, very happy with those aluminium extrusions
Now i'm waiting for the printed parts to finish it !
Work still in progress (i'm slow…)
The geometry is very good, very happy with those aluminium extrusions

Now i'm waiting for the printed parts to finish it !
|
Re: CoreXY / First build January 28, 2015 03:15PM |
Registered: 9 years ago Posts: 1,011 |
Nice work m8 !
Collective intelligence emerges when a group of people work together effectively. Prusa i3 Folger (A lot of the parts are wrong, boring !)
Collective intelligence emerges when a group of people work together effectively. Prusa i3 Folger (A lot of the parts are wrong, boring !)
|
Re: CoreXY / First build January 28, 2015 10:20PM |
Registered: 10 years ago Posts: 770 |
|
Re: CoreXY / First build January 29, 2015 04:51AM |
Registered: 9 years ago Posts: 56 |
|
Re: CoreXY / First build January 29, 2015 09:27AM |
Registered: 10 years ago Posts: 770 |
|
Re: CoreXY / First build January 29, 2015 10:59AM |
Registered: 9 years ago Posts: 1,011 |
What about 3 leadscrews drived by a single motor ?
Collective intelligence emerges when a group of people work together effectively. Prusa i3 Folger (A lot of the parts are wrong, boring !)
Collective intelligence emerges when a group of people work together effectively. Prusa i3 Folger (A lot of the parts are wrong, boring !)
|
Re: CoreXY / First build January 29, 2015 11:31AM |
Registered: 9 years ago Posts: 1,159 |
|
Re: CoreXY / First build January 29, 2015 11:40AM |
Registered: 9 years ago Posts: 56 |
Quote
Zavashier
What about 3 leadscrews drived by a single motor ?
I thought about it, my wood planer has such a system.
But pinions and chain would be needed, that's a bit overkill imho.
Ultimakers seem to work very fine, that's why i decided to go this way for Z.
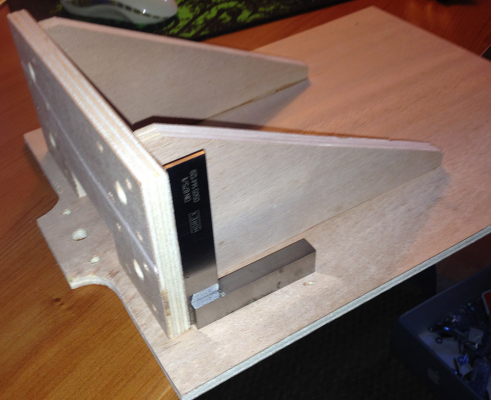
Though, those metal squares really don't fit, a plywood square will be a lot more stiff.
+ i'm using a shouting board*, so the plywood square will be more square than those chewy-squares...
* not sure of the translation... it's called a "planche à recaler" in french, the purpose is to get (really) perfect squared edges on a piece of wood with a hand plane.
Edited 1 time(s). Last edit at 01/29/2015 11:40AM by tpra.
|
Re: CoreXY / First build January 29, 2015 12:32PM |
Registered: 9 years ago Posts: 1,159 |
Quote
tpra
Quote
Zavashier
What about 3 leadscrews drived by a single motor ?
I thought about it, my wood planer has such a system.
But pinions and chain would be needed, that's a bit overkill imho.
Ultimakers seem to work very fine, that's why i decided to go this way for Z.
Though, those metal squares really don't fit, a plywood square will be a lot more stiff.
+ i'm using a shouting board*, so the plywood square will be more square than those chewy-squares...
* not sure of the translation... it's called a "planche à recaler" in french, the purpose is to get (really) perfect squared edges on a piece of wood with a hand plane.
Ah yes I am using a GT2 toothed belt around gt2 pulleys with a motor (Nema23 290oz of torque so plenty) directly driving one of my Leadscrews which in turn drives the others thru my GT2 endless belt.
Doug
|
Re: CoreXY / First build January 29, 2015 02:26PM |
Registered: 10 years ago Posts: 770 |
|
Re: CoreXY / First build January 29, 2015 03:37PM |
Registered: 10 years ago Posts: 344 |
|
Re: CoreXY / First build January 29, 2015 04:46PM |
Registered: 9 years ago Posts: 1,011 |
You were close  the good translation is Shooting board. You don't need a chain drive. A belt drive will work smoother and quieter, with reduced maintenance through. Anyway there's a lot of maneers to move verticaly a printbed. If it stays square, no matter the way.
Collective intelligence emerges when a group of people work together effectively. Prusa i3 Folger (A lot of the parts are wrong, boring !)
 the good translation is Shooting board. You don't need a chain drive. A belt drive will work smoother and quieter, with reduced maintenance through. Anyway there's a lot of maneers to move verticaly a printbed. If it stays square, no matter the way.
Collective intelligence emerges when a group of people work together effectively. Prusa i3 Folger (A lot of the parts are wrong, boring !)
|
Re: CoreXY / First build January 29, 2015 05:16PM |
Registered: 9 years ago Posts: 569 |
Quote
Floyd
There are a lot of machines that use a setup like yours with a single leadscrew and two guides.
I was wondering about that. How does the bed stay flat? Wouldn't it bend on the opposite side?
What about having the two guides at the front with the single screw in the back? Or would that cause binding issues for the guides?
Sorry for the stupid questions.
|
Re: CoreXY / First build January 30, 2015 03:28AM |
Registered: 9 years ago Posts: 1,159 |
Quote
Kurzaa
Quote
Floyd
There are a lot of machines that use a setup like yours with a single leadscrew and two guides.
I was wondering about that. How does the bed stay flat? Wouldn't it bend on the opposite side?
What about having the two guides at the front with the single screw in the back? Or would that cause binding issues for the guides?
Sorry for the stupid questions.
These cantilever effects are exactly why I use 4 smooth rods and 3 Leadscrews mind you my bed is heavy it will weigh close to 4Kg when assembled
My smooth rods are 12mm with 2 bearings on each located at each corner of the bed and I'm using 3 TR10x2 leadscrews in a triangular configuration fed with a closed loop GT2 belt and 36 tooth pulleys all driven from a single NEMA23 motor.
Doug
|
Re: CoreXY / First build January 30, 2015 04:01AM |
Registered: 9 years ago Posts: 1,011 |
There's pros and cons on any system. Two guides is easyer to install you just need a triangle arms shape to help the bed to lay flat. The most efficient and easy way is allign all the components on a single line, the lead screw between the two guides. The force distribution is at its best that way, and it's easy to manage. Theoricaly 4 guides brings more support, but you need at last twosynchronized lead screws to distribute the movement evenly. The real problem of this system is installation. To me it's very difficult to align 4 guides strictly parallel from eachother, attented you own measuring instruments precise enough to do that. Even if your structure is stricltly square, you must use a systems allowing to set at last 2 guides and 1 lead screw in any direction, preferabily both on the same side. Then you will need a lot of time to do a proper setup. Otherhand, with 3 lead screws only, you don't need any guide. Just install 2 leadscrews strictly parallel on one side. That's easy on the same pannel. Then the last screw just need to be vertical because you won't use a captive nut on it, but just a floating one. And you're done. Through, it's less expensive than a 4 rods + 2 lead screws system, and comparable with a 2 rods + 1 screw's price, even with transmission. I measured you can move that with a single Nema17 motor about 0.5Nm because the whole system is lighter and you have less friction.
Collective intelligence emerges when a group of people work together effectively. Prusa i3 Folger (A lot of the parts are wrong, boring !)
Collective intelligence emerges when a group of people work together effectively. Prusa i3 Folger (A lot of the parts are wrong, boring !)
|
Re: CoreXY / First build January 30, 2015 07:06AM |
Registered: 9 years ago Posts: 56 |
didn't even think about synchro belts to drive several screws ! far better than pinion/chain, indeed 
That's a very important point imho.
I have very high precision tools here. Still, i don't think it would be easy to align (i mean, even with the tools, even if you know how to use them, aligning 4 guides is very hard, you have more chances to get a self-blocking system than a smooth and free movement...).
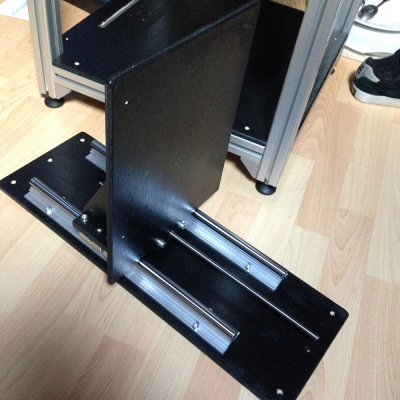
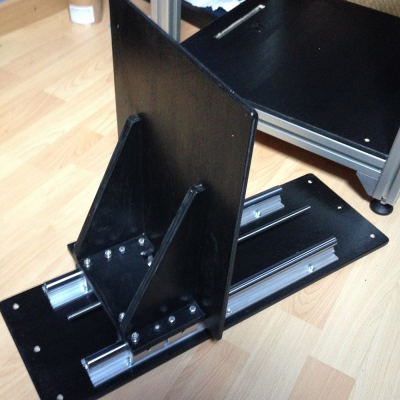
As Zavashier said, all you need to get a "non-bending" cantilever is stiff triangle arms (what i didn't do at first i'm correcting it, will post pics of the updated version tomorrow).

Thanks Zavashier for all your answers.Quote
Zavashier
To me it's very difficult to align 4 guides strictly parallel from eachother, attented you own measuring instruments precise enough to do that.
That's a very important point imho.
I have very high precision tools here. Still, i don't think it would be easy to align (i mean, even with the tools, even if you know how to use them, aligning 4 guides is very hard, you have more chances to get a self-blocking system than a smooth and free movement...).
As Zavashier said, all you need to get a "non-bending" cantilever is stiff triangle arms (what i didn't do at first
 i'm correcting it, will post pics of the updated version tomorrow).
|
Re: CoreXY / First build February 01, 2015 06:48AM |
Registered: 9 years ago Posts: 56 |
|
Re: CoreXY / First build February 08, 2015 05:36PM |
Registered: 9 years ago Posts: 56 |
Work still in progress 
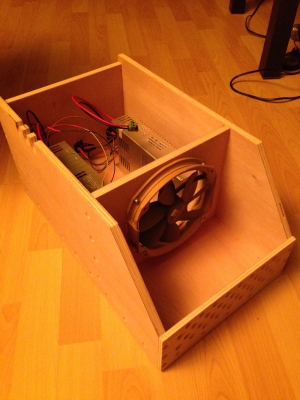
Today i finished the case for electronics (12V and 24V power supplies, smoothieboard and LCD panel).
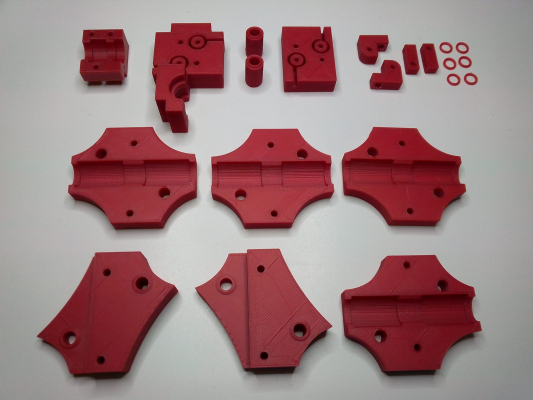
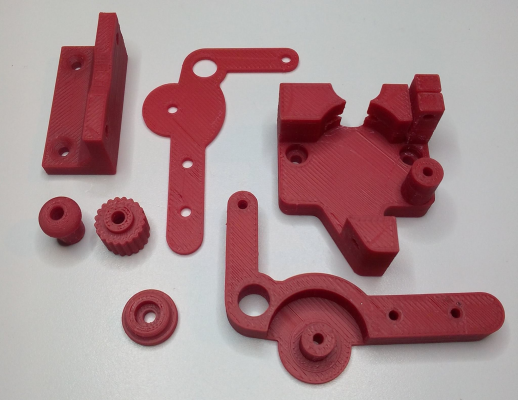
My friend just finished printing all the parts, i'll get them by 2 or 3 days, and the real fun will begin
CoreXY parts :
Extruder parts (Almi3k on thingiverse) :
The case (without smoothie and lcd) :

Today i finished the case for electronics (12V and 24V power supplies, smoothieboard and LCD panel).
My friend just finished printing all the parts, i'll get them by 2 or 3 days, and the real fun will begin

CoreXY parts :
Extruder parts (Almi3k on thingiverse) :
The case (without smoothie and lcd) :
|
Re: CoreXY / First build February 12, 2015 08:08PM |
Registered: 9 years ago Posts: 56 |
i just finished assembling the carriage 
everything moves as expected. very late here, tomorrow i'll connect everything to the smoothieboard and give it a try

everything moves as expected. very late here, tomorrow i'll connect everything to the smoothieboard and give it a try

|
Re: CoreXY / First build February 14, 2015 01:25PM |
Registered: 9 years ago Posts: 56 |
|
Re: CoreXY / First build February 15, 2015 10:33AM |
Registered: 9 years ago Posts: 56 |
|
Re: CoreXY / First build February 17, 2015 08:42AM |
Registered: 11 years ago Posts: 1,807 |
|
Re: CoreXY / First build February 22, 2015 07:50AM |
Registered: 9 years ago Posts: 56 |
Here's a video of one of the test/setup prints  Still needs a lot of fine-tuning but i'm so happy to see it move
  just stayed watching it printing for hours
[www.youtube.com]
 Still needs a lot of fine-tuning but i'm so happy to see it move
  just stayed watching it printing for hours
[www.youtube.com]
|
Re: CoreXY / First build March 03, 2015 01:10PM |
Registered: 9 years ago Posts: 346 |
Hello,
This is really a nice build.
Will you upload the CAD files (either as SW or IGES) for the machine? I am about to build one myself and I would like to use your way of holding the nozzle. It is very elegant.
How did your Z plane work out?
PS. The parts your friend made for you also looks really great (!). Don't be too disappointed if you cant make something like that right away.
|
Re: CoreXY / First build March 03, 2015 06:54PM |
Registered: 9 years ago Posts: 56 |
Quote
LarsK
Hello,
This is really a nice build.
Will you upload the CAD files (either as SW or IGES) for the machine? I am about to build one myself and I would like to use your way of holding the nozzle. It is very elegant.
How did your Z plane work out?
PS. The parts your friend made for you also looks really great (!). Don't be too disappointed if you cant make something like that right away.
Hi,
Thanks

It prints parts, with a correct geometry, i wasn't expecting much more (well, i assume i knew building the first one would just lead me to modify it almost immediately / build another one
 )
)Here's a picture of a print (fanduct problem on top, solved since that print) : [pix.slic.it]
Actually it's my first printer, and it has design flaws that i want to correct.
I already made a (huge ^^) list of what i want to make better / easier, and began to think about the next version, with lot less vitamins needed, easier fine tuning of geometry (x,y,z and bed level), better quality linear motion components (still don't know between full hiwin or a hiwin/igus mix), a bed that's 'really' flat.
It will be released open source, but i wouldn't like to release what i consider unfinished and complicated to put together (i.e. this version).
Still, if you want any part CAD of the current design, i can upload it to github if needed, just keep in mind it's a "prototype"


Edited 1 time(s). Last edit at 03/03/2015 06:54PM by tpra.
|
Re: CoreXY / First build March 11, 2015 09:39AM |
Registered: 9 years ago Posts: 346 |
Hello Tpra
Sorry for the late response. Eventually I have gone with my own design. I have done so for the simple reason that my "working" Delta printer is not so much working for these parts. I simply can't get it to print such solids parts as you are using. Warping and loosing contact with the bed all the time. Maybe because I am using ABS.
So I am going to go with a design that I have more confidence that I can print - And even if I can't print it, I can fabricate it in other materials.
How are your printer working out for you? Can you keep the carriage stable enough for thin wall prints?
Sorry, only registered users may post in this forum.
