G&C Printer
Posted by filipeCampos
|
Re: G&C Printer November 08, 2016 10:51AM |
Registered: 9 years ago Posts: 893 |
|
Re: G&C Printer November 11, 2016 05:25AM |
Registered: 9 years ago Posts: 893 |
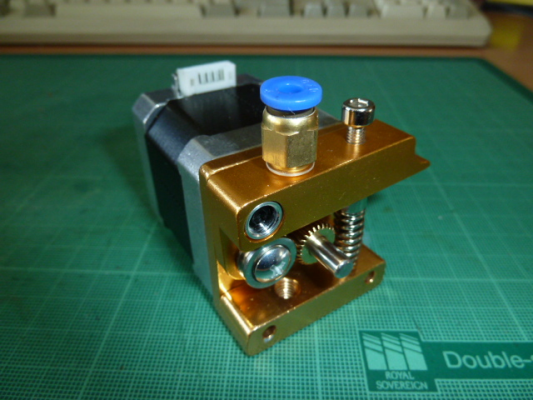
Oh dear... after all your hard work, when I got the extruder parts in the post I found out that the hole on the swinging arm has an M6 thread - and I have a bowden coupler with the correct thread!
At least it now keeps the adjustment screw working properly.
Thanks for your efforts anyway Filipe.
At least it now keeps the adjustment screw working properly.
Thanks for your efforts anyway Filipe.

|
Re: G&C Printer November 13, 2016 06:35AM |
Registered: 9 years ago Posts: 893 |
Filipe,
Just one more question (in 2 parts!): what steps/mm are you using for your Chinese extruder? And is that for a 1.8 or 0.9 degree extruder motor? I'm just looking for a starting value for steps/mm before I start calibrating the extrusion.
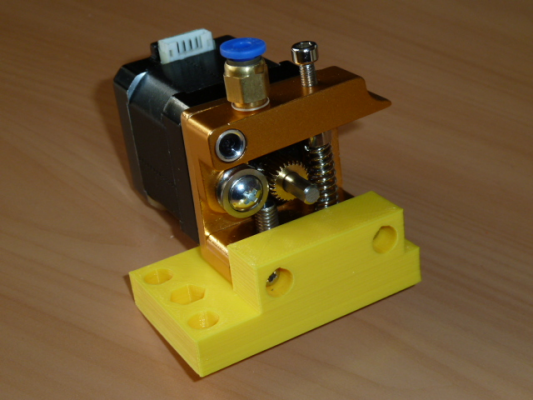
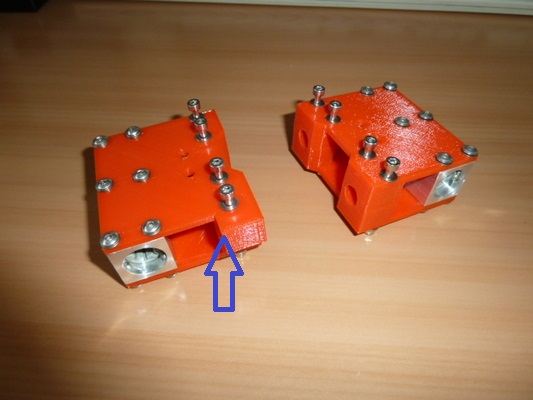
My motor mount is just about finished, although untested as I'm waiting for some longer fixing screws for the carriage. I'll put up some details once I prove that it works, but here's a quick look:
|
Re: G&C Printer November 14, 2016 04:41AM |
Registered: 8 years ago Posts: 346 |
|
Re: G&C Printer November 14, 2016 06:20AM |
Registered: 9 years ago Posts: 893 |
Quote
filipeCampos
looks simple and clean, good design.
with a 1.9degree motor and 1/32 steppers the step per mm is +/- 190. Start with this value and make the 10mm test to get a more precise value.
Thanks - I just wanted a starting point before I started the proper calibration. It helps to be reasonably close to the correct value before I start!

|
Re: G&C Printer December 04, 2016 03:17PM |
Registered: 9 years ago Posts: 893 |
I had posted elsewhere that I was was having a lot of problems with noise when printing - a continual buzzing that sounded like something was vibrating badly. Previously I'd bought some Igus bearings to replace the cheap Chinese LM8UU linear bearings but was unable to make them work, as the plastic tubes formed in the X and Y carriages distorted the Igus bearings too badly. This is not a fault of Filipe's design, which was always intended for the hard-cased LM8UU - it's just that the Igus bearings have VERY tough specifications for the hole they fit into.
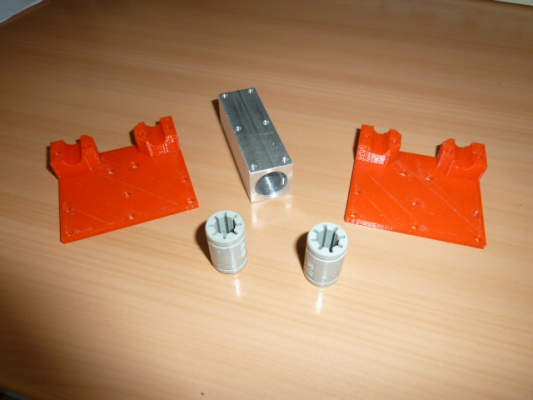
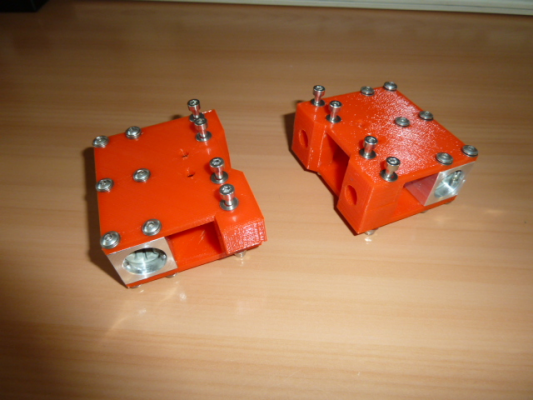
I went back to Zelogik's original metal design to solve this problem, using the aluminium tubes from his work in combination with plastic parts loosely based on Filipe's original parts. The only difference in the aluminium parts was that I added extra holes to account for the extra support required by PLA (instead of 3mm aluminium sheet).
This was not a trivial project - I have a big lathe and a drill press, plus a long background in model engineering, and I had to use that experience to ensure that the bearing holes were central and in line with the length of the bar. I also made each plastic part 3 or 4 times as I found problems when trying to put everything together. For example, without CNC my tapped holes were not always exactly where they should have been, so I had to 'adjust' the OpenSCAD files to make the pieces fit properly. I also had to make some thin spacers for the top side panels, as the Y carriage just touched them in their original fitting.
I'm pleased to say that the effort was worth it - now all I can hear are the motors and fans, and the nasty noises have gone away. Unfortunately the X carriage crashed when I first powered it up and, in the process, some blades on my hot-end fan got broken. I thought my changes had introduced some new problems as the whole printer was humming and vibrating badly, and it wasn't until I took the fan off that I realised that it was totally out of balance! I could barely hold it in my fingers while it was running. It should be back to normal once I replace it.
I downloaded Zelogik's PDF drawing files from HERE. I can release the OpenSCAD files if anyone is interested - in the clear understanding that anyone trying the same modification will need to adjust values to make everything work.
Edited 1 time(s). Last edit at 12/04/2016 03:19PM by David J.
|
Re: G&C Printer December 12, 2016 11:17AM |
Registered: 8 years ago Posts: 346 |
Hi David,
great improvement you have made, the noise are gone?
One problem i have when i was using printed part is with the lock of the two 8mm rodds where the carriage move. When i was adding more tension on the belt i noticed the plastic pieces over time stopped to secure correctly the rods. Was result is was not possible to add to much tension or else the rods will simply move.
One improvement was to modify these two plastics part to secure better the rodds
You project is finished and is too late to tell you this but anyway..
Igus sell metal casing to put the plastic, check this link: [www.igus.pt]
On their web site the smaller i can see is for 12mm and not 8mm, not sure if they sell 8mm.
But i think is could be a solution to replace all the 8mm rodds with 12mm aluminum ones and use these 12mm bearing.
|
Re: G&C Printer December 12, 2016 02:50PM |
Registered: 9 years ago Posts: 893 |
Yes - almost all of the horrible noise has gone - if you remember, I had complained that it sounded like there was a panel vibrating - but now all I can hear are the motors and the fans. I must do something about the PSU fan...
I had to experiment with those clamps for the 8mm rods before I got it right; in the end, I cut off almost all of the design to leave just the clamping bit, and printed a few of those test pieces with various dimensions until I got something that I liked.
I thought about the metal-shelled IGUS bearings, but decided to try the ones I had already. Thankfully they worked well!
Edited 1 time(s). Last edit at 12/12/2016 02:51PM by David J.
|
Re: G&C Printer December 13, 2016 09:39AM |
Registered: 7 years ago Posts: 33 |
David J, awesome solution!
I’m building the G&C myself, though taking a bit longer time then I expected...
And I’ve myself thought about how it could be changed into using ALU parts instead of the printed ones, until now I didn’t know about Zelogik's design.
Anyway I really like your “halfway” solution, and even if you mentioned you had some issues with it I think (with my metalworking knowledge) it’s very doable.
Only problem I have is the lack of access to a lathe Or knowing anyone how has it…
Would you mind a sharing little more detail on your alu profile and dimensions?
Dimension of the profile?
The whole for the bearings, did you just drill it or also ream it? Dimension?
Thank in advance!
|
Re: G&C Printer December 13, 2016 01:22PM |
Registered: 9 years ago Posts: 893 |
If you go to the Zelogik link I posted above and download the PDF file containing the drawings you'll find all you need. The part I used is called "guideY", but I added extra fixing holes as plastic isn't as rigid as 3mm aluminium sheet.
I took a chance and bought 20mm square aluminium bar from an eBay supplier. It turned out to be nice and straight, with good 90-degree angles and flat sides, and about 19.97mm on each side. It isn't necessary to have it exactly 20mm on each side - but if it's too far away the dimensions of the plastic parts will need to be changed.
I started with the holes for the fixing screws, ready for tapping at the end of machining. The bearing hole was drilled after finding the centre of the bar - I started with a centre drill, then a drill around 8mm, then a final drill that was very slightly smaller than the final diameter required (I can't remember the size, but it was a fraction of an inch!). I finished the hole with a 15mm reamer, then checked it with a digital caliper; it turned out to be almost exactly 15mm diameter. Sounds easy, but I've missed out all the things I did without thinking, based on my previous experience! A lathe would be essential, unless you have access to some serious CNC equipment.
BTW: it's worth knowing the history of this printer: Zelogik designed his CoreXY printer to be made of (mostly) aluminium parts. Filipe took that design and turned it into a complete package using 3D-printed parts (Zelogik's original design was quite sketchy). He designed his printer so that it could be made by someone who didn't have access to a metalworking shop - he also added a huge amount of detail for all the extra parts that are needed to complete a printer (everything's in his files).
If you don't want to go to the trouble of making these metal parts you could stick to Filipe's original design and use genuine LM8UU bearings from Mikuni. Far superior quality, but not cheap. Otherwise, talk to Filipe as I know he has had some ideas for improving things in this area.
|
Re: G&C Printer December 15, 2016 08:16AM |
Registered: 7 years ago Posts: 33 |
David J, thanks for your response.
Yeah I checked Zelogik link before I posted but could not find the part in the PFD files sub folder, still can’t.
Could only find the STL file.. but maybe I’m just blind.
Anyway it does not matter now with your explanation, thanks.
My wish would be to convert some of the pieces into aluminum as I don’t think printed parts will hold up over time.
But as a start, since I have no access to good leveled drill press or lathe I’ll be using printed parts.
My plan is/was to use bronze bushings due to sound issues with the typical cheap LM8UU.
But they are more tricky to use then I imagined, especially with not so precise printed parts.
So if I happen to find access to a lathe or someone who can do it, this might be a possible solution.
|
Re: G&C Printer December 15, 2016 09:04AM |
Registered: 8 years ago Posts: 346 |
Hi Amoniak ,
Bronze bushings look like to be a good option, but i will be necessary to modify the printed parts because they do not have the same dimension of the LM8UU.
Produce all the parts in aluminum was Zelogik was done it will be very difficult, time consuming and can be expensive. only do this if you have access to the necessary machine and the skills.
If you are considering to build a printer with all component in metal i think you should not go this way.
The easy way in my opinion is to go with liner rails and a big metal plate to fix everything in place. Check the thread of the G&C metal upgrade I have done to my printer. The result is far to be the best looking and is easy to see some strange options. But this is because i was making a upgrade and reusing the printer I have, lots of constrains from the start. Anyway, the main idea I want to transmit to you is the cost of building the original design of Zelogik in metal can be the same or bigger was building a new one with linear rails.
Edited 1 time(s). Last edit at 12/15/2016 09:07AM by filipeCampos.
|
Re: G&C Printer December 15, 2016 09:23AM |
Registered: 8 years ago Posts: 346 |
Not sure if you are interested in a printer it use linear rail, they are expensive.
But still trying to explain what I was telling in the last post, check the design of the next printer:
[www.eclips3d.com]
The printer use lots of ideas similar to the upgrade i have done, but a LOT better looking.
- it was top metal plate that was the linear rails. is laser cut, so the installation is easy and precise.
- the x axis use a single linear rail
-the bottom was a metal plate too. If I was building a new one i will do the same, but use the plate to fix the rods and ball screw of the bed.
-use a cantilever bed with 3 point of leveling.
Edited 1 time(s). Last edit at 12/15/2016 09:24AM by filipeCampos.
|
Re: G&C Printer December 15, 2016 09:39AM |
Registered: 9 years ago Posts: 893 |
I tried bronze bushes, and found them to be harder to set up than IGUS ones! You have to get the pair of bushes EXACTLY lined up, otherwise they will jam.
Perhaps a pair of very short bushes - perhaps just 2 or 3mm long spaced well apart - would do the trick, as they probably would mind being slightly out of line (but I'm only guessing).
If you have to go with plastic bearing supports then I go back to my original suggestion, which is to try and find some good-quality LM8UU bearings to fit into Filipe's design.
Incidentally, while poking around YouTube I found a video of mine that illustrated the noise that bothered me so much:
YouTube
Now that's all gone...
Changing to linear rails is the ultimate solution, and Filipe's new machine looks very good, but the level of expense goes up a lot - it's not just the rails themselves, it's all the other things that go with them, such as sturdier frames, supports, and so on.
Edited 1 time(s). Last edit at 12/15/2016 09:43AM by David J.
Perhaps a pair of very short bushes - perhaps just 2 or 3mm long spaced well apart - would do the trick, as they probably would mind being slightly out of line (but I'm only guessing).
If you have to go with plastic bearing supports then I go back to my original suggestion, which is to try and find some good-quality LM8UU bearings to fit into Filipe's design.
Incidentally, while poking around YouTube I found a video of mine that illustrated the noise that bothered me so much:
YouTube
Now that's all gone...

Changing to linear rails is the ultimate solution, and Filipe's new machine looks very good, but the level of expense goes up a lot - it's not just the rails themselves, it's all the other things that go with them, such as sturdier frames, supports, and so on.
Edited 1 time(s). Last edit at 12/15/2016 09:43AM by David J.
|
Re: G&C Printer December 26, 2016 04:59AM |
Registered: 9 years ago Posts: 893 |
Just to round off my story about the noise, replacing the LM8UU bearings, etc. - I have just done a test print after fitting an E3D Titan extruder & motor directly onto the X carriage. No nasty noises, even though I was printing at 120mm/s.
This wasn't an ideal speed for printing though, as there were signs of oscillations on the corners, leading to ripples along the flat side. I'll probably stick to 100mm/s in the future, unless I can get the surfaces better by adjusting acceleration, jerk, etc.
This wasn't an ideal speed for printing though, as there were signs of oscillations on the corners, leading to ripples along the flat side. I'll probably stick to 100mm/s in the future, unless I can get the surfaces better by adjusting acceleration, jerk, etc.
|
Re: G&C Printer December 27, 2016 04:47AM |
Registered: 8 years ago Posts: 346 |
I was an expensive upgrade, the total cost was between 400€ to 500€. I reduced some of the expense buying the HiWin linear rail in second hand. The 3 rails cost me 145€, brought to a German guy in eBay. If there was new they will cost me almost 3 times more. The second hand buying was a suggestion of D.D and was a pretty good idea.Quote
David J
Changing to linear rails is the ultimate solution, and Filipe's new machine looks very good, but the level of expense goes up a lot - it's not just the rails themselves, it's all the other things that go with them, such as sturdier frames, supports, and so on.
The print quality is great but the money and time put on the machine to achieve this was high. At the end i pretty sure this is not for everyone. If you want print quality is better to buy a prusa mk2, you need to print slower but you get almost the same print quality.
David: You are using the E3D Titan extruder for some time, can you give your feedback? I using a bulldog clone and i pretty happy with it. It was cost me less of 14€, is a great extruder for the price.
Edited 4 time(s). Last edit at 12/27/2016 04:55AM by filipeCampos.
|
Re: G&C Printer December 27, 2016 09:29AM |
Registered: 9 years ago Posts: 893 |
I've only just started with the Titan extruder - it's well made, small and very powerful. It's also easy to use and keep clean as the serrated part that drives the filament is easy to get at from the side of the case. You can also slot an E3D v6 hot end straight in - but not on this printer! I have about 40 - 50mm of bowden tube between the extruder on the top of the X-carriage and the hot end underneath, so nothing to get concerned about. It should be very good for flexible filaments, something I want to try soon, as the filament is always under restraint - straight from the driving teeth into the support tube.
Those are the good points - the only bad point is the price, as it isn't cheap. If you need a bowden coupler then that's extra (I made mine on a lathe). In my case, this was a Christmas present from my wife so I didn't have to justify my spending to her!
Those are the good points - the only bad point is the price, as it isn't cheap. If you need a bowden coupler then that's extra (I made mine on a lathe). In my case, this was a Christmas present from my wife so I didn't have to justify my spending to her!

Sorry, only registered users may post in this forum.
