G&C Printer
Posted by filipeCampos
|
Re: G&C Printer October 11, 2015 05:10PM |
Registered: 9 years ago Posts: 893 |
|
Re: G&C Printer October 12, 2015 11:46AM |
Registered: 9 years ago Posts: 893 |
Filipe,
Some more amendments for your BOM!
The new motor mounts will need a number of M4 x 16mm screws (10?) if you use washers under the screw heads, 14mm if not.
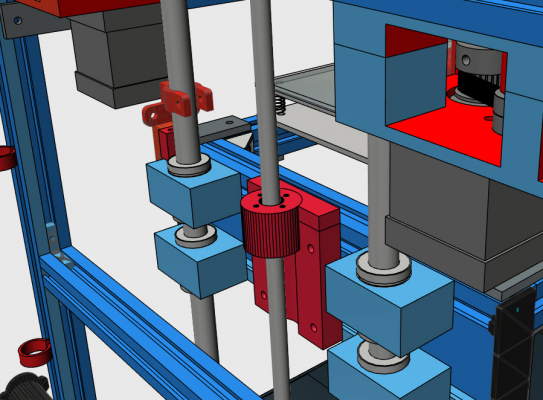
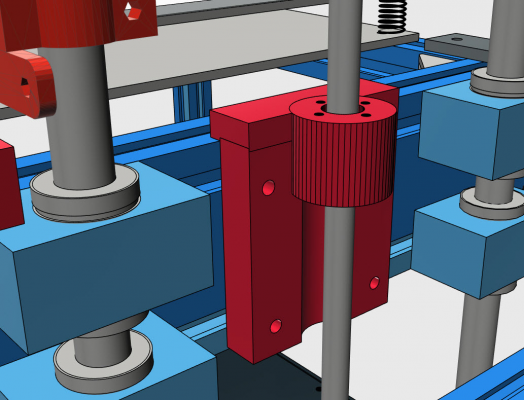
Also, how do you fasten the Z screw nut to the Z carriage mount? The one at the top of your picture below. M2.5 screws and nuts, or self-tapping screws?
You'll probably want to add these to the BOM as well.
Edited 3 time(s). Last edit at 10/12/2015 11:47AM by David J.
Some more amendments for your BOM!

The new motor mounts will need a number of M4 x 16mm screws (10?) if you use washers under the screw heads, 14mm if not.
Also, how do you fasten the Z screw nut to the Z carriage mount? The one at the top of your picture below. M2.5 screws and nuts, or self-tapping screws?
You'll probably want to add these to the BOM as well.
Edited 3 time(s). Last edit at 10/12/2015 11:47AM by David J.
|
Re: G&C Printer October 12, 2015 01:41PM |
Registered: 8 years ago Posts: 346 |
The Z axis use
Z screw mount: 4 x 20mm M2.5, 2 x 10mm M4, 4 x 15mm M4, 6 x M4 T-nuts
The 4 SCV12UU: 8 x 25mm M4, 8 x M4 washer (optional), 8 x M4 t-nuts
the 4 SH12A : 8 x 10mm M5, 8 x M5 t-nuts
The z motor mount: 4 x 15mm M4, 4 x M4 t-nuts
Edited 1 time(s). Last edit at 10/12/2015 01:42PM by filipeCampos.
Z screw mount: 4 x 20mm M2.5, 2 x 10mm M4, 4 x 15mm M4, 6 x M4 T-nuts
The 4 SCV12UU: 8 x 25mm M4, 8 x M4 washer (optional), 8 x M4 t-nuts
the 4 SH12A : 8 x 10mm M5, 8 x M5 t-nuts
The z motor mount: 4 x 15mm M4, 4 x M4 t-nuts
Edited 1 time(s). Last edit at 10/12/2015 01:42PM by filipeCampos.
|
Re: G&C Printer October 15, 2015 05:38AM |
Registered: 9 years ago Posts: 893 |
Filipe,
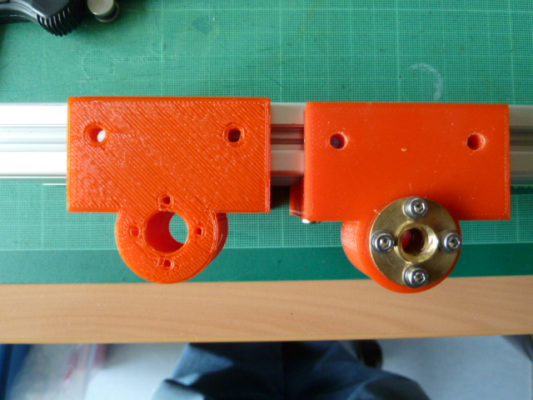
I've discovered a problem with one of the new pieces for the Z axis - the Z screw mount doesn't line up with the slots on the top of the 20x60 extrusion.
The new design is on the right in both pictures.
I think that I can see what the problem is - when you thickened the vertical part to allow for a deeper slot for the coupler, the top screw holes weren't moved to compensate for the extra thickness. I guess you would also need to increase the width of the top piece as well. Or perhaps it wasn't necessary to thicken the vertical part?
What do you think?
Edited 2 time(s). Last edit at 10/15/2015 05:51AM by David J.
|
Re: G&C Printer October 15, 2015 06:32AM |
Registered: 8 years ago Posts: 346 |
This is strange, because i do not remember to have this problem when i have installed my printed piece.
I already checked the main 3d project and the problem your are reporting is in fact there...
Not sure what happened... I have several versions of this piece in my computer and each version in different files, i think i have uploaded to the main 3d project the wrong piece file.
I will correct this and upload the correct one.
By the way, the 4 lateral holes do all the work to secure the piece in the bed, these 2 upper holes are not really necessary.
Now you have several options:
1) not put any screw in these upper holes
2) print a new one with the problem corrected
3) use an drill to gain 2mm
I removed the 2 upper holes, they are not necessary. Use less plastic to print and more easy to install.
I have upload the new version (without 2 upper holes).
This weekend i will try to install the reprap firmware in the printer. David, you are using an duet board, do you have already made the configuration?
Edited 5 time(s). Last edit at 10/15/2015 07:03AM by filipeCampos.
|
Re: G&C Printer October 15, 2015 07:16AM |
Registered: 9 years ago Posts: 893 |
|
Re: G&C Printer October 15, 2015 08:36AM |
Registered: 8 years ago Posts: 346 |
|
Re: G&C Printer October 15, 2015 08:49AM |
Registered: 9 years ago Posts: 893 |
|
Re: G&C Printer October 16, 2015 05:28AM |
Registered: 8 years ago Posts: 346 |
Hi David,
I receive this week the arduino due clone ordered from ebay almost 1 month ago... I was waiting for this board to install with an radds 1.5 and replace my old ramps 1.4 + arduino mega.
I have made some prints with my new board, using the last dev. version of repetier. The arduino is connected by usb to octoprint (raspberry pi version 512MB ), For the 1º time i was able to print using only the raspberry and no need of copy the gcode to an SD card.
The result is very impressive, this new boards combination make the printer "fly". The printer was able to print flawless at 150mm/s and the resulting print has a very good quality. After i have see the difference between an 32 bit and 8 bit board, i will never use again an 8 bit board.
I really like the combination of repetier + radds, it give me lots of little options/upgrades that make a big difference at the end, the migration process from an ramps was easy. The board is not very well known and deserve a lot more credit. The only think i do not like in the radds board is not directly compatible with the 2 lcd i have (20x4 lcd and GLCD), both my lcd have an 10 pin connector and the radds use an 12pin connector.
This weekend i will install and try the new reprap firmware to check if is good.
Edited 2 time(s). Last edit at 10/16/2015 05:44AM by filipeCampos.
|
Re: G&C Printer October 16, 2015 07:52AM |
Registered: 9 years ago Posts: 893 |
|
Re: G&C Printer October 17, 2015 10:37AM |
Registered: 9 years ago Posts: 893 |
Filipe,
I made a slight modification to one of the less important parts - the LED holder. I didn't want to stick it to the frame using tape, so I added lugs at each end for 4mm screws.
I don't know how to do this in 123D, so mine was designed in OpenSCAD. You are welcome to the files, but they may not be much use to you! It's it also your choice whether you make this change in the design file - I have what I want...
Cheers,
David
I made a slight modification to one of the less important parts - the LED holder. I didn't want to stick it to the frame using tape, so I added lugs at each end for 4mm screws.
I don't know how to do this in 123D, so mine was designed in OpenSCAD. You are welcome to the files, but they may not be much use to you! It's it also your choice whether you make this change in the design file - I have what I want...

Cheers,
David
|
Re: G&C Printer October 17, 2015 12:20PM |
Registered: 8 years ago Posts: 346 |
Hi,
My led support is secure using 2 little legs that i use to secure at the same time to cable of the min Y endstop. The piece was glued to 2 legs and then i simply snap inside the 2020.
You solution is nice too, but the 2 T-nuts will block and not allow to pass the cable inside the 2020 extrusion. In your case this will work if you change the position of the Y min endstop, you can put for example in the same place where i have my max y endstop.
|
Re: G&C Printer October 17, 2015 04:11PM |
Registered: 9 years ago Posts: 893 |
|
Re: G&C Printer October 19, 2015 05:43AM |
Registered: 8 years ago Posts: 346 |
Hi David,
I have installed/tested reprap firmware in my printer and almost everything work well. Overall i like the reprap firmware, there are a lot of good things in the firmware: the configuration in SD cards, easy to upgrade, macros, etc. I will upload later my configuration files to the G&C printer project.
Yesterday i was testing the reprap firmware and because i do not have an lcd connected it was necessary to use my peronal pc to control the printer. Normally i only use it to slide stl and upload to octoprint. After have made lots of usb connect and disconnect i was thinking that it will be nice to have an pc full time connected to the printer, it will allow the printer to be fully independent. Then i have this crazy idea, what about install in the printer an low powered windows tablet. There is a lot of cheap windows 7'' tablet in the market, but all have the same problem, then do not allow to have usb and be powered at the same time. this happens because the use the otg micro usb to power the tablet and none have 2 usb. After some searching i have found this crazy device: PIPO X8. Is cheap, low power, was the computation power to run any 3d printer software, touch screen, LAN, wifi, usbs and use 12V power (easy to connect to the 12v power supply of the printer).
I now thinking about an clean solution to incorporate this device in one of my printed panels.
Edited 2 time(s). Last edit at 10/19/2015 05:45AM by filipeCampos.
|
Re: G&C Printer October 19, 2015 06:23AM |
Registered: 10 years ago Posts: 14,672 |
1. If you connect the Duet to your home network, then you can use any tablet to control the printer over your wifi. If the Duet is too far away to connect to your router, then you can use an wifi to Ethernet bridge such as the WR710N.
2. Are you aware of the PanelDue touch screen control panel for Duet electronics? See [miscsolutions.wordpress.com] for details. I manufacture and sell the display controller board, and you add your own compatible 4.3, 5 or 7 inch display panel. Or you can buy the complete kit form T3P3.
3. If the issue is providing 5V power to a tablet, you can get this from the Duet electronics board if you are using the on-board 5V switching regulator.
Edited 1 time(s). Last edit at 10/19/2015 06:26AM by dc42.
Large delta printer [miscsolutions.wordpress.com], E3D tool changer, Robotdigg SCARA printer, Crane Quad and Ormerod
Disclosure: I design Duet electronics and work on RepRapFirmware, [duet3d.com].
|
Re: G&C Printer October 19, 2015 07:20AM |
Registered: 8 years ago Posts: 346 |
Quote
dc42
1. If you connect the Duet to your home network, then you can use any tablet to control the printer over your wifi. If the Duet is too far away to connect to your router, then you can use an wifi to Ethernet bridge such as the WR710N.
2. Are you aware of the PanelDue touch screen control panel for Duet electronics? See [miscsolutions.wordpress.com] for details. I manufacture and sell the display controller board, and you add your own compatible 4.3, 5 or 7 inch display panel. Or you can buy the complete kit form T3P3.
The idea is not to have an simple lcd/touch screen or replace an wifi router.
The main idea is to install an windows tablet, this way you can: download stl, make the sliding, control the printer (usb, lan, bluetooth, wifi), add usb web cam, ftp server, cura, Slic3r, repetier server, pronterface, etc... I already have 2 lcd that i was using in my ramps board and when i have replaced with an radds boards i can not directly used them. The lcd solution was fine for me when i was using the ramps board, but now i do not have one. The solution is to pay 40€ for an radds lcd? The tablet at long term if far better, complete and cheap solution and it will be compatible with any board on the market.
Quote
dc42
3. If the issue is providing 5V power to a tablet, you can get this from the Duet electronics board if you are using the on-board 5V switching regulator.
My problem is not where to get 5v, the problem is to use usb and power the tablet at the same time. I have radds board and i need to connect the tablet to the board using usb. Bluetooth is other possibility, but i not sure if the speed connection will be good.
Edited 1 time(s). Last edit at 10/19/2015 07:23AM by filipeCampos.
|
Re: G&C Printer October 19, 2015 08:10AM |
Registered: 9 years ago Posts: 893 |
Good luck with that tablet - the project should be interesting...
I decided to try and print the panels, and found that I couldn't do the covers over the base. In theory my printer should be able to print 200mm x 200mm, but in reality I have spring clips at the front and back to hold the glass on, and the corners of the glass are cut off to clear the heatbed fixing screws.
Never mind - I have found an ebay supplier of 3mm black acrylic sheet in convenient 200mm x 200mm pieces, so I'll probably use that.
|
Re: G&C Printer October 19, 2015 08:30AM |
Registered: 8 years ago Posts: 346 |
|
Re: G&C Printer October 19, 2015 08:57AM |
Registered: 9 years ago Posts: 893 |
|
Re: G&C Printer October 22, 2015 05:29AM |
Registered: 8 years ago Posts: 346 |
|
Re: G&C Printer October 22, 2015 07:10AM |
Registered: 9 years ago Posts: 893 |
|
Re: G&C Printer October 27, 2015 02:48PM |
Registered: 9 years ago Posts: 893 |
Well, I've decided that I can't wait for the delivery of 12mm Z axis supports from China - the end-date of their delivery window is this coming Friday and, if it doesn't arrive by then, I have to negotiate with the supplier for another 8 days before ebay will act. I have now ordered from a UK supplier (as I should have in the first place) and expect them in the next day or so. If the original order arrives then I'm only down £5 - I can live with that.
Apart from that, I've been having problems with the Igus bearings in the Y axis direction - it would jam constantly, especially if I pushed on one side. I think the X axis was tilting slightly. Today I replaced them with some traditional LM8UU bearings that I had in my box, and now X and Y moves at the slightest touch no matter where I push. There's no significant tilt or rattle either, although the bearings are a bit noisy, as you'd expect. I suspect that the lack of a steel shell around the Igus bearings was allowing them to squash when the fixing screws were tightened, messing up the shape of the inner hole. With the LM8UU bearings I can tighten the screws as hard as I like, without distortion. I'll keep the LM8UU bearings for the moment, and perhaps change them to bronze bushings at a later date (I have metalworking machinery, including a lathe, so I should be able to make them myself). Alternatively I may try to buy some genuine Misuni LM8UU bearings, if I can find a supplier - and, before anyone says anything, I know they are not cheap!
One more thing - Filipe, I have read your instructions for routing and tightening the belts, and I just need to clarify something: to preform the final tensioning, should I start with one end of the belt firmly fixed to the X carriage, the other belt mount a little off the X carriage, and use the final tightening of those screws to bring it up tight?
Apart from that, I hope that soon I will be in a position to make some progress - everything else has been prepared, but I didn't want to put any other parts on until the Z axis was complete (in case I needed plenty of space to set it up).
|
Re: G&C Printer October 27, 2015 04:25PM |
Registered: 8 years ago Posts: 346 |
about the igus bearings, a have some problems with there installation. These bearing are not easy to install because any piece not in the right place and the igus bearing will not move correctly. The metal bearing are more forgiving. But i have fixed and both x and y are working fine in my printer. I have the same problem in the y axis and i solved by simply unscrew the pla pieces that secure the y 8mm bars, move the carriage to the point zero and screw again the pla pieces. I have done the same thing in the other side of the y. If the igus bearing are not working well at the end of y because the 2 y bars not perfectly parallels. Putting the metal bearing will solve this, but the bars will still not be perfect parallels.
I suggest you try again with the igus bearing-
For the belts: is like you have say. Just remember to screw the 4 pla pieces that secure the belts to the carriage only at the end.
if you like i can try to help you with online chat, like skype
I suggest you try again with the igus bearing-
For the belts: is like you have say. Just remember to screw the 4 pla pieces that secure the belts to the carriage only at the end.
if you like i can try to help you with online chat, like skype
|
Re: G&C Printer October 27, 2015 05:33PM |
Registered: 9 years ago Posts: 893 |
Filipe,
Each axis is moving so smoothly now that I'm reluctant to change things - as I said, I can move everything in any direction with the lightest touch. When the Igus bearings were fitted, the X axis was OK, but the Y axis was very temperamental; if I tipped the frame over forwards or backwards the mechanism would fall due to its own weight, but if I tried to push it as if the belt was driving it, the whole X axis would twist and jam. I am sure that my rods were parallel, and that it was the twisting that was stopping movement.
I think I'm OK with the belts now - if I struggle then we can hold a Skype call as a last-chance rescue option!
Thanks,
David
|
Re: G&C Printer October 28, 2015 06:58AM |
Registered: 8 years ago Posts: 346 |
Hi,
My carriage do not move at the lightest touch, there are some inertia and when i was using the metal bearing the carriage was moving "more easy".
The igus bearing do add more friction but they removed all the looseness and reduce noise and vibrations. For the Y axis the use on the igus have only reduced a little the noise. I think the print quality using the metal or plastics bearing is the same. i have some trouble in the installation, like to not screw too mutch the pla piece, readjust some of the pla pieces that support the Y bars.
I remember before using the igus i was running my stepper at 0.6 volts, after installed it was necessary to increase the voltage to 0.8 because the motor do not have the force to homing the y.
Having the igus in the y axis will not be a big improvement, only some noise redution. The main gain is installing the igus bearing in the carriage.
Yesterday i receive and installed 4 x 1/128 steppers, these bad boys are really an nice product. Now the motor do almost no noise at all, i need to post an video to show this..
|
Re: G&C Printer October 28, 2015 02:31PM |
Registered: 9 years ago Posts: 893 |
Progress report - my printer now has belts! The pictures you posted that show the layout of each belt was a great help. I did manage to end up with one belt much shorter than the other, then I realised that in one place I had gone around an extra pulley. 
Once I'd routed that belt properly it was exactly the same length as the other...
The whole process was a lot easier than expected, with the main difficulty being trying to get hold of the end of the belt in some of the tight corners. I used a special tool in the end - a straightened paper-clip with about 10mm bent up at 90 degrees. Hooking the belt was so much easier when I'd worked that out!

Once I'd routed that belt properly it was exactly the same length as the other...

The whole process was a lot easier than expected, with the main difficulty being trying to get hold of the end of the belt in some of the tight corners. I used a special tool in the end - a straightened paper-clip with about 10mm bent up at 90 degrees. Hooking the belt was so much easier when I'd worked that out!
|
Re: G&C Printer October 29, 2015 11:23AM |
Registered: 8 years ago Posts: 346 |
nice... With the carriage and corexy mechanism mounted you can start to test the x and y movements.
For me the most difficult part was the mounting of the Z axis, have you done this part?
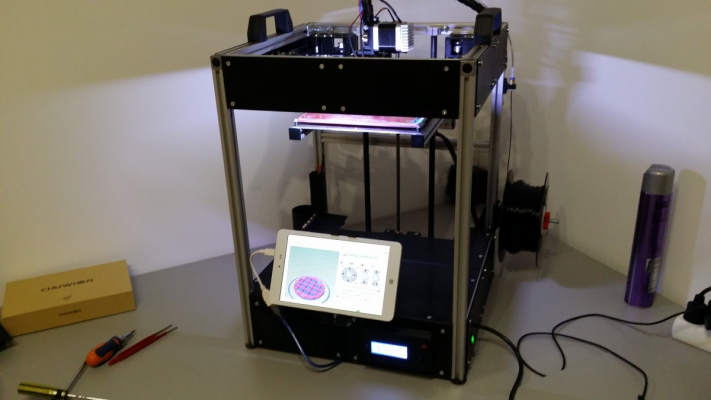
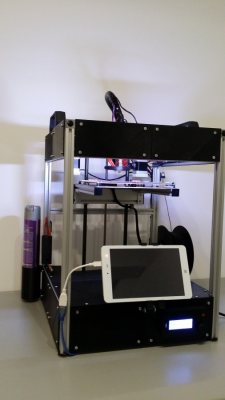
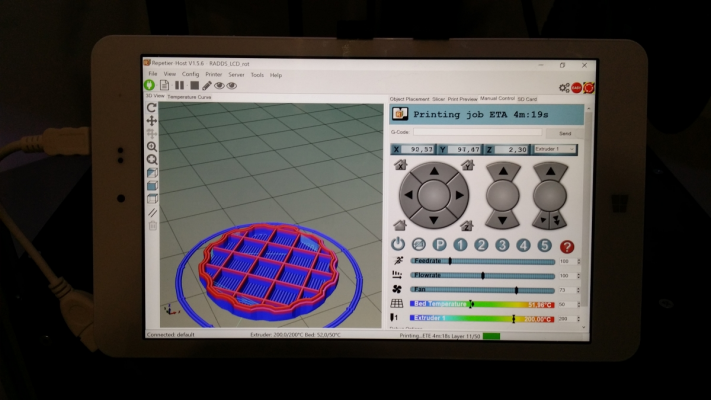
I have designed and started to printing and new front panel that will support an radds lcd 20x4. I have printed and installed in the printer an arms that will support an cheap windows 10 tablet. this tablet will do the sliding and touch screen to control the print in real time. This weekend i will try to finish everything and upload some photos and this new pieces in the project.
Do you have an duet lcd?
|
Re: G&C Printer October 29, 2015 03:11PM |
Registered: 9 years ago Posts: 893 |
The final parts for the Z axis arrived today. 
This will be tomorrow's job.
Once that is in place I will start to fit all the parts that involve wiring - I've been leaving them for now because I didn't want to be pushing wires aside when setting up the Z axis. I've also decided to go for 24v, so that will be an extra set of tasks to be completed...
I do have a Duet, but not the LCD screen - my printer will sit next to my computer most of the time, so an LCD screen is an expensive luxury...
I came across one problem when doing the belts, which you might like to consider: the pieces that hold the belts to the X carriage have a peg in the middle that the belt goes around, but while adjusting the belt tension the peg broke on a couple of the pieces after putting the belt in and taking it out again a few times. There may be 2 ways of fixing this - make the groove wider, so it's easier to get the belt in (but the problem may be that my printer made them a bit 'fat' anyway), or make the peg much larger so it will be stronger. In the end it wasn't much of a problem, as I wrapped the belt around the broken-off peg and pushed it back into the hole, and it's now very secure!

This will be tomorrow's job.
Once that is in place I will start to fit all the parts that involve wiring - I've been leaving them for now because I didn't want to be pushing wires aside when setting up the Z axis. I've also decided to go for 24v, so that will be an extra set of tasks to be completed...

I do have a Duet, but not the LCD screen - my printer will sit next to my computer most of the time, so an LCD screen is an expensive luxury...
I came across one problem when doing the belts, which you might like to consider: the pieces that hold the belts to the X carriage have a peg in the middle that the belt goes around, but while adjusting the belt tension the peg broke on a couple of the pieces after putting the belt in and taking it out again a few times. There may be 2 ways of fixing this - make the groove wider, so it's easier to get the belt in (but the problem may be that my printer made them a bit 'fat' anyway), or make the peg much larger so it will be stronger. In the end it wasn't much of a problem, as I wrapped the belt around the broken-off peg and pushed it back into the hole, and it's now very secure!
|
Re: G&C Printer October 30, 2015 05:34AM |
Registered: 8 years ago Posts: 346 |
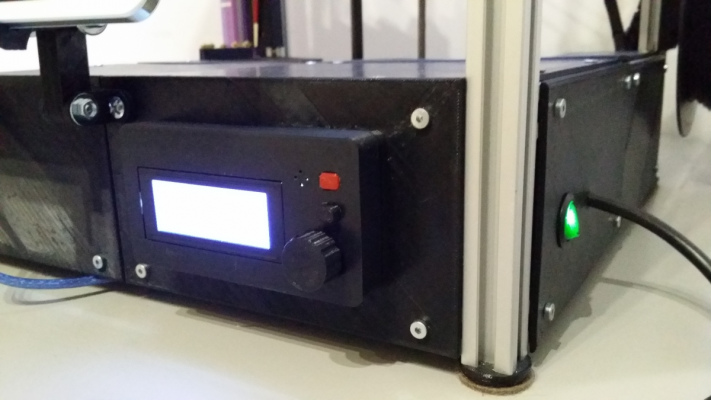
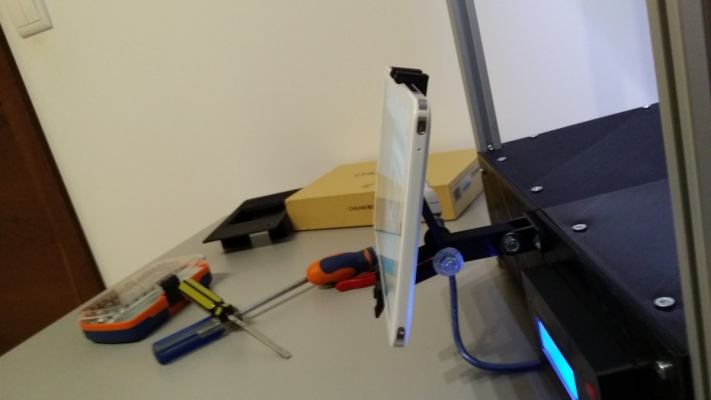
i have done some upgrades. Added an arms to secure an tablet, replace the glcd for an radds lcd, added 1/128 steppers. I will upload the new radds panel to the project of the printer.
The radds lcd case:
The arm of the tablet:
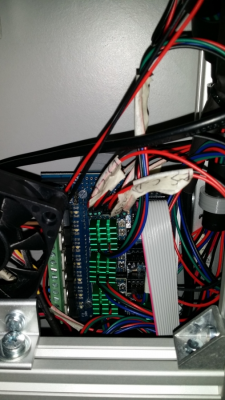
1/128 radds steppers:
The radds lcd case:
The arm of the tablet:
1/128 radds steppers:
|
Re: G&C Printer October 30, 2015 06:28AM |
Registered: 8 years ago Posts: 346 |
Quote
David J
I came across one problem when doing the belts, which you might like to consider: the pieces that hold the belts to the X carriage have a peg in the middle that the belt goes around, but while adjusting the belt tension the peg broke on a couple of the pieces after putting the belt in and taking it out again a few times. There may be 2 ways of fixing this - make the groove wider, so it's easier to get the belt in (but the problem may be that my printer made them a bit 'fat' anyway), or make the peg much larger so it will be stronger. In the end it wasn't much of a problem, as I wrapped the belt around the broken-off peg and pushed it back into the hole, and it's now very secure!
Sure, i can make them more fat.
Sorry, only registered users may post in this forum.
