Coffeetable CoreXY:: new build :: small apartment rep-strap solutions
Posted by realthor
|
Re: Coffeetable CoreXY:: new build :: small apartment rep-strap solutions November 27, 2015 01:05PM |
Registered: 8 years ago Posts: 346 |
I have used 8 bit and them changed to an 32 bit in my corexy printer. The 32 bit board are an good investment, most of this board have more features (web interface, more steppes), they allow to print fast and the most important feature is the constant velocity. This constant print velocity affect a lot the print quality.
If you use an ramps then do no install an GLCD, use only an 20x4 lcd. I have some problems with the ramps because of the lack of power computation, at the end to have good prints it was necessary to disconnect the lcd, print from the SD card and not print fast.
I use radds 1.5 and is rock solid, it main advantages are 1/128 steppers (very silent), 6 steppers, 6 endstop, lcd 20x4 or PanelDue. But was an big disadvantage to not have an web interface like the duet and still was manual steppers configuration.
In my opinion an good 32 bit board is an good investment, the board will drive well any printer. Any future printer you will build can reuse the same 32 bit board.
Edited 4 time(s). Last edit at 11/27/2015 01:14PM by filipeCampos.
|
Re: Coffeetable CoreXY:: new build :: small apartment rep-strap solutions November 27, 2015 02:44PM |
Registered: 9 years ago Posts: 1,035 |
I see there that only RepRapFirmware supported boards (Duet,?) can make use of it. What's the point because Duet already has a web interface. I don't really get it. Can this be used with SBASE? Will we be able to use it for Arduino Mega and the likes? That is the plan?
Regarding the board, like I said, I already have a solidoodle board that is already representing the obsolete pack of <32bit boards. I think I might use that for setting up the printer and upgrade to 32bit when that is done. Right now I am ordering belts, pulleys, rods and what not from Aliexpress so that will take maybe a month to get here ... I have enough time to finish the design and document myself better on boards/etc.
Designwise, I would be so happy to manage a solution with 2 10mm rods on the diagonals because:
1) I will avoid drilling the tubes
2) I will have the motor in one corner just like the XY motors are at corners
3) I will have all endstops in one single block like i presented a few posts above
4) I will be able to add another Z rod just oposite to the Z stepper and have a 3 guides Z, albeit not very symmetrical (3 out of four corners)
XY is basically done, it's corexy not much about it. I am still trying to convince myself that X rods in a vertical stacking is a good solution. I have a feeling that horizontal rods is a better way somehow.
I can't get it, as space usage is concerned, both eat the same amount of space out of Y because you have to have 2 bearings per side ... the horizontal placement eats 8mm more + the plastic to support it because of the rod itself but you gain some space above and it's easier to place a blower fan compared to the smartrap core solution of one rod over the other.
Have any advice regarding the mentioned issues?
Edited 1 time(s). Last edit at 11/27/2015 02:45PM by realthor.
RepRap Lander concept on Concept Forge
RepRap Lander concept on RepRap Forums
My Things, mostly experimental stuff
|
Re: Coffeetable CoreXY:: new build :: small apartment rep-strap solutions November 29, 2015 11:55AM |
Registered: 9 years ago Posts: 346 |
Quote
realthor
I see there that only RepRapFirmware supported boards (Duet,?) can make use of it. What's the point because Duet already has a web interface. I don't really get it. Can this be used with SBASE? Will we be able to use it for Arduino Mega and the likes? That is the plan?
ESP8266 is supported in newest Repetier. I have not tested it and I don't even own the chip required to do so.
For the record, I have no comment to you rod concerns. I don't see any problems, in general CoreXY printers are very forgiving, you can make almost anything work. The only real showstopper is wobbling beds (most often caused by wobbling screws I think). Other then that you can make it print. My first CoreXY is a testament to that

I would remind you that end-stops are not only installed for homing the printer. They are also _end_stops_ to stop the printer from hammering into the side of itself. If your printer misses some steps it can start doing that, and depending on how long you take to stop it and build quality it can hurt it self a lot that way. That said, I only use max end-stops, so mine will only stop if it does this in one direction. I am not telling you not to implement your end-stop plan, just reminding you that with this design choice you put your printer at risk if it loses steps.
|
Re: Coffeetable CoreXY:: new build :: small apartment rep-strap solutions November 29, 2015 12:25PM |
Registered: 9 years ago Posts: 1,035 |
Hmmm, didn't think of that. You only half the risk if you implement endstops only at one end of X,Y,Z , while in my case the risk would be 100% on X and 50/50 on Y and on Z, just like in your/usual case.
How can you lose steps on X?
And the risk is just when the print is so big that losing 10-20 steps (or whatever number is usual, I have no idea) would mean that the carriage goes past the margins of the bed while it thinks he's still inside.
If you do the math you find out that the risk is very small. Most users disable enstops after homing anyways.
I wonder if this is something to be really concerned about in a big way.
RepRap Lander concept on Concept Forge
RepRap Lander concept on RepRap Forums
My Things, mostly experimental stuff
|
Re: Coffeetable CoreXY:: new build :: small apartment rep-strap solutions November 29, 2015 01:05PM |
Registered: 9 years ago Posts: 346 |
Quote
realthor
(SNIP)
If you do the math you find out that the risk is very small. Most users disable enstops after homing anyways.
I wonder if this is something to be really concerned about in a big way.
I don't think you are correct that most users disable endstops after homing. It is often mentioned in these forums as a troubleshooting step - But that is what it is, troubleshooting. If you have endstops with false triggering then you have a hardware problem to solve. And that is regardless of what hardware you are running, there are no reason why there should be so much interference that they false trigger. To my knowledge all firmwares comes pre-set with end-stops always on. I certainly do not recommend disabling them.
You can be pretty sure that you will do something that makes your printer hit the sides doing run-in, but after that it should never happen... Also the nature of CoreXY means that if one belt gets lose it will also go directly to the side and start banging. BUT if you build your printer right then the steppers will just lose steps and make noise. Worst case you will need to tighten your belts and the pulley screws. It is not a big thing. If you are happy with your idea then go with that.
If it for some reason is not working out, then you can very quickly make some friction brackets for the rods and install more endstops on these, like I have done on my first CoreXY here.
Edited 1 time(s). Last edit at 11/29/2015 01:06PM by LarsK.
|
Re: Coffeetable CoreXY:: new build :: small apartment rep-strap solutions November 29, 2015 05:32PM |
Registered: 9 years ago Posts: 1,035 |
It's not about me wanting to keep by all means this idea. That was my feeling after reading it in different threads. But having only one endstop per axis is still 50/50 chances for something bad happening. It's not like all printers decide to only skip steps and drive nuts toward the endstop-less end.
 On another note I have an announcement to make, I have just bought a 3d printer. It was a very quick decision and for 330Eur I snatched a Dreammaker Overlord Pro
  which I still can't believe is true. I made a test print and everything looks ok so far. Now I am back home with it, my girlfriend is sleeping so I can't start it and thinker because of that awful sound it makes when calibrating and at rapid accelerations .
I will spend some time with it learning and maybe upgrading. Now I feel so-so about having ordered many parts for my corexy because I don't know if it makes any sense to create it anymore ... but I think i'll do it anyways now I can experiment the diagonal bed support and the belt-spectra combo for lifting it .
.
Edited 1 time(s). Last edit at 11/29/2015 05:32PM by realthor.
RepRap Lander concept on Concept Forge
RepRap Lander concept on RepRap Forums
My Things, mostly experimental stuff
 On another note I have an announcement to make, I have just bought a 3d printer. It was a very quick decision and for 330Eur I snatched a Dreammaker Overlord Pro
  which I still can't believe is true. I made a test print and everything looks ok so far. Now I am back home with it, my girlfriend is sleeping so I can't start it and thinker because of that awful sound it makes when calibrating and at rapid accelerations .
I will spend some time with it learning and maybe upgrading. Now I feel so-so about having ordered many parts for my corexy because I don't know if it makes any sense to create it anymore ... but I think i'll do it anyways now I can experiment the diagonal bed support and the belt-spectra combo for lifting it
 .
.Edited 1 time(s). Last edit at 11/29/2015 05:32PM by realthor.
RepRap Lander concept on Concept Forge
RepRap Lander concept on RepRap Forums
My Things, mostly experimental stuff
|
Re: Coffeetable CoreXY:: new build :: small apartment rep-strap solutions November 29, 2015 06:24PM |
Registered: 9 years ago Posts: 346 |
Congrats on the Overlord, I was actually looking for it on kickstarter the other day (but didn't remember the name) to see what became of it.
Can't believe you got one for just 330€ , amazing price, I just read a little about the reactions from the users, looks like it requires a bit of tweaking especially for ABS printing - But for 330 and then you have it - Great, good for you! - Enjoy.
Just to cap off our endstop conversation - You misunderstand where I wanted to go with my last comment. When I said go for your design, it was not said in resignation or anything I ONLY mentioned the end-stops to make you aware of it. I honestly and 100% do not see any big problems in where you are (were) going and had I come up with the idea for one of my printers, I might have done the same as it is a neat solution for simplification of the printer.
Can't believe you got one for just 330€ , amazing price, I just read a little about the reactions from the users, looks like it requires a bit of tweaking especially for ABS printing - But for 330 and then you have it - Great, good for you! - Enjoy.
Just to cap off our endstop conversation - You misunderstand where I wanted to go with my last comment. When I said go for your design, it was not said in resignation or anything
 I ONLY mentioned the end-stops to make you aware of it. I honestly and 100% do not see any big problems in where you are (were) going and had I come up with the idea for one of my printers, I might have done the same as it is a neat solution for simplification of the printer.
|
Re: Coffeetable CoreXY:: new build :: small apartment rep-strap solutions November 29, 2015 07:29PM |
Registered: 9 years ago Posts: 1,035 |
Yeah, it is a bit of a rough ride with the Overlord especially with the noise and calibration. I am just reading everything that comes into my hands atm. There are already mods about the dreadful sound at calibration (which I hear doesn't work as expected) but they involve replacing the driver steppers and installing motor dampeners. I would first look into a firmware update because the firmware controls the steppers (there are no pots to fiddle with). They promised to open source the firmware this autumn and still since 6mo there is no update on the github... but they kept their promises so far so let's hope.
I considered the printer because of this open source plan too but it mostly fell out from the sky, I had no more plans to buy anything ready-made... I am much more interested in building a printer from scratch and using known open source firmwares. This is why I will built the CoffeeCore (lol, i see people name their printers so why not).
OK, back to the issue at hand: thanks for re-explaining. I think I get it what you wanted to say. I've explained my reasons to build a EndstopBlock. One more reason is that for fairly well tensioned belt and fairly stable frame and smooth rods I really can't see why the steppers would skip. This might change with experience and I will act accordingly but for now let's suppose I can build a XY stage that will not skip .
.
In the meantime I have:
1) settled on a non-invasive (on the table's steel tubes) way to clamp the legs to the capsized top board: I will have an M6 insert nut into the board and a threaded rod through the square tube to the upper side, where I now have the metal brackets that were used to fix the legs to the board. There it will be fastened with a washer and a locknut. This for all four legs. Should provide a fairly sturdy assemble. I will have to think of a way to cross-brace without drilling the tubes... but that after I would have built it.
2) I have ordered 624vv bearings (the likes that Slid3R uses to route the spectra) and am looking into a simple way to connect the belt and the spectra (I am thinking that triangle strapring buckle can do the trick). I know that this looks very unprofessional but now my corexy has become an experimental platform, I allow myself to do this. Moreover, i see nothing wrong with it:
Edit: I am also aware of the quite low resolution of this solution. I might use a geared stepper if I find it troublesome. Or maybe we can find a solution to DIY/3d print low backlash gears. Who knows.
I don't quite like the messy pads used to bridge the legs, vertical linear rods and the bearings mounts so there I need some advice. Maybe I should separate them but in one piece everything is better tied. If something snaps I will have to print the whole thing again which is something I try to avoid.
3) I am still looking at pros/cons for vertical stacking of X rods like SmartrapCore or Prusa and horizontal positioning like most corexy do. I'd like to hear some opinions on this one.
PS: oh and the owner promised to send me the laser engraver that was part of the kickstarter as well as it didn't arrive yet from the DreamMaker ... that would be sweet.
Edited 1 time(s). Last edit at 11/29/2015 07:39PM by realthor.
RepRap Lander concept on Concept Forge
RepRap Lander concept on RepRap Forums
My Things, mostly experimental stuff
I considered the printer because of this open source plan too but it mostly fell out from the sky, I had no more plans to buy anything ready-made... I am much more interested in building a printer from scratch and using known open source firmwares. This is why I will built the CoffeeCore (lol, i see people name their printers so why not).
OK, back to the issue at hand: thanks for re-explaining. I think I get it what you wanted to say. I've explained my reasons to build a EndstopBlock. One more reason is that for fairly well tensioned belt and fairly stable frame and smooth rods I really can't see why the steppers would skip. This might change with experience and I will act accordingly but for now let's suppose I can build a XY stage that will not skip
 .
.In the meantime I have:
1) settled on a non-invasive (on the table's steel tubes) way to clamp the legs to the capsized top board: I will have an M6 insert nut into the board and a threaded rod through the square tube to the upper side, where I now have the metal brackets that were used to fix the legs to the board. There it will be fastened with a washer and a locknut. This for all four legs. Should provide a fairly sturdy assemble. I will have to think of a way to cross-brace without drilling the tubes... but that after I would have built it.
2) I have ordered 624vv bearings (the likes that Slid3R uses to route the spectra) and am looking into a simple way to connect the belt and the spectra (I am thinking that triangle strapring buckle can do the trick). I know that this looks very unprofessional but now my corexy has become an experimental platform, I allow myself to do this. Moreover, i see nothing wrong with it:
Edit: I am also aware of the quite low resolution of this solution. I might use a geared stepper if I find it troublesome. Or maybe we can find a solution to DIY/3d print low backlash gears. Who knows.
I don't quite like the messy pads used to bridge the legs, vertical linear rods and the bearings mounts so there I need some advice. Maybe I should separate them but in one piece everything is better tied. If something snaps I will have to print the whole thing again which is something I try to avoid.
3) I am still looking at pros/cons for vertical stacking of X rods like SmartrapCore or Prusa and horizontal positioning like most corexy do. I'd like to hear some opinions on this one.
PS: oh and the owner promised to send me the laser engraver that was part of the kickstarter as well as it didn't arrive yet from the DreamMaker
 ... that would be sweet.
Edited 1 time(s). Last edit at 11/29/2015 07:39PM by realthor.
RepRap Lander concept on Concept Forge
RepRap Lander concept on RepRap Forums
My Things, mostly experimental stuff
|
Re: Coffeetable CoreXY:: new build :: small apartment rep-strap solutions November 30, 2015 04:24AM |
Registered: 11 years ago Posts: 364 |
|
Re: Coffeetable CoreXY:: new build :: small apartment rep-strap solutions November 30, 2015 04:42AM |
Registered: 9 years ago Posts: 1,035 |
Quote
ekaggrat
for the z axis to get more resolution you could rap the string around a few times like the core xz approach of Nicholas
Thanks for the suggestion It never clicked to me that corexz might be used as an inspiration. I will look into that and post updated design if I am able to come up with anything usable.
RepRap Lander concept on Concept Forge
RepRap Lander concept on RepRap Forums
My Things, mostly experimental stuff
|
Re: Coffeetable CoreXY:: new build :: small apartment rep-strap solutions December 02, 2015 09:56AM |
Registered: 9 years ago Posts: 1,035 |
I am thinking to go bushing for the sliders and I have a few options:
For X:
1) 10pcs Wear-Resisting SF-1 Self Lubricating Bearing Bushing 8mm x 10mm x 12mm >> € 2,67 / Pack + € 1,11 shipment via China Post Registered Air Mail => € 3,78
I get to 0.378Eur/piece
What is the diameter among these values? and what do they mean? 8mm x 10mm x 12mm; I take it that 8mm is diameter, 10 or 12 is the length and the third dimension no idea.
2) 4pcs 8mm bearing bushing 3d printer accessory Ultimaker copper bush 8 mm * 11 mm * 30 mm diy for slide block >> € 4,30 (Free Shipping) => 1.075Eur/ piece
For Y:
3) for the 10mm rods I am thinking to try these ones, just to see how well do these perform because I've heard about them being used by some builders. They are quite expensive but they come from Europe and I'll have someone bring them from Germany around Christmas because they don't ship them here:
Igus Gleitlager DryLin® R - RJ4JP 01-10 >> EUR 11.99 => 2.99/piece
I was also looking at the graphite self lubricating bushings on aliexpress but they are around 3Eur/piece too and I have no idea what's their deal.
For Z I have no idea yet which one should I use.
Do you have any advice on this particular topic of bushings?
RepRap Lander concept on Concept Forge
RepRap Lander concept on RepRap Forums
My Things, mostly experimental stuff
|
Re: Coffeetable CoreXY:: new build :: small apartment rep-strap solutions December 02, 2015 04:25PM |
Registered: 10 years ago Posts: 344 |
|
Re: Coffeetable CoreXY:: new build :: small apartment rep-strap solutions December 02, 2015 05:30PM |
Registered: 9 years ago Posts: 1,035 |
any experience with one over the other?
RepRap Lander concept on Concept Forge
RepRap Lander concept on RepRap Forums
My Things, mostly experimental stuff
RepRap Lander concept on Concept Forge
RepRap Lander concept on RepRap Forums
My Things, mostly experimental stuff
|
Re: Coffeetable CoreXY:: new build :: small apartment rep-strap solutions January 21, 2016 08:24AM |
Registered: 9 years ago Posts: 1,035 |
I didn't have much time lately and I had another printer that took my whole time getting used to and learning the printing side of 3D printing so here i am, project is not dead  (at least so far).
Anyways, I am back with the design of the parts for the CoffeeTable CoreXY.
As a side note, I did a quick experiment in CAD, loaded some ALU profiles, extruded them and tried to see if anything matches my current design. I was very surprised to notice that I can swap my current square steel tubes for alu extrusions (20x20 I believe) and with little modifications (if at all), I can re-build the printer on an alu frame.
But back to the matter at hand, I want to print the parts I have designed but I believe there could be a problem with the tolerances of the parts (I have little to none experience with design intent related to tolerances).
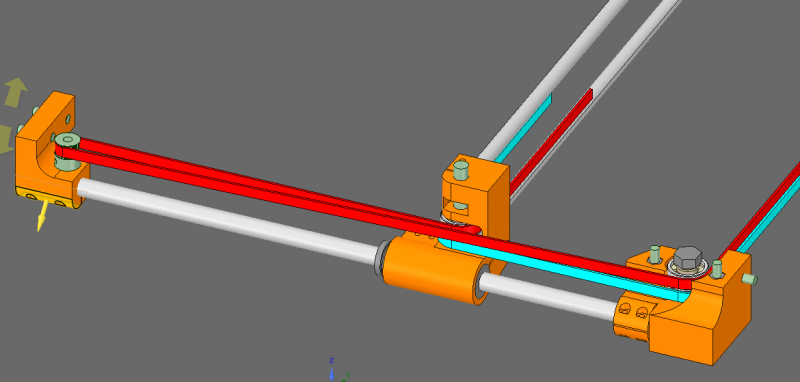
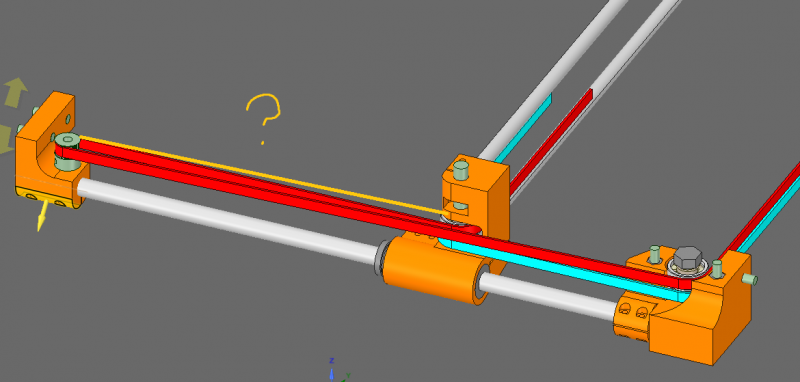
My current XY assembly looks like this:
There are slots for all holes where the smooth rods will be inserted.
But:
1) I don't know if those slots are enough to compensate for a tight fit (exact ID with the OD of the LM8UU or LM10UU)
2) How thick of a "meat" of the printed part around the linear bearing will allow enough flex so I can force the bearing inside at a very tight fit?
3) Are there any other mistakes you can spot from the pictures in this post?
I have also uploaded the design to thingiverse at http://www.thingiverse.com/thing:1283295
I know this looks overly complicated and maybe too beeffy (at least compared to the SmartRap CoreXY parts) but that will maybe change with following iterations based on what input I have here and after I'll have had the part in my hands/printer.
Edited 3 time(s). Last edit at 01/21/2016 08:38AM by realthor.
RepRap Lander concept on Concept Forge
RepRap Lander concept on RepRap Forums
My Things, mostly experimental stuff
 (at least so far).
Anyways, I am back with the design of the parts for the CoffeeTable CoreXY.
As a side note, I did a quick experiment in CAD, loaded some ALU profiles, extruded them and tried to see if anything matches my current design. I was very surprised to notice that I can swap my current square steel tubes for alu extrusions (20x20 I believe) and with little modifications (if at all), I can re-build the printer on an alu frame.
But back to the matter at hand, I want to print the parts I have designed but I believe there could be a problem with the tolerances of the parts (I have little to none experience with design intent related to tolerances).
My current XY assembly looks like this:
There are slots for all holes where the smooth rods will be inserted.
But:
1) I don't know if those slots are enough to compensate for a tight fit (exact ID with the OD of the LM8UU or LM10UU)
2) How thick of a "meat" of the printed part around the linear bearing will allow enough flex so I can force the bearing inside at a very tight fit?
3) Are there any other mistakes you can spot from the pictures in this post?
I have also uploaded the design to thingiverse at http://www.thingiverse.com/thing:1283295
I know this looks overly complicated and maybe too beeffy (at least compared to the SmartRap CoreXY parts) but that will maybe change with following iterations based on what input I have here and after I'll have had the part in my hands/printer.
Edited 3 time(s). Last edit at 01/21/2016 08:38AM by realthor.
RepRap Lander concept on Concept Forge
RepRap Lander concept on RepRap Forums
My Things, mostly experimental stuff
|
Re: Coffeetable CoreXY:: new build :: small apartment rep-strap solutions January 24, 2016 04:48AM |
Registered: 9 years ago Posts: 1,035 |
I have printed the Y Carriage and measured it and I seem to have a design issue: because I am trying to clamp both the 8mm X lower rod and the 10mm ID linear bearings with the same bolt (the M8 that holds the 608 bearings), I need very (and I mean VERY) precise printer to make the part. If it's not spot on, either the 8mm rod will be clamped and the bearing will be loose inside the case or the bearing will be well clamped while the smooth rod will be loose in the smaller hole.
This is a bummer which could get me to design separate clamping for each component.
This post is more like an update but if you have any constructive advice related to my above issue please chime in.
RepRap Lander concept on Concept Forge
RepRap Lander concept on RepRap Forums
My Things, mostly experimental stuff
|
Re: Coffeetable CoreXY:: new build :: small apartment rep-strap solutions January 24, 2016 05:37AM |
Registered: 8 years ago Posts: 67 |
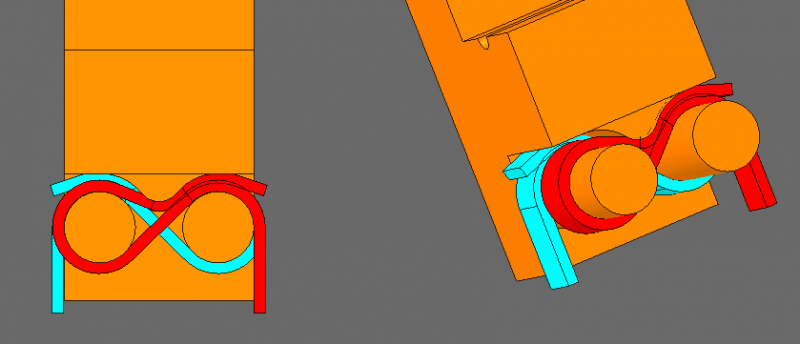
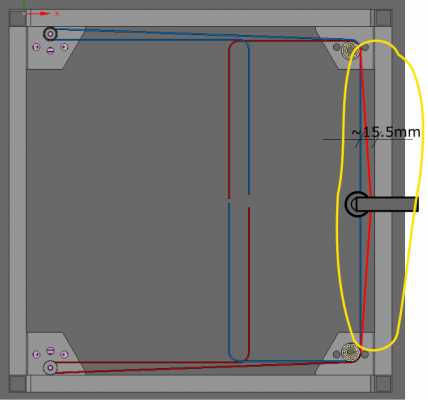
Well, I'm not an expert or anything, but shouldn't the belts be parallel, both to each other and to themselves?
I'm referring to this picture:
since you have both belts "wrapped" around the same shaft on Y carriage, one (or both) of them is not running parallel or whatever the word is...
It's hard to explain with my limited knowledge of technical terms, but when the belts are wrapped like that, the steps/mm value will differ depending on the current position of the Y carriage... uh... like a triangle
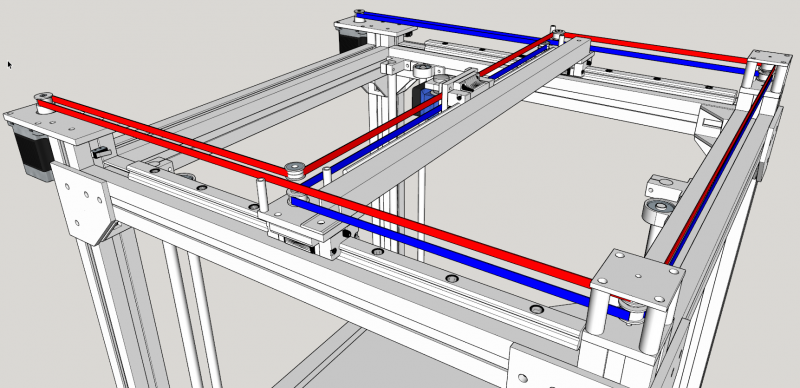
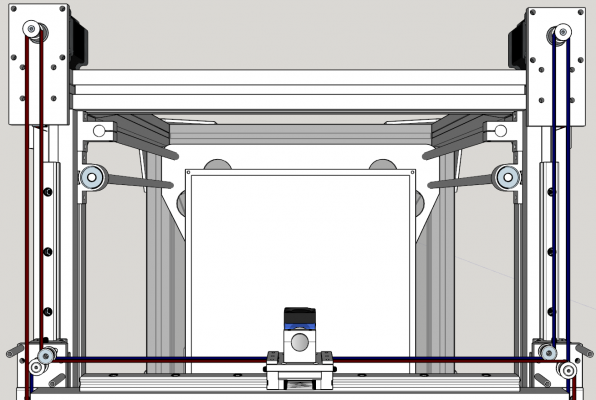
for comparison and to better understanding of what I mean, here are a few photos of my design:
EDIT found exactly what I mean discussed here. Should make more sense than my "explanation"
Edited 1 time(s). Last edit at 01/24/2016 06:04AM by Dalius98.
I'm referring to this picture:
since you have both belts "wrapped" around the same shaft on Y carriage, one (or both) of them is not running parallel or whatever the word is...
It's hard to explain with my limited knowledge of technical terms, but when the belts are wrapped like that, the steps/mm value will differ depending on the current position of the Y carriage... uh... like a triangle

for comparison and to better understanding of what I mean, here are a few photos of my design:
EDIT found exactly what I mean discussed here. Should make more sense than my "explanation"

Edited 1 time(s). Last edit at 01/24/2016 06:04AM by Dalius98.
|
Re: Coffeetable CoreXY:: new build :: small apartment rep-strap solutions January 24, 2016 08:17AM |
Registered: 9 years ago Posts: 1,035 |
@Dalius98: I am doing nothing new here but re-interpretting the classic two-stage (two-planes?) Core XY arrangement. Smartrap CoreXY also uses exactly this and Wild River 240 before them and countless others. The illusion is due to the orthogonal view in my CAD. Unless there is something all these printers miss I don't think there is anything different in my setup. All that matters in this case is that the belt segments that go from corners towards the Y carriage must be parallel by all means. This avoids the issue you are linking.
Regarding the Y carriage, I have finally set my mind at ease with the updated design. Unless you have a very precise 3D printer to begin with, having the 608 bearings' shaft clamp both lower X rod and the linear bearings is challenging. So I have dissociated the two and now each hole has its own screw, with the M8 bolt still performing two functions, being the shaft for the 608s and clamping the bearings.
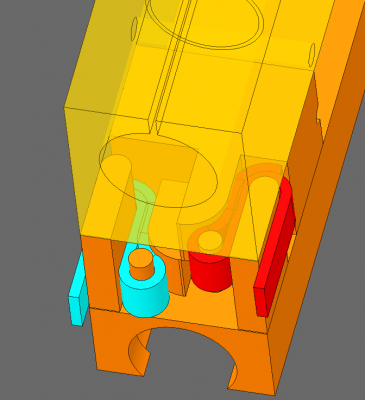
Will focus further on on the X carriage because I don't like the fact that Smartrap Core has the protrusions that catch the belt while preventing having two hotends, or at least this is how I see it. So, in my interpretation of the X carriage, the belts should be "caught" inside the block, not outside it and I have a wild design that some may love some may hate but here it is. (Note: it would be so much easier to explain in a video how it works but unfortunately I don't yet have it printed, that will come later):
The green piece can be printed in one piece with the whole X carriage (depending how the slicers will accept/perform without adding support material) but for experimentation I have it as a separate part. Basically you route the belt around the rounded slot and back on the smooth/non-toothed side of the green piece then slide it downwars/upwards between the teeth so it can be gripped by the tension, preventing it from falling down. I am still refining the concept so bare with me while providing any observation you might have.
There are several concerns I have, related to the resistance of the piece the belt wraps around and the printing orientation if all is one piece. I'll have to experiment I guess.
RepRap Lander concept on Concept Forge
RepRap Lander concept on RepRap Forums
My Things, mostly experimental stuff
|
Re: Coffeetable CoreXY:: new build :: small apartment rep-strap solutions January 24, 2016 10:03AM |
Registered: 11 years ago Posts: 5,780 |
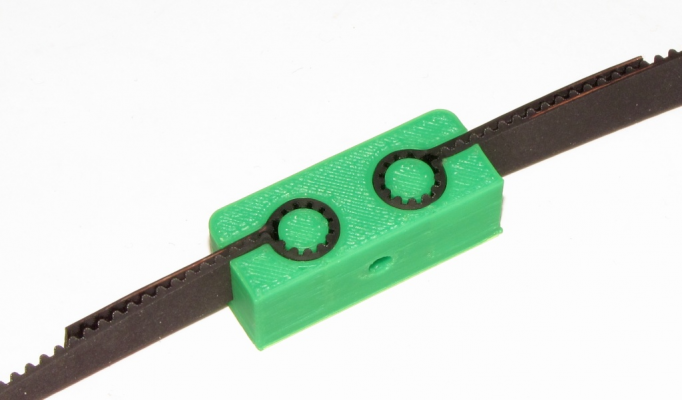
It can be tough to print teeth that match GT2 belt teeth because of the fine detail/small spacing. I designed this belt clamp that uses the belt's own teeth to secure the belt, simply by folding the belt back on itself. It is very easy to print because you don't need to print any fine detail. With this design, even if you pull the belt so tight that the center peg breaks, the belt will remain in place.
The youmagine page has designs for single and double clamps that mount horizontally and vertically:
GT2 belt clamps
It would be pretty easy exercise to modify the design to allow it to both adjust tension and clamp the belt tightly.
Ultra MegaMax Dominator 3D printer: [drmrehorst.blogspot.com]
The youmagine page has designs for single and double clamps that mount horizontally and vertically:
GT2 belt clamps
It would be pretty easy exercise to modify the design to allow it to both adjust tension and clamp the belt tightly.
Ultra MegaMax Dominator 3D printer: [drmrehorst.blogspot.com]
|
Re: Coffeetable CoreXY:: new build :: small apartment rep-strap solutions January 24, 2016 10:17AM |
Registered: 9 years ago Posts: 1,035 |
Quote
the_digital_dentist
It can be tough to print teeth that match GT2 belt teeth because of the fine detail/small spacing. I designed this belt clamp that uses the belt's own teeth to secure the belt, simply by folding the belt back on itself. It is very easy to print because you don't need to print any fine detail. With this design, even if you pull the belt so tight that the center peg breaks, the belt will remain in place.
The youmagine page has designs for single and double clamps that mount horizontally and vertically:
GT2 belt clamps
It would be pretty easy exercise to modify the design to allow it to both adjust tension and clamp the belt tightly.
That's smart thanks for the suggestion I'll try to incorporate it into the X carriage design. My immediate observation is that I'd have troubles routing the belt inside the carriage... will think of something ultimately...
Edited 2 time(s). Last edit at 01/24/2016 05:54PM by realthor.
RepRap Lander concept on Concept Forge
RepRap Lander concept on RepRap Forums
My Things, mostly experimental stuff
|
Re: Coffeetable CoreXY:: new build :: small apartment rep-strap solutions January 24, 2016 02:48PM |
Registered: 8 years ago Posts: 67 |
Quote
realthor
@Dalius98: I am doing nothing new here but re-interpretting the classic two-stage (two-planes?) Core XY arrangement. Smartrap CoreXY also uses exactly this and Wild River 240 before them and countless others. The illusion is due to the orthogonal view in my CAD. Unless there is something all these printers miss I don't think there is anything different in my setup. All that matters in this case is that the belt segments that go from corners towards the Y carriage must be parallel by all means. This avoids the issue you are linking.
Ah, after looking at the aforementioned printers, I see the difference between them and the problem I suggested. It's just the motor pulley that is offset to one side a bit, while still keeping all the parallelism of the Y plane (or whatever)... like this, right?
Sorry to cause this misunderstanding

Edited 1 time(s). Last edit at 01/24/2016 02:49PM by Dalius98.
|
Re: Coffeetable CoreXY:: new build :: small apartment rep-strap solutions January 24, 2016 04:06PM |
Registered: 9 years ago Posts: 1,035 |
No worries, every time we revise something or read a slightly different approach we increase our power to mix and match the new info in new and maybe unpredictable ways, maybe one of those will end up one day as a stroke of genius ...but it's always a product of reading and seeing and mistaking and misunderstanding a lot  .
.
Edit: forgot to answer you sorry ...so yes you are right in your latest sketch.
Do you guys have any idea you could quickly scribble on a piece of paper and send a picture over... a way to integrate the digital_dentist's idea into an X carriage that has stacked rods? The problem is that the insert place is in between rods which makes it impractical to insert the loop as pictured, which would go from above or from below, areas that are inaccessible with a design like I have presented...
I can't find for the life of me a solution simpler than mine (which is not simple in the first place ) but it is easy to crochet the belt and even tension it to an acceptable degree with everything assembled, which is a plus in the Smartrap corexy's way of doing things.
Edited 2 time(s). Last edit at 01/24/2016 05:56PM by realthor.
RepRap Lander concept on Concept Forge
RepRap Lander concept on RepRap Forums
My Things, mostly experimental stuff
 .
.Edit: forgot to answer you sorry ...so yes you are right in your latest sketch.
Do you guys have any idea you could quickly scribble on a piece of paper and send a picture over... a way to integrate the digital_dentist's idea into an X carriage that has stacked rods? The problem is that the insert place is in between rods which makes it impractical to insert the loop as pictured, which would go from above or from below, areas that are inaccessible with a design like I have presented...
I can't find for the life of me a solution simpler than mine (which is not simple in the first place
 ) but it is easy to crochet the belt and even tension it to an acceptable degree with everything assembled, which is a plus in the Smartrap corexy's way of doing things.
Edited 2 time(s). Last edit at 01/24/2016 05:56PM by realthor.
RepRap Lander concept on Concept Forge
RepRap Lander concept on RepRap Forums
My Things, mostly experimental stuff
|
Re: Coffeetable CoreXY:: new build :: small apartment rep-strap solutions January 24, 2016 04:52PM |
Registered: 9 years ago Posts: 1,035 |
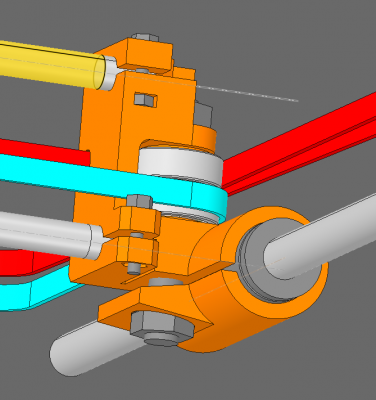
Ok, I might have a couple of solutions:
Now the problem is what are those pins, are they fixed into the printed body or are they free-floating? In the arrangement above the belt is introduced already folded onto itself in the lateral slot in the carriage and it will be slid from the larger area into the narrow channel where it will be locked. This might work even without the pin but I believe the pin is helping. It can be a "fixed" pointed column and the belt loop onto itself will be slid into that pin. Now should that pin be plastic or metal and how will it be fixated in that place...
Suggestions?
Edit: I've uploaded the solutions I could think of on thingiverse: [www.thingiverse.com]
Edited 3 time(s). Last edit at 01/25/2016 05:00PM by realthor.
RepRap Lander concept on Concept Forge
RepRap Lander concept on RepRap Forums
My Things, mostly experimental stuff
Now the problem is what are those pins, are they fixed into the printed body or are they free-floating? In the arrangement above the belt is introduced already folded onto itself in the lateral slot in the carriage and it will be slid from the larger area into the narrow channel where it will be locked. This might work even without the pin but I believe the pin is helping. It can be a "fixed" pointed column and the belt loop onto itself will be slid into that pin. Now should that pin be plastic or metal and how will it be fixated in that place...
Suggestions?

Edit: I've uploaded the solutions I could think of on thingiverse: [www.thingiverse.com]
Edited 3 time(s). Last edit at 01/25/2016 05:00PM by realthor.
RepRap Lander concept on Concept Forge
RepRap Lander concept on RepRap Forums
My Things, mostly experimental stuff
|
Re: Coffeetable CoreXY:: new build :: small apartment rep-strap solutions January 24, 2016 06:35PM |
Registered: 11 years ago Posts: 5,780 |
The pin doesn't need to be fixed at all- once the belt is under tension, it won't go anywhere. You do need to make sure that the slots for the belt (in front of the pins) just allows the 2 layers of interdigitated belt to fit. That is how the belt is prevented from slipping. I used a slot width of 2.2 mm based on the dimensions of GT2 belt, and it fits tightly and will not slip, period.
Will you be sliding the motor mounts to tension the belts?
Ultra MegaMax Dominator 3D printer: [drmrehorst.blogspot.com]
Will you be sliding the motor mounts to tension the belts?
Ultra MegaMax Dominator 3D printer: [drmrehorst.blogspot.com]
|
Re: Coffeetable CoreXY:: new build :: small apartment rep-strap solutions January 24, 2016 06:48PM |
Registered: 9 years ago Posts: 1,035 |
Quote
the_digital_dentist
The pin doesn't need to be fixed at all- once the belt is under tension, it won't go anywhere. You do need to make sure that the slots for the belt (in front of the pins) just allows the 2 layers of interdigitated belt to fit. That is how the belt is prevented from slipping. I used a slot width of 2.2 mm based on the dimensions of GT2 belt, and it fits tightly and will not slip, period.
Based on GT2 specs I've calculated roughly 2.26mm between the walls. 2.2 seems even better although I don't know if 0.06 matters.
Also if the pins are free-floating then tension will be rapidly lost as the pins would be dragged towards the narrow channel designed for the belt-on-belt fold. If the pins were fixated in such a way that I must pull the loop to insert it onto the pin then I could tension the belt without other additional means.
Quote
the_digital_dentist
Will you be sliding the motor mounts to tension the belts?
To be honest I have no idea. I wouldn't like to have mobile motors (they will/should be pretty well fastened to the frame I suppose) and frankly the amount of tension I can put into the belt while mounting it in the X carriage plus some in-line tensioners is as far as I have thought about it. I don't really see many options with corexy, as the only ends of the belts are at the carriage and there aren't many places where I could run a deflection pulley system. So the X carriage seems to be the best place to apply tension to the belts. It's just quite tricky.
Edited 3 time(s). Last edit at 01/24/2016 07:41PM by realthor.
RepRap Lander concept on Concept Forge
RepRap Lander concept on RepRap Forums
My Things, mostly experimental stuff
|
Re: Coffeetable CoreXY:: new build :: small apartment rep-strap solutions January 24, 2016 08:04PM |
Registered: 9 years ago Posts: 1,035 |
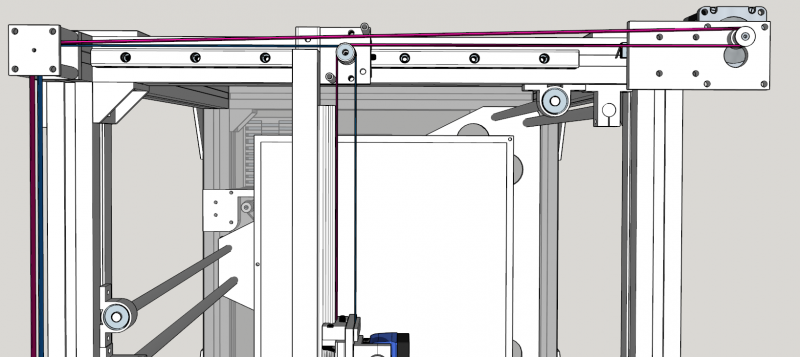
Maybe something like this (in addition to what is achievable from the X carriage side)? :
RepRap Lander concept on Concept Forge
RepRap Lander concept on RepRap Forums
My Things, mostly experimental stuff
RepRap Lander concept on Concept Forge
RepRap Lander concept on RepRap Forums
My Things, mostly experimental stuff
|
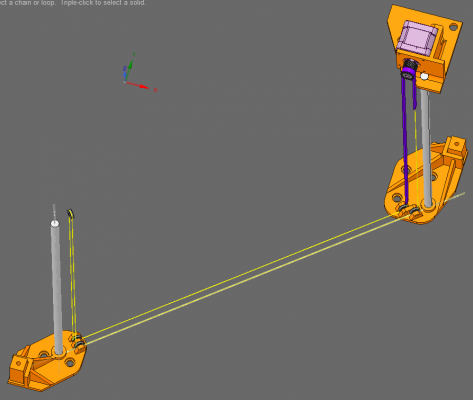
Re: Coffeetable CoreXY:: new build :: small apartment rep-strap solutions February 02, 2016 08:11PM |
Registered: 9 years ago Posts: 1,035 |
Update:
1) I can't really use the tensioning system I sketched above because the belt would be contacting the bearing with its teeth causing increased noise as the teeth rattle against the smooth bearing. So far I can't think of another way to tension the belts. This is still an open issue.
2) I am mostly done designing all the parts except the Z stage which I am very unsure of. That is again an open issue.
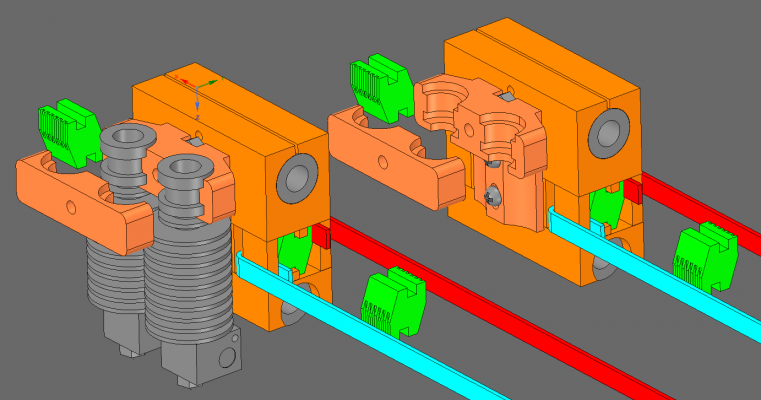
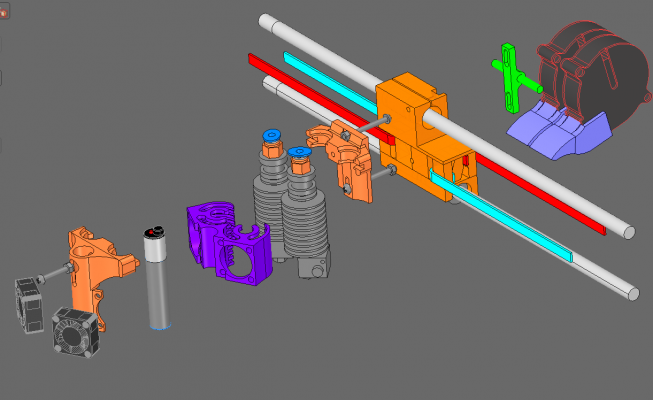
3) I have finally finished designing the printer head. I've settled for double bowden for lightweight but have set myself a target to construct a flying dual extruder for Cartesian printers. That should be enough of a challenge but shouldn't be anything too complicated. It will be a scara arm holding two motors, basically a TV mount arm on one vertical member of the frame.
The printer head is what I want to discuss in this post. Due to the metal frame of the table (now I wish I had some aluminum extrusions to build the frame) I had to build a very compact printer head but who doesn't need that. I had to fit on it:
- two hotends,
- 2 cooling fans for the hotends ,
- 2 cooling fans for the printed parts,
- 1 Inductive/Capacitive probe (am looking into Renishaw-style probe but that will be another design)
- and maybe a small board to fit all the connectors for easy replacement.
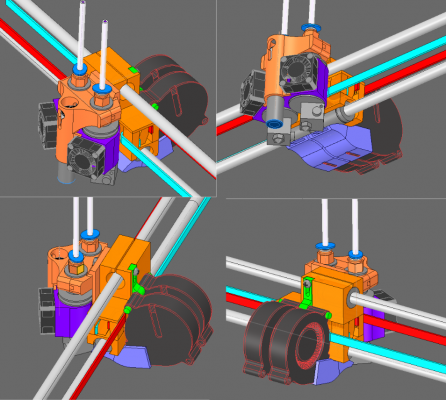
And here's what i come up with at this point:
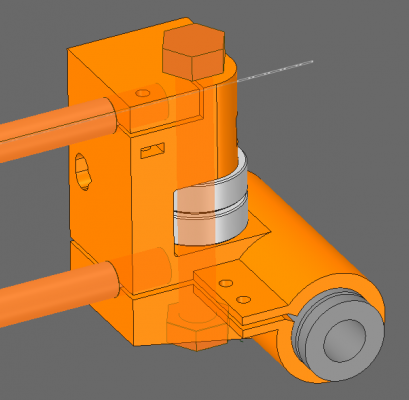
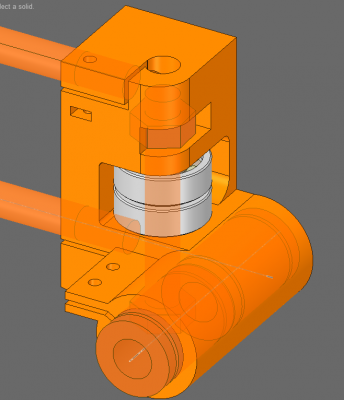
I tried to find a way to add a capacitive/inductive probe that wouldn't be too far to the side or too far in the back (like some Smartrapcore derivatives do) so I planted it dead center in front and in between to some degree the two hotends. That triggered the two-fan hotend cooling solution, which I wasn't very fond of at first but now it looks to be ok.
I tried three squirrel cage fans at the back but again space requirement had me settle for two, cooling the printed parts, while the hotends are cooled by the two 25mm axial fans at the front. The squirrel cage blowers have snap-on interchangeable funnels to concentrate the airflow right below nozzle and their orientation can be slightly altered by rotating the fans a bit.
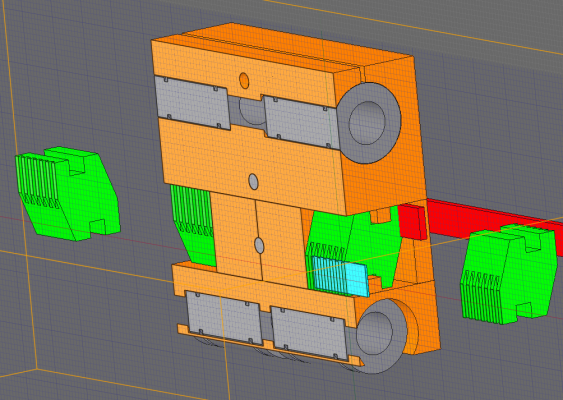
To reduce as much as possible the distance between the probe and the hotends I had to drop the nuts that are used to clamp it secure and settle for a threaded cylinder created by two halves, one belonging to the fans shroud and the other the clamping half cylinder that is also clamping the two hotends. The below exploded view should explain better cause it's really difficult to explain:
Ok, now I'll let you decide the course of the discussion, if not, I'll be back with another update soon.
RepRap Lander concept on Concept Forge
RepRap Lander concept on RepRap Forums
My Things, mostly experimental stuff
|
Re: Coffeetable CoreXY:: new build :: small apartment rep-strap solutions February 03, 2016 12:24AM |
Registered: 8 years ago Posts: 67 |
|
Re: Coffeetable CoreXY:: new build :: small apartment rep-strap solutions February 03, 2016 02:17AM |
Registered: 9 years ago Posts: 1,035 |
Quote
Dalius98
Couldn't you tension the belts the same way as you've sketched, but by pushing them towards the center of the printer? There has to be some leftover space to do so... And you could use a smooth idler... Or why not use a toothed idler and just tension them like you wanted?
Oh I can tension the heck out of it at the X Carriage but it is not elegant I guess, you have to work in that little space and I don't like forcing anything near the 8mm X rods. I haven't decided yet on a solution between the two that are left to judge (the infinite sign one has dropped). As much as I like the pins idea over my toothed arrest system for the belts, I kind of find the latter more rep-rappy
 (the pins would almost surely be metal because they are about 4mm diam).
I wouldn't use a bearing on the toothed side of the printer for noise reasons. Also a toothed pulley on the toothed side would probably work but again more vitamins and I don't know if that much tension would be needed. I believe I have to find the longest run of belt that doesn't reach a pully and put there an in-line 3d printed tensioner. It's the simplest choice really but even that might not be necessary at all because I've seen Smartrapcore installations where all is done by hand at the X carriage side.
RepRap Lander concept on Concept Forge
RepRap Lander concept on RepRap Forums
My Things, mostly experimental stuff
|
Re: Coffeetable CoreXY:: new build :: small apartment rep-strap solutions February 16, 2016 06:18PM |
Registered: 9 years ago Posts: 1,035 |
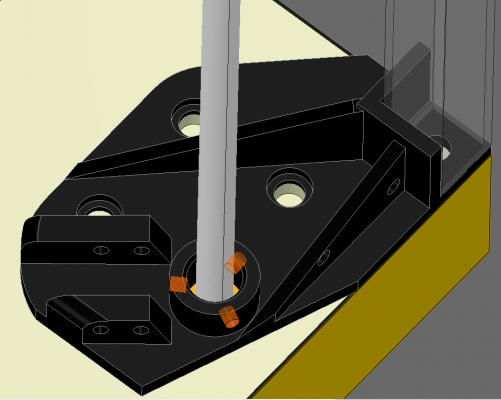
I'm facing a dilemma guys (one of the many  ). As I print my parts I am more and more certain that I will not be able to get exact verticality for the Z smooth rods. For the rods to be perfectly vertical I would need very precise positioning between the "foot" pads and the top plates. I have just screwed the foots into the board and I am pretty sure they will not align perfectly with the top plates.
Because I can't expect such a build to be perfectly square, perfectly aligned, perfectly whatever, I must design for imperfection and I am thinking at ways to "fix" the vertical alignment of the Z smooth rods. The top hole will be both in plastic and in the metal bracket so that one has to be left alone (after drilling I can't do anything to move it around). The bottom clamp has to be somehow altered to be able to adjust the positioning.
I was thinking at having a larger hole to receive the rod, say 15mm diam, with three holes at 120 degrees where I would screw some M3 bolts that I can adjust. Then, after adjusting, fix somehow in place the rod (pouring some melted plastic or some hard glue). My question to you is: is there a better way to obtain good alignment between the top plate and the bottom one?
The bad part is that the foot is already printed and i'd have to drill a large hole with a spade bit and I will expose the infill but I don't think that will be a problem. I am just looking to find a good filler agent (plastic/glue) that will not permanently fix the rod (after it sets I'd rotate the rod so it won't completely stick to it, or maybe use some silicone spray or something similar to prevent sticking). Again, maybe the screws would be enough if they are the self-tapping type and I force them through a smaller pilot hole.
But then again maybe you have better ideas.
RepRap Lander concept on Concept Forge
RepRap Lander concept on RepRap Forums
My Things, mostly experimental stuff
 ). As I print my parts I am more and more certain that I will not be able to get exact verticality for the Z smooth rods. For the rods to be perfectly vertical I would need very precise positioning between the "foot" pads and the top plates. I have just screwed the foots into the board and I am pretty sure they will not align perfectly with the top plates.
Because I can't expect such a build to be perfectly square, perfectly aligned, perfectly whatever, I must design for imperfection and I am thinking at ways to "fix" the vertical alignment of the Z smooth rods. The top hole will be both in plastic and in the metal bracket so that one has to be left alone (after drilling I can't do anything to move it around). The bottom clamp has to be somehow altered to be able to adjust the positioning.
I was thinking at having a larger hole to receive the rod, say 15mm diam, with three holes at 120 degrees where I would screw some M3 bolts that I can adjust. Then, after adjusting, fix somehow in place the rod (pouring some melted plastic or some hard glue). My question to you is: is there a better way to obtain good alignment between the top plate and the bottom one?
The bad part is that the foot is already printed and i'd have to drill a large hole with a spade bit and I will expose the infill but I don't think that will be a problem. I am just looking to find a good filler agent (plastic/glue) that will not permanently fix the rod (after it sets I'd rotate the rod so it won't completely stick to it, or maybe use some silicone spray or something similar to prevent sticking). Again, maybe the screws would be enough if they are the self-tapping type and I force them through a smaller pilot hole.
But then again maybe you have better ideas.
RepRap Lander concept on Concept Forge
RepRap Lander concept on RepRap Forums
My Things, mostly experimental stuff
|
Re: Coffeetable CoreXY:: new build :: small apartment rep-strap solutions February 18, 2016 08:57PM |
Registered: 9 years ago Posts: 1,035 |
I am thinking of HMA (hot glue) but I am not sure how flexible that ends up as a solid and if that rubberyness can be acceptable in such a setting (clamping of vertical linear guides). Care to share some thoughts?
RepRap Lander concept on Concept Forge
RepRap Lander concept on RepRap Forums
My Things, mostly experimental stuff
RepRap Lander concept on Concept Forge
RepRap Lander concept on RepRap Forums
My Things, mostly experimental stuff
Sorry, only registered users may post in this forum.
