My CoreXY Build Plan
Posted by jnsbanman
|
My CoreXY Build Plan January 29, 2016 01:31PM |
Registered: 8 years ago Posts: 49 |
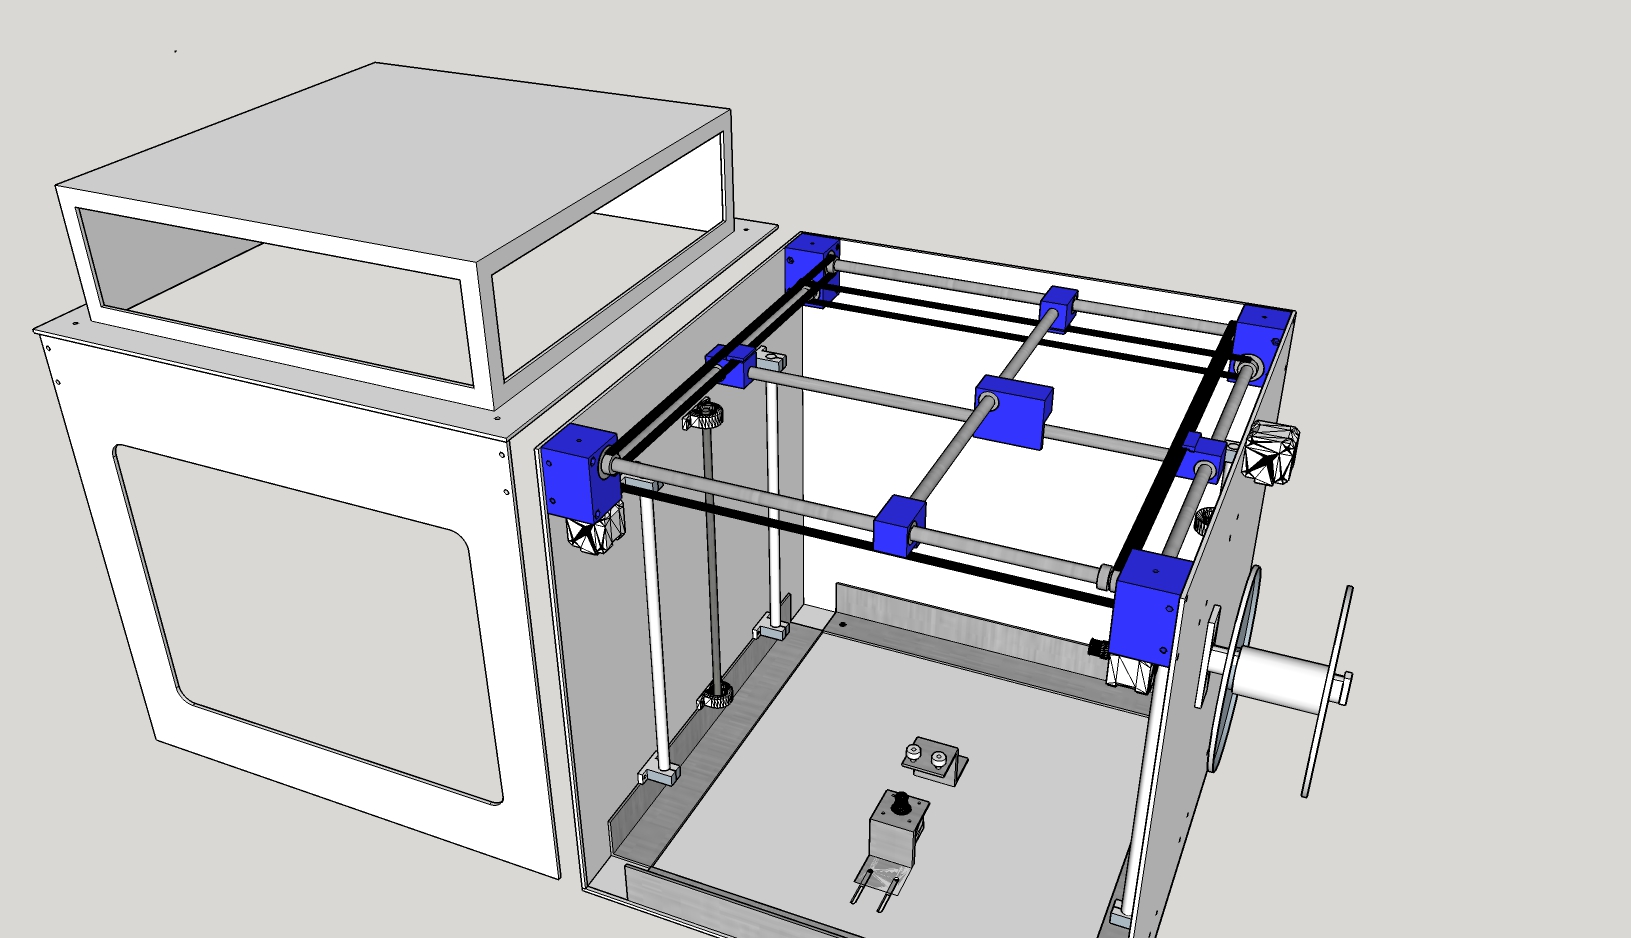
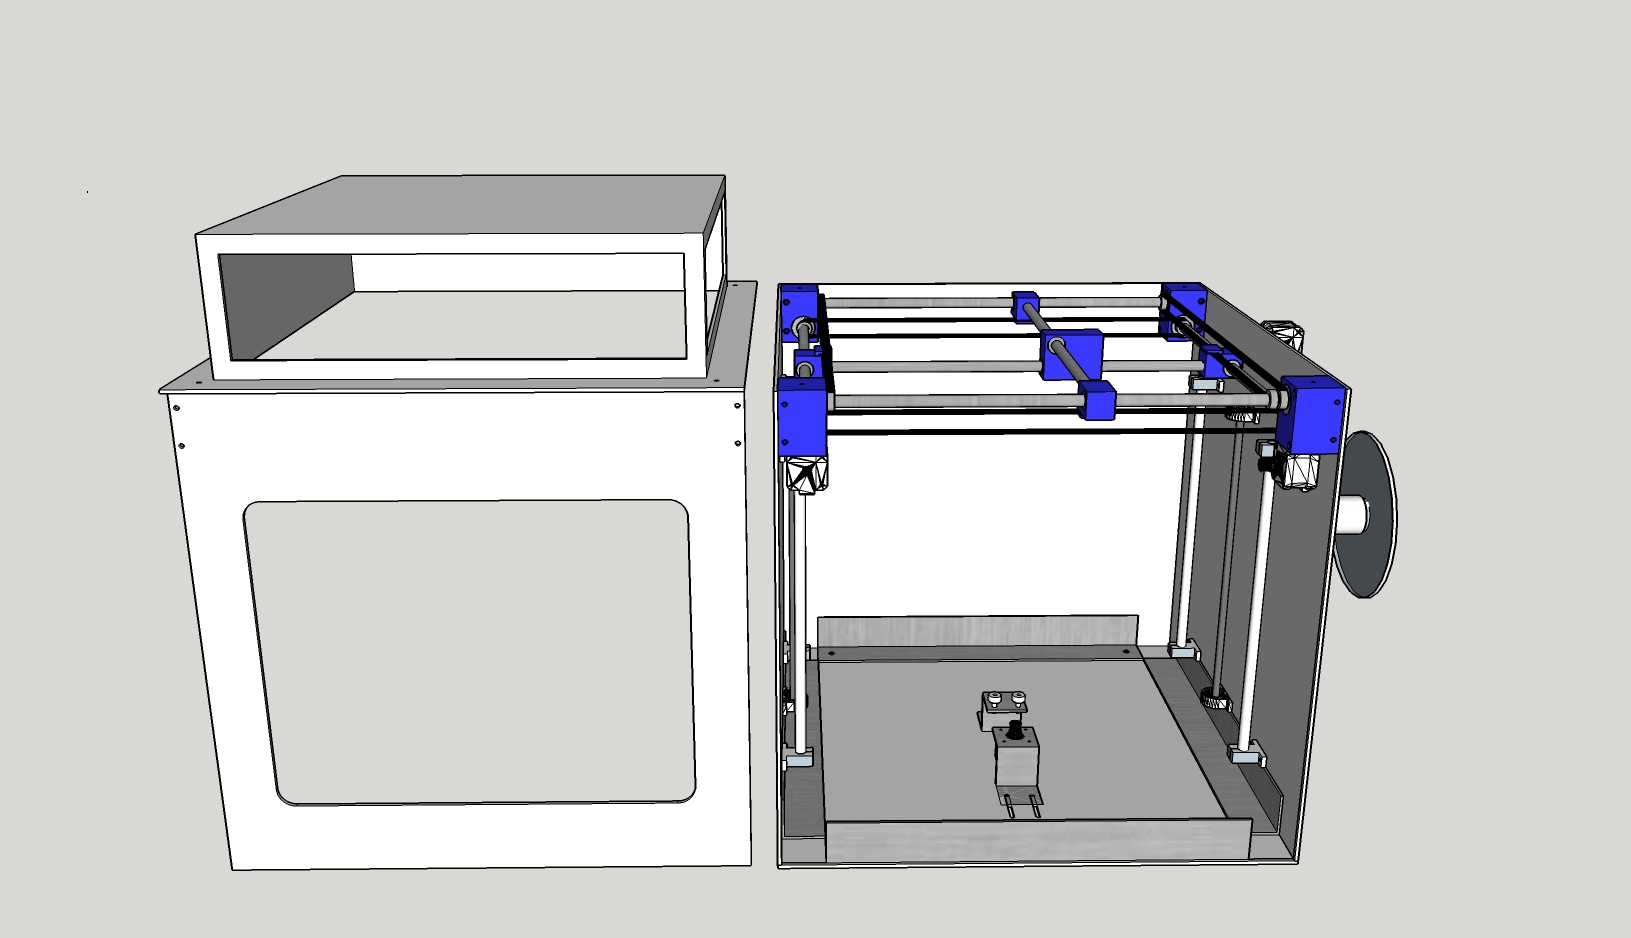
Here is my concept for a decent sized CoreXY printer. Target build volume is 300x300x300.
Questions I have for those that are more experiences with these systems
Linear Rails for X and Y axis - 12mm or 10mm?
X/Y rails that will support the Gantry - 12mm or 10mm?
Z Axis rails - 12mm or 10mm
The external frame is being CNC cut from 4mm Fire Rated Alpolic. The 4 vertical sides are being cut as 1 piece then folded to exact inside dimensions then the corners epoxied with industrial epoxy. This puppy will be rock solid. The top an bottom pieces will be bolted on angles that attach to the vertical box. The material being used is a brushed aluminium/stainless steel look. Prototypes for the corner blocks will be printed, then once fit is verified possibly will machine from aluminium blocks.
All axis will be run from one Nema 17 (76 oz in). Electronics most likely will be Ramps 1.4, Mega 2560 and DRV8825
I invite any critisms or advice to improve the design. Image is attached
Edit: Guess I should provide some dimensions... The box external dimensions are 588mm width x 588mm depth x 550mm height. The perimeter X/Y axis rails are 500mm (2 per axis), The individual X and Y axis rails are 475mm each (1 per axis), The Z axis rails are 400mm each (4 total). The 2 lead screws are 8mm.
Edited 2 time(s). Last edit at 01/29/2016 03:30PM by jnsbanman.
|
Re: My CoreXY Build Plan January 29, 2016 03:50PM |
Registered: 10 years ago Posts: 14,672 |
It sounds to me that you are planning to spend a lot on the mechanics of your printer, but spoiling it by choosing poor electronics. Arduino/RAMPS is fast enough to drive a CoreXY printer, but has too many limitations to make it a good choice on anything other than a bargain basement printer. In particular it is not 24V capable. You should be using either 24V or mains power for a heated bed of that size.
I won't comment on the mechanics because that is not my area of expertise.
Edited 1 time(s). Last edit at 01/29/2016 03:51PM by dc42.
Large delta printer [miscsolutions.wordpress.com], E3D tool changer, Robotdigg SCARA printer, Crane Quad and Ormerod
Disclosure: I design Duet electronics and work on RepRapFirmware, [duet3d.com].
|
Re: My CoreXY Build Plan January 29, 2016 04:24PM |
Registered: 8 years ago Posts: 49 |
Quote
dc42
It sounds to me that you are planning to spend a lot on the mechanics of your printer, but spoiling it by choosing poor electronics. Arduino/RAMPS is fast enough to drive a CoreXY printer, but has too many limitations to make it a good choice on anything other than a bargain basement printer. In particular it is not 24V capable. You should be using either 24V or mains power for a heated bed of that size.
I won't comment on the mechanics because that is not my area of expertise.
Ok... What would make a good match electronics wise for a printer of this size? I am wide open to suggestion.
I have looked at some of the Azteeg products and they look good. I would not need more then 2 extruders, and 3 axis motors. The X3 looks like it might fit the bill.
Or the GT2560 look interesting but could not find too much about it... Looks pretty new.
Edited 4 time(s). Last edit at 01/29/2016 04:31PM by jnsbanman.
|
Re: My CoreXY Build Plan January 29, 2016 06:35PM |
Registered: 11 years ago Posts: 5,780 |
Go for a 32 bit board like Duet or Smoothieboard.
I use the latter. It was a refreshing change to convert my printer from Arduino/RAMPS to Smoothie- configuration changes on smoothieboard are simply edits to a single text file that is read by the board each time it boots up. No more hunting through multiple config files and a screwing around with the flakey Arduino IDE to recompile firmware every time you make a change. It has numerous other features that make it superior to the A/R setup. More info here: [smoothieware.org]
Ultra MegaMax Dominator 3D printer: [drmrehorst.blogspot.com]
|
Re: My CoreXY Build Plan January 30, 2016 02:31AM |
Registered: 9 years ago Posts: 83 |
Quote
the_digital_dentist
Go for a 32 bit board like Duet or Smoothieboard.
I use the latter. It was a refreshing change to convert my printer from Arduino/RAMPS to Smoothie- configuration changes on smoothieboard are simply edits to a single text file that is read by the board each time it boots up. No more hunting through multiple config files and a screwing around with the flakey Arduino IDE to recompile firmware every time you make a change. It has numerous other features that make it superior to the A/R setup. More info here: [smoothieware.org]
People are still recompiling their firmware for a config change? I thought even Marlin had moved way past that within the last couple years-- Repetier hasn't needed recompiling for config changes since I've been using it.
Quote
jnsbanman
Ok... What would make a good match electronics wise for a printer of this size? I am wide open to suggestion.
I have looked at some of the Azteeg products and they look good. I would not need more then 2 extruders, and 3 axis motors. The X3 looks like it might fit the bill.
Or the GT2560 look interesting but could not find too much about it... Looks pretty new.
The three main contenders for 32 bit are smoothieboard / azteeg, running smoothieware, duet running dc42's version of the reprapfirmware, or due/radds running Repetier/due (dc42's RRF is in theory now usable on due/radds as well).
All three are now available in the US as well, which is a nice change, and they all three support 24V power supplies.
Also consider the newer THB6128 stepper drivers-- finding a motor that plays nice with the DRV8825 is more difficult (Having said that, the smoothieboard and the duet have non-socketed drivers, which is either good, or bad, depending on your point of view. The azteeg X5 v2 is also soldered in, but they're THB6128's).
Having said all that, your design looks very much like an ultimaker gantry, instead of coreXY-- not that there's anything wrong with that per se, but I don't know how well it scales.
|
Re: My CoreXY Build Plan January 31, 2016 01:15PM |
Registered: 8 years ago Posts: 49 |
Quote
grat
Quote
the_digital_dentist
Go for a 32 bit board like Duet or Smoothieboard.
I use the latter. It was a refreshing change to convert my printer from Arduino/RAMPS to Smoothie- configuration changes on smoothieboard are simply edits to a single text file that is read by the board each time it boots up. No more hunting through multiple config files and a screwing around with the flakey Arduino IDE to recompile firmware every time you make a change. It has numerous other features that make it superior to the A/R setup. More info here: [smoothieware.org]
People are still recompiling their firmware for a config change? I thought even Marlin had moved way past that within the last couple years-- Repetier hasn't needed recompiling for config changes since I've been using it.
Quote
jnsbanman
Ok... What would make a good match electronics wise for a printer of this size? I am wide open to suggestion.
I have looked at some of the Azteeg products and they look good. I would not need more then 2 extruders, and 3 axis motors. The X3 looks like it might fit the bill.
Or the GT2560 look interesting but could not find too much about it... Looks pretty new.
The three main contenders for 32 bit are smoothieboard / azteeg, running smoothieware, duet running dc42's version of the reprapfirmware, or due/radds running Repetier/due (dc42's RRF is in theory now usable on due/radds as well).
All three are now available in the US as well, which is a nice change, and they all three support 24V power supplies.
Also consider the newer THB6128 stepper drivers-- finding a motor that plays nice with the DRV8825 is more difficult (Having said that, the smoothieboard and the duet have non-socketed drivers, which is either good, or bad, depending on your point of view. The azteeg X5 v2 is also soldered in, but they're THB6128's).
Having said all that, your design looks very much like an ultimaker gantry, instead of coreXY-- not that there's anything wrong with that per se, but I don't know how well it scales.
I think it will be between the smoothieboard and the duet. I think I would prefer the socketed drivers... just incase.
Could you elaborate on when you mean by it does not scale well?
|
Re: My CoreXY Build Plan January 31, 2016 05:11PM |
Registered: 10 years ago Posts: 14,672 |
Socketed drivers are much less reliable than on-board drivers, that's why the more advanced boards don't use them.
Large delta printer [miscsolutions.wordpress.com], E3D tool changer, Robotdigg SCARA printer, Crane Quad and Ormerod
Disclosure: I design Duet electronics and work on RepRapFirmware, [duet3d.com].
Large delta printer [miscsolutions.wordpress.com], E3D tool changer, Robotdigg SCARA printer, Crane Quad and Ormerod
Disclosure: I design Duet electronics and work on RepRapFirmware, [duet3d.com].
|
Re: My CoreXY Build Plan February 01, 2016 08:37AM |
Registered: 8 years ago Posts: 49 |
|
Re: My CoreXY Build Plan February 01, 2016 10:08AM |
Registered: 9 years ago Posts: 101 |
|
Re: My CoreXY Build Plan February 01, 2016 10:39AM |
Registered: 11 years ago Posts: 5,780 |
There are two main reasons why socketed drivers are less reliable than those mounted on the controller board.
1) heat- the driver chips are designed to be heat sinked by bonding them to a ground plane on the circuit board. The socketed drivers don't have that and even if they did, the board is so small it would not be a very effective heat sink. The drivers mounted on the smoothieboard are soldered to the ground plane and it sucks the heat right out of them.
2) trim pots to set the current- the pots are fragile and located very close to other nodes in the circuit. It is very easy to break the pot and very easy to short out connections on the driver module when trying to adjust motor current. It is also sort of difficult to know exactly what the motor current is when tweaking the pot because the different versions of the modules use different reference resistors and you need to measure the voltage across that resistor as you adjust the pot. That leads to setting the current too high and burning up the driver chip (see #1 above). It's a tight fit to get the screwdriver on the pot and get a voltmeter on the board to try to read the reference voltage. On the Smoothieboard (and probably Duet), motor current is set using digital pots that are adjusted by a variable in the config.txt file. You specify the current you want and that's the current you get - no guessing, no measuring, no pots, no voltmeters.
As a dentist, I am used to working in very small space that is dark, wet, has a moving tongue, sometimes accompanied by a strong gag reflex, and often only able to see what I'm doing in a mirror, so I would generally be regarded as having "mad hand skillz". Back when I was using a RAMPS board in my printer I went through about 5 of the motor driver modules because of broken pots, shorted connections, and toasted chips. Believe me when I say that the socketed modules are a poor design, period. If you go with a board that has socketed motor driver modules, buy a bunch of extras because you're going to need them.
Edited 1 time(s). Last edit at 02/01/2016 10:41AM by the_digital_dentist.
Ultra MegaMax Dominator 3D printer: [drmrehorst.blogspot.com]
|
Re: My CoreXY Build Plan February 02, 2016 08:49AM |
Registered: 8 years ago Posts: 49 |
Quote
the_digital_dentist
There are two main reasons why socketed drivers are less reliable than those mounted on the controller board.
1) heat- the driver chips are designed to be heat sinked by bonding them to a ground plane on the circuit board. The socketed drivers don't have that and even if they did, the board is so small it would not be a very effective heat sink. The drivers mounted on the smoothieboard are soldered to the ground plane and it sucks the heat right out of them.
2) trim pots to set the current- the pots are fragile and located very close to other nodes in the circuit. It is very easy to break the pot and very easy to short out connections on the driver module when trying to adjust motor current. It is also sort of difficult to know exactly what the motor current is when tweaking the pot because the different versions of the modules use different reference resistors and you need to measure the voltage across that resistor as you adjust the pot. That leads to setting the current too high and burning up the driver chip (see #1 above). It's a tight fit to get the screwdriver on the pot and get a voltmeter on the board to try to read the reference voltage. On the Smoothieboard (and probably Duet), motor current is set using digital pots that are adjusted by a variable in the config.txt file. You specify the current you want and that's the current you get - no guessing, no measuring, no pots, no voltmeters.
As a dentist, I am used to working in very small space that is dark, wet, has a moving tongue, sometimes accompanied by a strong gag reflex, and often only able to see what I'm doing in a mirror, so I would generally be regarded as having "mad hand skillz". Back when I was using a RAMPS board in my printer I went through about 5 of the motor driver modules because of broken pots, shorted connections, and toasted chips. Believe me when I say that the socketed modules are a poor design, period. If you go with a board that has socketed motor driver modules, buy a bunch of extras because you're going to need them.
Ok that totally makes sense. So i think I have the electronics aspects nailed down.
What are everyone's thoughts on the the rails? I think it is probably worth the few extra $$$ each to go with 12mm rods for all of them. I was looking up how the ultimakers are built and they use a smaller rod size for the 2 rods that the gantry moves on. Other then lowering moving mass I do not see that being so great for deflection. I am no engineer but I would think if all the rods (x,y and gantry) were the same and larger size would allow for the most strength.
I will most likely we going with a bowden style extruder so weight on the axis' should be very minimal.
|
Re: My CoreXY Build Plan February 02, 2016 11:08AM |
Registered: 11 years ago Posts: 5,780 |
If you look at the corexy structure, especially the XY mechanism and the way it typically fits into the machine's frame, it is very easy to use fully supported guide rails on the Y axis instead of end supported rails because the rails are typically parallel and adjacent to frame members. Attaching the fully supported rails to the frame member every 30 - 50 mm makes the rails as stiff as the much larger cross-section area frame members. There's nothing better for print quality and precision than rigid guide rails and a rigid frame.
For the X axis (on which the extruder carriage rides), I would also use a single linear guide instead of a pair of round rails. It will be lower mass, more compact, and the bearings are as near perfect as you can get. The rails are rectangular, typically wider than they are tall when the bearing block rides on the top surface, so if you have a rail that is 12 x 8 mm, turn it so the 12mm side is vertical to minimize flex, or mount the thing on an aluminum tube to increase rigidity.
I recently bought 3 linear guides >0.5m long on ebay, one new old stock and two used, and paid about $34 each including shipping. There are similar deals on ebay all the time- you just have to wade through many pages of linear guide listings to find them. At that price it seems almost crazy to use anything else.
This picture shows how linear guides can be positioned for coreXY. I have added a feature that may or may not be necessary, depending on the size of the printer and whether it will be enclosed and used to print ABS. If so, as the temperature rises the aluminum frame that holds the two Y axis guide rails will expand moving the two rails farther apart by about 1mm if the frame is 0.5 m square. If the X axis steel guide rail, which won't expand as much as the aluminum frame, is rigidly attached to the two Y axis bearing blocks, the thermal expansion will create a very big side load on the Y axis blocks which could cause the mechanism to bind. What I would do is rigidly attach one end of the X axis guide rail to the Y axis block with a spacer (gray in the picture) that is the same thickness as the X axis block, and then use a second bearing block on the X axis to attach the other end of that rail to the other side Y rail (on the left in the picture). That will allow the two Y rails to move apart due to thermal expansion of the machine's frame without causing any side loading on the Y axis blocks. This would also allow some error in the Y axis guide rail parallelism. I'm still thinking about what to do about the steel Y axis rails which won't expand as much as the aluminum frame members they are mounted on.
This all sounds complicated but the same problems exist when using end-supported round rails- thermal expansion will cause the supports to move (or flex) and the rails to flex. All these problems would disappear if the frame pieces holding the Y axis rails were made of steel instead of aluminum.
Ultra MegaMax Dominator 3D printer: [drmrehorst.blogspot.com]
For the X axis (on which the extruder carriage rides), I would also use a single linear guide instead of a pair of round rails. It will be lower mass, more compact, and the bearings are as near perfect as you can get. The rails are rectangular, typically wider than they are tall when the bearing block rides on the top surface, so if you have a rail that is 12 x 8 mm, turn it so the 12mm side is vertical to minimize flex, or mount the thing on an aluminum tube to increase rigidity.
I recently bought 3 linear guides >0.5m long on ebay, one new old stock and two used, and paid about $34 each including shipping. There are similar deals on ebay all the time- you just have to wade through many pages of linear guide listings to find them. At that price it seems almost crazy to use anything else.
This picture shows how linear guides can be positioned for coreXY. I have added a feature that may or may not be necessary, depending on the size of the printer and whether it will be enclosed and used to print ABS. If so, as the temperature rises the aluminum frame that holds the two Y axis guide rails will expand moving the two rails farther apart by about 1mm if the frame is 0.5 m square. If the X axis steel guide rail, which won't expand as much as the aluminum frame, is rigidly attached to the two Y axis bearing blocks, the thermal expansion will create a very big side load on the Y axis blocks which could cause the mechanism to bind. What I would do is rigidly attach one end of the X axis guide rail to the Y axis block with a spacer (gray in the picture) that is the same thickness as the X axis block, and then use a second bearing block on the X axis to attach the other end of that rail to the other side Y rail (on the left in the picture). That will allow the two Y rails to move apart due to thermal expansion of the machine's frame without causing any side loading on the Y axis blocks. This would also allow some error in the Y axis guide rail parallelism. I'm still thinking about what to do about the steel Y axis rails which won't expand as much as the aluminum frame members they are mounted on.
This all sounds complicated but the same problems exist when using end-supported round rails- thermal expansion will cause the supports to move (or flex) and the rails to flex. All these problems would disappear if the frame pieces holding the Y axis rails were made of steel instead of aluminum.

Ultra MegaMax Dominator 3D printer: [drmrehorst.blogspot.com]
|
Re: My CoreXY Build Plan February 02, 2016 05:01PM |
Registered: 8 years ago Posts: 24 |
Quote
the_digital_dentist
For the X axis (on which the extruder carriage rides), I would also use a single linear guide instead of a pair of round rails. It will be lower mass, more compact, and the bearings are as near perfect as you can get. The rails are rectangular, typically wider than they are tall when the bearing block rides on the top surface, so if you have a rail that is 12 x 8 mm, turn it so the 12mm side is vertical to minimize flex, or mount the thing on an aluminum tube to increase rigidity.
Don't you think accelerations in Y-axis will result in higher forces in Y than the flex in Z given by the pure weight of the extruder assembly? I believe so, why I would put the rail for the X-axis with its longer side horizontally, not vertically. Like in your picture! I am asking since I am building a printer with these kind of guides right now.
My Delta Printer: [www.thingiverse.com]
|
Re: My CoreXY Build Plan February 03, 2016 12:32AM |
Registered: 11 years ago Posts: 5,780 |
It probably doesn't really matter, but you can always test it by supporting the ends of the rail over a flat surface then measuring the flex as you push down on the rail or load it with weights.
I would think that unless the acceleration in the Y axis is >= 1G, the flex in the rail when turned sideways would be lower than the other way. The drawing was intended only as an illustration of using a second bearing block on the X axis to allow thermal expansion that moves the Y axis rails farther apart.
Ultra MegaMax Dominator 3D printer: [drmrehorst.blogspot.com]
|
Re: My CoreXY Build Plan February 03, 2016 09:03AM |
Registered: 8 years ago Posts: 49 |
Sorry, only registered users may post in this forum.