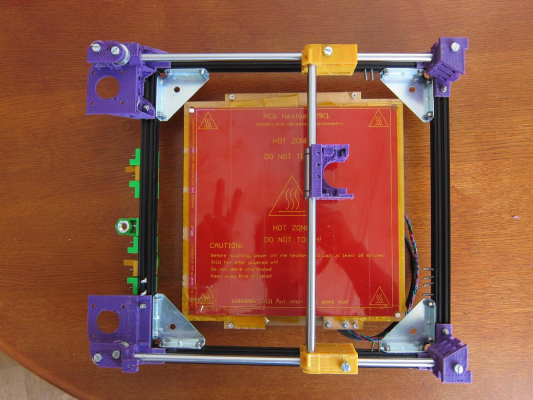
Foldable, portable CoreXY (Fusebox derivative)
Posted by lkcl
|
Re: Foldable, portable CoreXY (Fusebox derivative) April 06, 2016 01:45AM |
Registered: 8 years ago Posts: 47 |
|
Re: Foldable, portable CoreXY (Fusebox derivative) April 06, 2016 09:26PM |
Registered: 8 years ago Posts: 776 |
Quote
pen25
looks good. congrats on getting this to work.
thanks!
Quote
how well does it maintain print calibration when you fold it move it and set it back up to print?
haha i haven't got that far yet
 i just had to take the box apart and the z-assembly today, to fit new attachments. i fixed two issues: first, the wing nuts kept jamming against plastic and metal, so i've turned them round and/or moved them away from screws, extrusion and other parts. second, those metal corners i found on ebay are enormous: 50mm on the square-sides, which is good for structural bracing but bad for space. i've had to redesign the attachments to take the corner-braces into account. so it'll be a total recalibration after reassembly anyway.
second issue: i was *really* annoyed with how ineffective steel L-brackets were at providing any kind of structural integrity. so much so that i took them completely out - including in the box halves. i therefore relied exclusively on the hardboard to keep the metal extrusion in place.... which turns out to have been a bad idea. now, in talking to makerbeam about the T-plates and L-brackets, and mentioning that i'd found some folded triangular corner-braces that are highly effective, by way of a "thank you" they sent me some of the little cubes - enough to put one in at each corner of the box halves.
now, i've analysed those corner cubes, and if i can cut the extrusion to exact lengths and dead-flat, i believe that they will provide structural rigidity, especially in combination with the hardboard stopping every piece of extrusion on from rotating around their long axis. so i want to tackle that tomorrow: cut out the extrusions at the corners and put in the cubes instead.
once i've done that, *then* i will have a properly rigid set of box halves, plus i've just fitted the corner braces this evening into the Top CoreXY assembly...
... and after *that*, doing a test which allows me to answer your question meaningfully will be possible.
whew
 took a while to explain, but if i don't put the groundwork in place and try the assemble-calibrate-disassemble-move-assemble test with things as they are, it's a guaranteed "ehhmm.... no". honestly though i would be quite happy to recalibrate on every setup, as i would consider it to be just "good engineering practice" to double-check precision equipment regularly. so it's not been a design goal to require "no calibration" between setups.
that having been said, it would be cool if it was reasonably accurate. we'll see.... give me a couple of days.
|
Re: Foldable, portable CoreXY (Fusebox derivative) April 07, 2016 01:26PM |
Registered: 10 years ago Posts: 651 |
Sounds like is coming along. Pretty good for a first print. The bridge came out good.
While the corner cubes sound like they'd help, It's been proven they reduce rigidity over connecting the extrusions directly to each other, but rather add extra parts (however insignificant). Connecting them directly like this would be more rigid Dentist's Post on connecting Extrusion. and require less parts and cost less.
I'm sure you're aware either situation will require really precise cutting of the extrusion. Which is why it's recommended to cut and then mill the ends square. Non square cuts will make it go out of square. I know you were using an Angle Grinder at the end and it's probably fairly difficult to get square cuts, and looks unsafe. Not having a Mill myself, or a Chop Saw and not wanting to blow the budget buying either, I'd get a Miter Box like this one here and screw it to a workbench. I'd use a couple of Clamps to hold down the extrusion against one of the rails and cut it with a Hacksaw. Lastly check with a Carpenter's Square like this one here and file it.
I'd make every attempt to make those cuts square cause depending on how out of square the extrusion end cuts are, you may end up with portions that don't touch the corner cube or the other extrusion (if going without corner cubes)
Looking forward to more progress
Edited 1 time(s). Last edit at 04/07/2016 01:45PM by FA-MAS.
|
Re: Foldable, portable CoreXY (Fusebox derivative) April 07, 2016 07:06PM |
Registered: 8 years ago Posts: 776 |
Quote
FA-MAS
Sounds like is coming along. Pretty good for a first print. The bridge came out good.
While the corner cubes sound like they'd help, It's been proven they reduce rigidity over connecting the extrusions directly to each other, but rather add extra parts (however insignificant). Connecting them directly like this would be more rigid Dentist's Post on connecting Extrusion. and require less parts and cost less.
ooo i liiike thaaat
 never occurred to me to drill a hole in the extrusion so that you could tighten up a hex-bolt. niiice.
well... i'm going with cubes not because they're cheap but because anyone who wants to make a sandwich200 without needing power-tools or a machine shop could do so. in theory you could hand-drill holes in extrusion, but i wouldn't rate my chances or my patience.
Quote
I'm sure you're aware either situation will require really precise cutting of the extrusion.
yeah. not keen on that at all... but look at it this way: if someone orders Misumi 1515s, they're orderable to the mm, so that's fine... and i'm sure that there are other places you can get 15mm extrusion cut to order... and it'll be supplied dead-flat. i'm "winging it" at the moment, which is why i got the 1m extrusions, so i can cut them up on-site if i make a design mistake.
Quote
Which is why it's recommended to cut and then mill the ends square. Non square cuts will make it go out of square. I know you were using an Angle Grinder at the end and it's probably fairly difficult to get square cuts, and looks unsafe.
hahahahahahhhhaaahh. ahahahahahahaaa. unsafe? unsafe?? i go out to the balcony only after taking deep breaths and psyching myself up. it's f******g scary as hell. i've worked with 125mm diameter 1mm cutting discs before, on steel bar and so on, so i do actually know what i'm doing, and have had discs explode on me, metal get ripped out of my hand and fly off across the room and so on, so after 6 months of daily use and making mistakes i got the hang of it.... BUT.... you're absolutely right, i wouldn't recommend to ANYONE that they consider using one.
Quote
Not having a Mill myself, or a Chop Saw and not wanting to blow the budget buying either, I'd get a Miter Box like this one here and screw it to a workbench. I'd use a couple of Clamps to hold down the extrusion against one of the rails and cut it with a Hacksaw. Lastly check with a Carpenter's Square like this one here and file it.
i'm really on a budget and also limited time, so i borrowed the disc cutter (because i'm competent with them, despite being s**t-scared every time i switch them on)
Quote
I'd make every attempt to make those cuts square cause depending on how out of square the extrusion end cuts are, you may end up with portions that don't touch the corner cube or the other extrusion (if going without corner cubes)
well, for the first 30 cuts everything went fine. but towards the end of cutting the initial frame metal out a couple of weeks back, the disc started to get flexible. even the slightest pressure caused it to bow into a bowl-shape instead of being a flat disc. what that meant was, the last few cuts it ended up *vibrating* as well as going off-true. the hole it made was so wide i might as well have used a 4mm angle-grinder. anyway i worked out how to hold it to stop it vibrating.
so what i've started doing is, just cutting about 1 to 1.5mm away from where i need, then putting the "grinder" disc in, marking all 4 sides clearly, and just mashing the end down to the marks until it's flat and true. messy, noisy, but it's aluminium - not steel - so i don't get sparks burning up my clothes like i did a few years back!
basically, same technique as what you're recommending, just done by hand with one steel toe-capped boot on top of the extrusion, and some cardboard to keep it off the ground. don't tell no-one, i'm a cowboy engineer at heart - i just use what i've got to hand

Quote
Looking forward to more progress
well, it's all done. that was today's task, to cut 30mm off the 4 main uprights of the box, replace them with cubes. i also took the opportunity to drop in the hex-nuts needed to fit the triangle hardboard at a later date, put the 60mm spring-loaded guitar-case clasps on, and fitted some replacement wing-nut holders for the top CoreXY part. so there are a total of three wing-nut holders on each side along the top box rail! two for the CoreXY, and one for the Z-Assembly (there's another one on the bottom box rail to hold the Z-Assembly dead upright). yes the CoreXY and Z-Assembly are hinged, but i don't trust the hinges to be accurate.
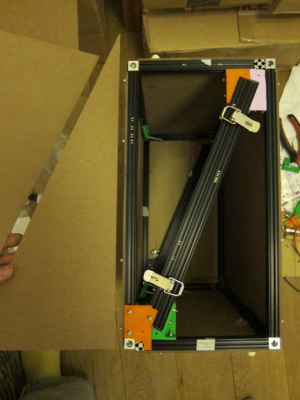
photos:
ok so that's the box when "stowed". and aarrgh, you can see i've missed out some hex nuts in the rails, i'm going to have to disassemble it again, argh
 anyway, those guitar-case clasps, despite being off of ebay, fit perfectly. i've got the hook-parts turned through 90 degrees, i'll cut a hole for them in the hardboard: likewise for the spring-loaded clip. maybe not... maybe put that on top of the hardboard.... the nice thing about the clasps, is, they actually overlap the bars, creating a nice way to keep the two halves in alignment (they don't slip in other words). if i put them on top of the hardboard, instead of direct on the frame, they won't overlap on the frame... but ah ha! they'd overlap on the hardboard, so that would be ok.
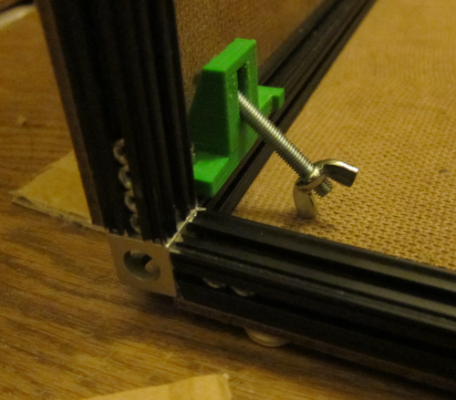
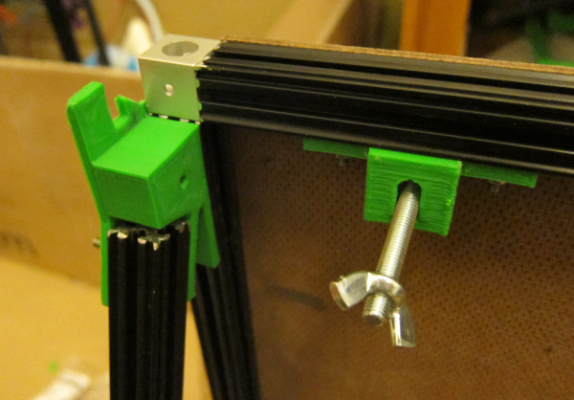
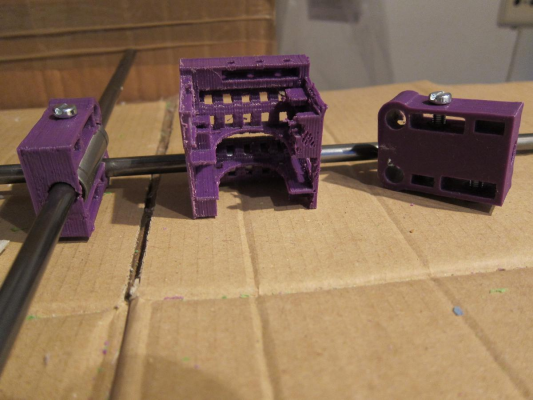
the next two show a couple of corner cubes - i did ok with the cutting and then angle-grinding. the bottom photo, the wing-nut holder, you can just see behind the wing-nut there's an interlock part, where the upright extrusion fits into, and in that way you know that you've got the Z-Assembly perfectly upright and in the right place. the top photo, it's a similar story: the parts there do a double overlapped interlock, so you simply can't have the top CoreXY part off of true. there's four of those, one at each corner of the top CoreXY part, so it's *going* to be dead level.
oh, i also managed to put all four steel corner triangles into the top CoreXY assembly: i tried bending it out of shape by hand.... not a chance: i think it might have budged about 1mm under more pressure than i was comfortable applying. so i am very happy with that. i'll do another test tomorrow when i've got the printer re-assembled.
Edited 1 time(s). Last edit at 04/08/2016 04:25AM by lkcl.
|
Re: Foldable, portable CoreXY (Fusebox derivative) April 08, 2016 07:21AM |
Registered: 8 years ago Posts: 776 |
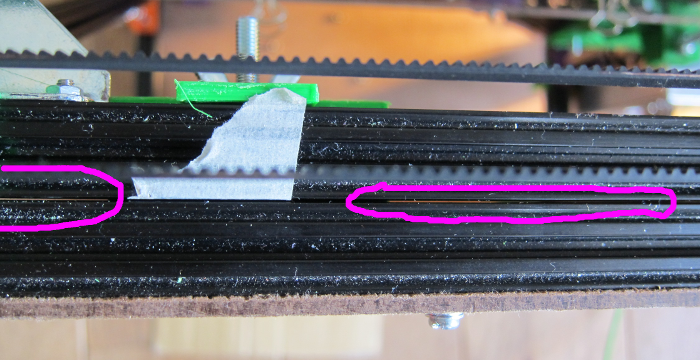
ok, so it's all assembled... and we have one of those "argh" moments when you realise there was a lapse in concentration during the design phase of the corexy-to-boxframe attachments. the top CoreXY is now rock solid (so it's not such a big concern) but i'm not happy with myself at the mistake.
basically you can see what the mistake is: i put a light underneath and have circled in purple where light shows through, you can see a huge 1mm gap between the top boxframe extrusion and the corexy one. that should be ZERO.
now, with the join parts between the two box halves i did a proper analysis, and set up two parts that overlapped both extrusions (L-shaped) and then interlocked together. fitting together, both L shapes create a C shape that is then jammed together by a 50mm wing-nutted bolt, sandwiching the two extrusions and ensuring that they're rock solid against each other.
... unfortunately, because the box wall is in the way, it's not possible to do that double-L-becomes-a-C trick. i _was_ going to put a 2.8mm interlock onto these parts, to fit down into the extrusion groove, but forgot to do it before printing and assembling the parts. i'd be slightly concerned about it shearing off under the pressure from the wing-nut/bolt, but on balance i feel it would be effective.... ... i just damn well forgot to prioritise adding that groove lock, i thought it wasn't critical (only "assembly convenience").
after thinking about it, that 1mm gap - which is all around - is going to be a problem when operating at high speed. argh. well, i didn't want to poke holes in the outer box, but now that i think about it, the hardboard is 3mm thick anyway: poking a hole in it and having an L-shape that wraps around the extrusion would aaactually be okaaay. there's screws on the outside of the box as well (to hold the hardboard).... hmmmm....
|
Re: Foldable, portable CoreXY (Fusebox derivative) April 08, 2016 06:03PM |
Registered: 10 years ago Posts: 651 |
|
Re: Foldable, portable CoreXY (Fusebox derivative) April 08, 2016 10:45PM |
Registered: 8 years ago Posts: 776 |
Quote
FA-MAS
That's looking from the top down when it's in deployed setup?
yehh it iiis, that's the timing belts on the right edge. i'll deal with this one later, i'm still arseing about with a 3mm geared extruder, have to have gears because 3mm PLA needs 3x the pressure: direct-drive doesn't cut it.
|
Re: Foldable, portable CoreXY (Fusebox derivative) April 09, 2016 08:06AM |
Registered: 8 years ago Posts: 776 |
[youtu.be]
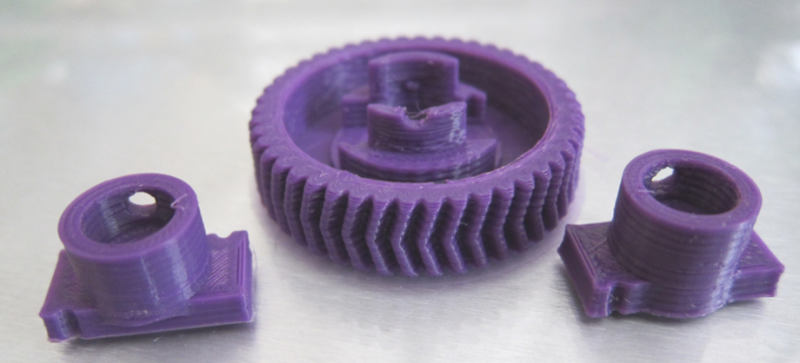
woooow. 28mm3/s at 350mm/s print speed. that's with the new 0.4mm nozzle, 1/4 micro-stepping, a 3.54:1 (46:13) geared extruder i had to make and 2.85mm filament. temperature is 230C (for PLA!). results came out like this:
i've not taken the gear off the printbed yet. layer height is 0.2mm. the inner attachment on the left is at 0.15mm, the one on the right is at 0.2. i was getting fed up of printing out entire gears just because the extruder gears don't fit (or go off-centre), it would be possible now to make alternative gear attachments using simple geometric shapes: a cube and five cylinders. there's little holes for M2.5 self-tapping screws if you're feeling extra-paranoid about making sure the parts stay together.
i got a slight amount of blobbing on the inside where it gets thinner, and the printhead begins to slow down (cura has a "min time per layer" setting and slows the print down) - i think probably what happened is the slower speed allowed the filament to come out a bit quick - result: blotch, blotch
anyway - hmmm... i wonder if this printer will go faster?
woooow. 28mm3/s at 350mm/s print speed. that's with the new 0.4mm nozzle, 1/4 micro-stepping, a 3.54:1 (46:13) geared extruder i had to make and 2.85mm filament. temperature is 230C (for PLA!). results came out like this:
i've not taken the gear off the printbed yet. layer height is 0.2mm. the inner attachment on the left is at 0.15mm, the one on the right is at 0.2. i was getting fed up of printing out entire gears just because the extruder gears don't fit (or go off-centre), it would be possible now to make alternative gear attachments using simple geometric shapes: a cube and five cylinders. there's little holes for M2.5 self-tapping screws if you're feeling extra-paranoid about making sure the parts stay together.
i got a slight amount of blobbing on the inside where it gets thinner, and the printhead begins to slow down (cura has a "min time per layer" setting and slows the print down) - i think probably what happened is the slower speed allowed the filament to come out a bit quick - result: blotch, blotch

anyway - hmmm... i wonder if this printer will go faster?
|
Re: Foldable, portable CoreXY (Fusebox derivative) April 10, 2016 06:55AM |
Registered: 8 years ago Posts: 776 |
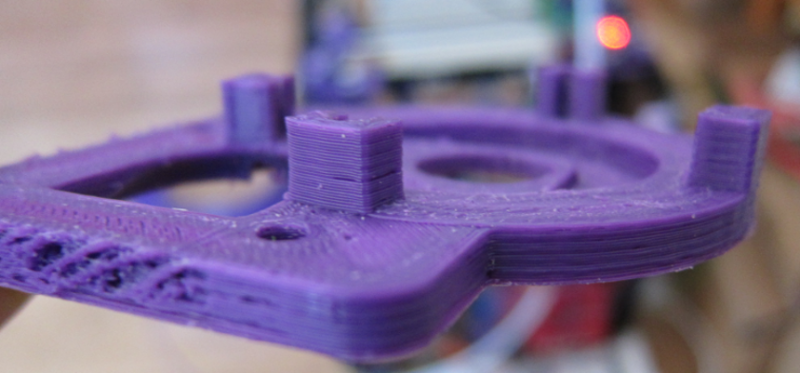
ok this is interesting, note on the right edge, where the printer's going in an arc, that's fine. on the corner: fine. but in the middle, where it's speeding up, that's where zagging occurs. soooo..... from this we can conclude that i'm either running it too fast or that there is lag on the extruder. i'll try backing it down to 250mm/sec speed, see if that helps.
|
Re: Foldable, portable CoreXY (Fusebox derivative) April 10, 2016 07:27AM |
Registered: 10 years ago Posts: 179 |
What kind of nozzle are you using? 28mm3/s is something that only a Volcano should be capable of melting. Usual nozzles have around 10mm long melt chamber.
I can extrude PETG up to 10mm3/s and more without extruder skipping but e3d v6 lite just can not melt sufficiently above 6mm3/s (keep in mind that PETG requires more time to melt than PLA)
And 3mm is not really efficient at high volume melting because it has a lot bigger cross section than 1.75mm (filament needs to be melted right to the center).
I am not sure about the size of those prints but 350mm/s is something that requires a long distance to reach unless you are using a very high acceleration. I doubt that you are really reaching that speed anywhere on the prints. Oh and even Marlin has a maximum speed of 300mm/s set for X-Y so I hope that is changed.
|
Re: Foldable, portable CoreXY (Fusebox derivative) April 10, 2016 05:48PM |
Registered: 8 years ago Posts: 776 |
Quote
Edvardas
What kind of nozzle are you using?
E3Dv6.with a 0.4mm. i realllly didn't like the 0.3mm one.
Quote
28mm3/s is something that only a Volcano should be capable of melting. Usual nozzles have around 10mm long melt chamber
ahh that explains a lot.
.Quote
And 3mm is not really efficient at high volume melting because it has a lot bigger cross section than 1.75mm (filament needs to be melted right to the center)
ok so that explains why i had to up the temperature to 230C [with PLA!].
Quote
I am not sure about the size of those prints but 350mm/s is something that requires a long distance to reach unless you are using a very high acceleration. I doubt that you are really reaching that speed anywhere on the prints. Oh and even Marlin has a maximum speed of 300mm/s set for X-Y so I hope that is changed.
sounds about right (about the long distance) - those parts are 4cm across the bit on the left, the diameter of the circular bit is 6cm. i did however just reprint that "long" part - 230mm - and it came out fine, but i'd backed the rate down to 250mm/sec yes i've been setting different speeds. i haven't altered the acceleration (much - yet) but it's something i'll experiment with later.
ok so thank you this is all new to me (about the melt-chambers etc.) - it all makes a lot of sense when you start to think about it from an engineering perspective. what do you think, edvardas: i'm planning to get a micron3dp "cobra" with a high-flow kit, i like the look (and small size) of what they're doing - no PTFE tubing down the things so you can do very high temperatures (nylon, etc.)
|
Re: Foldable, portable CoreXY (Fusebox derivative) April 10, 2016 05:52PM |
Registered: 8 years ago Posts: 776 |
ok so i've altered the geared extruder so that it now has a 4.07:1 ratio (53:13), and it's stopped "skipping". it does make quite a bit of "clicking" because i split out the centre of the 53-tooth gear as a separate part to hold the MK8, because i was getting fed up of reprinting the large gears. i've put in screw-holes for locking the two parts together but didn't put them in yet. it's quite a compact design: 31mm high, takes 2 bearings, 4 M3x40 bolts, 1 M5x40 bolt, 1 spring - a couple other bits. i know there's a huge number of extruders out there, i just like the one i made 
set of build instructions and a commissioning video, here: [hands.com]
Edited 1 time(s). Last edit at 04/12/2016 11:28AM by lkcl.

set of build instructions and a commissioning video, here: [hands.com]
Edited 1 time(s). Last edit at 04/12/2016 11:28AM by lkcl.
|
Re: Foldable, portable CoreXY (Fusebox derivative) April 11, 2016 04:59AM |
Registered: 8 years ago Posts: 776 |
Quote
Edvardas
And 3mm is not really efficient at high volume melting because it has a lot bigger cross section than 1.75mm (filament needs to be melted right to the center).
hmmm..... y'know what? would it _actually_ be any different? yes bigger cross-section but the filament stays in for longer: overall it's the flow-rate that's the same. i looked at the volcano options - you can get replacement blocks and longer nozzles, so the heat chamber is extended to what.... 18mm? 20mm? i like that idea - i think i might have to try it. only thing is, they only have 0.6mm min nozzles. still, might be worth trying.
|
Re: Foldable, portable CoreXY (Fusebox derivative) April 11, 2016 06:23AM |
Registered: 10 years ago Posts: 179 |
They have developed 0.4mm recently [e3d-online.com]
|
Re: Foldable, portable CoreXY (Fusebox derivative) April 12, 2016 11:29AM |
Registered: 8 years ago Posts: 776 |
oo! oo! i want one!
 ok that does it, i'm going to get a volcano adapter set.
|
Re: Foldable, portable CoreXY (Fusebox derivative) April 12, 2016 10:05PM |
Registered: 8 years ago Posts: 776 |
ordered one straight away, by fedex shipping.
|
Re: Foldable, portable CoreXY (Fusebox derivative) April 15, 2016 06:02AM |
Registered: 8 years ago Posts: 776 |
ok so someone pointed out on one of the other forums that there's something called the "flex3drive", [mutley3d.com] [forums.reprap.org] and i have to say it looks absolutely solid and a much, *much* better concept than either direct-drive or bowden.
in combination with a volcano set (due to arrive this evening) i think it will be absolutely fantastic, and i will get the speeds i'm looking for. my main "bugbear" with the sandwich200 is that there exist quite a lot of folding, portable 3d printers out there - the larger ones yes they have to go in a separate box which increases the dimensions even further, but that's not really a huge distinctive feature. i've come up with some ideas for reducing the width and depth to around 280mm and still have a 200x200 print area: *that's* a cool distinctive feature, but i want to go further and have ridiculous speeds and clean prints as well.
i *like* doing 3d printer design and experimentation

|
Re: Foldable, portable CoreXY (Fusebox derivative) April 17, 2016 04:59AM |
Registered: 8 years ago Posts: 776 |
i've just upgraded to a duet 0.8.5 because i was running into a lot of issues with the rumba v1.2g (thermistor voltage-divider bridge circuit wrong offsets, freezing axes randomly at only 0.8A limits). whilst the speed limits are currently set to 250mm/sec but the printer is definitely, definitely doing a lot less than that, the quality comes out really well. it's kinda cute to be running at so significantly-slower speeds 
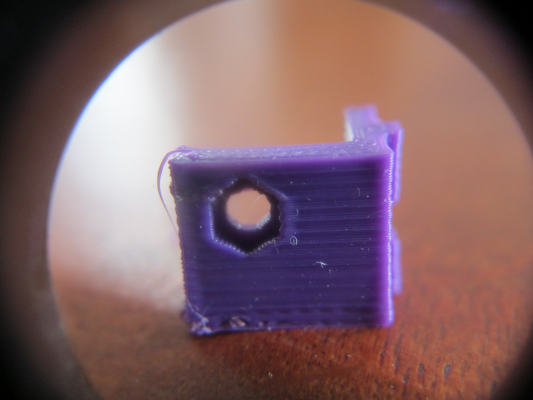
this part is 20mm across and that's a 0.2mm layer height. i've photographed it through an eye-loupe on "macro". unfortunately the effect i wanted to show you, you still can't see. at approx... mmm.... 0.25mm resolution there appear to be little "indentations", so the whole surface comes out like a "checkerboard". i'm curious to know what that might be, so i can eliminate it.
anyone any ideas?
Edited 1 time(s). Last edit at 04/17/2016 05:00AM by lkcl.
|
Re: Foldable, portable CoreXY (Fusebox derivative) April 17, 2016 06:59AM |
Registered: 10 years ago Posts: 179 |
|
Re: Foldable, portable CoreXY (Fusebox derivative) April 17, 2016 12:13PM |
Registered: 10 years ago Posts: 651 |
I saw that issue on my printer. I had what appeared to be really straight M8 thread rods. But even a minimal bend, even undetectable to our eyes could cause them. Lacking an actual lead screw, which would be preferred, I went to M6 threaded rods so they don't fight with the smooth rods. I also decoupled it from the Z Axis so it could wobble and not affect it. I used something like this, http://www.thingiverse.com/thing:20147
That took care of it for me, I'll be implementing something similar in my printer.
That took care of it for me, I'll be implementing something similar in my printer.
|
Re: Foldable, portable CoreXY (Fusebox derivative) April 17, 2016 05:46PM |
Registered: 8 years ago Posts: 776 |
Quote
Edvardas
Looks like you have got a so called Z-banding issue. It is caused by an M8 threaded rod that is not straight. Pitch on M8 rod is 1.25mm and it looks like the repeating banding happens at this distance which proves it all.
edvardas, FA-MAS, are you referring to the differences in the layers, that at regular intervals i have layers slightly offset from the others? if so, i can say "oh poo"
 i should probably try a lead screw. harumph. FA-MAS thanks for the reference to that z-axis decoupling idea. i'm puzzled because there is 70mm between the z-nut and the z-rods, which is an awful long way. mind you, i can clearly see the threaded bar going round off-centre by a good mm or so... so it's deefinitely not straight
no, what i was referring to is *horizontal* juddering at around 0.5mm intervals. it looks either like the extruder is "pulsing", or that there's so much buzzing from the corexy's X and Y belts that it's actually causing ripples in the filament. it's quite pretty, extremely regular, and very small - hardly visible until you look closely.
the current hypothesis is that it is because the GT2 timing belt teeth are going *in* towards some of the bearings. i think i've worked out a way to turn the belts round so that they're entirely smooth on bearings, it involves putting a single twist in the outer (left, right, longest) parts of the belt. i'll do a separate corexy thread about this because i can't be the only person whom this affects, the Fusebox people as well for certain. link here: [forums.reprap.org]
Edited 1 time(s). Last edit at 04/17/2016 07:57PM by lkcl.
|
Re: Foldable, portable CoreXY (Fusebox derivative) April 18, 2016 10:44AM |
Registered: 8 years ago Posts: 776 |
Quote
lkcl
oo! oo! i want one!ok that does it, i'm going to get a volcano adapter set.
arrived today, very excited - first print which was at 350mm/sec came out like this:
now, i'm really *really* excited because it's such a vast improvement over the default E3Dv6 heat chamber when running at that speed. clearly, the filament is actually properly extruding at an eeenormous 35mm3/sec (!!) through a 0.4mm nozzle.
howeverrrrr.... i can clearly see some flaws / limitations of running at this speed, and, especially, cura 15.04, which doesn't have "square-corner rounding" like skeinforge does, is definitely definitely showing up huge "bulges", which are much more prominent at this speed than i've previously seen. under an eye-loupe i can clearly see a side-effect of that corner-bulgeing, which is that the z-height actually slightly increases at the corners. i know this is a 0.25mm layer height but still, the layers are clearly going "up" a bit as well as bulgeing outwards.
also, when something goes wrong, it *really* shows
 in a couple of places it's clear that the filament skipped a beat, and then took like... 20mm to settle down again.
another aspect: one of the screw-holes is messy on one inside edge, and perfectly clean on the other. the extruder speeds up in between: the only explanation i can think of is, it was going slow on one of the holes, whizzed wheeeee over to the other side, then slowed down but filament kept oozing out a bit. so i probably overdid it a bit on the acceleration, there

but... wow, i'm like a kid in a candy store - hyper and bouncing around, this is so exciting to be able to make... stuff that can make stuff, and to be able to experiment like this and i'm *at home* and it's... it's... *affordable*, that's what completely amazes me about 3d printing.
|
Re: Foldable, portable CoreXY (Fusebox derivative) April 21, 2016 04:57PM |
Registered: 8 years ago Posts: 776 |
ok so i've started the revision 2, using a flex3drive, and, you can see above the first three parts. they're done with a 0.6mm E3Dv6 volcano nozzle which i'm currently experimenting with , to see how it does. with this nozzle, print times for 1.5 metres of PLA is around 20 minutes - the flow rate reported by cura is an enormous 24 to 35mm3/sec.
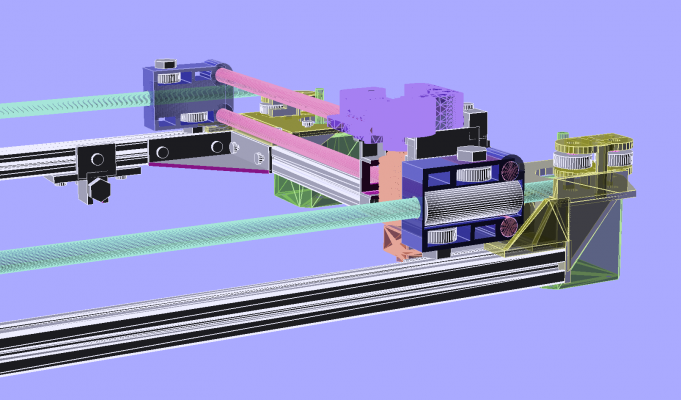
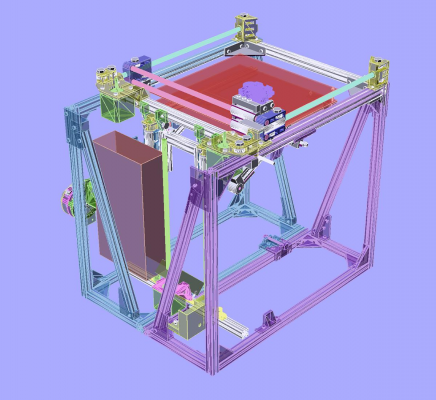
here's a 3d render from the CAD:
the external dimensions when assembled are 308 x 380 and i'll try to keep the height down to around 320-350 as well, so it's really small, but still can do a 200x200x200 print. basically i'm "stacking" the belts and rods - still using 8mm rods and LM8LUU's - and although i could use that drilling technique (thank you to Edvardas for pointing it out), i would like to avoid having to add a drill to the tools needed, so am using those strong corner brackets instead. those have got slightly in the way: if i was doing drilling it would be possible to reduce the length and width by a further 20mm, but that would mean not having standard 300mm length rods, and having to cut them to 280mm. all a lot of hassle, so "no".
also, on the Fusebox forum there's been some discussion about how to stabilise the z-rods, which are recommended to be 10 or 12mm for this style of "1-end" bed support. the people there are choosing aluminium extrusion, but again i'd like to avoid drills, so will be going with those lovely strong corner brackets instead, creating an upside-down very wide "U" out of 15x15 extrusion, where the uprights are 60mm or so, and there is a cross-bar around 140mm wide. the z-nut holder will be on the middle of that (a single piece of plastic), then the bearing-holders will be on the upright extrusion. as this is a folding design, i'll arrange some holders for the 2nd set of LM12UU bearings that the 15x15 extrusion will fit into, and this time i'll design some quick-release clips (like you get on mountain bike wheels) as i really didn't like wing-nuts. anyway the point of all these discussions on the Fusebox forum is to stop the bed from see-sawing, which it does quite badly on the Fusebox and the sandwich200v1 - not to the point of static inaccuracy but there is quite a bit of movement during active printing and i'd really rather there wasn't.
also, i'll be doing a twist in the belt this time, so that the belt is always on the "back" of the smooth 625 bearings. i'll also be adding in 20mm OD x 1mm washers as a sandwich around the 625 bearings, to make sure that the belt (even with a twist) stays dead-straight. there's only the one twist needed but i want to make sure the belt doesn't rub.
so much to do...
|
Re: Foldable, portable CoreXY (Fusebox derivative) April 24, 2016 11:55AM |
Registered: 8 years ago Posts: 776 |
here's the v2 starting to take shape, the outer dimensions when assembled are looking set to be 310 x 415 x 400mm, with the "stowed" size being 415x357x155mm (plus outer box material thickness x2).
noticeable changes in the z assembly: 12mm vertical rods, LM8LUU quad bearings, and the outer extrusion parts are reduced to one single piece of extrusion along the bottom, on which the PSU, NEMA17, Duet and the 12mm rods are mounted. also, the NEMA17 is mounted differently from the Fusebox. it's sitting on top of the lower extrusion, so that it's a little bit further inboard (reducing depth when stowed), as well as being more inline with the z-rods.
noticeable changes in the top corexy assembly: significantly smaller footprint without compromising rigidity or print quality; vertical x carriage rods; removable hotend assembly; and the default option for the print assembly will be a Flex3Drive, which i love as it combines the best of both the direct-extrusion and bowden worlds, without the disadvantages of either, as well.
also the x endstop will be mounted on the carriage. it is noticeable that it's the only wires going to the x-end, whereas if it was mounted on the carriage it could be cable-tied or otherwise tidied up without the inconvenience of having a totally separate set of cable-tidy arrangements just for three flimsy wires. this only becomes significant when it's also noted that the print head is removable, and having only a single set of cables down to the printhead is therefore an advantage.
i'm currently sorting out the z assembly hinges and layout: unlike most printers where it's pretty straightforward to drop things in different corners, plenty of space between parts, this is an extremely compact design where parts are overlapping not only in one arrangement (assembled) but a second entirely different configuration (stowed). it's.... tough! i'm currently working out how to sort out a design mistake where the distance between z-rods is too close to use the preferred method of those strong corner brackets. whoops....
Edited 1 time(s). Last edit at 04/24/2016 07:38PM by lkcl.
|
Re: Foldable, portable CoreXY (Fusebox derivative) April 26, 2016 06:37AM |
Registered: 8 years ago Posts: 776 |
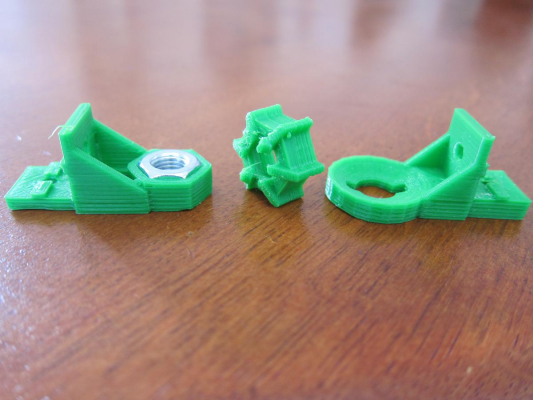
well duHuuuh, if i don't push the sandwich200v1 at insane speeds, the prints come out reeally well, surpriiiise!  this is an experiment (right and centre) to do a rotating z-nut idea based on a sphere. there's a concave spherical indentation in which the actual nut-holder can rotate. the "beetle" part has two protrusions that fit into a slot, which stops it from rotating when the threaded bar turns. however, in order to be effective, the level of those protrusions has to be dead-centre with the middle of the nut, meaning that the sphere has to be quite a large diameter... it just got all too complicated and i decided to go with a straight nut-holder.
this is with a 0.6mm nozzle and a 0.2mm layer height: the slower speeds of 50 and 100mm/s print-travel produce really nice prints: all the artefacts such as corner-bulging, z-banding, and "zagging" - they're all greatly reduced, whilst because the nozzle is so much larger the amount of time taken is a lot less as well.
Edited 1 time(s). Last edit at 04/26/2016 06:37AM by lkcl.
 this is an experiment (right and centre) to do a rotating z-nut idea based on a sphere. there's a concave spherical indentation in which the actual nut-holder can rotate. the "beetle" part has two protrusions that fit into a slot, which stops it from rotating when the threaded bar turns. however, in order to be effective, the level of those protrusions has to be dead-centre with the middle of the nut, meaning that the sphere has to be quite a large diameter... it just got all too complicated and i decided to go with a straight nut-holder.
this is with a 0.6mm nozzle and a 0.2mm layer height: the slower speeds of 50 and 100mm/s print-travel produce really nice prints: all the artefacts such as corner-bulging, z-banding, and "zagging" - they're all greatly reduced, whilst because the nozzle is so much larger the amount of time taken is a lot less as well.
Edited 1 time(s). Last edit at 04/26/2016 06:37AM by lkcl.
|
Re: Foldable, portable CoreXY (Fusebox derivative) April 27, 2016 01:17PM |
Registered: 8 years ago Posts: 776 |
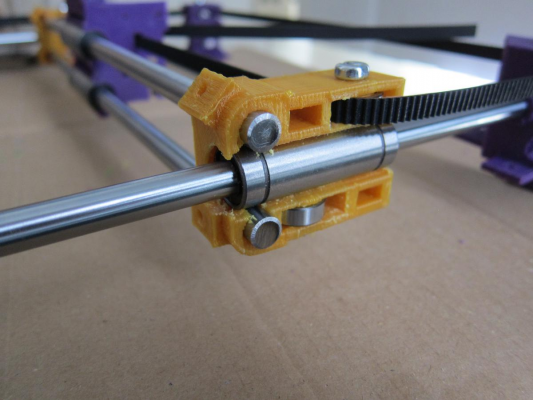
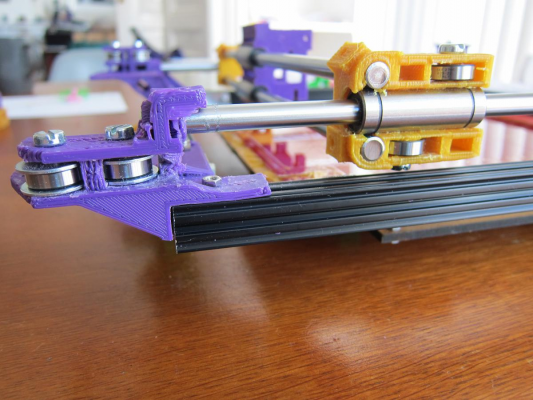
ok so the corexy parts are done and assembled (have to cut the extrusion tomorrow). linear bearings are good. belts have M5x20x1mm washers above and below the 625 bearings. xends are (now) straight. rods into idlers and motor parts are slightly off-centre but that will be corrected with the extrusion in place.
i had a bit of an issue with the x-ends: i forgot that when pushing LM8LUU bearings in, you have to print the parts "upright" so that you get continuous filament strength around the barrel of the linear bearing. i split four xend parts before it really sank in. also, as i have the x rods off-centre from the x-ends, and so close in the vertical arrangement that they're actually touching the LM8LUU, when inserting the rods the plastic bent out of shape asymmetrically.... and changed the angle of the rods to off-perpendicular! anyway i sorted that by expanding the hole slightly, and, as a result, thought it might be a good idea to copy that idea of putting in M3 nut-bolt holders in at the same time. the top ones are at 45 degrees because otherwise the Y-stop is in the way.
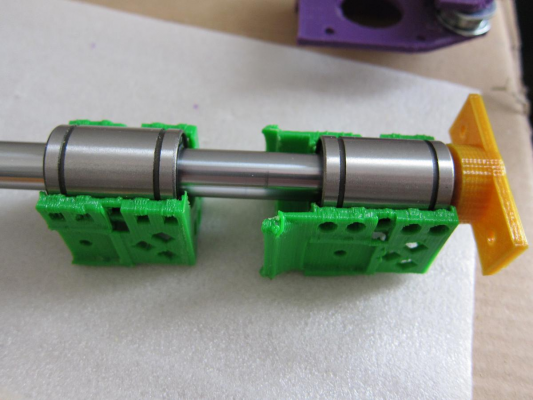
LM12UU bearings are monsters! they're 25mm - a full inch - wide! so i don't believe i wil have any problems with any flex in those 12mm bars
 i am surprised however that the LM12UU bearings tend to "judder" and jam quite significantly - a lot more than LM8UU and LM8LUU bearings.
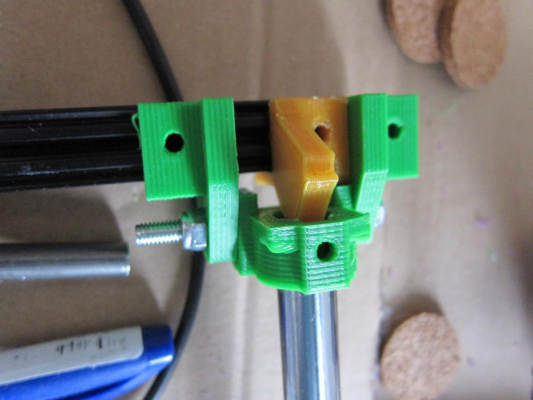
this one is a quick and dirty way to keep the top end of the z-rod from moving about when the printer is in "assembled" mode. the green parts are hinged around the M5 bolt, but there's quite a bit of play in it. so, the idea is: put in a "stopper" that is set to push downwards on the top of the rod (taking any "play" out of the M5 bolt"), and use an M3 nut-and-bolt to keep the M12 rod in the right place. yes - i know: i should be using bearings.... i'll sort that out another time.
in the v1 this isn't an issue because the zassembly is in its own rectangular frame, which is then mounted in four separate places onto the box halves. to reduce the amount of extrusion used i decided to go with only two mount-points onto the box halves for the zassembly, and to have the top hinged directly off the top corexy. of course, i forgot that that means an accurate non-moving hinge is needed... whoops. so, the stopper is a temporary "hack"...
anyway it's getting there....
Edited 2 time(s). Last edit at 04/27/2016 01:19PM by lkcl.
|
Re: Foldable, portable CoreXY (Fusebox derivative) April 27, 2016 01:43PM |
Registered: 10 years ago Posts: 651 |
|
Re: Foldable, portable CoreXY (Fusebox derivative) April 27, 2016 08:59PM |
Registered: 8 years ago Posts: 776 |
yehhh they're poked a bit too far through right now. i'll push the xend back so the rods are flush, and put the M3 lock nuts in when i've cut the extrusion and assembled it. it *has* to go back (flush) because the positions of the rod holes in the idlers and motor parts are very specific, and there's no adjustment mechanism (this was a deliberate design decision which i'll find out soon enough if it's a good one)
what is of more concern is, i'm going to be adding a twist in the belt, and i *hope* i left enough room - only about 3.5mm to 4mm or so, which in theory is enough for a 6mm belt to twist about its centre (3mm). if not, i'll have to move the twist to the front, but that means one more bearing where the belt will be teeth-to-bearing. luckily, though, even if i have to do that, there will be 2 more bearings to the carriage, so through the xends it will always be "smooth".
|
Re: Foldable, portable CoreXY (Fusebox derivative) April 28, 2016 09:37AM |
Registered: 8 years ago Posts: 776 |
walkthrough video - [youtu.be]
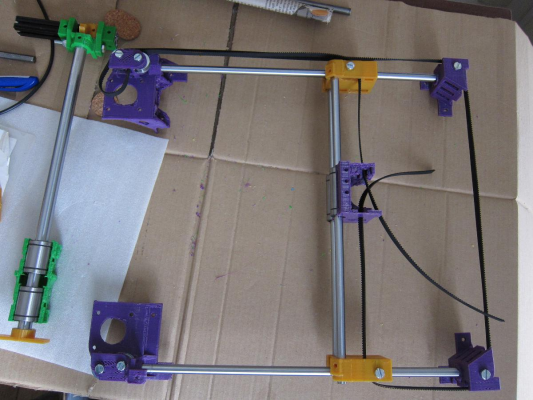
i did the assembly of the corexy extrusion - yay, the design decision to put the yrod mount points in the idler and motor parts worked out well, despite those parts having been run extremely fast and come out very messy.
here you go, FA-MAS - sorted
also, i just wanted to give people an idea of quite how compact this is:
there's like... 4mm clearance for the printbed, all round, which is just enough to poke it through when the printer's in "stowed" position.
now, i know people say that you should use 20x20 extrusion, but honestly, i've taken that top corexy frame, leaned it upright on a diagonal and then put a hell of a lot of weight on it, and it just doesn't bend. at all. my feeling is, that's down to the reduced dimensions: how many other 200x200 printbed printers have extrusion parts that are 285mm on left and right, 312mm on the front and 282mm on the back?
i think however that i will definitely go with 20x20 next time, because i found motedis.com from someone else mentioning it on here, and i feel that going with someone else cutting the extrusion to the right lengths would be.... sensible.
i did the assembly of the corexy extrusion - yay, the design decision to put the yrod mount points in the idler and motor parts worked out well, despite those parts having been run extremely fast and come out very messy.
here you go, FA-MAS - sorted

also, i just wanted to give people an idea of quite how compact this is:
there's like... 4mm clearance for the printbed, all round, which is just enough to poke it through when the printer's in "stowed" position.
now, i know people say that you should use 20x20 extrusion, but honestly, i've taken that top corexy frame, leaned it upright on a diagonal and then put a hell of a lot of weight on it, and it just doesn't bend. at all. my feeling is, that's down to the reduced dimensions: how many other 200x200 printbed printers have extrusion parts that are 285mm on left and right, 312mm on the front and 282mm on the back?
i think however that i will definitely go with 20x20 next time, because i found motedis.com from someone else mentioning it on here, and i feel that going with someone else cutting the extrusion to the right lengths would be.... sensible.
|
Re: Foldable, portable CoreXY (Fusebox derivative) April 28, 2016 04:56PM |
Registered: 8 years ago Posts: 776 |
okay, argh - i have some jammed LM12UU bearings. we're not sure why, it could well be that the rods are just out of spec (12.004 mm) as apparently the larger bearings don't like it when rods aren't in spec. all four of the LM12UU bearings "stick" and "jam", and i can hear a sort-of juddering noise which isn't great. but one of the bearings, when swapped to one of the rods, runs much smoother than any of the other [7] combinations. which tends to suggest that the rods are indeed out of spec.
anyway, with that fly in the ointment i'm probably going to take the opportunity to do a redesign, moving away from a cantilevered bed to using a design i outlined here [forums.reprap.org] - which is a rod-screw-rod arrangement at one end and plain screw-screw at the other, using 3 lead-screws with large GT2 gears attached to them, then using a small GT2-16 or GT2-20 and a 900mm closed GT2 6mm belt. the reason for using the gearing is to get some of the accuracy back when going to M8 / 2mm pitch lead screws.
i'll make sure that the 2 lead screws at the front are mounted on removable blocks. i don't actually need to do a huge amount, here: all that happens is that much of the complexity of the cantilevering goes away: one set of bed bearings (not two), i already have a top set of bearing-hinged rails, that's fine - i think it'll work out well.
Sorry, only registered users may post in this forum.
