SmartrapCore Question
Posted by engmaster
|
SmartrapCore Question April 27, 2016 09:58PM |
Registered: 8 years ago Posts: 11 |
Hello guys.
I need know what bed material SmartrapCore uses.
I try use a simple glass, but with PLA we have warp in big lenghts without heated bed =/ See my print in foto1
This printer use Acrylic or Polycarbonate in Bed material? Or it is one glass?
I searching for more than one week. I do not know which part I failed to realize this basic information =(
video: [www.youtube.com]
Edited 2 time(s). Last edit at 04/27/2016 10:17PM by engmaster.
|
Re: SmartrapCore Question April 27, 2016 10:22PM |
Registered: 9 years ago Posts: 83 |
Technically, the smartrapcore forum is a few doors down the hall.... but...
Looks like you're over-cooling to me. You really shouldn't get warp on PLA with a reasonably calibrated printer. I don't have a smartrap core, but the kit looks like standard PCB + glass. Can't tell if it's borosilicate or not (recommended).
I do heat my bed to about 50C for PLA (anything over room temp is probably OK, but I feel like I'm accomplishing something by going to 50C)-- between that and gluestick, the problem is getting the prints off the glass (hence borosilicate), rather than keeping them down for the duration.
Even so, while testing a new fan configuration I cooled the part so much I got warping like you show.
|
Re: SmartrapCore Question May 01, 2016 03:47AM |
Registered: 8 years ago Posts: 3,525 |
I've got a smartrapcore alu and its a mk2b pcb heater with float glass clipped on top. I use 60 deg for pla without any adhesion promoter and can easily remove parts once the bed temp is below 44 deg C.
Simon Khoury
Co-founder of [www.precisionpiezo.co.uk] Accurate, repeatable, versatile Z-Probes
Published:Inventions
Simon Khoury
Co-founder of [www.precisionpiezo.co.uk] Accurate, repeatable, versatile Z-Probes
Published:Inventions
|
long part sticking to printbed question May 22, 2016 05:51AM |
Registered: 8 years ago Posts: 776 |
Quote
engmaster
I try use a simple glass, but with PLA we have warp in big lenghts without heated bed =/ See my print in foto1
hiya engmaster, i'm changing the subject line (and i recommend you do the same), this isn't actually a smartrapcore question.
i've designed and built a 15.6in libre laptop on a 200x200 printbed, parts were 160 to 230mm long, between 2.5mm and 10mm wide, and between 10mm and in some cases 35mm high. the 160x10x35mm part was hollow, and had walls only 0.6mm thick along one long side. that would take about 2 hours to print, and even the slightest bit of warping was totally unacceptable.
so over the course of nearly 14 months i had to experiment to find out what worked best. it turned out to be a combination of factors:
- heated bed to 60C
- lacquer-free hairspray
- serious amounts of "brim" especially at the ends, to the point where i actually made custom-brims
this is the back edge part without the custom "brim":

and this is with:

that's after 6 months iterative refinements. earlier versions had supports up the walls, like flying buttresses that you see on old cathedrals, but those were a lot of effort to trim off. note that yes there is a cut all along the top edge, because there's a groove that a 1.5mm plywood panel slots into, and if the "brim" was added it would fill up that channel.
the parts are designed to be converted to injection-molding later, and they are also designed to be printed without requiring "support". the internal arches make it incredibly strong despite being 1mm thick walls.
now, the lacquer-free hairspray turned out to be needed because the length and thin-ness of these parts - just like the ones you're doing - was so extreme that they just wouldn't stick down otherwise. even with the brim and the hairspray, the height was so extreme as well as the length of time being so long that yes, often the parts would curl up after around 1.5 hours into the print.
so anyway i hope that helps. instead of hairspray you could google the 10-15% sugar-water solution instead of using lacquer-free hairspray, you *have* to use a printed bed with that, and when it cools the sugar crystallises, becomes brittle, and parts come off easily. hairspray is like a "nuke-it" solution - you will have difficulty getting the part off the printbed even when it's cooled down, requiring care and a lot of time with an xacto-knife to prise it off without damaging (scratching) the glass or breaking or cutting the part. the brim helps but it's not enough to get leverage.
|
Re: SmartrapCore Question May 22, 2016 05:56AM |
Registered: 8 years ago Posts: 776 |
Quote
DjDemonD
I've got a smartrapcore alu and its a mk2b pcb heater with float glass clipped on top. I use 60 deg for pla without any adhesion promoter and can easily remove parts once the bed temp is below 44 deg C.
so can i, DjDD, consistently and successfully 100%... until i try the long (160-230mm) thin (2.5 to 10mm) tall (20 to 35mm) parts for the libre laptop, and then it all goes horribly wrong either straight away or worse 1.5 hours into a 2 hour print.
did you manage to successfully print such extreme parts? if so that would be good to know.
|
Re: SmartrapCore Question May 22, 2016 08:08AM |
Registered: 8 years ago Posts: 3,525 |
I printed a washing machine door for a childs toy which was almost the size of the glass print bed.
This was no-name PLA. once it was cool it just came away. No warping, no adhesion promoters, just pla onto clean glass (clean it before printing with proper pure isopropyl alcohol - not hand gels stuff which has slippery additives).
Edited 1 time(s). Last edit at 05/22/2016 08:09AM by DjDemonD.
Simon Khoury
Co-founder of [www.precisionpiezo.co.uk] Accurate, repeatable, versatile Z-Probes
Published:Inventions
|
Re: SmartrapCore Question May 22, 2016 02:46PM |
Registered: 8 years ago Posts: 776 |
Quote
DjDemonD
I printed a washing machine door for a childs toy which was almost the size of the glass print bed.
[attachment 78485 2016-03-2612.17.02.jpg]
This was no-name PLA. once it was cool it just came away. No warping, no adhesion promoters, just pla onto clean glass (clean it before printing with proper pure isopropyl alcohol - not hand gels stuff which has slippery additives).
ok so that's radically different from a part that's 2.5mm wide, 230mm long and 10mm high. i'd say due to the diameter you've got best-case conditions there, whereas these long-thin-high parts are pretty much absolute worst-case conditions.
long, tall thin parts have very little surface area to grip to the printbed, and the printhead is "pulling" on the ends (a thin, 180 degree turn). i would expect adhesion on the part that you printed to be pretty much perfect. the reason is: the print-head is not doing 180 degrees back on itself at any time. there is instead plenty of surface-area to grip to the printbed.
so the difference is, the printhead lays down a track towards the corner ("dragging" as it goes), then turns 180 degrees back on itself dragging in the *opposite* direction, comprising two very tight close-together 90 degree turns. the leverage effect of those 2 90-degree turns on the thin, high part gets worse as the height increases. with long, thin parts not only do you have the reduced surface area but the tiny amount of shrinkage in PLA as it cools after it comes out the extruder, combined with the force of the filament being dragged against that very small area, *and* combined with the fact that as the height goes up (on thin, tall parts) the leverage against the printbed increases, it should come as absolutely no surprise that the ends come away.
this is also why *sometimes* you get pulling and lifting on 90 degree corners, but 90 degrees is nowhere near as bad as the worst-case conditions of 180 degrees that you get on long, thin parts.
by complete contrast, on that large round shape, you'd have near-perfect conditions: very little angle so the "drag" of the extrusion would be pulling hardly at all, and, even better, it's not pulling against a direction which would result in the PLA coming up: it's in fact pulling (almost) at right-angles to the edge, instead, where that "dragging" load is distributed across the (huge) area of the round shape.
there are a couple of other parts in the laptop which are even more extreme than the base back part i showed. these i *do* have to put buttressing against them (both at the ends in 3 places as well as in the middle). the height on those parts is something like 18mm, length 100mm, and the thickness is something like 0.9mm. yes. really, 0.9mm. and yes, it does have to be printed upright, not flat, because of curvature on one edge and interlocks on the other.

that part holds the keyboard in, at the back, and it slots into the base back parts. so it has to have a curve on the top edge, a lip 60% of the way up (to keep the keyboard from dropping down), some interlocks on the back so it doesn't fall out the base back part, and many other details.
the amount of "pinning" that i arranged on this part is extreme. you can see *five* sets of brims extending out a whopping 25mm either side (on a part that's 0.9mm wide), as well as side-buttressing at both ends as well as on a hole 3/4 the way along. i learned that the side-buttressing, which had to be all the way up the entire height, stopped that critical 90-followed-by-90-degree set of turns that would result not only in blobbing at the end on such a thin part but also would reduce the amount of sideways-force put on the part in that critical thin, high, direction.
does that make sense, DjDD, why you didn't have any difficulties at all with that part that you printed, and why it is so radically different from what the OP (and myself) are printing?
Edited 3 time(s). Last edit at 05/22/2016 02:52PM by lkcl.
-- sandwich200: compact portable folding corexy printer [reprap.org]
|
Re: SmartrapCore Question May 22, 2016 02:55PM |
Registered: 8 years ago Posts: 3,525 |
Ickl - Okay so the OP is getting warp without a heated bed. Fairly easy fix - get one. I accept your parts look fiendishly difficult to print. Send me an STL I'll have a try....
Edited 1 time(s). Last edit at 05/22/2016 02:55PM by DjDemonD.
Simon Khoury
Co-founder of [www.precisionpiezo.co.uk] Accurate, repeatable, versatile Z-Probes
Published:Inventions
Edited 1 time(s). Last edit at 05/22/2016 02:55PM by DjDemonD.
Simon Khoury
Co-founder of [www.precisionpiezo.co.uk] Accurate, repeatable, versatile Z-Probes
Published:Inventions
|
Re: SmartrapCore Question May 23, 2016 05:35AM |
Registered: 8 years ago Posts: 776 |
Quote
DjDemonD
Ickl - Okay so the OP is getting warp without a heated bed. Fairly easy fix - get one. I accept your parts look fiendishly difficult to print. Send me an STL I'll have a try....
oh! i didn't notice that you're not using a heated bed, engmaster! yyeah, that's not gonna work

DjDD that'd be really cool. and interesting to see how they come out on someone else's printer. so, thank you
the STL files for the libre laptop, i'll upload them here: [hands.com] it's a GPLv3+ libre-licensed project so i might as well. whilst the back_kbd_runner part is small, the base_back part is eeennnoormous - openscad takes several seconds to write it out to disk. just checking... yeah it's 12meg! ok so there are three possible parts to try (of varying complexity and amount of PLA) with two variants "pinned" and "nopin", they are:
- base_back_{pin.nopin}.stl
- screen_mid_{pin.nopin}.stl
- back_kbd_runner_{pin.nopin}.stl
the base_back one you _shouldn't_ need any underside support (i do have to redesign the end, you can see a "T" which comes out poorly) - in fact if you do it will fill in the whole part completely unnecessarily because the cathedral-style buttressing is perfectly adequate. it's about 3m of PLA so i will perfectly understand if you don't want to try that one.
the back_kbd_runner part should be reaaally interesting to try without support. i can pretty much guarantee it'll go horribly wrong without
the screen_mid one is also very challenging, not because of the length / thin-ness but because at each end there is a 3mm v-shaped cutout (an interlock into the edges). i always have difficulty with this part because the tiny ends, even though they're a 45-degree v, tend to warp, come off the bed, and/or bridging just doesn't work properly. i'll be redesigning this part anyway but i'd be interested to see if anyone else can successfully print it.
i've been using a 0.4mm nozzle successfully on all these, i was using repsnapper for a year, it was a leeetle odd in places, converted to cura 15.04, and it is... merely... less-odd. slic3r makes an absolute dog's dinner of the parts - i do *not* recommend even trying it. they're too complicated: slic3r just tries to be far too clever to get it right, and makes a complete pig's ear of the parts, in too many ways to even enumerate.
|
Re: SmartrapCore Question May 23, 2016 05:50AM |
Registered: 8 years ago Posts: 3,525 |
Okay I'll take a look.Might take a while by all accounts.
Are you fixed on using PLA? I have an enclosed printer so could print ABS in a heated chamber.
Edited 1 time(s). Last edit at 05/23/2016 07:17AM by DjDemonD.
Simon Khoury
Co-founder of [www.precisionpiezo.co.uk] Accurate, repeatable, versatile Z-Probes
Published:Inventions
Are you fixed on using PLA? I have an enclosed printer so could print ABS in a heated chamber.
Edited 1 time(s). Last edit at 05/23/2016 07:17AM by DjDemonD.
Simon Khoury
Co-founder of [www.precisionpiezo.co.uk] Accurate, repeatable, versatile Z-Probes
Published:Inventions
|
Re: SmartrapCore Question May 23, 2016 11:06AM |
Registered: 8 years ago Posts: 776 |
Quote
DjDemonD
Okay I'll take a look.Might take a while by all accounts.
no problem - no rush. the simplest quickest part would be back_kbd_runner, it's something like... mm.... 0.3m of PLA (when using 2.85mm diameter).
Quote
Are you fixed on using PLA? I have an enclosed printer so could print ABS in a heated chamber.
yehhh i tried ABS, after leaving the first prototype in a sunny bay window after photographing it.... mmmm yeah... melt, melt
ABS however was nowhere near strong or rigid enough, despite the laptop only being 1.1kg parts bent way beyond acceptable limits, tended to crumble, and even snapped. bear in mind, the thickness in some places is only 1mm, so ABS just couldn't cope.(actually, that flying-arches arrangement, inside the base_back, try bending it after it's printed - you'll be amazed at how strong it is)
what i will look at in the future is proto-pasta's high-temperature PLA (glass point of 85C), their carbon-fibre PLA (which needs a 0.5mm nozzle, so might not be ok), or maybe some of the hemp-reinforced PLA that's being researched and crowd-funded by a small italian group.
fortunately though this is an "embedded" design - no fans, no HDDs and it's a maximum 15W all-in, so if the internal temperature goes above even 55C something's badly wrong. bottom line, i can live with standard PLA.
Edited 1 time(s). Last edit at 05/23/2016 11:09AM by lkcl.
|
Re: SmartrapCore Question May 25, 2016 06:32PM |
Registered: 8 years ago Posts: 3,525 |
Okay so first attempt at the back_base. Printed with no support or brim or raft.
I agree they are quite strong, its a clever design even if something that gave the printer a workout. Simplfy3d made light work of it, but I did load it in slic3r and the resulting preview was laughable.
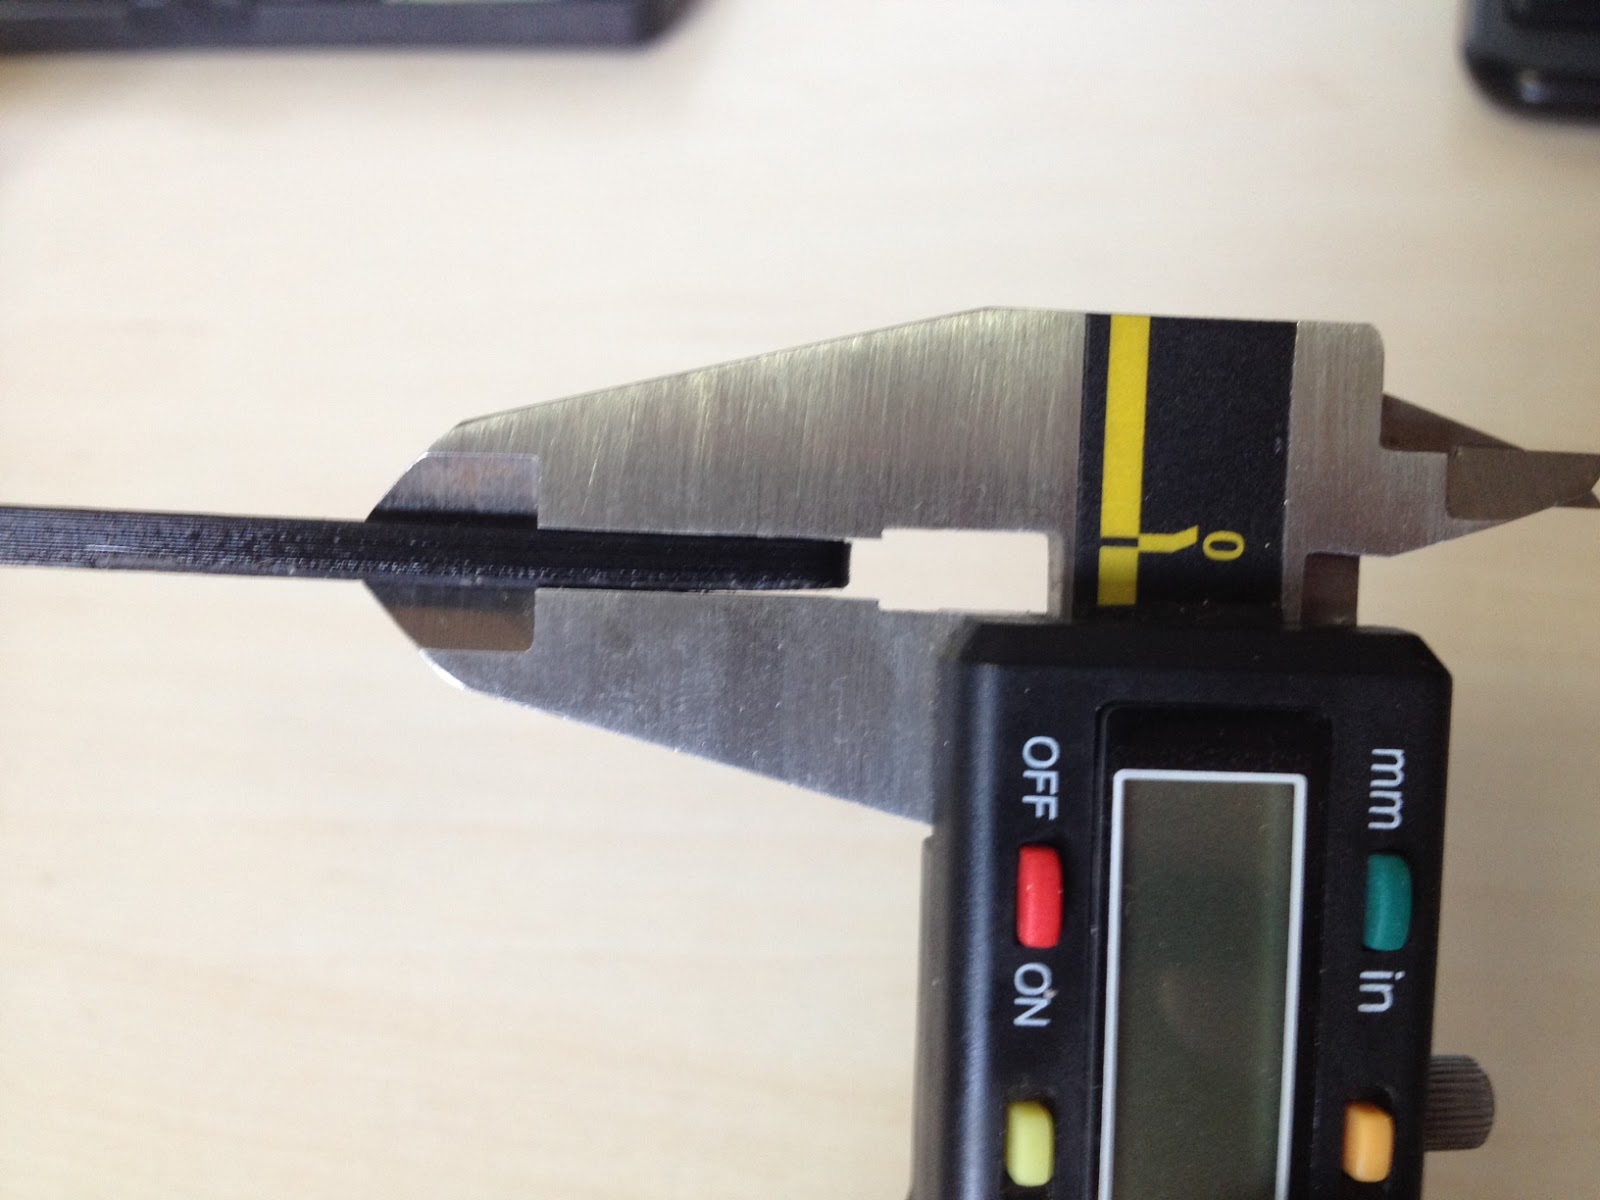
There is some lift I'd roughly measured the 6-7mm at each end has warped by a maximum of 0.3mm at the very end. Sorry if its hard to make out in the images. How does this compare to what you typically see? My recently enlarged smartrapcore alu machine was yesterday incapable of holding a 40mm part to the bed, but a bit of tinkering and a lot of hairspray, and now its gripping parts with normal-difficulty shapes.
I will try this part again tomorrow with some circular feet attached to the ends.
Simon Khoury
Co-founder of [www.precisionpiezo.co.uk] Accurate, repeatable, versatile Z-Probes
Published:Inventions
I agree they are quite strong, its a clever design even if something that gave the printer a workout. Simplfy3d made light work of it, but I did load it in slic3r and the resulting preview was laughable.


There is some lift I'd roughly measured the 6-7mm at each end has warped by a maximum of 0.3mm at the very end. Sorry if its hard to make out in the images. How does this compare to what you typically see? My recently enlarged smartrapcore alu machine was yesterday incapable of holding a 40mm part to the bed, but a bit of tinkering and a lot of hairspray, and now its gripping parts with normal-difficulty shapes.
I will try this part again tomorrow with some circular feet attached to the ends.
Simon Khoury
Co-founder of [www.precisionpiezo.co.uk] Accurate, repeatable, versatile Z-Probes
Published:Inventions
|
Re: SmartrapCore Question May 26, 2016 01:40PM |
Registered: 8 years ago Posts: 3,525 |
Second attempt today with some pads attached on the ends, circular to spread out the contraction forces. No lift on the part at all, there's a little bit of lift on the right hand set of pads.
Using Excelvan black PLA at 200 deg C, bed at 70 degC, extra hold hair spray on float glass.
The Cad has messed up the top edge but you can see what I'm getting at.
Simon Khoury
Co-founder of [www.precisionpiezo.co.uk] Accurate, repeatable, versatile Z-Probes
Published:Inventions
Using Excelvan black PLA at 200 deg C, bed at 70 degC, extra hold hair spray on float glass.
The Cad has messed up the top edge but you can see what I'm getting at.


Simon Khoury
Co-founder of [www.precisionpiezo.co.uk] Accurate, repeatable, versatile Z-Probes
Published:Inventions
|
Re: SmartrapCore Question May 26, 2016 05:18PM |
Registered: 8 years ago Posts: 776 |
Quote
DjDemonD
Okay so first attempt at the back_base. Printed with no support or brim or raft.
I agree they are quite strong, its a clever design even if something that gave the printer a workout.
yeah when joining the arches together i found that they curled up a tiiny bit, and as the next layer began to be added the printer would go "ker-chunkk" against the raised edge.... not a nice sound and it contributed to the part being ripped off eventually....Quote
Simplfy3d made light work of it, but I did load it in slic3r and the resulting preview was laughable.
i _did_ say! it's perl, which means it's ... ok i should stop. simplify3d i've not tried, i'll look it up. i need something that... y'know... "works".
Quote
There is some lift I'd roughly measured the 6-7mm at each end has warped by a maximum of 0.3mm at the very end. Sorry if its hard to make out in the images. How does this compare to what you typically see?
honestly i never let it get that far, i didn't want to spend the time on it - saw the bit coming up at the end after 4mm, stopped it, threw it in the bin and worked out some pinning based on a quick analysis of what could have been going wrong and how to fix it.
that's where i came up with those "square buttresses" idea, the one on the back_kbd_runner - but the look of that ruined the aesthetics of this part, so i worked something else out. slowly i got it down to just a brim (internally as well as externally).
btw congratulations on it at least staying down to complete the print, that's pretty impressive. that's 0.6mm of contact on one edge (!!) and 1.0mm of contact on the other. for anyone else reading this, these are *hollow* parts with a runner at 45 degrees cut into one of the edges to take a piece of plywood 1.5mm thick.
|
Re: SmartrapCore Question May 26, 2016 05:25PM |
Registered: 8 years ago Posts: 776 |
Quote
DjDemonD
Second attempt today with some pads attached on the ends, circular to spread out the contraction forces. No lift on the part at all, there's a little bit of lift on the right hand set of pads.
Using Excelvan black PLA at 200 deg C, bed at 70 degC, extra hold hair spray on float glass.
GREAT, that's really useful to know, because the one thing about the internal pinning that i added is, it messes up that 1.2mm 45 degree channel for the plywood. if you turn the part over you'll see all along one edge there's a tiny channel, i take a piece of 1.5mm plywood, shave 1mm off it at a 45 degree angle all along the edge, and then that slots into the channel in the PLA.
Quote
The Cad has messed up the top edge
yehhh i get that as well, cura 15.04 seems to do okay, but messes up the ends. why can we not get _one_ program that does a decent job on all parts?
no wonder people keep writing new gcode generators... maybe slicing is harder than we think it is...ok so question for you, how much effort does it take you to break that back part? i'm serious - as in, the real question is, would _you_ buy a 15.6in laptop that weighed 1.1kg which had that part in it? i need to know if it feels like it's strong enough so people won't go "this is ridiculous, look at how much it bends.... and it even snapped"
|
Re: SmartrapCore Question May 26, 2016 05:26PM |
Registered: 8 years ago Posts: 776 |
oh - also, are you getting any bleed-through from the internal arches? i get discolouration and bumps on the outside using cura 15.04 where the outer lines are clearly no longer straight, and you can make out the outline of the internal arches... on the *outside* of the part.
p.s. in case i didn't emphasise it - thank you!
Edited 1 time(s). Last edit at 05/26/2016 05:26PM by lkcl.
p.s. in case i didn't emphasise it - thank you!
Edited 1 time(s). Last edit at 05/26/2016 05:26PM by lkcl.
|
Re: SmartrapCore Question May 26, 2016 06:03PM |
Registered: 8 years ago Posts: 3,525 |
Okay so I can bend the back_base part quite a bit and it returns to its original shape, which for PLA is quite impressive I was expecting it to shatter into shards. I suppose it is quite thin and therefore flexible, despite being PLA. I am not quite willing to break it, it looks like it would take quite a bit of effort.
I am getting bleed through yes not too severe but its there.
I've had a go at the back_KBD_runner and printed it with just pads like the first part, flat as a pancake. So how many do you want?
Do you have an image of the complete laptop I'm curious to know what these parts end up looking like?
Simon Khoury
Co-founder of [www.precisionpiezo.co.uk] Accurate, repeatable, versatile Z-Probes
Published:Inventions
I am getting bleed through yes not too severe but its there.
I've had a go at the back_KBD_runner and printed it with just pads like the first part, flat as a pancake. So how many do you want?

Do you have an image of the complete laptop I'm curious to know what these parts end up looking like?
Simon Khoury
Co-founder of [www.precisionpiezo.co.uk] Accurate, repeatable, versatile Z-Probes
Published:Inventions
|
Re: SmartrapCore Question May 29, 2016 03:41PM |
Registered: 8 years ago Posts: 776 |
Quote
DjDemonD
Okay so I can bend the back_base part quite a bit and it returns to its original shape, which for PLA is quite impressive I was expecting it to shatter into shards. I suppose it is quite thin and therefore flexible, despite being PLA. I am not quite willing to break it, it looks like it would take quite a bit of effort.
awwww shaaaame
yeah it would eventually shatter, if you did try it please be careful. yeah i figured if they made cathedrals that have stood for a thousand years with arches like that then they must have got something rightQuote
I am getting bleed through yes not too severe but its there.
yeahhhh darn. can't think how to solve that except by just going resin, injection-mold or powder-printing.
Quote
I've had a go at the back_KBD_runner and printed it with just pads like the first part, flat as a pancake. So how many do you want?
unfair! how come you can do it!
Quote
Do you have an image of the complete laptop I'm curious to know what these parts end up looking like?
[rhombus-tech.net] - that's with bamboo 1.5mm plywood. i have a version in faberdashery robot silver and their translucent black, i used birchwood 1.5mm ply for that one - looks reaallly good. i'll try to find the photos, i took some a couple months back.
|
Re: SmartrapCore Question May 29, 2016 04:00PM |
Registered: 8 years ago Posts: 3,525 |
The laptop looks great really innovative. Laptops are so boring and generic I'd buy one like that on style grounds alone, add to that it's, I presume, recycled components and you've got a winner. Keep me posted.
As for why these parts don't stay flat when you print them I have no idea. What's your setup?
Simon Khoury
Co-founder of [www.precisionpiezo.co.uk] Accurate, repeatable, versatile Z-Probes
Published:Inventions
As for why these parts don't stay flat when you print them I have no idea. What's your setup?
Simon Khoury
Co-founder of [www.precisionpiezo.co.uk] Accurate, repeatable, versatile Z-Probes
Published:Inventions
|
Re: SmartrapCore Question May 30, 2016 02:59PM |
Registered: 8 years ago Posts: 776 |
Quote
DjDemonD
The laptop looks great really innovative. Laptops are so boring and generic I'd buy one like that on style grounds alone, add to that it's, I presume, recycled components and you've got a winner.
thanks. it's using the same "efficiently-produced" LCD (is the best way to put it) which you usually find in budget 15in laptops. i found a 10A e-bike battery that's only $8 in 1k volumes. but the main thing is, the CPU Card is removable, so you can always upgrade it *and* share the CPU Card across multiple devices. the list of benefits to this approach is like... huge. you save money long-term, you have apps *and* data on the same card which you can put into a tablet, or a laptop, or a micro-desktop pc, or... anything that's compatible. you can buy replacement CPU Cards and sell the old one so they stay out of landfill.... it just goes on and on and it's rather confusing as to why no other company has done it... then you realise that they can't maximise profit in fact they would *lose* money because they would make a chassis and someone else would come along and outsell them on a brtter CPU Card... oh and you wouldn't buy the upgraded laptop next year from them because the one you have with a *3rd party* CPU Card is perfectly fine.
whoops
Quote
Keep me posted.
you can register on the crowdfunding mailing list here if you prefer. [www.crowdsupply.com]
Quote
As for why these parts don't stay flat when you print them I have no idea. What's your setup?
well i've given the mendel90 to my friend who recommended it, and i'm in the middle of redesigning the sandwich200v2, so it's a moot question at the moment
it was repsnapper, then cura 15.04, with a 0.4mm nozzle, layer height 0.15mm (0.1mm was a bit too much for the mendel90). the glass i believe wasn't actually properly flat (as in, the *glass* wasn't flat)... all that's gone now, replaced by the sandwich200v2 which i have had to pack up for now and i have to redo the carriage to use something that's derived from the Sli3DR.Edited 1 time(s). Last edit at 05/30/2016 03:05PM by lkcl.
|
Re: SmartrapCore Question July 01, 2016 01:16AM |
Registered: 8 years ago Posts: 776 |
Quote
DjDemonD
The laptop looks great really innovative. Laptops are so boring and generic I'd buy one like that on style grounds alone, add to that it's, I presume, recycled components and you've got a winner. Keep me posted.
heya DJD we're up and live, [crowdsupply.com] thought you'd appreciate knowing.
|
Re: SmartrapCore Question July 01, 2016 04:47AM |
Registered: 8 years ago Posts: 3,525 |
Looks great. I hope it does well, will share it around.
Simon Khoury
Co-founder of [www.precisionpiezo.co.uk] Accurate, repeatable, versatile Z-Probes
Published:Inventions
Simon Khoury
Co-founder of [www.precisionpiezo.co.uk] Accurate, repeatable, versatile Z-Probes
Published:Inventions
|
Re: SmartrapCore Question July 01, 2016 12:52PM |
Registered: 8 years ago Posts: 776 |
Sorry, only registered users may post in this forum.