My coreXY design is progressing to the build stage
Posted by the_digital_dentist
|
Re: My coreXY design is progressing to the build stage August 30, 2017 11:07AM |
Registered: 6 years ago Posts: 14 |
I see.Quote
the_digital_dentist
No specific reason - I had some left-over pieces and didn't have any smaller stuff. Since there are no lateral forces on the bed smaller extrusion should work OK. I wasn't too worried about the weight- the Z axis drive I used can handle a LOT of weight.
Which bearings did you use for your pulleys? On your blog, you wrote F6902zz but elsewhere, I read F6903zz.
|
Re: My coreXY design is progressing to the build stage August 30, 2017 11:20AM |
Registered: 11 years ago Posts: 5,780 |
Most of the pulleys are F608zzs. The two larger pulleys in the XY stage are either F6903zz or F6902zz, I don't recall which. If you look at the CAD file, the correct part number should be assigned to those bearings/pulleys. I don't have the file in front of me, but I'm pretty sure it was F6902zz. Either one would work OK- you'd just have to change the bushing that reduces the bore to 8 mm.
Ultra MegaMax Dominator 3D printer: [drmrehorst.blogspot.com]
Ultra MegaMax Dominator 3D printer: [drmrehorst.blogspot.com]
|
Re: My coreXY design is progressing to the build stage September 05, 2017 11:26PM |
Registered: 11 years ago Posts: 5,780 |
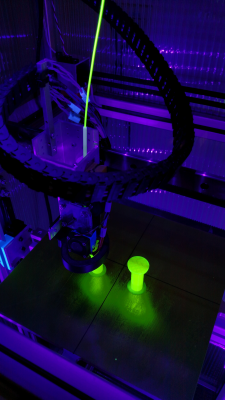
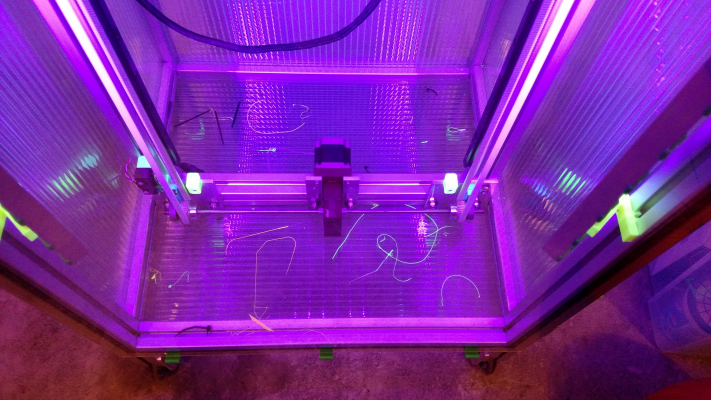
This is what 20+ Watts of UV LED's do for fluorescent yellow filament:
I tried to adjust the exposure to match the way it looks to the eye, but the picture still doesn't really show the brightness of the yellow plastic. It's almost painful to look at.
Ultra MegaMax Dominator 3D printer: [drmrehorst.blogspot.com]
I tried to adjust the exposure to match the way it looks to the eye, but the picture still doesn't really show the brightness of the yellow plastic. It's almost painful to look at.
Ultra MegaMax Dominator 3D printer: [drmrehorst.blogspot.com]
|
Re: My coreXY design is progressing to the build stage September 13, 2017 04:22PM |
Registered: 6 years ago Posts: 14 |
|
Re: My coreXY design is progressing to the build stage September 13, 2017 06:46PM |
Registered: 11 years ago Posts: 5,780 |
The sides of the tubing were cut to ensure clearance for the belts. I probably could have cut a little less, but leaving clearance that's too small can result in problems if you need to reposition something later. I used two larger pulleys in the corners to increase the belt clearance, also probably not strictly necessary.
Ultra MegaMax Dominator 3D printer: [drmrehorst.blogspot.com]
Ultra MegaMax Dominator 3D printer: [drmrehorst.blogspot.com]
|
Re: My coreXY design is progressing to the build stage September 14, 2017 02:26PM |
Registered: 11 years ago Posts: 5,780 |
I just received an order of Gates LL2MR09 belt. I'm going to run some test prints designed to maximize ringing and compare the Chinesium belt that's on UMMD now with the Gates stuff to see if there's any difference in print quality. I'll post photos in a couple days.
The Gates belt has nylon facing on the teeth and glass fiber core. I can see some of the fibers along the edges of the belt, just like the Chinese stuff.
Ultra MegaMax Dominator 3D printer: [drmrehorst.blogspot.com]
The Gates belt has nylon facing on the teeth and glass fiber core. I can see some of the fibers along the edges of the belt, just like the Chinese stuff.
Ultra MegaMax Dominator 3D printer: [drmrehorst.blogspot.com]
|
Re: My coreXY design is progressing to the build stage September 16, 2017 11:20AM |
Registered: 11 years ago Posts: 5,780 |
Here it is printing: [vimeo.com]
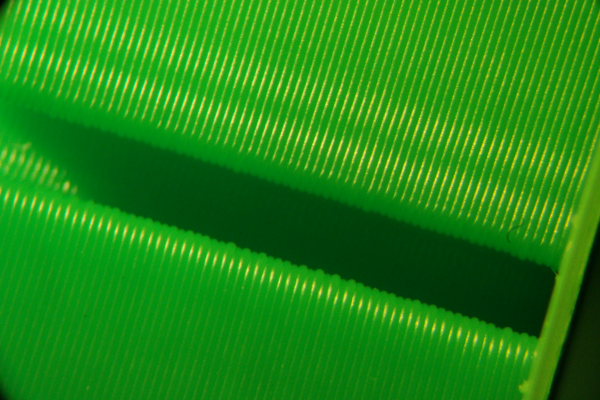
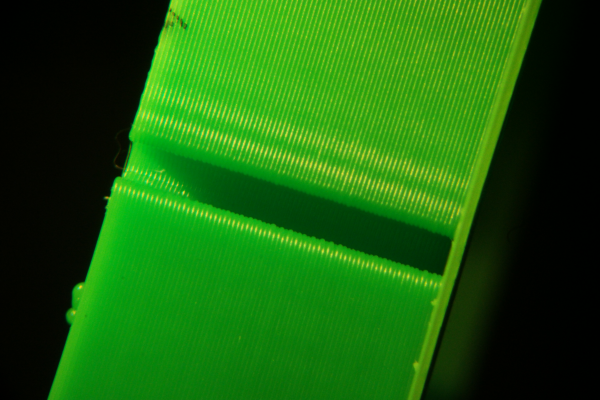
A couple "before" pix:
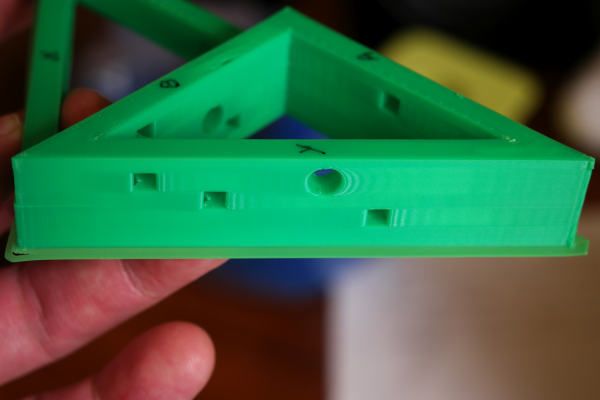
I designed a part to maximize ringing by putting a series of vertical slots into the sides of a square. The lengths between the vertical slots were varied to ensure a wide range of peak print speeds from about 30 mm/sec to 150 mm/sec. The blocks were printed with all speeds (except bottom and top layers) set to 200 mm/sec (which won't be reached due to limited line lengths, see below). I had a couple slight layer shifts occur in other prints when I had the acceleration set to 800 mm/sec^2, so I turned it down to 700 mm/sec^2, which seems to have completely eliminated shifting. I did find that the layers at the edges of the vertical slots varied in quality- it seems like the layers at edges that are created when the extruder has been moving at a low speed (coming out of the slot) stack up better, and when the extruder is decelerating from a high speed (going toward the slot) the layers stack up a little worse, as can be seen in the images. The images are of one of the vertical slots on a Y axis parallel side of the object, where moving mass is greatest and ringing should be worst. There's almost no ringing at all on the X axis sides of the objects, and none that I could get to show up in a photo.
I sliced the object in Cura and Slic3r with as identical settings as possible (0.2 mm layers, two walls, no infill, 200 mm/sec for all lines (but the longest uninterrupted run allows the extruder to get up to about 150 mm/sec), 0.4 mm wide lines, seam aligned, etc. It looks like the Slic3r object has slightly better layer registration, but I can't imagine why the slicer would make any difference there. I suspect it's just operating at the limit of the printer's precision and differences are just noise.
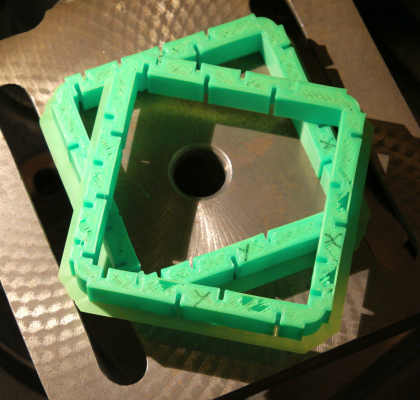
These are the parts I printed:
The gaps in the top are expected and OK- there's no infill and I specified 2 top layers and printed at 50 mm/sec, IRIC.
I have attached the stl file in case anyone wants to try it out.
The slots are spaced so that in each axis there are continuous line lengths of 2, 4, 6, 8, 10, 12 , 14, 16, 18, 20, 22, 24, 26, 28, 30, and 32 mm (some segments are on the inside and some on the outside walls of the prints). With 700 mm/sec^2 acceleration (and deceleration) the 32 mm length allows a peak speed of about 150 mm/sec to be reached. The shorter lengths correspond to lower peak speeds while printing those segments.
The longest line length required was found by first dividing speed by acceleration to get the time required to accelerate to 150 mm/sec, then calculating the line length for accelerated and decelerated motion based on that time by multiplying acceleration x time^2. The junction deviation isn't set to zero, so the peak speeds are probably slightly higher than calculated value because the lines don't start and stop from 0 mm/sec. I picked 150 mm/sec print speed because it seems faster than I'm ever going to actually print, but after this result, maybe I better reconsider. I didn't quite believe the result so I went looking for problems and checked the firmware settings for maximum speeds in X and Y and they were set to 500 mm/sec, so the firmware isn't limiting the speed during the test.
I may retry this test with the prints rotated by 45 degrees, that way only one motor will be turning as the sides of the squares are printing and that may lead to more ringing due to reduced available motor torque.
Edited 4 time(s). Last edit at 09/16/2017 11:47AM by the_digital_dentist.
Ultra MegaMax Dominator 3D printer: [drmrehorst.blogspot.com]
|
Re: My coreXY design is progressing to the build stage September 16, 2017 11:52AM |
Registered: 8 years ago Posts: 5,232 |
Quote
It looks like the Slic3r object has slightly better layer registration, but I can't imagine why the slicer would make any difference there.
I've noticed that slic3r often adds a lot of dezimals behind the digit. Maybe for a good reason? Would be interesting to compare both gcodes.
Do you expect (layer separation) problems when you will print faster than before?
|
Re: My coreXY design is progressing to the build stage September 16, 2017 12:37PM |
Registered: 11 years ago Posts: 5,780 |
The layers seem to be bonded together just fine. I printed in ABS, nozzle at 235C and enclosure about 42C for most of the prints.
Ultra MegaMax Dominator 3D printer: [drmrehorst.blogspot.com]
Ultra MegaMax Dominator 3D printer: [drmrehorst.blogspot.com]
|
Re: My coreXY design is progressing to the build stage September 17, 2017 02:37PM |
Registered: 11 years ago Posts: 5,780 |
Further testing- I designed a new object with longer straight runs that will allow the print speed to go up to 250 mm/sec, turned up junction deviation to 0.2 (previously set to 0.05), and ran a print. I managed to get it to ring an unacceptable amount. I had no idea this thing could go so fast and still produce something that doesn't look like a bird's nest. Maybe a more complex geometry print would come out a lot worse. As with the other prints, two walls, zero infill.
The X, Y are the sides parallel to those axes. The A and B labels are sides where only the A or B motor was spinning along the length of the side of the print. Surprisingly, the ringing doesn't look much different along the single motor sides than it does along the X and Y axes where both motors are spinning. The moving mass is about the same in both cases. There is slightly less ringing on the X side than the Y side, probably because of the lower moving mass of the X movement.
Like the guy on the interwebs once said "video or it didn't happen":
[vimeo.com]
The layers seem to be a little less solidly bonded to each other in this print than the previous ones, but maybe turning up the print temperature a little would fix that. I ran it at 235C
Ultra MegaMax Dominator 3D printer: [drmrehorst.blogspot.com]
|
Re: My coreXY design is progressing to the build stage September 18, 2017 07:12AM |
Registered: 8 years ago Posts: 1,671 |
|
Re: My coreXY design is progressing to the build stage September 18, 2017 05:00PM |
Registered: 10 years ago Posts: 14,672 |
Nice! It goes to show that the CoreXY architecture is capable of good printing speeds.
Here's another example of a CoreXY machine printing fast: [somei3deas.wordpress.com].
Large delta printer [miscsolutions.wordpress.com], E3D tool changer, Robotdigg SCARA printer, Crane Quad and Ormerod
Disclosure: I design Duet electronics and work on RepRapFirmware, [duet3d.com].
Here's another example of a CoreXY machine printing fast: [somei3deas.wordpress.com].
Large delta printer [miscsolutions.wordpress.com], E3D tool changer, Robotdigg SCARA printer, Crane Quad and Ormerod
Disclosure: I design Duet electronics and work on RepRapFirmware, [duet3d.com].
|
Re: My coreXY design is progressing to the build stage September 18, 2017 07:20PM |
Registered: 11 years ago Posts: 5,780 |
In my case the acceleration is a pretty low 700 mm/sec^2 to avoid layer shifting due to the high moving mass of the Y axis. And it sounds like someone with thick thighs running a marathon in corduroy pants. Would the drivers on the Duet WiFI kill most of that noise, or is that noise created by the teeth of the belt slapping against the smooth pulley surfaces?
Edited 1 time(s). Last edit at 09/18/2017 10:04PM by the_digital_dentist.
Ultra MegaMax Dominator 3D printer: [drmrehorst.blogspot.com]
Edited 1 time(s). Last edit at 09/18/2017 10:04PM by the_digital_dentist.
Ultra MegaMax Dominator 3D printer: [drmrehorst.blogspot.com]
|
Re: My coreXY design is progressing to the build stage September 19, 2017 06:38AM |
Registered: 8 years ago Posts: 1,671 |
|
Re: My coreXY design is progressing to the build stage September 19, 2017 08:26AM |
Registered: 11 years ago Posts: 5,780 |
Same filament- color balance off a little. I didn't pay attention to the print times.
Ultra MegaMax Dominator 3D printer: [drmrehorst.blogspot.com]
Ultra MegaMax Dominator 3D printer: [drmrehorst.blogspot.com]
|
Re: My coreXY design is progressing to the build stage September 19, 2017 02:33PM |
Registered: 11 years ago Posts: 5,780 |
Ringing doesn't seem to be a function of speed per se. It's more a function of jerk/junction deviation. They determine the speeds to which the extruder carriage accelerates and decelerates after or before a change in direction. Back when I was using the XY mechanism to plot on paper, I did some tests in which I varied the junction deviation.
http://forums.reprap.org/read.php?397,659980,715340#msg-715340
I didn't pursue it any further, too bad. As I understand it, curves at speed will lead to more ringing because the planner can't keep up with the directional changes.
Anyway, that's all 20:20 hindsight. I swapped the belts and reran the high speed print. I can't see any print quality differences. Maybe the prints are not optimal for revealing differences between the belts or maybe there just isn't much performance difference, at least in the short term.
I took some photos of the belts under a microscope and there are some interesting differences. The Chinese belt actually looks better at least in terms of surface finish and shape of teeth. The pictures are posted on my blog, here.
Ultra MegaMax Dominator 3D printer: [drmrehorst.blogspot.com]
|
Re: My coreXY design is progressing to the build stage September 19, 2017 04:39PM |
Registered: 10 years ago Posts: 14,672 |
Quote
the_digital_dentist
In my case the acceleration is a pretty low 700 mm/sec^2 to avoid layer shifting due to the high moving mass of the Y axis. And it sounds like someone with thick thighs running a marathon in corduroy pants. Would the drivers on the Duet WiFI kill most of that noise, or is that noise created by the teeth of the belt slapping against the smooth pulley surfaces?
Switching from a Duet 085 (x16 microstepping) to a Duet WiFi (which I usually run at x16 microstepping interpolated to x256) made my delta printer much quieter despite the use of smooth idler pulleys, to the extent that my next job was to find quieter cooling fans. Later I switched to toothed idler pulleys because I thought the smooth ones were creating noise, but I can't say I noticed any difference. So in my experience, the motor noise at x16 microstepping far outweighs any noise from using smooth idlers. YMMV especially if you are currently using x32 microstepping.
Large delta printer [miscsolutions.wordpress.com], E3D tool changer, Robotdigg SCARA printer, Crane Quad and Ormerod
Disclosure: I design Duet electronics and work on RepRapFirmware, [duet3d.com].
|
Re: My coreXY design is progressing to the build stage September 24, 2017 10:33PM |
Registered: 11 years ago Posts: 5,780 |
I took SoM and UMMD to the Milwaukee Maker Faire this weekend. UMMD went over in my car, lying on its back. When I got to the event I pulled it out of the car, rolled it about 100 m, stood it up and started printing without any adjustments.
I sort of pushed the limits on UMMD and it behaved well, but the print didn't do so well.
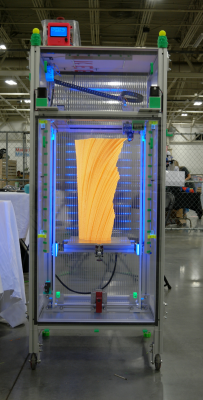
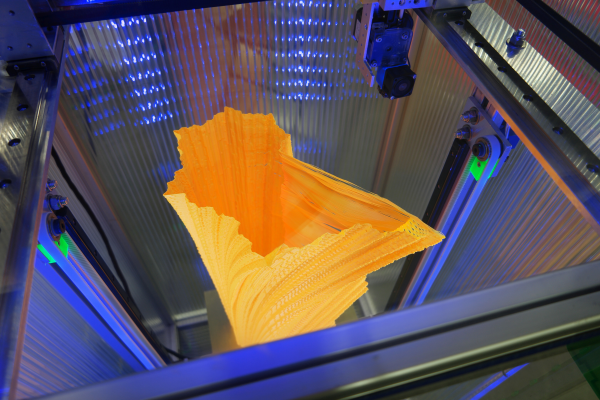
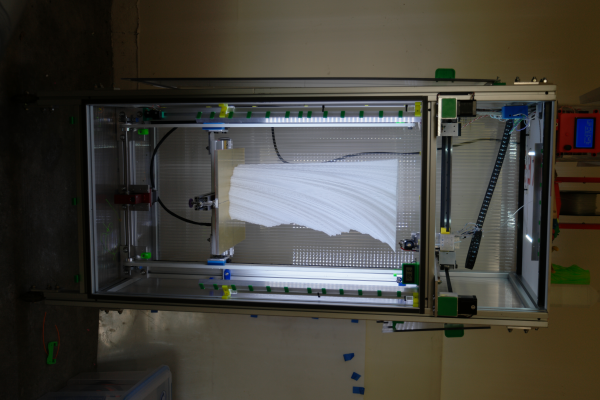
This is a single walled vase 500mm tall, in 200 um layers using Cura's spiralized outer contour mode (don't know why it still creates a seam), 0.4 mm wall thickness. It took about 12 hours. I fully expected it to turn into a bird's nest, but it managed to go right to the top. It looks great from the front, anyway..
Next time I'll print it with a bigger nozzle, 0.6 or 0.8mm and two perimeters. I used Cura because Slic3r couldn't slice it properly.
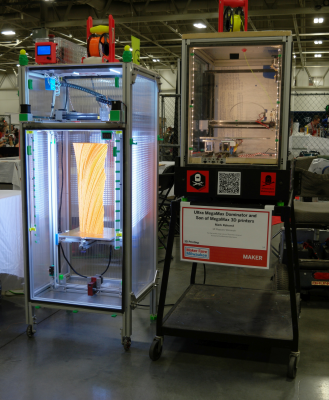
I finally got a semi decent picture of the printers together.
SoM's covers are pretty badly scratched because there is nowhere to put them, so I end up leaning them against whatever is nearby, they fall, and get scratched. UMMD has a magnetically attached lower front cover. The upper front cover drops into the slots in the printer's frame. I printed some hooks and mounted them on the sides of the printer so I'd have somewhere to put them when they are off the machine, and hopefully avoid them getting scratched up.
Edited 1 time(s). Last edit at 09/24/2017 10:38PM by the_digital_dentist.
Ultra MegaMax Dominator 3D printer: [drmrehorst.blogspot.com]
|
Re: My coreXY design is progressing to the build stage September 26, 2017 10:58AM |
Registered: 6 years ago Posts: 1,007 |
Quite an achievement, I reckon. And no auto bed leveling ?  Shake it in a trunk, put it up, power "et voila". Indeed, when good engineering practice and proper assembly methods are used.
Definitely belts for the Z are a good choice for tall machine and worth the worm gearbox.
"A comical prototype doesn't mean a dumb idea is possible" (Thunderf00t)
 Shake it in a trunk, put it up, power "et voila". Indeed, when good engineering practice and proper assembly methods are used.
Definitely belts for the Z are a good choice for tall machine and worth the worm gearbox.
"A comical prototype doesn't mean a dumb idea is possible" (Thunderf00t)
|
Re: My coreXY design is progressing to the build stage September 26, 2017 03:17PM |
Registered: 11 years ago Posts: 5,780 |
The belt drive Z axis has exceeded my expectations. I was talking with some people at the makerspace about it and we may be building a few similar machines for use at the space.
Ultra MegaMax Dominator 3D printer: [drmrehorst.blogspot.com]
Ultra MegaMax Dominator 3D printer: [drmrehorst.blogspot.com]
|
Re: My coreXY design is progressing to the build stage September 27, 2017 02:40AM |
Registered: 8 years ago Posts: 5,232 |
|
Re: My coreXY design is progressing to the build stage September 27, 2017 04:59AM |
Registered: 12 years ago Posts: 72 |
You can't convert one to a stepper motor, but you could convert one into a DC servo motor by attaching an incremental encoder. The encoder should be attached to the motor itself and not the gearbox output in order to reduce backlash.Quote
o_lampe
Just asked myself, if it would be possible to adapt a windscreen wiper wormdrive to a Stepper or a smaller wormdrive from electric window screens? This is the RepRap forum at least
|
Re: My coreXY design is progressing to the build stage September 27, 2017 07:11AM |
Registered: 11 years ago Posts: 5,780 |
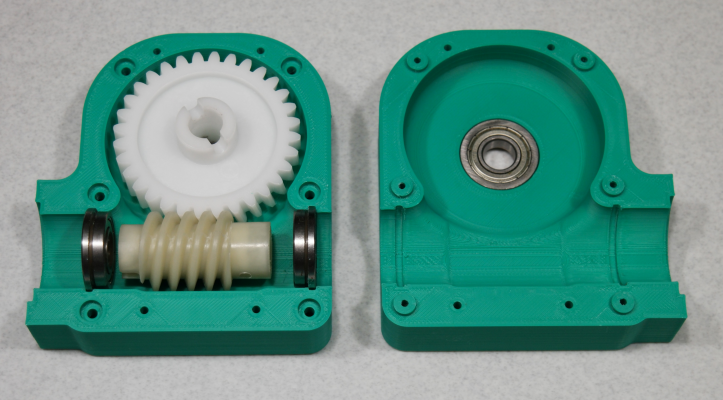
Car seat adjusters often use worm drives, too. The biggest problem would be fitting a stepper on the gear box. Backlash shouldn't be an issue because the weight of the bed assembly will keep the gears fully meshed at all times. Several months ago I looked into making a worm gearbox using inexpensive plastic gears for garage door openers. I got as far as printing the housing with ball bearings fitted, but haven't made the shafts for the gears yet.
IRIC, the gears will provide either 16 or 20:1 reduction, which may or may not be enough to prevent bed drop completely, but should at least slow it down a lot, depending on the mass of the bed. It is designed to fit a NEMA-23 motor on the end. I printed it using ABS which should be OK if the motor warms up a bit, but the motor can probably be run at a low current/heat and still have plenty of torque to move the bed. The motor in the Rino is rated for 1.8A IRIC, and I'm running it at 1A and it barely gets warm.
There are two problems with the plastic gears- making shafts will have to be done on a lathe, and there is a distinct seam in the worm gear where the two halves of the mold didn't quite line up when it was made. I suspect that that will result in a periodic bump in the layer thickness that could end up visible in a print. I have no concerns about the gears being strong enough for the task. If they can lift a garage door, they can easily lift a printer's bed that probably weighs 0.05% of a garage door.
Maybe the metal gears could be removed from a seat adjuster and be positioned in a printed frame...
Ultra MegaMax Dominator 3D printer: [drmrehorst.blogspot.com]
|
Re: My coreXY design is progressing to the build stage September 28, 2017 01:56AM |
Registered: 8 years ago Posts: 5,232 |
|
Re: My coreXY design is progressing to the build stage September 29, 2017 07:58PM |
Registered: 11 years ago Posts: 5,780 |
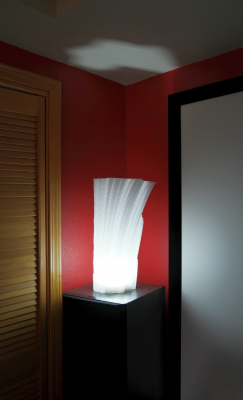
I had another go at the big vase, this time using transparent ABS with 3 perimeters, speed set to 60 mm/sec. 39 hours and 781g later, it finished at 500 mm tall. The back side is almost as perfect as the front- there are two small splits that are of no consequence. For some reason, at about 495 mm, the extruder decided to incorporate a blob of burnt filament into the print on the back side. The bottom layer has some cracks, maybe due to being on the bed at 95C for almost 40 hours. I'll try reducing the temperature a bit more next time. It isn't the least bit fragile and can be handled without worrying about it coming apart.
Any way, here it is, soon to become a lamp:
Video
Here's what it looks like with an LED flashlight inside:
Edited 1 time(s). Last edit at 09/30/2017 10:43AM by the_digital_dentist.
Ultra MegaMax Dominator 3D printer: [drmrehorst.blogspot.com]
Any way, here it is, soon to become a lamp:
Video
Here's what it looks like with an LED flashlight inside:
Edited 1 time(s). Last edit at 09/30/2017 10:43AM by the_digital_dentist.
Ultra MegaMax Dominator 3D printer: [drmrehorst.blogspot.com]
|
Re: My coreXY design is progressing to the build stage September 30, 2017 10:52AM |
Registered: 11 years ago Posts: 5,780 |
Quote
o_lampe
It would be nice to find a wormgear that already requires a 5mm or 1/4" shaft diameter. Easier to adapt to common steppers...
[www.ebay.com]
[www.ebay.com]
[www.ebay.com]
You still need bearings, a mount, a motor, and means to couple to the shaft at the input and an output shaft. How many hours and what additional cost is there compared to just spending a few more $ and getting a Rino? That's why my development of the device using garage door gears stopped. OTOH, a low cost stepper driven worm gear would be useful for all sorts of things besides 3D printers.
Edited 2 time(s). Last edit at 09/30/2017 11:03AM by the_digital_dentist.
Ultra MegaMax Dominator 3D printer: [drmrehorst.blogspot.com]
|
Re: My coreXY design is progressing to the build stage October 05, 2017 11:16AM |
Registered: 6 years ago Posts: 1,007 |
Quote
the_digital_dentist
You still need bearings, a mount, a motor, and means to couple to the shaft at the input and an output shaft. How many hours and what additional cost is there compared to just spending a few more $ and getting a Rino? That's why my development of the device using garage door gears stopped. OTOH, a low cost stepper driven worm gear would be useful for all sorts of things besides 3D printers.
Not worth it indeed for the Z.
On the other hand, for an extruder by doing it yourself you can design the system to be as compact as possible and remove any backlash. I tried it, it is OK but not that many advantages compared to regular gears.
"A comical prototype doesn't mean a dumb idea is possible" (Thunderf00t)
|
Re: My coreXY design is progressing to the build stage October 17, 2017 12:47AM |
Registered: 11 years ago Posts: 5,780 |
As everyone who uses a 3D printer knows, the machines produce a lot of trash in the form of single line extrusions, extruder drool, failed prints, bits of support material, etc. I have noticed that in UMMD the stuff tends to accumulate at the bottom of the printer, very close to the two Z axis drive pulleys. I'll be adding a couple shields to prevent most of the falling debris from getting between the belts and pulleys.
I'll also be adding a heater to the enclosure for reliable ABS printing in the next week or so. Stay tuned for updates.
Ultra MegaMax Dominator 3D printer: [drmrehorst.blogspot.com]
I'll also be adding a heater to the enclosure for reliable ABS printing in the next week or so. Stay tuned for updates.
Ultra MegaMax Dominator 3D printer: [drmrehorst.blogspot.com]
|
Re: My coreXY design is progressing to the build stage October 31, 2017 02:07PM |
Registered: 11 years ago Posts: 5,780 |
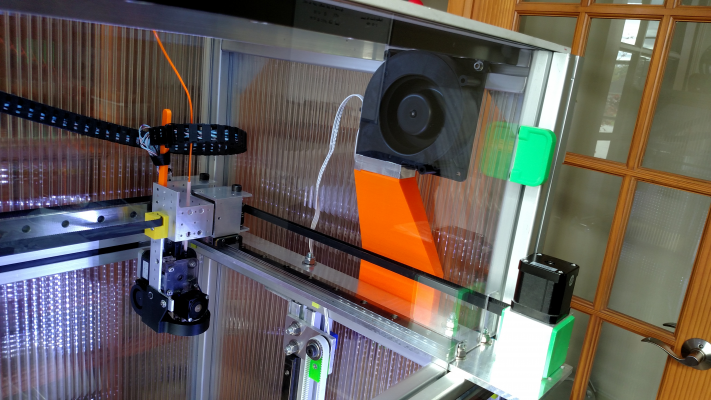
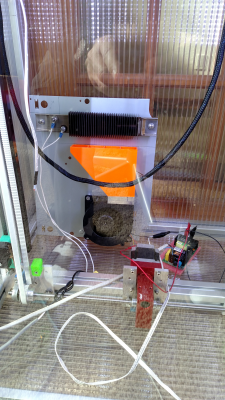
I had some time to work on the enclosure heater. Right now I have two 24V blowers, one sucks air at the top of the enclosure and blows it down and the other blows up against a 500W heater. I ran some experiments today to see how well it was going to work. Everything is hay-wired for now because I'm just experimenting.
This is the upper blower, held on the frame with a couple t-nuts. The orange duct is printed ABS and fits between the dual layer PC and the printer's frame:
This is the heater and its blower, mounted on a steel sheet from the bottom of an old VCR:
I started testing using just the enclosure heater. The enclosure temperature went from 21C to 42C in 45 minutes. 42C was the limit using the enclosure heater alone. Then I turned on the bed heater set to 105C for printing ABS and the enclosure temperature hit 50C in another 15 minutes.
When the temperature got to 50C one of the blowers started making noises. They are rated to run at 60C, but they were pulled from some equipment so there's no telling how many hours they had on them.
Ultra MegaMax Dominator 3D printer: [drmrehorst.blogspot.com]
|
Re: My coreXY design is progressing to the build stage October 31, 2017 02:25PM |
Registered: 8 years ago Posts: 5,232 |
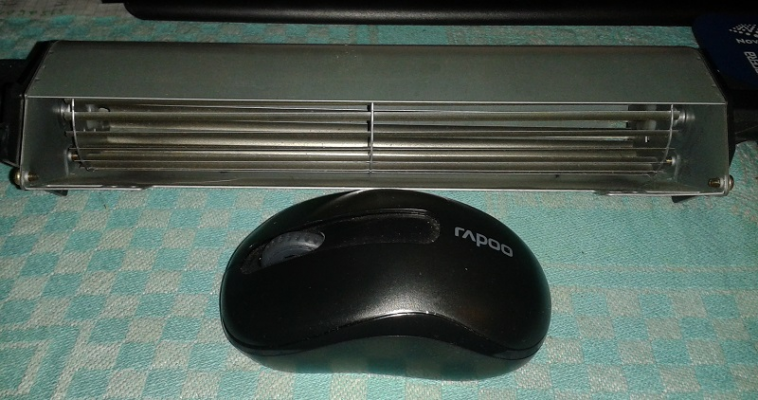
I found a metal fan in an old HP-laser printer. It's probably circulating air more evenly. At least it doesn't care about temperatures.
Edited 1 time(s). Last edit at 10/31/2017 02:27PM by o_lampe.
Edited 1 time(s). Last edit at 10/31/2017 02:27PM by o_lampe.
Sorry, only registered users may post in this forum.
