Hlidskjalf, Dual CoreXY
Posted by prot0typ1cal
|
Re: Hlidskjalf, Dual CoreXY August 12, 2017 03:03AM |
Registered: 6 years ago Posts: 86 |
Could it be your stepper directions are wrong?
I have:
M569 P5 S1 ; Drive 5 goes forwards Y
M569 P6 S1 ; Drive 6 goes forwards V
M569 P7 S1 ; Drive 7 goes forwards X
M569 P8 S1 ; Drive 8 goes forwards U
From the debug I guess you have the same?
As Y moves the wrong way and for y move the x carriage steppers are turning the wrong way. They should turn the other way to keep the carriage in place when doing the y move if they turn the wrong way the will move double the distance? Or have I gotten everything screwed up? Still early in the morning here
|
Re: Hlidskjalf, Dual CoreXY August 12, 2017 03:42AM |
Registered: 7 years ago Posts: 249 |
Just after midnight here :p
From my config.g :
; Add R1 for RAPS128 driver chips
M569 P0 S1 R1 ; Drive 0 goes forwards X
M569 P1 S1 R1 ; Drive 1 goes forwards Y
M569 P2 S1 R1 ; Drive 2 goes forwards Z
M569 P3 S1 R1 ; Drive 3 goes forwards E1 aka U
M569 P4 S1 R1 ; Drive 4 goes forwards E2 aka V
M569 P5 S1 R1 ; Drive 5 goes forwards E3 aka Z2
Yea, I understand the kinematics.
If any steppers were backwards, the X and U moves would be wrong as well. And the U would also move during a Y command, and it doesn't.
Preplexing... someone drank all my beer.
|
Re: Hlidskjalf, Dual CoreXY August 12, 2017 03:49AM |
Registered: 6 years ago Posts: 86 |
|
Re: Hlidskjalf, Dual CoreXY August 12, 2017 04:05AM |
Registered: 6 years ago Posts: 86 |
I’m trying to think what would happen if I swapped two stepper, maybe in combination with wrong direction but I think I need more coffee before I can visualize that…
Any chance you could provide a sketch with your pullies/idlers/belts and how the motors are connected to the controller and I could compare it to my setup. Would need the driver mapping too…
Another thing you could try is to configure it as a simple corexy, I did this as a test before there was firmeware support for corexyu. Both carriages should then move as one.
|
Re: Hlidskjalf, Dual CoreXY August 13, 2017 02:50AM |
Registered: 10 years ago Posts: 14,672 |
If you swap the X and Y motors on a CoreXY setup, the XY coordinate system changes from left handed (+Y direction rotated 90deg clockwise from +X direction) to right handed (+Y rotated 90deg anticlockwise from +X), or vice versa.
Large delta printer [miscsolutions.wordpress.com], E3D tool changer, Robotdigg SCARA printer, Crane Quad and Ormerod
Disclosure: I design Duet electronics and work on RepRapFirmware, [duet3d.com].
Large delta printer [miscsolutions.wordpress.com], E3D tool changer, Robotdigg SCARA printer, Crane Quad and Ormerod
Disclosure: I design Duet electronics and work on RepRapFirmware, [duet3d.com].
|
Re: Hlidskjalf, Dual CoreXY August 14, 2017 12:23PM |
Registered: 7 years ago Posts: 249 |
The fact X and U move correctly eliminates the possibility of steppers either wired wrong or running in reverse.
What is needed is a way to monitor output to the motors from the Due or RADDS, or both independently.
The resulting move in Y is being hijacked somewhere, the debug says the axis are in the correct position.
Obviously from the video they are not.
What is needed is a way to monitor output to the motors from the Due or RADDS, or both independently.
The resulting move in Y is being hijacked somewhere, the debug says the axis are in the correct position.
Obviously from the video they are not.
|
Re: Hlidskjalf, Dual CoreXY August 14, 2017 05:07PM |
Registered: 10 years ago Posts: 14,672 |
Are your motor and belt configurations exactly equivalent to the ones Lars is using, and do you have the XYZUV labels on the same motor positions?
Large delta printer [miscsolutions.wordpress.com], E3D tool changer, Robotdigg SCARA printer, Crane Quad and Ormerod
Disclosure: I design Duet electronics and work on RepRapFirmware, [duet3d.com].
Large delta printer [miscsolutions.wordpress.com], E3D tool changer, Robotdigg SCARA printer, Crane Quad and Ormerod
Disclosure: I design Duet electronics and work on RepRapFirmware, [duet3d.com].
|
Re: Hlidskjalf, Dual CoreXY August 15, 2017 01:56AM |
Registered: 7 years ago Posts: 249 |
Yea, Lars' is like mine.
I'm wondering if my error is from not homing the axis, though that might be hard given the wonky Y.
Lars posted his config.g back on page 3, here's mine:
I'm wondering if my error is from not homing the axis, though that might be hard given the wonky Y.
Lars posted his config.g back on page 3, here's mine:
; CoreXYU config file for dc42 RADDS firmware

M550 PHlidskjalf 	; Set machine name
G21         		        ; Work in millimetres
G90         		        ; Send absolute coordinates...
M83         		        ; ...but relative extruder moves
M555 P1 			; Set firmware compatibility to look like RepRapFirmare
M575 P1 B57600 S1	; Comms parameters for PanelDue

; Axis and motor configuration
M584 X0 Y1 Z2:5 U3 V4 E6:7 P4           ; Set up steppers for x, y, u, v, z and e, use P4 once it works to hide V
M574 X2 Y2 Z2 U1 S0			   ; set endstop configuration (all endstops at high end except U, active low)

; Core xyu
M669 K5; Select CoreXYU mode
M208 X-5 Y-5 U5 V-5 Z0 S1        ; Set axis minima
M208 X500 Y500 U500 V500 Z500 S0 ; Set axis maxima

; Add R1 for RAPS128 driver chips
M569 P0 S1 R1 ; Drive 0 goes forwards X
M569 P1 S1 R1 ; Drive 1 goes forwards Y
M569 P2 S1 R1 ; Drive 2 goes forwards Z
M569 P3 S1 R1 ; Drive 3 goes forwards E1 aka U
M569 P4 S1 R1 ; Drive 4 goes forwards E2 aka V
M569 P5 S1 R1 ; Drive 5 goes forwards E3 aka Z2
M569 P6 S0 R1 ; Drive 6 goes forwards E4 aka E0
M569 P7 S0 R1 ; Drive 7 goes forwards E5 aka E1
M569 P8 S0 R1 ; Drive 8 goes forwards E6 not used

M350 X32 Y32 U32 V32 Z4:4 E16:16 I0 ; Configure microstepping without interpolation
M42 P67 S0
M42 P68 S255
M42 P69 S0

M92 X160 Y160 U160 V160 Z160:160 						; Set steps per mm
M566 X600 Y600 U600 V600 Z12:12 E60:60 				; Set maximum instantaneous speed changes jerk (mm/min)
M203 X24000 Y24000 U24000 V24000 Z300:300 E1400:1400 	; Set maximum speeds (mm/min)
M201 X1500 Y1500 U1500 V1500 Z250:250 E120:120 			; Set accelerations (mm/s^2)
M906 X1700 Y1700 U1700 V1700 Z1700:1700 E800:800 I30    	; Set motor currents (mA) and motor idle factor in per cent
M84 S30 											; Set idle timeout

; Tool definitions
M563 P0 D0 H1                          	; Define tool 0
G10 P0 S0 R0                        	        ; Set tool 0 operating and standby temperatures
;*** If you have a single-nozzle build, comment the next 2 lines
M563 P1 D1 H2 X3                     	; Define tool 1 and bind it to U-axis (X3)
G10 P1 S0 R0                       	        ; Set tool 1 operating and standby temperatures
M92 E2500:2500                         	; Set extruder steps per mm
|
Re: Hlidskjalf, Dual CoreXY August 15, 2017 02:28AM |
Registered: 6 years ago Posts: 86 |
Doubt it, I have never needed to home axis to get it to work...Quote
prot0typ1cal
I'm wondering if my error is from not homing the axis, though that might be hard given the wonky Y.
If you still want to try you can use G92 to set the pos af all axis and they will marked as homed me think.
|
Re: Hlidskjalf, Dual CoreXY August 15, 2017 03:05AM |
Registered: 6 years ago Posts: 86 |
Hmm...Quote
prot0typ1cal
Yea, Lars' is like mine.
One of the left hand stepper turning clockwise on your printer will move the belt to the right on the back side as far as I can se from the pictures on the first page..?
One of the left hand stepper turning clockwise on my printer will move the belt to the left on the back side....
Edited 2 time(s). Last edit at 08/15/2017 03:07AM by lars.arvidson.
|
Re: Hlidskjalf, Dual CoreXY August 17, 2017 11:20AM |
Registered: 7 years ago Posts: 249 |
Thanks Lars,
Thinking and believing proved me wrong before, so started mucking about with the config.
Systematically flipping S1's and S0's came up with some interesting combinations, none of which were 100%.
Soooo... swapped the U and V cables. Slap me with a trout!
XYUV All S1's, Semper Ubi Sub Ubi.
XU400 x Y360 CoreXYU
Edited 1 time(s). Last edit at 08/17/2017 11:22AM by prot0typ1cal.
|
Re: Hlidskjalf, Dual CoreXY August 17, 2017 02:33PM |
Registered: 6 years ago Posts: 86 |
|
Re: Hlidskjalf, Dual CoreXY August 20, 2017 04:46PM |
Registered: 7 years ago Posts: 249 |
Working out end stops.
So far one end stop for X min (left head), Y max (gantry) and Z min (right ball screw).
For RepRap with RADDS, the Y endstop is plugged into the Y min, even though it's really Y max.
U is a lost cause ATM, ideally trip on the X max RADDS pins. RADDS has XYX min, and XYZ max pin outs available, yet all are not active in firmware. When U trips in the fine move, applies an offset so X and U coordinates are same in respects to nozzles.
As I have a two ballscrew Z, it would be beneficial to have two endstops, for each ballscrew, to prevent out of synch conditions. Don't have a probe so auto-levelling is out.
Z home should then uncouple both into a W and Z axis (yes, they each have separate drivers), then move both together to their individual endstops, wait till both trip, move both away, move both to fine trip. Add offset for level to one Z, re-couple into one axis.
Need to implement the above logic. There's more, but that will at least get me printing I think.
|
Re: Hlidskjalf, Dual CoreXY August 20, 2017 06:04PM |
Registered: 7 years ago Posts: 249 |
Figured, since I require 5 endstops, best to start delving into code again.
Unfortunarely am hitting a wall during compiling. Filamentsensor.cpp is throwing an error that causes compiling to stop.
Don't remember seeing any filament sensor stuff before?
Anyways, here's the blurb:
meh
Unfortunarely am hitting a wall during compiling. Filamentsensor.cpp is throwing an error that causes compiling to stop.
Don't remember seeing any filament sensor stuff before?
Anyways, here's the blurb:
'Building file: ../src/FilamentSensors/FilamentSensor.cpp'
'Invoking: Cross G++ Compiler'
arm-none-eabi-g++ -D__SAM3X8E__ -Dprintf=iprintf -I"C:\Eclipse\Firmware\CoreNG\cores\arduino" -I"C:\Eclipse\Firmware\CoreNG\libraries\Flash" -I"C:\Eclipse\Firmware\CoreNG\libraries\SharedSpi" -I"C:\Eclipse\Firmware\CoreNG\libraries\Storage" -I"C:\Eclipse\Firmware\CoreNG\libraries\Wire" -I"C:\Eclipse\Firmware\CoreNG\asf" -I"C:\Eclipse\Firmware\CoreNG\asf\common\utils" -I"C:\Eclipse\Firmware\CoreNG\asf\common\services\clock" -I"C:\Eclipse\Firmware\CoreNG\asf\sam\drivers\efc" -I"C:\Eclipse\Firmware\CoreNG\asf\sam\drivers\emac" -I"C:\Eclipse\Firmware\CoreNG\asf\sam\drivers\pmc" -I"C:\Eclipse\Firmware\CoreNG\asf\sam\drivers\spi" -I"C:\Eclipse\Firmware\CoreNG\asf\sam\drivers\twi" -I"C:\Eclipse\Firmware\CoreNG\asf\sam\services\flash_efc" -I"C:\Eclipse\Firmware\CoreNG\asf\sam\utils" -I"C:\Eclipse\Firmware\CoreNG\asf\sam\utils\cmsis\sam3x\include" -I"C:\Eclipse\Firmware\CoreNG\asf\sam\utils\header_files" -I"C:\Eclipse\Firmware\CoreNG\asf\sam\utils\preprocessor" -I"C:\Eclipse\Firmware\CoreNG\asf\thirdparty\CMSIS\Include" -I"C:\Eclipse\Firmware\CoreNG\variants\duet" -I"C:\Eclipse\Firmware\RepRapFirmware\src" -I"C:\Eclipse\Firmware\RepRapFirmware\src\Duet" -I"C:\Eclipse\Firmware\RepRapFirmware\src\Duet\Lwip" -I"C:\Eclipse\Firmware\RepRapFirmware\src\Duet\EMAC" -O2 -Wall -c -std=gnu++11 -mcpu=cortex-m3 -mthumb -ffunction-sections -fdata-sections -fno-threadsafe-statics -fno-rtti -fno-exceptions -nostdlib "-Wa,-ahl=FilamentSensor.s" -MMD -MP -MF"src/FilamentSensors/FilamentSensor.d" -MT"src/FilamentSensors/FilamentSensor.o" -o "src/FilamentSensors/FilamentSensor.o" "../src/FilamentSensors/FilamentSensor.cpp"
../src/FilamentSensors/FilamentSensor.cpp: In member function 'bool FilamentSensor::ConfigurePin(GCodeBuffer&, StringRef&, bool&)':
../src/FilamentSensors/FilamentSensor.cpp:46:52: error: invalid conversion from 'void (*)(void*)' to 'void (*)()' [-fpermissive]
   attachInterrupt(pin, InterruptEntry, CHANGE, this);
                                                    ^
../src/FilamentSensors/FilamentSensor.cpp:46:52: error: too many arguments to function 'void attachInterrupt(uint32_t, void (*)(), uint32_t)'
In file included from C:\Eclipse\Firmware\CoreNG\cores\arduino/Core.h:206:0,
                 from C:\Eclipse\Firmware\RepRapFirmware\src/RepRapFirmware.h:31,
                 from ../src/FilamentSensors/FilamentSensor.h:11,
                 from ../src/FilamentSensors/FilamentSensor.cpp:8:
C:\Eclipse\Firmware\CoreNG\cores\arduino/WInterrupts.h:28:6: note: declared here
 void attachInterrupt(uint32_t pin, void (*callback)(void), uint32_t mode);
      ^
make: *** [src/FilamentSensors/FilamentSensor.o] Error 1
meh
|
Re: Hlidskjalf, Dual CoreXY August 20, 2017 06:07PM |
Registered: 10 years ago Posts: 14,672 |
You need to update your CoreNG files and rebuild that project.
The Pins_RADDS.h file says that the U endstop input is Arduino Due pin 39.
Edited 1 time(s). Last edit at 08/20/2017 06:09PM by dc42.
Large delta printer [miscsolutions.wordpress.com], E3D tool changer, Robotdigg SCARA printer, Crane Quad and Ormerod
Disclosure: I design Duet electronics and work on RepRapFirmware, [duet3d.com].
|
Re: Hlidskjalf, Dual CoreXY August 20, 2017 09:02PM |
Registered: 7 years ago Posts: 249 |
Thanks dc42,
Yea an additional error for platform.cpp pointed me in the CoreNG direction. Will update.
Still need to unlock another endstop for W (second Z).
Looks like pin 39 is a PWM off the servo bank, prefer to use X max, and Z max for W.
Trouble ahead.
PanelDue stuff:
Eventually would like to also add a pulse encoder wheel to drive the axis. There's empty pins that are used for the RADDS 4x20 LCD.
Plus, I'm guessing will need to plug in the 10 pin SD header from RADDS to the PanelDue to get the reader to work, though haven't tried it out yet.
For now, will concentrate on endstops, as they are the current priority.
|
Re: Hlidskjalf, Dual CoreXY September 03, 2017 10:47PM |
Registered: 7 years ago Posts: 249 |
Finally got my axis to home properly.
Still need to adjust the minima/maxima to drive XY zero center of the bed.
And add Z offsets for the two heads.
Ran out of M3 nuts to mount my bed, and have 60 odd crimps to patch in the extruders.
One thing at a time :p
Funny, RADDS did not like the W being an invisible axis for dual Z ballscrew homing with endstops.
Here's my config and axis home code:
X homes to the left
U homes to the right
Y homes to the rear
Z homes down
Edited 1 time(s). Last edit at 09/03/2017 11:37PM by prot0typ1cal.
Still need to adjust the minima/maxima to drive XY zero center of the bed.
And add Z offsets for the two heads.
Ran out of M3 nuts to mount my bed, and have 60 odd crimps to patch in the extruders.
One thing at a time :p
Funny, RADDS did not like the W being an invisible axis for dual Z ballscrew homing with endstops.
Here's my config and axis home code:
; CoreXYU config file for dc42 RADDS firmware

M550 PHlidskjalf 	; Set machine name
G21         		; Work in millimetres
G90         		; Send absolute coordinates...
M83         		; ...but relative extruder moves
M555 P1 			; Set firmware compatibility to look like RepRapFirmare
M575 P1 B57600 S1	; Comms parameters for PanelDue

; Axis and motor configuration
M584 X0 Y1 Z2:5 U3 V4 W8 E6:7      ; Set up steppers for x, y, u, v, z and e, must not hide W for dual ballscrew
M574 X1 Y2 Z2 U2 W2 S0			   ; set endstop configuration. X Z and W endstops at min, Y and U max, all NO active low (S0)

; Core xyu
M669 K5; Select CoreXYU mode
M208 X-5 Y-5 U-5 V-5 W-5 Z-5 S1        ; Set axis minima
M208 X400 Y360 U400 V360 W415 Z415 S0  ; Set axis maxima

; Add R1 for RAPS128 driver chips
M569 P0 S1 R1 ; Drive 0 goes forwards X
M569 P1 S1 R1 ; Drive 1 goes forwards Y
M569 P2 S0 R1 ; Drive 2 goes forwards Z
M569 P3 S1 R1 ; Drive 3 goes forwards E1 aka U
M569 P4 S1 R1 ; Drive 4 goes forwards E2 aka V
M569 P5 S0 R1 ; Drive 5 goes forwards E3 aka W
M569 P6 S0 R1 ; Drive 6 goes forwards E4 aka E0
M569 P7 S0 R1 ; Drive 7 goes forwards E5 aka E1
M569 P8 S0 R1 ; Drive 8 goes forwards E6 not used

M350 X32 Y32 U32 V32 W4 Z4:4 E16:16 I0 ;RADDS does not use M350 but RRF does seem to need this info
; The following sets the RADDS extension board microsteps, uncomment only one set
; 1/4
; M42 P67 S0
; M42 P68 S255
; M42 P69 S0

; 1/8
; M42 P67 S255
; M42 P68 S255
; M42 P69 S0

; 1/16
M42 P67 S0
M42 P68 S0
M42 P69 S255

; 1/32
; M42 P67 S255
; M42 P68 S0
; M42 P69 S255

; 1/64
; M42 P67 S0
; M42 P68 S255
; M42 P69 S255

; 1/128
; M42 P67 S255
; M42 P68 S255
; M42 P69 S255

M92 X160 Y160 U160 V160 W160 Z160:160 						 ; Set steps per mm
M566 X600 Y600 U600 V600 W12 Z12:12 E60:60 				     ; Set maximum instantaneous speed changes jerk (mm/min)
M203 X30000 Y30000 U30000 V30000 W3000 Z3000:3000 E1400:1400 ; Set maximum speeds (mm/min)
M201 X1500 Y1500 U1500 V1500 W250 Z250:250 E120:120 		 ; Set accelerations (mm/s^2)
M84 S30 											         ; Set idle timeout

; Tool definitions
M563 P0 D0 H1                       	; Define tool 0
G10 P0 S0 R0                        	; Set tool 0 operating and standby temperatures

;*** If you have a single-nozzle build, comment the next 2 lines
M563 P1 D1 H2 X3                     	; Define tool 1 and bind it to U-axis (X3)
G10 P1 S0 R0                       	    ; Set tool 1 operating and standby temperatures
M92 E2500:2500                       	; Set extruder steps per mm
X homes to the left
; homex.g
; called to home the X axis

G91
; Move quickly to X axis endstop and stop there (first pass)
G1 X-400 F1800 S1

; Go back a few mm
G1 X5 F600

G90
; Move slowly to X axis endstop once more (second pass)
G1 X-400 F300 S1

G92 X0
U homes to the right
; homeu.g
; called to home the U axis

G91
; Move quickly to X axis endstop and stop there (first pass)
G1 U400 F1800 S1

; Go back a few mm
G1 U-5 F600

G90
; Move slowly to X axis endstop once more (second pass)
G1 U400 F300 S1

G92 U400
Y homes to the rear
; homey.g
; called to home the Y axis

G91
; Move quickly to Y axis endstop and stop there (first pass)
G1 Y360 F1800 S1

; Go back a few mm
G1 Y-5 F600

G90
; Move slowly to Y axis endstop once more (second pass)
G1 Y360 F300 S1

G92 Y360
Z homes down
; homez.g
; called to home the Z axis
G91

; Split Z into Z and W
M584 Z2 W5

; Move quickly to Z axis endstop and stop there (first pass)
G1 Z500 W500 F1800 S1

; Go back a couple mm on Z
G1 Z-2 W-2 F600

; Move slowly to Z axis endstop once more (second pass)
G1 Z4 W4 F300 S1

;Add offset by changing 0 to some distance to level bed
G1 Z0 W-0.83

; Combine Z and W
M584 Z2:5 W8

; Set Z position value
G92 Z415
G90
Edited 1 time(s). Last edit at 09/03/2017 11:37PM by prot0typ1cal.
|
Re: Hlidskjalf, Dual CoreXY September 09, 2017 08:04PM |
Registered: 7 years ago Posts: 249 |
Putting together my heated bed in preparation of the glossy black Printbite on its way from the UK.
Bed is made of 1/4" ATP-5 aluminum, 300x300 ReRrap Big Bed, 2mm of silicone, and 1/2" of cloth fiber garolite (CE).
The garolite has been pocketted for the heater and silicone.
Looking more like a 3d printer now
Bed is made of 1/4" ATP-5 aluminum, 300x300 ReRrap Big Bed, 2mm of silicone, and 1/2" of cloth fiber garolite (CE).
The garolite has been pocketted for the heater and silicone.

Looking more like a 3d printer now

|
Re: Hlidskjalf, Dual CoreXY September 09, 2017 08:04PM |
Registered: 7 years ago Posts: 249 |
Putting together my heated bed in preparation of the glossy black Printbite on its way from the UK.
Bed is made of 1/4" ATP-5 aluminum, 300x300 RepRap Big Bed, 2mm of silicone, and 1/2" of cloth fiber garolite (CE).
The garolite has been pocketted for the heater and silicone.
Looking more like a 3d printer now
Edited 1 time(s). Last edit at 09/09/2017 09:52PM by prot0typ1cal.
Bed is made of 1/4" ATP-5 aluminum, 300x300 RepRap Big Bed, 2mm of silicone, and 1/2" of cloth fiber garolite (CE).
The garolite has been pocketted for the heater and silicone.
Looking more like a 3d printer now
Edited 1 time(s). Last edit at 09/09/2017 09:52PM by prot0typ1cal.
|
Re: Hlidskjalf, Dual CoreXY September 10, 2017 05:56PM |
Registered: 7 years ago Posts: 249 |
Been mapping the RADDS v1.5 board, cause there's a bunch of stuff I want to do for this project.
Like a handle jog wheel and PWM for the 2x filament fans.
Coming up with only a few pin conflicts:
Pin 2 and 3 are used by both the thermisters T2 and T3, and Z axis Step and Direction.
Pin 5 is used by PWM1 and AUX_ADC.
AUX_ADC is required to use for a Z probe as it must be ADC enabled pin.
I imagine the higher unassigned pins (70, 72, 73 and 77) probably are part of the External CD pin outs.
A few probably aren't used at all by RADDS. Pins 54 thru 59 are most likely just ground pins as 53+ pins for Due are just that.
Anyways, here's what I got ATM:

|
Re: Hlidskjalf, Dual CoreXY September 10, 2017 09:16PM |
Registered: 7 years ago Posts: 249 |
By comparison, the Due, and so the RADDS as well, has an "A" and "P" channel. So A0 through A11 can have a corresponding P value.
This image provided by angelo is in the same orientation as the image above:
To help understand all of this, GrayNomad published this guide years ago, however the dual bank is down instead of to the right like the previous two images:
Question is, how does RRF know the difference between A5 and P5 ?
This image provided by angelo is in the same orientation as the image above:

To help understand all of this, GrayNomad published this guide years ago, however the dual bank is down instead of to the right like the previous two images:

Question is, how does RRF know the difference between A5 and P5 ?
|
Re: Hlidskjalf, Dual CoreXY September 10, 2017 11:06PM |
Registered: 7 years ago Posts: 249 |
LOL, After setting up the bed heater in the config.g
Everything looked good, solid leads, correct temperature on PanelDue.
Turned on the bed to 60C and promptly popped the 15 amp fuse !!!
Is there a way to limit current (PID?) or is it a bang-bang thing?
Perhaps should inch it up a few degrees C at a time?, dunno if there's a metric saying for this.
Everything looked good, solid leads, correct temperature on PanelDue.
Turned on the bed to 60C and promptly popped the 15 amp fuse !!!
Is there a way to limit current (PID?) or is it a bang-bang thing?
Perhaps should inch it up a few degrees C at a time?, dunno if there's a metric saying for this.
|
Re: Hlidskjalf, Dual CoreXY September 11, 2017 01:31AM |
Registered: 8 years ago Posts: 5,232 |
Even in PID mode the current will be 100% in the beginning unless you limit it in the bed config parameters. It's the S-parameter.
|
Re: Hlidskjalf, Dual CoreXY September 12, 2017 04:05PM |
Registered: 6 years ago Posts: 1 |
Hi,
you can use [www.reprap.me] external Controller max 80A
greetings
Edited 1 time(s). Last edit at 09/13/2017 03:24PM by hliebscher.
you can use [www.reprap.me] external Controller max 80A
greetings
Edited 1 time(s). Last edit at 09/13/2017 03:24PM by hliebscher.
|
Re: Hlidskjalf, Dual CoreXY September 13, 2017 03:12AM |
Registered: 7 years ago Posts: 249 |
Thanks!
Yea, my PSU can pour out 40 amps, so be good to uncork it on the heated bed rather than squeezing juice down to only 15 amps.
Prolly heat up a skosh faster as well.
For now, grabbed a pack of fuses, so try out the S parameter. Thanks o_lampe
|
Re: Hlidskjalf, Dual CoreXY September 15, 2017 03:34PM |
Registered: 7 years ago Posts: 249 |
|
Re: Hlidskjalf, Dual CoreXY September 24, 2017 12:53AM |
Registered: 7 years ago Posts: 249 |
The TE717 works great !
Still had to supply the RADDS heatbed inputs with current for the ouputs to work, no big deal.
Need to remachine the Garolite backer as well, it's totally not flat and wants to distort the aluminum print surface.
On the plus side, it gets hot really fast. Less than a minute from 20 to 60 C, though bang bang is a little annoying to maintain temps with the PSU constantly ramping up and down.
Currently machining a vitamin kit, that will replace some of the 3dprinted brackets with billet aluminum.
While the 3dprinted brackets did allow proof of concept, they've contributed to alignment and backlash issues.
Also received the black printbite from F3D, looks fantastic, can't wait to try it out
Printbite
Still had to supply the RADDS heatbed inputs with current for the ouputs to work, no big deal.

Need to remachine the Garolite backer as well, it's totally not flat and wants to distort the aluminum print surface.
On the plus side, it gets hot really fast. Less than a minute from 20 to 60 C, though bang bang is a little annoying to maintain temps with the PSU constantly ramping up and down.
Currently machining a vitamin kit, that will replace some of the 3dprinted brackets with billet aluminum.
While the 3dprinted brackets did allow proof of concept, they've contributed to alignment and backlash issues.
Also received the black printbite from F3D, looks fantastic, can't wait to try it out
Printbite
|
Re: Hlidskjalf, Dual CoreXY October 15, 2017 08:44PM |
Registered: 6 years ago Posts: 8 |
Quote
bobbyd
Hey guys, add one more to the race! I've been doing some searching for quite some time for a 3D printer to design and build until I stumbled across this. I think the corexyu looks like a fantastic design. I am currently designing all of the parts in autocad and am mostly done doing so. I hope to be finished designing and testing various parts by august, and then be done building it by the end of august. My design is going to have...
I'm hoping that by the time I finish building the printer the triple z axis leveling feature will have been implemented into reprapfirmware.
- 200mm x 200mm x 300mm build volume
- Duet Wifi and Duex5
- Dual E3D Titan Aeros
- Extreme part cooling for PLA prints
- 12mm XYU axis rods with Igus Drylin bearings
- Nema 23 0.9deg XYU stepper motors for extra torque and accuracy
- 10mm width gt2 belt
- MK42 heated bed
- 4 Contact points on bed corners (taz 6 like auto leveling)
- Triple z axis for bed leveling adjustment
- 24V Power for smoother stepper motor movement
- Brass wire brush along Y axis to clean inactive nozzle
- Hardened steel nozzles
- and more...
Thanks prot0typ1cal for all of the information on the corexyu. I wouldn't have been able to make a project like this without it. Good luck guys!
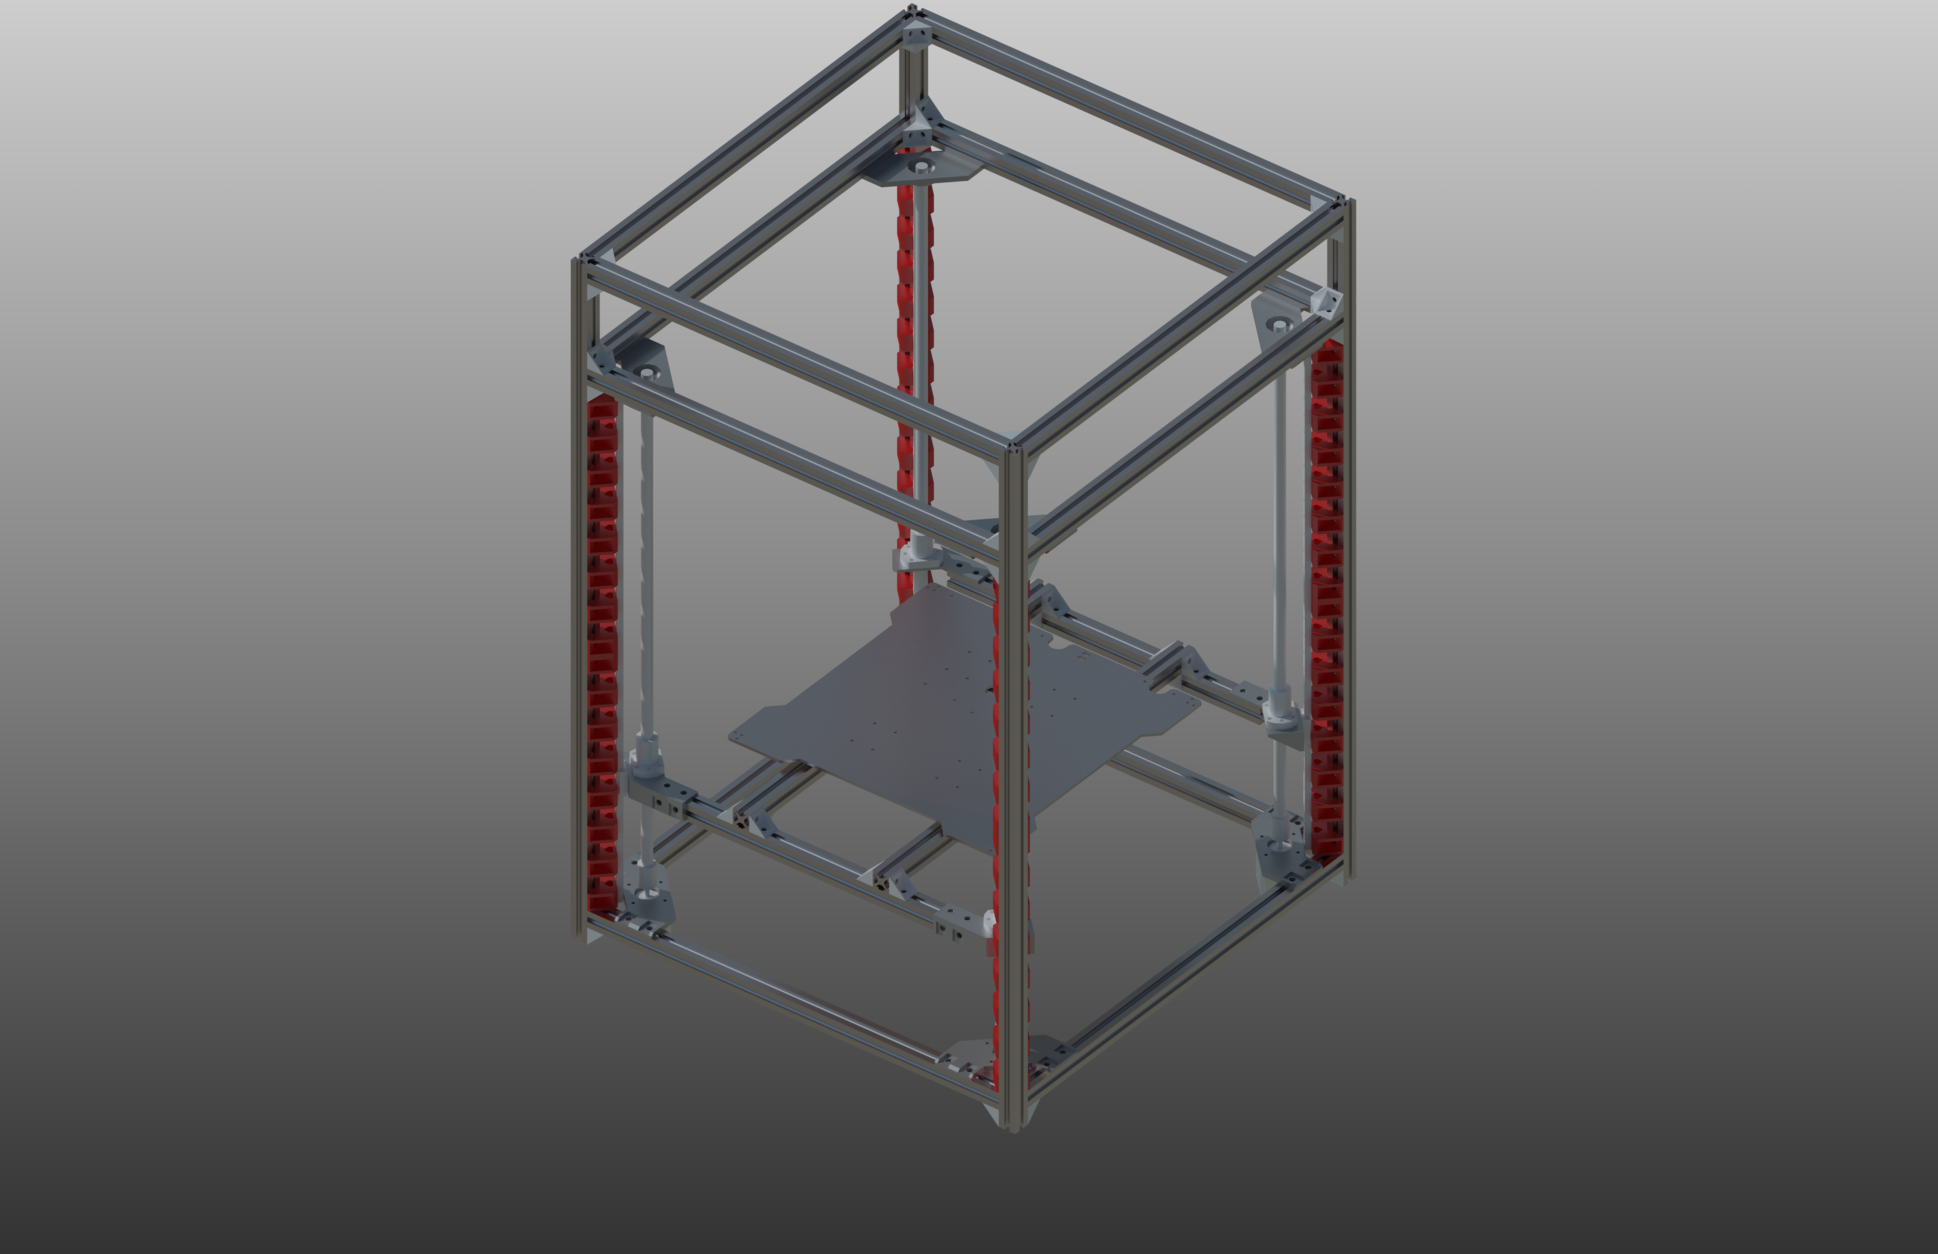
So I am just now starting my CoreXYU build after a hectic few months. I decided to redesign the printer in AutoCad again as the previous design just became a huge work around. I have changed a few things on the previous list. My design will feature...
300mm x 300mm x 500mm
Dual E3D Titans (not aero) with the volcano hotend
half decent linear rails for all axis
quad linear rails and ball screws for the z axis (bed leveling)
and lulzbot nozzle wipes
Everything else is the same This time I am starting from the ground up instead of designing the CoreXYU mechanics first because I think that was my big mistake. I have finished designing the entire z axis and have attached a rendering (please excuse the quality I've never done a rendering in AutoCad before). I expect to have everything in the rendering built by the end of November (I am being more realistic about my time frame this time). I'll keep you guys posted and probably post pics of the rendering actually built once its finished.
|
Re: Hlidskjalf, Dual CoreXY October 16, 2017 01:23AM |
Registered: 8 years ago Posts: 5,232 |
4 ballscrews and 4 linear rails will fail. This is overconstraint twice ( is that the right word? )
IMHO two rails and 3 ballscrews will be better.
Also, I wouldn't put bearings on top of the ballscrews, but selfaligning (thrust-) bearings on the bottom end. Use pulleys and closed loop belts to drive them.
IMHO two rails and 3 ballscrews will be better.
Also, I wouldn't put bearings on top of the ballscrews, but selfaligning (thrust-) bearings on the bottom end. Use pulleys and closed loop belts to drive them.
|
Re: Hlidskjalf, Dual CoreXY October 16, 2017 02:01AM |
Registered: 6 years ago Posts: 8 |
Quote
o_lampe
4 ballscrews and 4 linear rails will fail. This is overconstraint twice ( is that the right word? )
IMHO two rails and 3 ballscrews will be better.
Also, I wouldn't put bearings on top of the ballscrews, but selfaligning (thrust-) bearings on the bottom end. Use pulleys and closed loop belts to drive them.
I'm not sure what you mean by over constraint. And are you saying the linear rail in conjunction with the ball screw is over constraint or the aluminum rods connecting the four corners. Also I'm super OCD so having 3 ball screws with 2 linear rails is very displeasing to me. Its why I did 4 rails and ballscrews. And I'm fine with the motor directly connected to the ballscrew with a bearing holder on top. I want to make it as simple as possible. And as symmetrical as possible...


Sorry, only registered users may post in this forum.