Overengineered CoreXY
Posted by anvoice
|
Overengineered CoreXY January 27, 2017 03:34AM |
Registered: 9 years ago Posts: 238 |
Hello everyone,
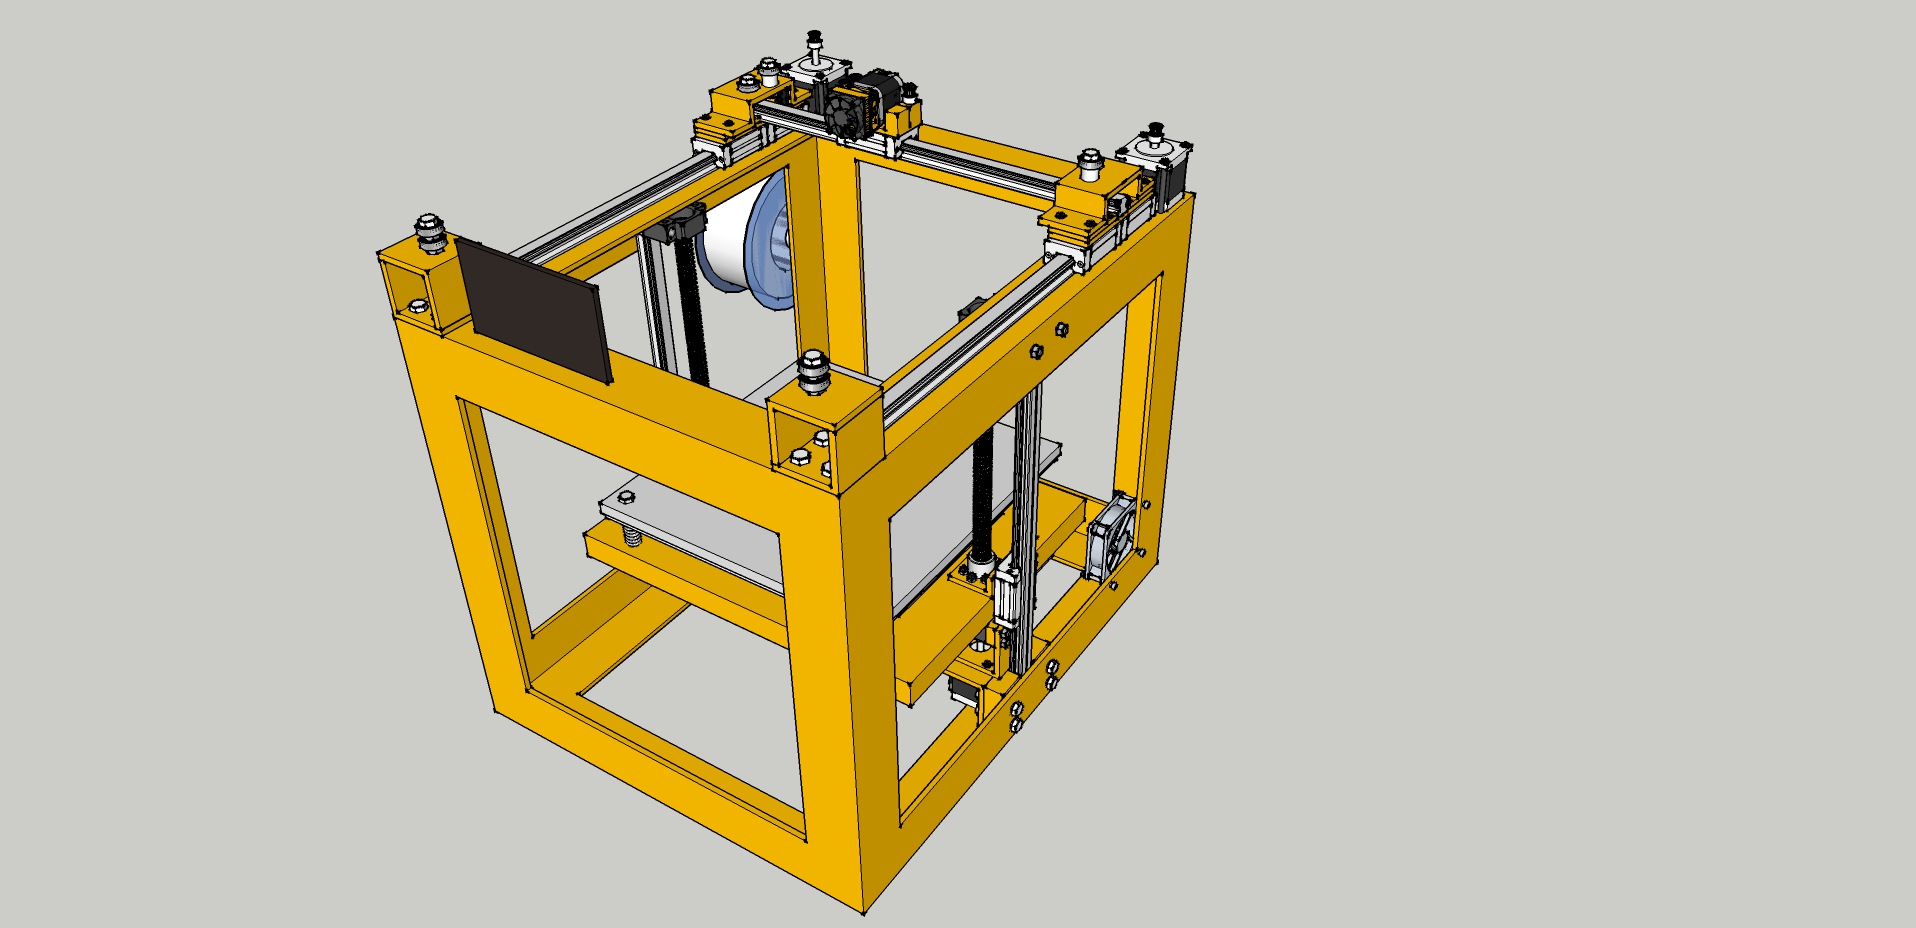
While I have not yet finished my first corexy, I naturally felt the need to start designing my second. You know how it goes. The first machine is probably nothing to look at, as I started building it as a complete novice. The second may be a little more interesting, mainly because I decided to over engineer it to the max. Attached is a rough sketch of a rough design of the printer.
I'm planning on using 2.5"x2.5"x.25" steel angle for the frame. Yes, you'll need to be a bodybuilder to lug this thing around. I'll either weld it together myself or have it welded depending on availability of this service in my area. I may get a bulldozer instead of a 3d printer, but might as well go all out.
I'll use 20mm linear guides for all axes: 2x for the y and z, 1x for the x axis. Nema 23 2A motors (at least 180oz-in) to drive it around. The z axis will use 1605 ballscrews for positioning. If I find the slightest traces of imperfection in the guise of z banding etc., I'll switch to better quality screws.
For electronics I'm planning on the duet wifi with a 7" lcd for control, as I have high expectations for its performance (*looks at dc42) and future upgradability.
The main idea is to get prints with absolute emphasis on quality. I'd be interested in seeing how using precise positioning components compares with the traditional approach taken to many 3d printers (round guiding rail, less-than rigid frames, or even the delta kinematics). Naturally as I'm posting this in the corexy section, this will be a corexy build. I'll probably start assembling components together as soon as I finalize the drawings, barring some major flaws discovered in the design by myself or others. Let me know if this has anyone even mildly interested and I'll try to keep the progress outlined here as I go along.
|
Re: Overengineered CoreXY January 27, 2017 04:49AM |
Registered: 8 years ago Posts: 346 |
For the size of the printer i think this design is a little too much...
nema23 for a 3d printer? The move the carriage you do not need so much force. Is look like more you are building a cnc and not a 3d printer.
Having rigidity on the frame e moving mechanism is important, but do not Over engineer everything.
For example, each of your Y rails was 2 blocks. one block or two block you get the same print quality. But using two block you lose space and add friction, so i think is better to have only one.
Over engineer the main frame or z axis i do not see any problem where, but not the corexy mechanism.
You will gain more print quality if you focus on building a rigid and at the same time light moving mechanism.
other observation, the pulley are on the top on a square metal support. I think is better to increase the square length and put the pulleys inside.
Edited 1 time(s). Last edit at 01/27/2017 04:54AM by filipeCampos.
|
Re: Overengineered CoreXY January 27, 2017 04:56AM |
Registered: 9 years ago Posts: 238 |
I can always remove an extra block and test to see if print quality deteriorates. The reason I have on the y 2 right now is to combat possible torque forces on the H-bot design. As I mentioned, I want the best print quality possible.
As a newbie engineer, I'm making a lot of assumptions, but I don't see any way around that.
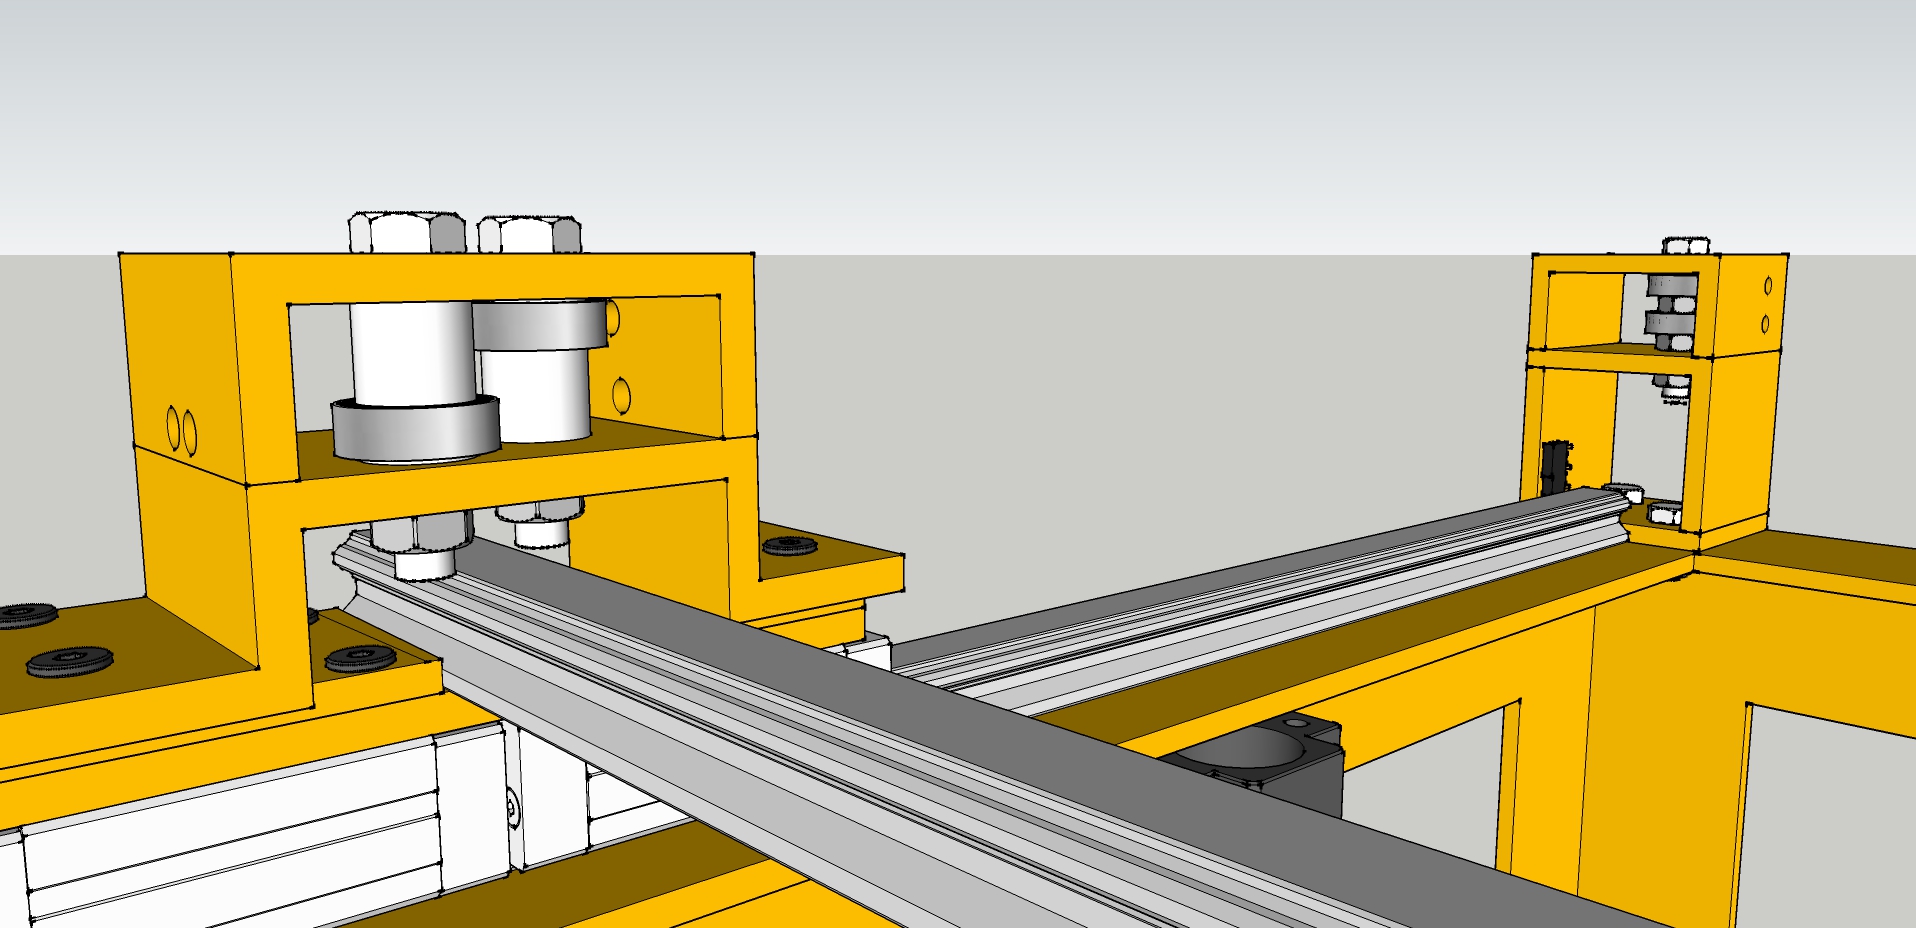
As far as the pulleys go, I think I like that idea. Basically add to the stiffness of the pulley system? I'll incorporate that into the design.
Edit: attached is the new design for the pulleys based on your idea.
Edited 2 time(s). Last edit at 01/27/2017 05:25AM by anvoice.
As a newbie engineer, I'm making a lot of assumptions, but I don't see any way around that.
As far as the pulleys go, I think I like that idea. Basically add to the stiffness of the pulley system? I'll incorporate that into the design.
Edit: attached is the new design for the pulleys based on your idea.
Edited 2 time(s). Last edit at 01/27/2017 05:25AM by anvoice.
|
Re: Overengineered CoreXY January 27, 2017 07:56AM |
Registered: 8 years ago Posts: 346 |
using one block or two i pretty sure it will give a print quality identical. By default if you use good quality rails the rigidity of only one block will guaranty very high rigidity for a 3d printer.
Not only rigidity is important, there are other aspect of a printer that affect a great dead on the final print quality:
-To avoid artifact problems on the print and fast print speed you need to have a low mass carriage.
-A direct extruder is more easy to setup and give better result on retractions and some difficult filaments.
-32bit board
-A good hotend that not jam.
-good extruder that have a good force and can push corretly the filament.
-For printing PLA the fan is a factor key. The faster it will cooldown the pla the better, but without affecting the temp of the bed or nozzle. hotend sock is a good option in this situation.
-For ABS the enclosure is a factor key.
-the slider and the configuration used: there are slider to simply give better results than other. in my opinion: Simplify3D > Slic3r > cura. So far for me Simplify3D is the best and cura is the easy one to use
If your goal is print quality you need first to decide for what type of filament the printer will be used, you can build a great printer for abs that will be very bad for pla and vice versa.
Edited 1 time(s). Last edit at 01/27/2017 08:00AM by filipeCampos.
|
Re: Overengineered CoreXY January 27, 2017 09:12AM |
Registered: 11 years ago Posts: 5,780 |
I'm all about overbuilding things, but steel is going to be awfully heavy. Better put some casters on it because you won't be setting in on furniture. Steel is cheap- extend the verticals so it stands on the floor and puts the mechanism at a convenient, reachable height. But since it's going to be tall, you might as well extend the Z axis.,,,
and end up with something like this:
You shouldn't need NEMA-23 motors for the XY stage, and probably won't want them. They tend to vibrate a lot (read: noise) compared to NEMA-17 motors, and won't accelerate as quickly as NEMA-17 because of the mass of the rotors. You really shouldn't need the higher torque that NEMA-23 motors can deliver, unless your moving masses are really high (3 extruders, etc.). How big is the bed going to be? A NEMA-17 motor may be sufficient to lift the bed depending on the screw pitch. I would avoid using multiple motors to drive multiple screws- belt them together to drive with a single motor. Ball screws tend to have longer pitch that may allow the bed to drop if the power to the Z axis motor is lost for any reason (power switched off, power failure, cat chewing through wires, controller reset, or driver failure). It would be a good idea to plan for some means of preventing bed drop, especially if the bed is big/heavy.
If you're bolting the Y axis guide rails to the welded frame it will be critical to ensure that the frame is welded accurately, which isn't likely to happen unless you pay a lot for the job. It would be best to mill the surface with a pair of flat, level, parallel slots for the guide rails to sit in. You might consider designing the rigid frame as one piece and then making the critical XY and Z axis parts bolt into it. In my printer, I prepared the XY stage as a separate module whose position can be adjusted within the machine's frame. I did the same with the Z axis- those critical parts and be repositioned and adjusted for orthogonality.
That brings up another point. The order in which you design things can make your life easy or miserable. Most people design printers so the linear motion components of the printer become part of the frame. That's OK if the frame is bolted together and you can easily unbolt it to make changes as needed. But a welded frame is a different animal. You can't change it easily, so it's better to design the linear motion parts of the printer as separate modules that bolt into the frame. It's much easier to design the XY and Z modules first, then design the frame around them, than to build a frame and try to make the other parts fit into it. When you design the frame, give yourself a couple mm extra space to allow for inaccuracies in the frame construction and to make positional adjustments of the XY and Z modules. Another problem with using the linear motion as part of the frame is that it makes it difficult to enclose the printer. When guide rails, pulleys, bearing blocks and motors extend beyond the sides of the frame, the enclosure becomes much larger and you can only attach it to the printer frame with difficulty. Nothing is easier to enclose than a rectangular solid with flat sides- just attach flat panels. Even if you don't intend to enclose it now, you may want to in the future. Making your machine enclosable now may save you a complete rebuild later.
Similarly, when designing the XY stage, start at the extruder carriage and figure out how big it needs to be to accommodate all the stuff it's going to have to carry- extruder(s), fans, LEDS, circuit boards, belt clamps, etc. Once you have it roughly figured out (don't worry, it's going to change before you're done), figure out how long the guides have to be to move the extruder over the entire bed (plus a few mm), then shop for linear guides that are long enough- don't worry about actual length- they can be cut. Once you have the linear guides in hand, start designing the support structure to fit them. If you start by designing specific linear guides into the machine, you'll have to get those specific guides to build the machine, by paying full retail price, rapidly driving cost up.
Edited 3 time(s). Last edit at 01/27/2017 01:18PM by the_digital_dentist.
Ultra MegaMax Dominator 3D printer: [drmrehorst.blogspot.com]
and end up with something like this:

You shouldn't need NEMA-23 motors for the XY stage, and probably won't want them. They tend to vibrate a lot (read: noise) compared to NEMA-17 motors, and won't accelerate as quickly as NEMA-17 because of the mass of the rotors. You really shouldn't need the higher torque that NEMA-23 motors can deliver, unless your moving masses are really high (3 extruders, etc.). How big is the bed going to be? A NEMA-17 motor may be sufficient to lift the bed depending on the screw pitch. I would avoid using multiple motors to drive multiple screws- belt them together to drive with a single motor. Ball screws tend to have longer pitch that may allow the bed to drop if the power to the Z axis motor is lost for any reason (power switched off, power failure, cat chewing through wires, controller reset, or driver failure). It would be a good idea to plan for some means of preventing bed drop, especially if the bed is big/heavy.
If you're bolting the Y axis guide rails to the welded frame it will be critical to ensure that the frame is welded accurately, which isn't likely to happen unless you pay a lot for the job. It would be best to mill the surface with a pair of flat, level, parallel slots for the guide rails to sit in. You might consider designing the rigid frame as one piece and then making the critical XY and Z axis parts bolt into it. In my printer, I prepared the XY stage as a separate module whose position can be adjusted within the machine's frame. I did the same with the Z axis- those critical parts and be repositioned and adjusted for orthogonality.
That brings up another point. The order in which you design things can make your life easy or miserable. Most people design printers so the linear motion components of the printer become part of the frame. That's OK if the frame is bolted together and you can easily unbolt it to make changes as needed. But a welded frame is a different animal. You can't change it easily, so it's better to design the linear motion parts of the printer as separate modules that bolt into the frame. It's much easier to design the XY and Z modules first, then design the frame around them, than to build a frame and try to make the other parts fit into it. When you design the frame, give yourself a couple mm extra space to allow for inaccuracies in the frame construction and to make positional adjustments of the XY and Z modules. Another problem with using the linear motion as part of the frame is that it makes it difficult to enclose the printer. When guide rails, pulleys, bearing blocks and motors extend beyond the sides of the frame, the enclosure becomes much larger and you can only attach it to the printer frame with difficulty. Nothing is easier to enclose than a rectangular solid with flat sides- just attach flat panels. Even if you don't intend to enclose it now, you may want to in the future. Making your machine enclosable now may save you a complete rebuild later.
Similarly, when designing the XY stage, start at the extruder carriage and figure out how big it needs to be to accommodate all the stuff it's going to have to carry- extruder(s), fans, LEDS, circuit boards, belt clamps, etc. Once you have it roughly figured out (don't worry, it's going to change before you're done), figure out how long the guides have to be to move the extruder over the entire bed (plus a few mm), then shop for linear guides that are long enough- don't worry about actual length- they can be cut. Once you have the linear guides in hand, start designing the support structure to fit them. If you start by designing specific linear guides into the machine, you'll have to get those specific guides to build the machine, by paying full retail price, rapidly driving cost up.
Edited 3 time(s). Last edit at 01/27/2017 01:18PM by the_digital_dentist.
Ultra MegaMax Dominator 3D printer: [drmrehorst.blogspot.com]
|
Re: Overengineered CoreXY January 27, 2017 12:29PM |
Registered: 7 years ago Posts: 249 |
|
Re: Overengineered CoreXY January 27, 2017 12:48PM |
Registered: 11 years ago Posts: 1,049 |
One has to assess what effects print quality
and
Knock off the items on the list to get at quality prints
Never have seen a list of what drives quality printing.
Digital Dentist may be able to provide his hit list.
Really does a Steel frame, welded together, never to be adjusted, make it better, less frustrating.
Is this going to be a M1A1 battle printer?
Does a PLA cooler fan really work -- or prevent layer to layer adhesion?
A good hotend that doesn't jam ----- Holy Grail of FFF printing
Do you really need print to be completed in 26 sec ? 50m/sec filament feed rate 100m/sec XY speeds.
you want a rock solid printer --- save up your money buy a 3D systems projet series printer
(I don't see any steel angle iron welded up on it???)
|
Re: Overengineered CoreXY January 27, 2017 01:19PM |
Registered: 8 years ago Posts: 346 |
to responde to this let me ask other question:Quote
cozmicray
Does a PLA cooler fan really work -- or prevent layer to layer adhesion?
can you tell me a good pla printer that does not have one or more cooling pla fan?
If is planning to build a printer for pla is need to plan the space for one or more fans.
E3D v6 little: it was a ptfe tube that goes from the extruder diretly to the nozzle, very dificult to get a jam.Quote
cozmicray
A good hotend that doesn't jam ----- Holy Grail of FFF printing
if possible without lossing print quality them YES. This is common sense...Quote
cozmicray
Do you really need print to be completed in 26 sec ? 50m/sec filament feed rate 100m/sec XY speeds.
where is the fun of this? this forum is about building printer and not selling them..Quote
cozmicray
you want a rock solid printer --- save up your money buy a 3D systems projet series printer
what wrong with the list I have done?Quote
cozmicray
One has to assess what effects print quality
and
Knock off the items on the list to get at quality prints
Never have seen a list of what drives quality printing.
Having a bad day? from your last post and if your are a amercian i pretty sure you voted trump..
Edited 1 time(s). Last edit at 01/27/2017 01:22PM by filipeCampos.
|
Re: Overengineered CoreXY January 27, 2017 02:15PM |
Registered: 11 years ago Posts: 5,780 |
Many print quality problems boil down to unintended motion of the extruder relative to the bed. If the extruder goes exactly where it is supposed to and the bed doesn't move around while the extruder is moving, the print quality will be very high. If you want high quality prints, you have to ferret out all the sources of unwanted/unintended relative motion between the bed and the extruder. One way to think about things is to try to understand the underlying assumptions we make about them. For example, inexperienced people tend to assume that printer frames and guide rails don't flex, that bearings don't have any play, that everything behaves ideally. What you have to do it think about how something can behave in a nonideal way and what that might do to the print, and how to prevent that nonideal behavior from occurring or from influencing the print.
Problems in printer mechanism that lead to print quality degradation:
1) Flexible frame construction. If the frame flexes and wobbles while the extruder carriage is moving and starting and stopping, the bed better wobble right along with it. It's nearly impossible to guarantee that, so it's best to make everything very rigid. If plastic parts in the frame improve its rigidity, the frame's structural elements are too flexible to start with. Use metal to metal connections. If it's too flexible that way, use larger cross section frame members. Wood and "wood products" warp with temperature and humidity changes.
2) Flexible and non parallel guide rails- if the rails flex due to forces in the mechanism, the extruder or bed will move in ways it shouldn't. CAD designs are based on the X,Y, and Z axes being orthogonal. If the rails aren't aligned parallel to each other in each axis and orthogonal to the other axes, it will be impossible to print anything accurately. That means you won't be able to print functional, threaded, screw-together assemblies, gears, tightly fitting lids, etc. Using linear guides fixes most of the nonparallel problems. Designing the orthogonality to be adjustable, then testing and adjusting it fixes orthogonality issues.
3) Sloppy bearings- most of the low cost bearings for low cost round rails are loose, sometimes by design, sometimes as a result of poor quality construction/fit to the rail. Quality linear guides (not the cheap knock-offs of HiWin guides, but real HiWin guides and any of the Japanese, German, or US made guides) pretty much fix this problem.
4) Expecting too much from the motors, belts, and electronics. Trying to print too fast, and/or with acceleration and jerk set too high, results in bad prints. Belts stretch. Moving masses can't be started and stopped instantly. Motors and belts act like springs. This sort of stuff is seen as layer shifting or ringing in prints at sharp corners in surfaces that are parallel to the higher moving mass axis, usually the Y axis in CoreXY and "i" type Cartesian printers.
5) Thermal expansion can create problems- the most common example being heated bed flexing due to bang-bang temperature "control" causing an undulating print surface in the Z axis. Thermal effects can cause other problems, too.
6) Using multiple motors to lift the Z axis. Relying on multiple steppers to stay in sync is asking for trouble. Sooner or later they are going to shift and ruin the orthogonality of the Z axis with XY plane. Usually this causes first layer adhesion issues before you notice that the orthogonality is off. Most people notice it when their bed levelers run out of adjustment range on one side.
There are a lot of issues associated with keeping the first layers of prints stuck to the bed (corners lifting is a print quality problem), extruder behavior (over and under extrusion, retraction), and slicer settings (almost everything), too.
Ultra MegaMax Dominator 3D printer: [drmrehorst.blogspot.com]
|
Re: Overengineered CoreXY January 27, 2017 02:19PM |
Registered: 7 years ago Posts: 249 |
Quote
filipeCampos
Having a bad day? from your last post and if your are a amercian i pretty sure you voted trump..
Working on a larger version, with faster print speed:

Edited 2 time(s). Last edit at 01/27/2017 02:21PM by prot0typ1cal.
|
Re: Overengineered CoreXY January 27, 2017 04:32PM |
Registered: 9 years ago Posts: 238 |
Thanks for the (mostly critical?) input everyone.
I have a heavy-duty table that I'll probably use for the printer, so I'm not sure yet if I'll be putting casters on it. I realize I'll have difficulty aligning the XY mechanism, but it's a challenge I'm willing to take up. I feel a welded steel frame is a really elegant solution provided I can get reasonable alignment.
The printer bed size is 14"x14"x0.5". Not all of that is printable area, but a good chunk in the middle is. I'm thinking due to the weight of the bed and the steel angle element it sits on, I will need
I'm all for machining the linear guide surfaces. The local makerspace has a mill so I'll probably use that (now I just need to learn how to use it).
The other factors mentioned I'm thinking about. I'll definitely enclose the machine for ABS prints (thinking of using 3mm extruded acrylic for the enclosure). About the kind of plastic: I'm thinking of making this machine versatile enough to use anything I throw at it, including engineering and high-temperature plastics. That means enclosure and a good hotend (not yet decided which yet). Cooling fan is an important detail, but that can be retrofitted at almost any time, I think the frame/linear motion design is considerably more critical.
Finally, I agree that there is no fun in getting a ready system. Designing my own is far more interesting and rewarding.
Please keep the critiques coming, I'm all for improving my design.
|
Re: Overengineered CoreXY January 27, 2017 04:57PM |
Registered: 11 years ago Posts: 5,780 |
I'd talk to the people at the makerspace about what you're doing before you weld the frame together. Milling machines have limited addressable volume and your printer frame might exceed the limits if you weld it together before milling.
OTOH, if you mill it before you weld it you're right back to the alignment problem you wanted to fix by milling the frame.
This sort of stuff is where the fun lies in building 3D printers. You not only have to design it, but you also have to figure out how to build it.
Ultra MegaMax Dominator 3D printer: [drmrehorst.blogspot.com]
|
Re: Overengineered CoreXY January 27, 2017 05:03PM |
Registered: 7 years ago Posts: 249 |
anvoice,
Regarding your frame, if you make the corner spars taller, you can still mount your CoreXY stuff inside the 90 via adjustable brackets so machining is not required, and keeps your top flat for the enclosure.
If tall enough, the filament spool will also be inside, no escape for the warm air. I think DD said he is doing this for his Trump tower. Sry DD, no offense intended.
The extra cost/weight of the angle is far less than the added benefits.
Suggest you invert the angle iron for the bottom sides. This allows for a flat shelf that is easily cleaned, and provide a protected, open bottom for your electronics.
The coefficient for thermal expansion for steel is about half that of aluminum, neighborhood of .0006"/100 F/inch. F'yea, I'm Murican. So try to match your enclosure panels to be about the same.
Since you're going for an enclosure, maybe use perforated 90 degree steel (stuff used for racks and shelves). Lightens the whole weight and provides easy mounting.
Consider painting the steel, ounce of prevention, unless it's gonna be stainless :p
Edited 2 time(s). Last edit at 01/27/2017 05:05PM by prot0typ1cal.
|
Re: Overengineered CoreXY January 27, 2017 07:45PM |
Registered: 9 years ago Posts: 238 |
I'll have to think about this one. I doubt their mill will have enough volume to machine after welding.Quote
the_digital_dentist
I'd talk to the people at the makerspace about what you're doing before you weld the frame together. Milling machines have limited addressable volume and your printer frame might exceed the limits if you weld it together before milling.
OTOH, if you mill it before you weld it you're right back to the alignment problem you wanted to fix by milling the frame.
This sort of stuff is where the fun lies in building 3D printers. You not only have to design it, but you also have to figure out how to build it.
|
Re: Overengineered CoreXY January 27, 2017 07:51PM |
Registered: 9 years ago Posts: 238 |
Thanks for the suggestion. So you're saying don't mount the coreXY mechanism to the frame, but use some kind of bracket system hanging inside the frame?Quote
prot0typ1cal
anvoice,
Regarding your frame, if you make the corner spars taller, you can still mount your CoreXY stuff inside the 90 via adjustable brackets so machining is not required, and keeps your top flat for the enclosure.
If tall enough, the filament spool will also be inside, no escape for the warm air. I think DD said he is doing this for his Trump tower. Sry DD, no offense intended.
The extra cost/weight of the angle is far less than the added benefits.
Suggest you invert the angle iron for the bottom sides. This allows for a flat shelf that is easily cleaned, and provide a protected, open bottom for your electronics.
The coefficient for thermal expansion for steel is about half that of aluminum, neighborhood of .0006"/100 F/inch. F'yea, I'm Murican. So try to match your enclosure panels to be about the same.
Since you're going for an enclosure, maybe use perforated 90 degree steel (stuff used for racks and shelves). Lightens the whole weight and provides easy mounting.
Consider painting the steel, ounce of prevention, unless it's gonna be stainless :p
I'll think about inverting the angle, but I feel like it'll be a bit sturdier the way it is now. There's a fair bit of space on the bottom to service the electronics, assuming I can lift it to get under there...
I feel that all the perforated steel I've seen is quite thin, too much so to make a rigid frame, though maybe I've just not seen the thick kind.
I'm going to paint it all right! Both for protection and aesthetics.
Edited 1 time(s). Last edit at 01/27/2017 08:38PM by anvoice.
|
Re: Overengineered CoreXY January 27, 2017 08:59PM |
Registered: 11 years ago Posts: 1,049 |
You have a list ---- does Anovice have his?
He is thinking about painting his printer? ---- going to be used on shrimp boat?
If the E3D v6 lite is the ultimate --- why does E3D make all metal V6, Volcano
PTFE melts -- clogs nozzle --- the ends of PTFE always a problem?
all the PTFE tube I have seen melts well before 320 degree claim
E3D had to send out new gears for V6 because it was jamming
I am trying VStruder bowden to deltaprintr mini hotend ---- far from perfect
[deltaprintr.com]
you dream of being able even to vote for someone like Donald Trump!!!!
Quote
filipeCampos
to responde to this let me ask other question:Quote
cozmicray
Does a PLA cooler fan really work -- or prevent layer to layer adhesion?
can you tell me a good pla printer that does not have one or more cooling pla fan?
If is planning to build a printer for pla is need to plan the space for one or more fans.
E3D v6 little: it was a ptfe tube that goes from the extruder diretly to the nozzle, very dificult to get a jam.Quote
cozmicray
A good hotend that doesn't jam ----- Holy Grail of FFF printing
if possible without lossing print quality them YES. This is common sense...Quote
cozmicray
Do you really need print to be completed in 26 sec ? 50m/sec filament feed rate 100m/sec XY speeds.
where is the fun of this? this forum is about building printer and not selling them..Quote
cozmicray
you want a rock solid printer --- save up your money buy a 3D systems projet series printer
what wrong with the list I have done?Quote
cozmicray
One has to assess what effects print quality
and
Knock off the items on the list to get at quality prints
Never have seen a list of what drives quality printing.
Having a bad day? from your last post and if your are a amercian i pretty sure you voted trump..
|
Re: Overengineered CoreXY January 28, 2017 03:13AM |
Registered: 9 years ago Posts: 238 |
So thinking about the alignment problem: I was machining the rails that will become the top of the frame flat for the guide rails, then drilling the holes and assembling the rail system (including x axis), after which I would invert it and make sure it runs smoothly. Then I could tack-weld it together and make sure it still runs smoothly: if not, break it off, repeat until it does, finish the weld then. Finally, I could use a digital dial riding on one of the y rails and touching the other to make sure they're perfectly aligned, if they're not, use a rubber mallet to get them into perfect alignment. That would ensure the coreXY mechanism is properly adjusted I think.
For z, I could mill the same 90 degree steel angle to be exactly 90 degrees where the z guide rails will rest on it. That would ensure that the z rails can be square to the coreXY system, but would still require alignment to make sure there is no roll of the z guides along the x axis.
Thoughts?
For z, I could mill the same 90 degree steel angle to be exactly 90 degrees where the z guide rails will rest on it. That would ensure that the z rails can be square to the coreXY system, but would still require alignment to make sure there is no roll of the z guides along the x axis.
Thoughts?
|
Re: Overengineered CoreXY January 28, 2017 07:24AM |
Registered: 8 years ago Posts: 1,671 |
My HiFi Stand is pre-welded and cost £10, I think its pretty square and rigid enough, easy provides 300x300 in XY, and about 1m in z
though the noise travels through it quite a bit(obviously not the best hifi stand but if I see any more i'll be getting them)
Edited 1 time(s). Last edit at 01/28/2017 07:25AM by MechaBits.
though the noise travels through it quite a bit(obviously not the best hifi stand but if I see any more i'll be getting them)
Edited 1 time(s). Last edit at 01/28/2017 07:25AM by MechaBits.
|
Re: Overengineered CoreXY January 28, 2017 08:42AM |
Registered: 11 years ago Posts: 5,780 |
It doesn't sound like a reliable way to ensure that all the guide rails are aligned. I think that making the main frame as a fixture to hold an XY subframe and a Z subframe is going to be more reliable because it allows adjustment of the relative positions and angles between the subframes. Drilling holes or even milling slots for screws in the main frame members is a lot easier than welding, testing, breaking welds and rewelding and testing again, etc.
Ultra MegaMax Dominator 3D printer: [drmrehorst.blogspot.com]
Ultra MegaMax Dominator 3D printer: [drmrehorst.blogspot.com]
|
Re: Overengineered CoreXY January 28, 2017 12:34PM |
Registered: 11 years ago Posts: 1,049 |
|
Re: Overengineered CoreXY January 28, 2017 02:51PM |
Registered: 9 years ago Posts: 238 |
What would you suggest for a way to align the coreXY subframe? Aluminum extrusion? Or not supporting as cozmicray suggests?Quote
the_digital_dentist
It doesn't sound like a reliable way to ensure that all the guide rails are aligned. I think that making the main frame as a fixture to hold an XY subframe and a Z subframe is going to be more reliable because it allows adjustment of the relative positions and angles between the subframes. Drilling holes or even milling slots for screws in the main frame members is a lot easier than welding, testing, breaking welds and rewelding and testing again, etc.
I don't mind spending a day making/breaking welds if that's what it would take to align it. If it just won't work, that's a different story, but I feel like it should: after being tack-welded, the system won't move, so I can quickly test whether it's still aligned and snap the weld off if not, finish it if it is.
|
Re: Overengineered CoreXY January 28, 2017 03:40PM |
Registered: 8 years ago Posts: 601 |
|
Re: Overengineered CoreXY January 28, 2017 03:43PM |
Registered: 11 years ago Posts: 5,780 |
Well, you know more about welding than I do. If you think that will work, give it a try.
I suggest making the XY stage out of a single, flat piece of steel or aluminum (some +s and -s for either) of adequate thickness, if you have the capability or budget to have it cut, then drop it into the frame and have it sit on adjustment screws so it can be leveled within the frame. Do similar for the Z axis and set up adjusters to bring it into orthogonality with the XY plane. That arrangement will permit swapping the XY stage into other frames (maybe a mill, laser, or a lighter weight transportable prnter frame), and make alterations and maintenance easier by allowing you to work on the machine in pieces on a bench instead of bending your back or crawling on the floor to reach things (I hate that kind of stuff!).
I would have used a single flat plate for my XY stage but the size exceeded the tool capacity I had available and the cost of having it cut compared to the cost of building it the way I did was just a bit too high. I like working on the Bridgeport mill at the makerspace, too.
Ultra MegaMax Dominator 3D printer: [drmrehorst.blogspot.com]
|
Re: Overengineered CoreXY January 28, 2017 04:16PM |
Registered: 9 years ago Posts: 238 |
|
Re: Overengineered CoreXY January 28, 2017 04:24PM |
Registered: 9 years ago Posts: 238 |
Yep, I really like your build. Since I'm not going the aluminum extrusion route that closes some doors and opens others.
I also feel the cost of having a huge plate cut for the coreXY will be rather prohibitive. Otherwise I'd do just that. As is I think I'll chance having to rework it several times before I get the alignment right. No experimentation, no innovation I guess.
The local makerspace actually just moved, really hoping they still have the mill available, otherwise I'll be hard pressed for options.
|
Re: Overengineered CoreXY January 28, 2017 04:43PM |
Registered: 11 years ago Posts: 5,780 |
I wouldn't say there's no experimenting/innovation. You're going to have to figure out how to make your technique work. That may be a matter of being creative with the procedure and techniques or developing special tools (clamps, jigs) to make it easier. Necessity is the mother of invention... and Frank Zappa.
Edited 1 time(s). Last edit at 01/28/2017 04:44PM by the_digital_dentist.
Ultra MegaMax Dominator 3D printer: [drmrehorst.blogspot.com]
Edited 1 time(s). Last edit at 01/28/2017 04:44PM by the_digital_dentist.
Ultra MegaMax Dominator 3D printer: [drmrehorst.blogspot.com]
|
Re: Overengineered CoreXY January 28, 2017 06:59PM |
Registered: 11 years ago Posts: 1,049 |
If you can make a shaped rail and a circulating ball trolley
easier and better than a purchased unit --- wow --- have at it
and six or seven times over.
And have a mill that can handle 14 x 14 x14 inch
and experience to mill accurate enough for 3D printing
wow ---- have at it.
Read the
My coreXY design is progressing to the build stage thread
[forums.reprap.org]
lots of great design / building there!
|
Re: Overengineered CoreXY January 29, 2017 04:34AM |
Registered: 9 years ago Posts: 238 |
Yep, the more I read the more it seems that my idea working would be somewhat of a miracle. Perhaps I can find a milling service that has a large enough mill to machine the full frame?
Otherwise I might try out an intelligent suggestion someone gave me recently of using a large piece of tooling plate and cutting the coreXY stage out of that.
Otherwise I might try out an intelligent suggestion someone gave me recently of using a large piece of tooling plate and cutting the coreXY stage out of that.
|
Re: Overengineered CoreXY January 29, 2017 06:18AM |
Registered: 7 years ago Posts: 2 |
A welded frame could be slightly bent due to stresses induced by the welding, I think the only way to make it truly accurate is to machine it after welding.
A cheap(er) accurate approach would be to waterjet cut a tooling plate (mic-6, salplan 5000) into a flat frame for the XY guides, then bolt it onto aluminium extrusion. That way, all you have to do is align the Z-axis with the XY-axis instead of having to align everything to everything. The general stiffness of aluminium is plenty compared to steel, if you need more stiffness just use wider aluminium extrusion. (45x45 is you are worried about it, personally I would go for 30x30)
Also a note on the X axis, you have a floating linear guide there which does not create a stiff gantry. For linear guides, a stiff gantry can even out errors in the individual linear guides, so I would personally go for a tooling plate the width of the Y carriages, then mount the guide on there. The added advantage is that you can then straighten the guide with regards to the tooling plate, as described in the mounting guide from e.g. THK :[tech.thk.com]
Edit: I just saw that you already got the tooling plate advice. I agree
Edited 1 time(s). Last edit at 01/29/2017 06:18AM by Dutch_Razor.
|
Re: Overengineered CoreXY January 29, 2017 09:34AM |
Registered: 11 years ago Posts: 5,780 |
This is what I am thinking would make using a steel frame pretty easy. The XY stage (red) rests on leveling adjusters either welded or screwed into the frame (I'd screw them in):
The only thing in the machine that needs to be accurately aligned is the XY plane relative to the Z axis- the guide rails must be orthogonal, and the bed parallel to the XY plane- via the usual bed leveling system. The frame can be out of square and it doesn't matter as long as the XY and Z orthogonality can be adjusted and the bed can be leveled. If you used 3 point mount (pitch and roll adjustments), you could bolt the Z axis into the frame then just adjust the XY stage pitch and roll to ensure orthogonality, though having some adjustment capability on the Z axis would probably be a good idea too, depending on how it is made and on whether you can count on it maintaining rail to rail parallelism when you bolt it into the frame.
Leveling things accurately with 4 screws is a problem as we have seen with many poorly conceived print bed levelers. Using 3 point leveling would require adding a cross bar on one side of the frame for the XY roll adjuster.
Fitting the XY stage into the frame as I have drawn it would require removing a couple of the levelers. If you opened the top of the frame you could make it so the XY stage can just drop in from above and sit on the levelers. That would make servicing and swapping the XY stage into another frame pretty easy, and theoretically, let you put the XY stage back without having to make any adjustments.
You could add more adjusters above the XY stage to tighten down as clamps so it doesn't vibrate or shift when transported, or do something similar to my CoreXY bed levelers with one point fixed, one leveler in a slot, and the third free to slide in XY, and use springs (or clamps) to hold it down.
Ultra MegaMax Dominator 3D printer: [drmrehorst.blogspot.com]

The only thing in the machine that needs to be accurately aligned is the XY plane relative to the Z axis- the guide rails must be orthogonal, and the bed parallel to the XY plane- via the usual bed leveling system. The frame can be out of square and it doesn't matter as long as the XY and Z orthogonality can be adjusted and the bed can be leveled. If you used 3 point mount (pitch and roll adjustments), you could bolt the Z axis into the frame then just adjust the XY stage pitch and roll to ensure orthogonality, though having some adjustment capability on the Z axis would probably be a good idea too, depending on how it is made and on whether you can count on it maintaining rail to rail parallelism when you bolt it into the frame.
Leveling things accurately with 4 screws is a problem as we have seen with many poorly conceived print bed levelers. Using 3 point leveling would require adding a cross bar on one side of the frame for the XY roll adjuster.
Fitting the XY stage into the frame as I have drawn it would require removing a couple of the levelers. If you opened the top of the frame you could make it so the XY stage can just drop in from above and sit on the levelers. That would make servicing and swapping the XY stage into another frame pretty easy, and theoretically, let you put the XY stage back without having to make any adjustments.

You could add more adjusters above the XY stage to tighten down as clamps so it doesn't vibrate or shift when transported, or do something similar to my CoreXY bed levelers with one point fixed, one leveler in a slot, and the third free to slide in XY, and use springs (or clamps) to hold it down.

Ultra MegaMax Dominator 3D printer: [drmrehorst.blogspot.com]

Sorry, only registered users may post in this forum.