Cable management to the X-Y carriage - how did you do it?
Posted by David J
|
Cable management to the X-Y carriage - how did you do it? January 31, 2018 10:16AM |
Registered: 9 years ago Posts: 893 |
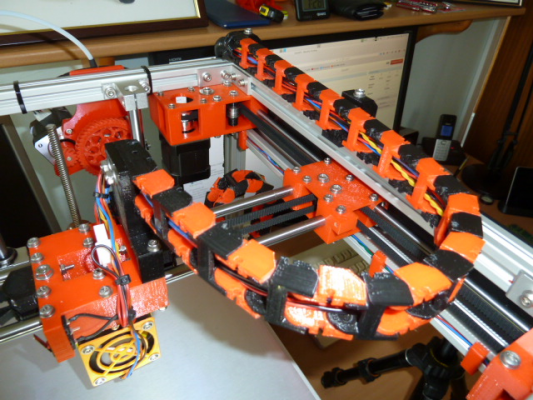
My CoreXY printer has the X-Y carriage and extruder cables kept under control via this cable chain (filament goes separately):
This has worked really well up to now, but the link connections are wearing and the whole thing's getting very droopy, despite supports to help it out as it moves around. It's getting so bad now that the links' connections will just pop out at the slightest touch. Clearly I'm asking too much of this sort of chain, so now I need to improve things.
I'd really like to see pictures of what other builders have done, to give me some ideas for improvement.
Thanks in advance,
David
|
Re: Cable management to the X-Y carriage - how did you do it? January 31, 2018 12:20PM |
Registered: 11 years ago Posts: 5,780 |
I think that if you buy commercial drag chain you'll find the tolerances much tighter and it will last longer. Drag chain is cheap stuff- there's no reason to print it when the commercial stuff is so cheap and performs so much better.
I use a horizontal drag chain in my printer, but I have it arranged in a very large, gentle loop. It looks like you have it anchored to the frame along the right side which will force it to curl in a pretty tight radius. Besides wearing out your printed drag chain, that will cause wire breakage eventually, and that can be a difficult problem to isolate because the wires break inside their insulation and become intermittent. If the motor driver leads become intermittent, they can destroy the motor driver chip.
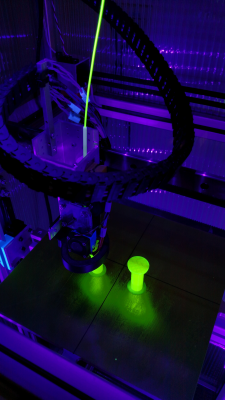
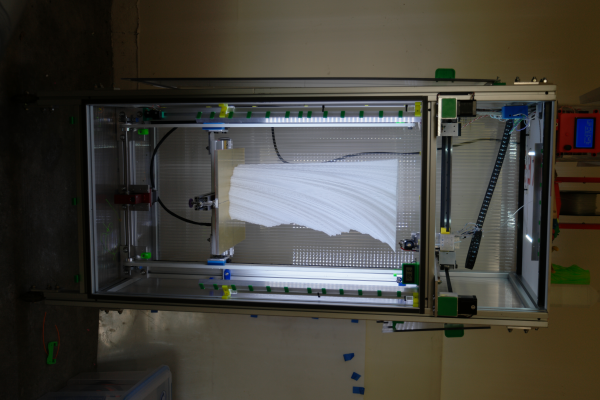
Here's my drag chain- it anchors on the left side and curls around the extruder carriage a full 360 degrees where it anchors at the left front of the extruder carriage. I does require extra length to do that, so it droops a bit, but it doesn't flex any of the wires in a small radius.
You might be able to see it better in this picture- the drag chain anchors on a small piece of metal attached to the printer's frame on the left side where all the cables are, with the opening facing the front of the printer, then curls around and attaches to the extruder carriage with the opening facing the back of the printer.
Edited 2 time(s). Last edit at 01/31/2018 12:28PM by the_digital_dentist.
Ultra MegaMax Dominator 3D printer: [drmrehorst.blogspot.com]
|
Re: Cable management to the X-Y carriage - how did you do it? January 31, 2018 02:03PM |
Registered: 9 years ago Posts: 893 |
|
Re: Cable management to the X-Y carriage - how did you do it? January 31, 2018 02:37PM |
Registered: 8 years ago Posts: 338 |
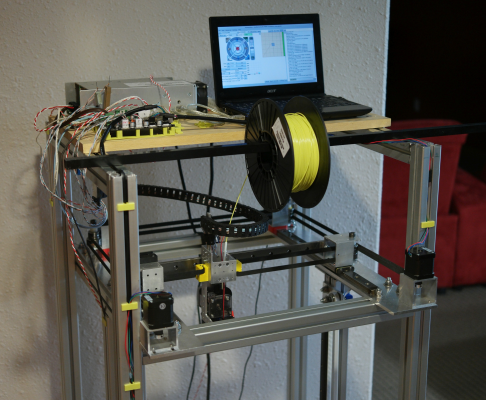
I’m using a db25 cable and two breakout boards
Edited 1 time(s). Last edit at 01/31/2018 02:41PM by Qdeathstar.
Edited 1 time(s). Last edit at 01/31/2018 02:41PM by Qdeathstar.
|
Re: Cable management to the X-Y carriage - how did you do it? January 31, 2018 07:50PM |
Registered: 11 years ago Posts: 5,780 |
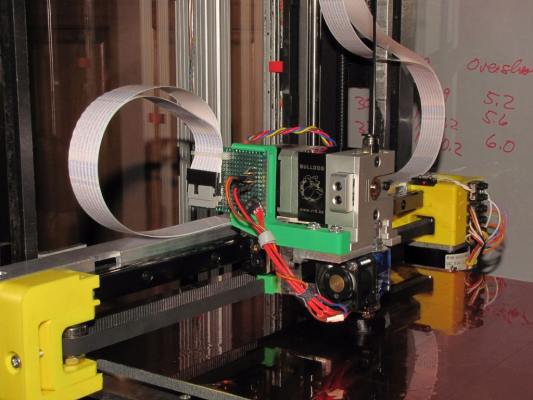
My other printer, not corexy uses a flex-ribbon cable:
I struggled to figure out how to use it in a coreXY (I have another one of those cables), but couldn't figure out a good way to do it.
Ultra MegaMax Dominator 3D printer: [drmrehorst.blogspot.com]
I struggled to figure out how to use it in a coreXY (I have another one of those cables), but couldn't figure out a good way to do it.
Ultra MegaMax Dominator 3D printer: [drmrehorst.blogspot.com]
|
Re: Cable management to the X-Y carriage - how did you do it? February 01, 2018 03:20AM |
Registered: 9 years ago Posts: 893 |
|
Re: Cable management to the X-Y carriage - how did you do it? February 01, 2018 07:19AM |
Registered: 11 years ago Posts: 5,780 |
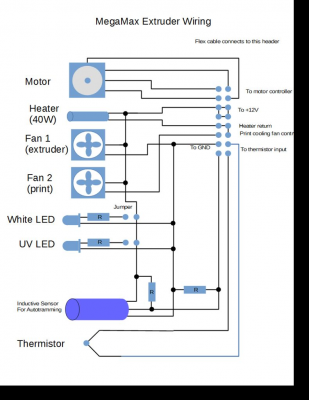
Here's how I wired it. I never installed the LEDs or the bed sensor (no need), and it uses a 24V supply, not 12V.
Ultra MegaMax Dominator 3D printer: [drmrehorst.blogspot.com]
Ultra MegaMax Dominator 3D printer: [drmrehorst.blogspot.com]
|
Re: Cable management to the X-Y carriage - how did you do it? February 01, 2018 08:01AM |
Registered: 9 years ago Posts: 893 |
|
Re: Cable management to the X-Y carriage - how did you do it? February 01, 2018 10:13AM |
Registered: 11 years ago Posts: 5,780 |
I was running at 12V, 40W heater initially, so 3+ lines were needed. I couldn't feel any heating in the cable, so I suspect the 1A rating per conductor was pretty conservative, and maybe limited by the connectors more than the cable.
Ultra MegaMax Dominator 3D printer: [drmrehorst.blogspot.com]
Ultra MegaMax Dominator 3D printer: [drmrehorst.blogspot.com]
|
Re: Cable management to the X-Y carriage - how did you do it? February 01, 2018 11:37AM |
Registered: 7 years ago Posts: 363 |
|
Re: Cable management to the X-Y carriage - how did you do it? February 01, 2018 08:47PM |
Registered: 8 years ago Posts: 338 |
i like it, it is self supporting, it your printer was very big i thing you could just add a hook,... I am not printing yet though and i haven’t tested it fully. It has 20awg wire in it which is good enough for the 40w heaters my set up is using.
Edited 1 time(s). Last edit at 02/01/2018 08:48PM by Qdeathstar.
Edited 1 time(s). Last edit at 02/01/2018 08:48PM by Qdeathstar.
|
Re: Cable management to the X-Y carriage - how did you do it? March 08, 2018 12:01AM |
Registered: 9 years ago Posts: 53 |
Quote
the_digital_dentist
I think that if you buy commercial drag chain you'll find the tolerances much tighter and it will last longer. Drag chain is cheap stuff- there's no reason to print it when the commercial stuff is so cheap and performs so much better.
I use a horizontal drag chain in my printer, but I have it arranged in a very large, gentle loop. It looks like you have it anchored to the frame along the right side which will force it to curl in a pretty tight radius. Besides wearing out your printed drag chain, that will cause wire breakage eventually, and that can be a difficult problem to isolate because the wires break inside their insulation and become intermittent. If the motor driver leads become intermittent, they can destroy the motor driver chip.
Here's my drag chain- it anchors on the left side and curls around the extruder carriage a full 360 degrees where it anchors at the left front of the extruder carriage. I does require extra length to do that, so it droops a bit, but it doesn't flex any of the wires in a small radius.
You might be able to see it better in this picture- the drag chain anchors on a small piece of metal attached to the printer's frame on the left side where all the cables are, with the opening facing the front of the printer, then curls around and attaches to the extruder carriage with the opening facing the back of the printer.
Looks like your new corexy is coming along nicely. As I remember, you were designing it for a heated enclosure, right?
I'm stuck on the cable chain for mine. Same style layout as yours. My target chamber temp is 60C, but some common Nylons have a plastic temperature lower than PLA. Did you find a high temp cable chain? Some of the glass filled chains can get expensive, but provide good torsional rigidity for this style layout. I always thought that side mount droopy cable chains looked kludgey, but some manufacturers app notes I've seen seem to validate side mount chains- just expect some droop. Can you add a side view pic showing the droop?
|
Re: Cable management to the X-Y carriage - how did you do it? March 08, 2018 10:05AM |
Registered: 11 years ago Posts: 5,780 |
Yes, heated. I have been running it at 45C with very good results. See: [drmrehorst.blogspot.com]
Here's the drooping drag chain:
I haven't had any problems with the drag chain.
Ultra MegaMax Dominator 3D printer: [drmrehorst.blogspot.com]
Here's the drooping drag chain:
I haven't had any problems with the drag chain.
Ultra MegaMax Dominator 3D printer: [drmrehorst.blogspot.com]
|
Re: Cable management to the X-Y carriage - how did you do it? March 09, 2018 10:13AM |
Registered: 9 years ago Posts: 53 |
Spectacular pic! This really helps. Will check out your blog.
I was considering an Z offset cable chain as well. Are the two cable chain end points fixed or do you allow them to rotate in the Y axis? As the carriage moves in X, the cable chain end point on the carriage would move outside the flex plane of the chain if the top of the chain was fixed. In my case, I wasn't planning to raise the Z offset start point quite as much, and with a 3D printed chain there's enough twisting slop in the chain, so don't think I need to rotate at the carriage. Do you just rely on the chain twisting slightly?
I was considering an Z offset cable chain as well. Are the two cable chain end points fixed or do you allow them to rotate in the Y axis? As the carriage moves in X, the cable chain end point on the carriage would move outside the flex plane of the chain if the top of the chain was fixed. In my case, I wasn't planning to raise the Z offset start point quite as much, and with a 3D printed chain there's enough twisting slop in the chain, so don't think I need to rotate at the carriage. Do you just rely on the chain twisting slightly?
|
Re: Cable management to the X-Y carriage - how did you do it? March 09, 2018 10:34AM |
Registered: 11 years ago Posts: 5,780 |
I have anchored both ends of the drag chain. The end that is mounted on the frame of the printer (at about the middle of the Y axis on that side) opens toward the front of the printer and the end on the extruder carriage opens toward the back of the printer, so it is making a full circle loop. You can tilt the frame end and extruder carriage end openings downward a little to raise the loop so that when it droops it doesn't drag on the X axis.
Don't use too short a drag chain- you want a nice gentle curve no matter where the extruder carriage goes.
Ultra MegaMax Dominator 3D printer: [drmrehorst.blogspot.com]
Don't use too short a drag chain- you want a nice gentle curve no matter where the extruder carriage goes.
Ultra MegaMax Dominator 3D printer: [drmrehorst.blogspot.com]
Sorry, only registered users may post in this forum.
