CoreXY construction question
Posted by JoergS5
|
CoreXY construction question August 07, 2018 02:54PM |
Registered: 5 years ago Posts: 155 |
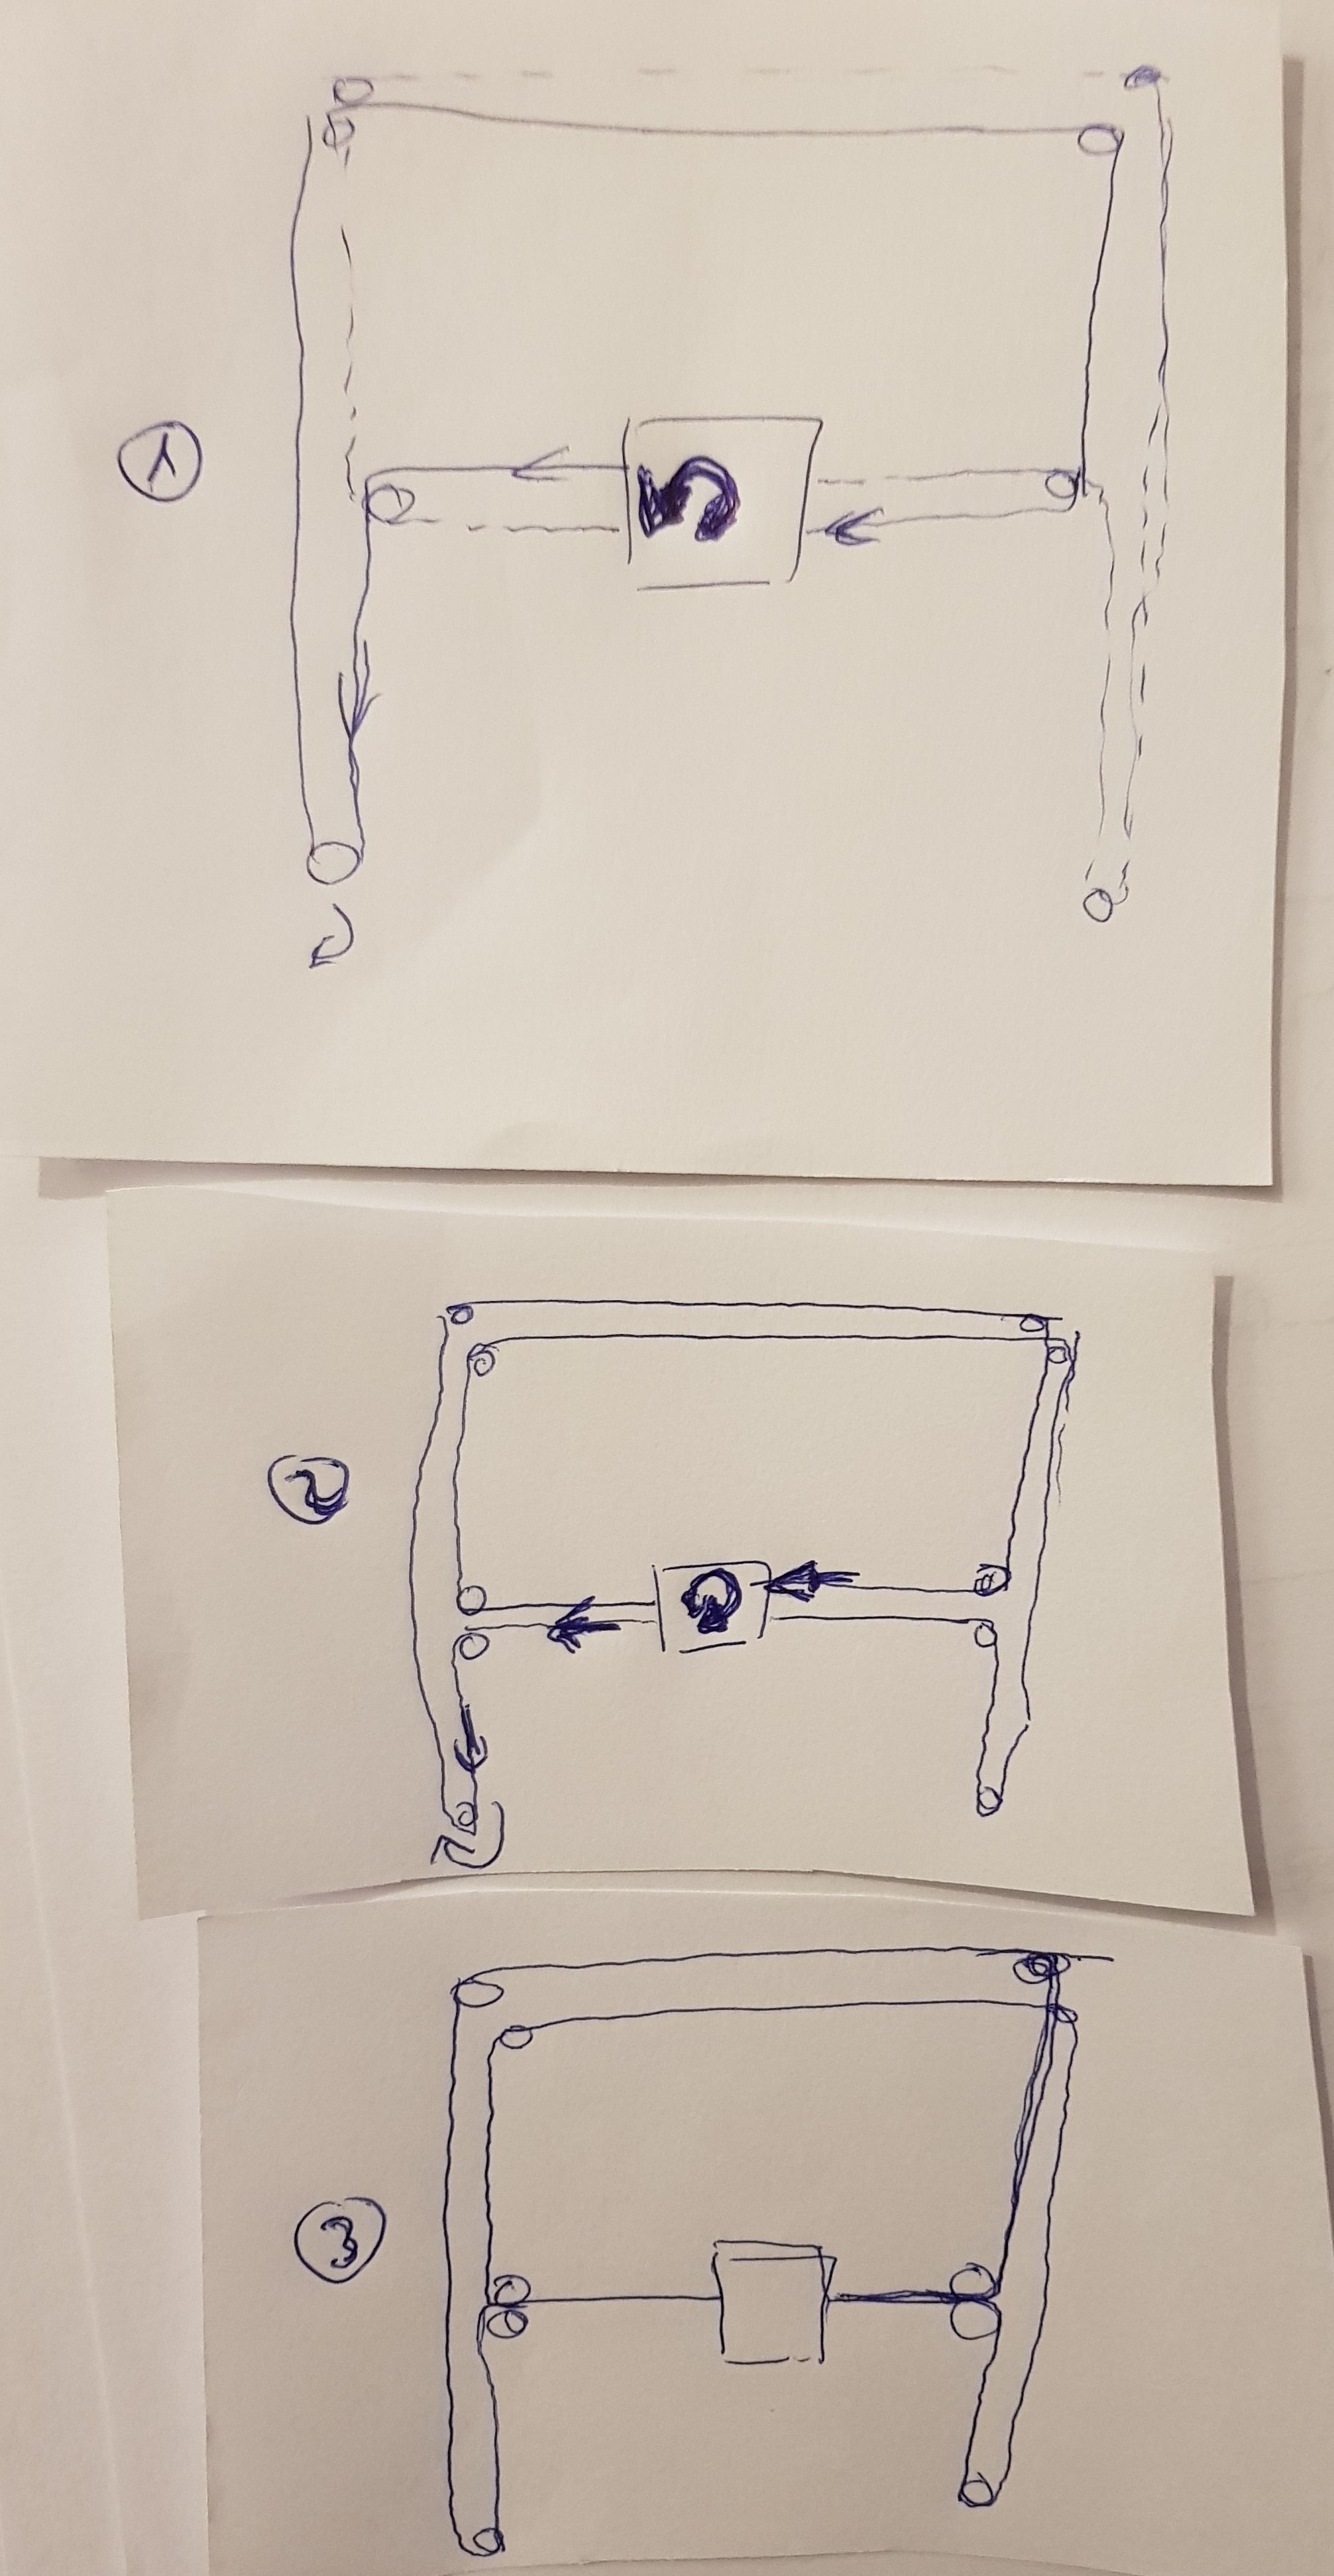
Hello, I am still building a CoreXY printer and a new question arose, please see images.
The top two images are the normal two level construction: if the left stepper rotates, the forces at the hotend try to rotate left or right, will tend to stuck the hotend / linear X block and will have higher friction. The other hotend connections will lower this torque when they have high tension.
But why not avoid this torque by constructing it like in the bottom image, guiding the belts in the middle to the hotend? If the belts are two level, you can arrange the pulleys - by a little offset of two axes - so that the belts are above each other.
Edited 7 time(s). Last edit at 08/07/2018 03:42PM by JoergS5.
|
Re: CoreXY construction question August 07, 2018 03:42PM |
Registered: 6 years ago Posts: 134 |
|
Re: CoreXY construction question August 07, 2018 03:54PM |
Registered: 5 years ago Posts: 155 |
Thanks for adding the new aspect of Z torque ;-) You are right, it's more complicated than I thought.
I have to think about how to optimize the arrangement of the linear guide again (e. g. horizontal or vertical). I expect this arrangement is important how torque and frictions have an impact.
I did not understand your last sentence, unfortunately. Could you please provide a sample/image?
I have to think about how to optimize the arrangement of the linear guide again (e. g. horizontal or vertical). I expect this arrangement is important how torque and frictions have an impact.
I did not understand your last sentence, unfortunately. Could you please provide a sample/image?
|
Re: CoreXY construction question August 07, 2018 04:49PM |
Registered: 6 years ago Posts: 134 |
Not very good picture I hope the concept will be explained.
Delta Z1 and delta Z2 are equal. The middle line is the movement plane. If belts will be on the same side of XY movement plane and aligned like in your second example top belt will have longer "lever" then the bottom belt.
Delta Z1 and delta Z2 are equal. The middle line is the movement plane. If belts will be on the same side of XY movement plane and aligned like in your second example top belt will have longer "lever" then the bottom belt.

|
Re: CoreXY construction question August 07, 2018 04:59PM |
Registered: 11 years ago Posts: 5,780 |
I've seen printers designed that way before, for the same reason you want to do it. You will eliminate torque about the Z axis, but you'll still have rotational torque about the Y axis because the belts will be attaching to the extruder carriage with vertical separation on both sides of the carriage.
You could build a corexy mechanism with the belts on the same Z level, crossing them at the back and twisting them so the smooth back sides rub against each other, then bring the belts to the extruder carriage at the same Z level (back to back and just touching) and almost completely eliminate all the torque on the extruder carriage.
Ultra MegaMax Dominator 3D printer: [drmrehorst.blogspot.com]
|
Re: CoreXY construction question August 08, 2018 01:54AM |
Registered: 5 years ago Posts: 155 |
Thank you piper3d for your image, now it is clear. I detected your video of the Piper 2 printer yesterday, I wish you very success with your nice project(s).
Twisting the belts will have other disadvantages at the pulley, they would need to be tilted a bit. It is worth some thought however to bring the belts together at the extruder point. I hope that removing all torque will lead to the X block moving easily.
I will test your solutions/proposals in my build, thank you for your input. One build will be a big printer, and one a DICE like mini printer. I will try a wire solution for the DICE like printer. Wire has an advantage to bring the wires nearer at each other in the respect of the discussion here.
Edited 1 time(s). Last edit at 08/08/2018 01:58AM by JoergS5.
|
Re: CoreXY construction question August 08, 2018 09:00AM |
Registered: 11 years ago Posts: 5,780 |
Twisting belts doesn't require tilting the pulleys if they are far enough apart. I don't recall the exact number, but I think it was something like 20x the belt width for a 180 degree twist.
Ultra MegaMax Dominator 3D printer: [drmrehorst.blogspot.com]
Ultra MegaMax Dominator 3D printer: [drmrehorst.blogspot.com]
|
Re: CoreXY construction question August 08, 2018 02:16PM |
Registered: 5 years ago Posts: 155 |
|
Re: CoreXY construction question August 08, 2018 02:25PM |
Registered: 11 years ago Posts: 5,780 |
I agree. I don't like twisting belts either. Right now the Z axis belts in my printer have twists in them, but as soon as I have an excuse to take it apart again, the twists are coming out.
Ultra MegaMax Dominator 3D printer: [drmrehorst.blogspot.com]
Ultra MegaMax Dominator 3D printer: [drmrehorst.blogspot.com]
|
Re: CoreXY construction question August 08, 2018 02:37PM |
Registered: 5 years ago Posts: 155 |
|
Re: CoreXY construction question August 08, 2018 03:45PM |
Registered: 11 years ago Posts: 5,780 |
I put the Rino back into UMMD after the failed, self-made worm drive project, and I used GT2 belts and put a twist in them to see if it had any effect on the print quality - none that I could see. It's a PITA to disconnect the belts and reassemble, so for now, it sits with twists in the belts. I'll probably untwist the belts before the Milwaukee MakerFaire at the end of September.
Here's a photo that shows some of the twisted belt:
Ultra MegaMax Dominator 3D printer: [drmrehorst.blogspot.com]
Here's a photo that shows some of the twisted belt:

Ultra MegaMax Dominator 3D printer: [drmrehorst.blogspot.com]
|
Re: CoreXY construction question August 08, 2018 03:57PM |
Registered: 6 years ago Posts: 134 |
In addition to the stability of X carriage, there is also stability of Y carriage. Belts located on one side of the XY plane will bend Y guiding rails. If you do not see it now, once you move to a longer Y or you will increase speed it will show itself. Plus crossing/twisting belts will result in belt rubbing idlers edges. There is no perfect solution each one is a trade-off.Quote
the_digital_dentist
You could build a corexy mechanism with the belts on the same Z level, crossing them at the back and twisting them so the smooth back sides rub against each other, then bring the belts to the extruder carriage at the same Z level (back to back and just touching) and almost completely eliminate all the torque on the extruder carriage.
|
Re: CoreXY construction question August 08, 2018 04:07PM |
Registered: 5 years ago Posts: 155 |
|
Re: CoreXY construction question August 08, 2018 04:13PM |
Registered: 5 years ago Posts: 155 |
piper3d, I found some interesting discussion in a cnc forum about stabilizing XY:
[www.cnczone.com]
#51 in the thread is especially good to understand the cable guidance.
This is in some details an explanation why CoreXY stabilizes XY, depending on the belts.
I don't understand all of the tread. I am searching some simulation freeware to get a good understanding, but did not find one yet.
Edited 1 time(s). Last edit at 08/08/2018 04:23PM by JoergS5.
|
Re: CoreXY construction question August 08, 2018 05:47PM |
Registered: 6 years ago Posts: 134 |
|
Re: CoreXY construction question August 09, 2018 08:09AM |
Registered: 11 years ago Posts: 5,780 |
This pretty much explains Y axis stability:
The green arrows are forces on the Y axis pulleys created by the lower belt, the blue arrows are forces created by the upper belt. When the belt tensions are equal, the net force at each pulley (orange arrows) is along the X axis, which is resisted by the X axis guide rail(s), or in my printer, UMMD, by the Y axis bearing blocks on their rails. If you put the lower belt (green) on first and apply some tension, the X axis rotates counterclockwise, as far as the mechanism will allow. When you put on the blue belt and tighten it, you apply a clockwise torque that balances the counterclockwise torque from the green belt. That brings the X axis back into square with the Y axis.
Ultra MegaMax Dominator 3D printer: [drmrehorst.blogspot.com]
|
Re: CoreXY construction question August 09, 2018 08:53AM |
Registered: 5 years ago Posts: 155 |
So if you detach the extruder/hotend from the X guide, and it does not rotate, it means that the tensions of the belts are equal. This could be used to calibrate it.
But if you move the steppers, the forces are different. So it's good if the tension forces are much higher than the forces of the movements.
And the pulley diameters should be the same for the forces to be the same (if tension is equal).
Please tell me if something of it is wrong...
I see one problem: the Y guides are under load to the extruder direction always. (ok, somewhere the tension/load must go)
My thoughts: the block at the X axis is force free (opposite forces on both sides), it runs with low friction because there is no force for the balls and the belts will even unburden in the Z direction. It will run fast.
The Y carriages on the other side will have a constant force at the outer sides on the balls, so friction is higher and ball intolerances will cause print problems. Would be nice to find a construction to set them force-free also.
Edited 2 time(s). Last edit at 08/09/2018 09:05AM by JoergS5.
|
Re: CoreXY construction question August 09, 2018 10:11AM |
Registered: 6 years ago Posts: 134 |
Rotate your drawing plane 90 degrees around X and look at XZ plane.Quote
the_digital_dentist
This pretty much explains Y axis stability:

Edited 1 time(s). Last edit at 08/09/2018 11:22AM by piper3d.
|
Re: CoreXY construction question August 09, 2018 01:57PM |
Registered: 5 years ago Posts: 155 |
I am not sure about your last graphic. The yellow arrow should be a vector addition of the other vectors. The blue and green ones don't have down direction.
I think the blue and green arrows produce a torsion, the left ones counterclock and the right ones clockwise, and balance each other out.
I think the blue and green arrows produce a torsion, the left ones counterclock and the right ones clockwise, and balance each other out.
|
Re: CoreXY construction question August 09, 2018 02:58PM |
Registered: 8 years ago Posts: 5,232 |
See the corners of the grey 'U' as pivot points and the forces will try to bend the bottom of the 'U' down. Just like the arrow indicates.
One could add a horizontal strut to make a close 'O' to compensate these forces. Like I did here ( but with forces in opposite direction )
Edited 1 time(s). Last edit at 08/09/2018 03:04PM by o_lampe.
One could add a horizontal strut to make a close 'O' to compensate these forces. Like I did here ( but with forces in opposite direction )

Edited 1 time(s). Last edit at 08/09/2018 03:04PM by o_lampe.
|
Re: CoreXY construction question August 09, 2018 03:03PM |
Registered: 6 years ago Posts: 134 |
|
Re: CoreXY construction question August 09, 2018 03:30PM |
Registered: 5 years ago Posts: 155 |
I understand. Bending force could be to the upper direction also, right? Like a heat bed which is fixed at 4 points and bending to top or down due to termal expansion.
Edit: no, ok, I understand: upper surface upset, lower stretched, one direction - down.
Edited 2 time(s). Last edit at 08/09/2018 03:58PM by JoergS5.
Edit: no, ok, I understand: upper surface upset, lower stretched, one direction - down.
Edited 2 time(s). Last edit at 08/09/2018 03:58PM by JoergS5.
|
Re: CoreXY construction question August 09, 2018 03:49PM |
Registered: 5 years ago Posts: 155 |
|
Re: CoreXY construction question August 09, 2018 04:04PM |
Registered: 6 years ago Posts: 134 |
If you are trying to show design I used, the downside is rotating forces around Y axis of X carriage see above  .
.
But it is your decision what to trade
.It is all a trade-off. What I like about my design is that structure is kept by belts, printed parts, and 8mm rods even on 1CF (300x300 bed) and it may run up to 300 mm/sQuote
the_digital_dentist
You will eliminate torque about the Z axis, but you'll still have rotational torque about the Y axis because the belts will be attaching to the extruder carriage with vertical separation on both sides of the carriage.
But it is your decision what to trade
|
Re: CoreXY construction question August 09, 2018 04:25PM |
Registered: 5 years ago Posts: 155 |
There are different requirements for a 3d printer: quality of print, speed, portability, cost, ease of usage, etc. etc.
As different as those requirements are, so are the constructions. That's the salt in the soup...
For me, I want a solid printer framed with concrete or granite to protect againts vibrations. BUT it is not as mobile as your printer ;-)
Edited 1 time(s). Last edit at 08/09/2018 04:27PM by JoergS5.
As different as those requirements are, so are the constructions. That's the salt in the soup...
For me, I want a solid printer framed with concrete or granite to protect againts vibrations. BUT it is not as mobile as your printer ;-)
Edited 1 time(s). Last edit at 08/09/2018 04:27PM by JoergS5.
|
Re: CoreXY construction question August 09, 2018 09:39PM |
Registered: 11 years ago Posts: 5,780 |
Quote
piper3d
If you are trying to show design I used, the downside is rotating forces around Y axis of X carriage see above
It is all a trade-off. What I like about my design is that structure is kept by belts, printed parts, and 8mm rods even on 1CF (300x300 bed) and it may run up to 300 mm/sQuote
the_digital_dentist
You will eliminate torque about the Z axis, but you'll still have rotational torque about the Y axis because the belts will be attaching to the extruder carriage with vertical separation on both sides of the carriage.
Actually, I was generalizing, and using my own printer's design as an example- the belts at the extruder carriage are offset in the XY plane and in the XZ plane creating twisting torques all over the place if the belt tensions aren't equal. Does it matter? Not that I can tell. I used linear guides in the Y axis and the Y axis pulleys are mounted on the Y axis bearing blocks, so the XZ plane torques in your diagram don't get applied to the X axis as they are resisted by the pulley mounts and bearing blocks. If you use end supported round rails in the Y axis, you will probably have to worry about the X axis flexing because of the Y axis does little to prevent it. You can eliminate that torque by putting one belt above and one below the Y axis guide rails, but you still have the inward force that will try to bow the X axis. The weight of the extruder carriage on the X axis will bias the bowing downward because the rails will tend to sag due to gravity. If you wanted to get really anal about it, you could calculate the sag and move the belt below the XY stage far enough that the belt tension would create an upward force that would counteract the effect of gravity on the X axis. But its a lot easier to just ignore it and use larger diameter round rails or linear guides.
When you build a corexy mechanism, or any other 3D printer mechanism, there are nonideal forces that result from imperfect layout, rigidity, stretching belts, etc. If the machine is built well enough it will resist those forces enough that they won't effect print quality, as evidenced by the many different designs that work even though they are less than ideal.
Ultra MegaMax Dominator 3D printer: [drmrehorst.blogspot.com]
|
Re: CoreXY construction question August 09, 2018 11:28PM |
Registered: 6 years ago Posts: 134 |
If you will expand your printer to have a 1mx1m print bed you will start seeing those forces. If you will try running your printer at speeds 400mm/s+ and acceleration 5000mm/s2+ you will see the influence. The same applies to my machine - I do not see those torque forces while printing at 300mm/s, but I do know they exist (reposting from another thread https://youtu.be/D-Es5PkO1gk it is not a perfect run just 2 sides came out fine I still have to improved extruder).Quote
the_digital_dentist
Does it matter? Not that I can tell.
And in regards to comparison, I am spending on my machines close to $250, yours probably cost you over 1K. I can carry my machine alone from one show to another (sometimes it rides in the front seat of the sedan barely fitting in) and it will be ready to print in 5 min, can you imagine at least doing this by yourself? I mentioned this once already somewhere else: at one point in time the best bridges were meant to be built from stones or concrete only (I am not talking about wooden
), then it was made clear that wire rope designs are even better. Devil is in our heads it is called "stereotypes".
|
Re: CoreXY construction question August 10, 2018 01:25AM |
Registered: 5 years ago Posts: 155 |
It is good if you know which forces or imperfections exist at your printer. Then you can
- solve print problems because you can find out where they come from (ringing etc.)
- know where to spend your next dollar best to improve the printer if you want to
You can decide to ignore those imperfections if they are small enough in your view.
Regardless of this knowledge, the application of best practices: the use of specific building instructions that have proven valuable from experience or physical models.
My experience shows me that one have to make one's own experience to really have this know how.
Sorry, only registered users may post in this forum.