another new core xy
Posted by TheHandsomeDog
|
Re: another new core xy January 08, 2019 04:59PM |
Registered: 5 years ago Posts: 27 |
Thanks for the link @mksa I read it in its entirety, it’s been a slow day. Whilst interesting I did not find any thing of any relevance to any of th I have posed. Is this the right link?
The digital dentist has set me on the right path regarding my bed plate and piper3d has me well and truely sold on the 3 motor z. It is something I had always planned to do long term I just couldn’t justify the expense of a duet + expansion board. Klipper should allow me to use and combination of boards I like to achieve the same for a fraction of the cost.
Unless anyone has had a bad experience with the above linked F6 board I think I’m going to bite the bullet and go for it.
A screen, board and 6x ‘tmc2208’ (I don’t expect the real thing but at £6 each what can you expect) is £60 a pi3 with card and power is £45 and is easily expandable in the future
If it doesn’t work I will still have a Pi3 for doing stuff (I have no clue what) and can easily convert back to plan A and a single motor Z
Edit: removed my misinformed pricing of the duet option
Apologies
Edited 3 time(s). Last edit at 01/09/2019 04:55PM by TheHandsomeDog.
|
Re: another new core xy January 08, 2019 06:10PM |
Registered: 10 years ago Posts: 14,672 |
The equivalent Duet product is nothing like the price you mention. A Duet Maestro plus the 2-stepper driver daughter board will give you seven genuine TMC2224 drivers (properly heatsinked unlike plug-in drivers), built in power monitoring, control of 3 fans, and compatibility with low cost 12864 displays.
If you increase the specification to ten high current stepper drivers with stall detection and a 7" colour touch screen, then of course it will cost more.
Edited 5 time(s). Last edit at 01/08/2019 06:19PM by dc42.
Large delta printer [miscsolutions.wordpress.com], E3D tool changer, Robotdigg SCARA printer, Crane Quad and Ormerod
Disclosure: I design Duet electronics and work on RepRapFirmware, [duet3d.com].
|
Re: another new core xy January 11, 2019 12:15PM |
Registered: 7 years ago Posts: 363 |
Quote
cozmicray
and unknown firmware Klipper (not much of a user base to get help )
Outside of this website Klipper actually has a fairly substantial user base. I was quite shocked to see how often it is recommended outside of these forums. There is a somewhat active IRC channel, the discussions on gitHub are active and helpful and the primary developer of the firmware is incredibly responsive. Klipper also has pretty solid documentation, including description documents for potential contributors to the software to understand it's structure.
My personal experience with Klipper has been exceptional using a Chinese all-in-one ramps board, an inexpensive RPi3 I got on sale and OctoPrint. If you are a bit of a tinker like I am and have extra electronics lying around I'd suggest you at least try it out before knocking it. I tried 6 different firmwares before deciding on Klipper (for several reasons beyond just cost). At this point, I'd refuse to purchase any controller that I couldn't run Klipper on.
I understand everyone has their preferences and perceptions, but that's just my own $0.02. I think klipper is a product of smart design and the performance/results are indicative of such. The only thing I can think of that comes close in terms of raw performance (ie step generation rate) is TeaCup firmware but it comparatively lacks in versatility.
Edited 1 time(s). Last edit at 01/11/2019 12:17PM by obelisk79.
|
Re: another new core xy January 13, 2019 02:40PM |
Registered: 5 years ago Posts: 27 |
Thank you for you reply. you put too little value in your opinion. it is great to hear that klipper is a working solution with an active community as I have sort of committed to using it now!
Once everything starts to arrive and construction begins I will post as much as I can, I already received the aluminium plates and profiles from the uk supplier but I do not want to start cutting anything until the Chinese parts arrive and I can confirm the dimensions of the pulleys etc. Im very pleased with the rigidity of the t section that the x axis linear rail will be mounted to. It is only 20mm x 20mm x 3mm thick but holding at both ends (500mm long) it is very hard to twist. the hardest part will be holding it to mark, drill and tap all those m3 holes, but I have a cunning plan.....
Once everything starts to arrive and construction begins I will post as much as I can, I already received the aluminium plates and profiles from the uk supplier but I do not want to start cutting anything until the Chinese parts arrive and I can confirm the dimensions of the pulleys etc. Im very pleased with the rigidity of the t section that the x axis linear rail will be mounted to. It is only 20mm x 20mm x 3mm thick but holding at both ends (500mm long) it is very hard to twist. the hardest part will be holding it to mark, drill and tap all those m3 holes, but I have a cunning plan.....
|
Re: another new core xy January 13, 2019 03:22PM |
Registered: 6 years ago Posts: 1,007 |
|
Re: another new core xy January 17, 2019 12:29PM |
Registered: 5 years ago Posts: 27 |
Ok i have a question...
Heated enclosure.
I’m going to board in the sides and top of this printer. As a carpenter by trade I have plenty of ply at my disposal, I know it’s not the best but I’m pretty sure that acrilic won’t hold up to well either. I can get my hands on some thin PIR rigid insulation to fill the 2020 frame to protect the ply a little.
At this point I’m not planning on adding any active heating to the enclosure, just going to let the 500w heat bed do it’s thing.
Do I need to be concerned about cooling for the hot end? I have a e3d v6 with the tiny fan. If the air temp in the box is 50° will the hot end have sufficient cooling at the cool end?
If not what is the solution? Presumably I will need to pump cool air in from outside the enclosure.
|
Re: another new core xy January 17, 2019 12:50PM |
Registered: 11 years ago Posts: 5,780 |
You don't need water cooling or to bring in outside air. I run my printer at 50C with the air inside the enclosure cooling the hot end. It only gets that warm to print ABS, and ABS doesn't get soft at 50C so it works fine.
Ultra MegaMax Dominator 3D printer: [drmrehorst.blogspot.com]
Ultra MegaMax Dominator 3D printer: [drmrehorst.blogspot.com]
|
Re: another new core xy January 17, 2019 06:08PM |
Registered: 5 years ago Posts: 27 |
|
Re: another new core xy January 18, 2019 01:00AM |
Registered: 11 years ago Posts: 5,780 |
I don't use a cooling fan for ABS at all. It might be useful for bridging...
Ultra MegaMax Dominator 3D printer: [drmrehorst.blogspot.com]
Ultra MegaMax Dominator 3D printer: [drmrehorst.blogspot.com]
|
Re: another new core xy January 26, 2019 02:28PM |
Registered: 5 years ago Posts: 27 |
mr dentist I do hope you dont mind me keep asking questions that I'm sue have been answered before but I'm going to carry on regardless as you seem to have a good grasp on this 3d printing thing!!!!!!
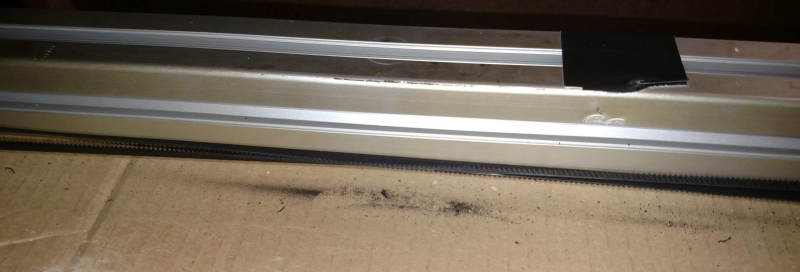
poking around here and google images, I see quite a few instances where the belts cross at the front of machine ie

this is despite having the belts at different levels. is there a reason for this. I can't think of one other than its an artifact of the single level belt system with rubbing belts
I would hate to make my machine and have a glaring fault like belt routing.
parts are starting to turn up almost daily now. still waiting on the pulleys thou so no start until they get here as I need to check diameters before machining axle locations.
poking around here and google images, I see quite a few instances where the belts cross at the front of machine ie

this is despite having the belts at different levels. is there a reason for this. I can't think of one other than its an artifact of the single level belt system with rubbing belts
I would hate to make my machine and have a glaring fault like belt routing.
parts are starting to turn up almost daily now. still waiting on the pulleys thou so no start until they get here as I need to check diameters before machining axle locations.
|
Re: another new core xy January 26, 2019 07:14PM |
Registered: 11 years ago Posts: 5,780 |
The belts cross because the corner pulleys each have their own axle. If they shared axles, and there's no reason not to with stacked belts, the belts would not cross.
I made a sand table that used single level belts with the pulleys arranged sort of like that and a half twist in the belts in that section where they cross so that the backs of the belts would touch instead of the teeth. After running it for a few hours, there was a pile of dust from the belts at the crossing point and at one of the corner pulleys where the flange was chewing on the edge of the belt because of the twist. I don't recommend trying to use both belts on a single level.
I converted it to stacked belts and now it works fine.
Ultra MegaMax Dominator 3D printer: [drmrehorst.blogspot.com]
|
Re: another new core xy January 27, 2019 04:54AM |
Registered: 5 years ago Posts: 27 |
I have no intention of crossing belts, just wondered why some stacked belt machines have dual axle pulleys that are offset as in the above pic. My design dictates the need For two seperate axles and I just wanted to check that I don’t need to offset them even thou they are in different planes
Thank you for all your help
Thank you for all your help
|
Re: another new core xy January 27, 2019 12:22PM |
Registered: 11 years ago Posts: 5,780 |
I think there's a lot of misunderstanding about corexy belt paths. You have one group of people who have no idea about keeping any of the belt segments parallel to any of the guide rails (their printers fail miserably), and others who think every segment has to be parallel to the rails. A third, and largest group, just copies what they see in other designs without understanding why or whether it works properly. Some get lucky and copy a design that works, others copy a bad design and then think there's something wrong or difficult about getting a corexy machine to work properly.
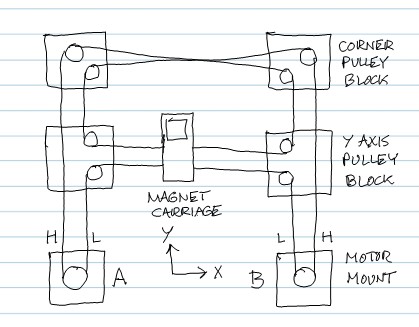
There's no need to offset the pulleys at all if the belts are stacked, but it will also depend on where the motors are mounted. In my sand table, I had to mount the motors to the inside of the table's frame, which also serves as the Y axis guide rails. So even though the belts are stacked, I used two axles at the corner pulleys so that I could keep the necessary parallel relationship between the Y axis belt segments and the table's frame. The outermost belt segments running along the Y axis rails pass through the Y axis bearing blocks. This is the belt layout I used:
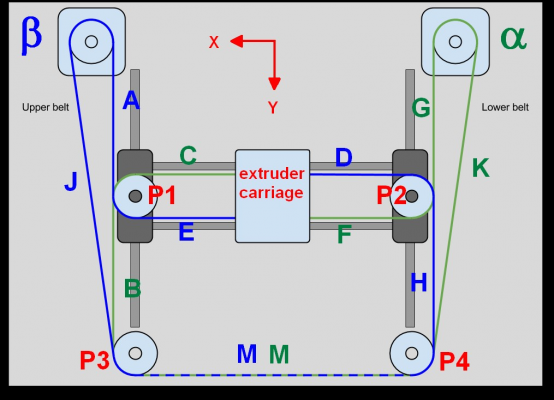
In my 3D printer, I used a slight variation of this arrangement, where the motors are mounted to the outside of the Y axis rails:
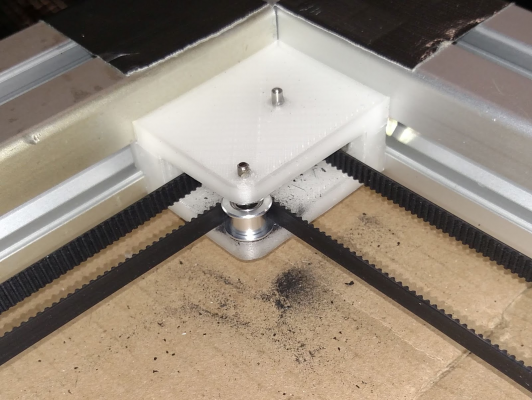
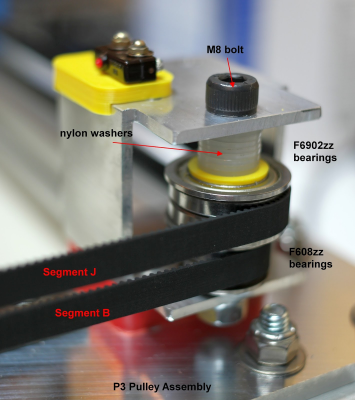
My variation is that I used linear guides instead of round guide rails and I used larger pulleys for one belt at each corner (P3 and P4) to prevent interference as the X axis moved close to the corner pulley blocks. The larger pulleys don't affect any of the belt paths that need to be parallel to the guide rails. Here's the P3 corner pulley block with the larger pulley on the upper belt. The P4 pulley block at the opposite corner has the larger pulley on the lower belt. It isn't absolutely necessary to do this, but at the time I built it I didn't know if the belts were going to flop around as the system moved and I didn't want to take a chance on the belts (segments A and J, and G and K) hitting each other.
Ultra MegaMax Dominator 3D printer: [drmrehorst.blogspot.com]
|
Re: another new core xy February 04, 2019 04:44PM |
Registered: 5 years ago Posts: 27 |
|
Re: another new core xy February 04, 2019 05:08PM |
Registered: 5 years ago Posts: 27 |
Progress
The 2020 has arrived along with the linear rails, rods and lead screws. I didnt get home until late tonight but as we just had a long week end thanks to the snow I have been able to make a lot of the plates. Still waiting for belts and pulleys to arrive so the critical xy plates are still to be done.
I actually made the plates before the delivery so was a little concerned that thing may not fit. Worried for nothing the leadscrew nuts were a push fit and the linear bearings couldn’t have been any more perfect. Even the bolt holes lined up!
Frame roughly built, I will cut gauge rods to align the mid rails that carry the xy carriage, but it’s getting late and my helpers bedroom is over the top of the garage so no sawing


Motor plates are done. Turned out ok, don’t have the motors yet but confidence is high

The z lift plates in the 3 stages of build. If I’m honest 1 is left untouched as it looks like I may have forgotten the finishing pass inside the bores. There’s no way the nut or bearing are going in.

And here’s a quick one of old mrs woopsie in all her glory. Lost count how many times of crashed this thing but she’s still holding up!! I think her saving grace is that the motors skip steps before anything breaks. Though only this weekend I left my little Festool drill on the table ... .rapid traversed over the top. Bent the drills spindle if you can believe it! Still runs but starting screws requires two hands now.

More to follow .......
Edited 1 time(s). Last edit at 02/04/2019 05:16PM by TheHandsomeDog.
The 2020 has arrived along with the linear rails, rods and lead screws. I didnt get home until late tonight but as we just had a long week end thanks to the snow I have been able to make a lot of the plates. Still waiting for belts and pulleys to arrive so the critical xy plates are still to be done.
I actually made the plates before the delivery so was a little concerned that thing may not fit. Worried for nothing the leadscrew nuts were a push fit and the linear bearings couldn’t have been any more perfect. Even the bolt holes lined up!
Frame roughly built, I will cut gauge rods to align the mid rails that carry the xy carriage, but it’s getting late and my helpers bedroom is over the top of the garage so no sawing


Motor plates are done. Turned out ok, don’t have the motors yet but confidence is high

The z lift plates in the 3 stages of build. If I’m honest 1 is left untouched as it looks like I may have forgotten the finishing pass inside the bores. There’s no way the nut or bearing are going in.

And here’s a quick one of old mrs woopsie in all her glory. Lost count how many times of crashed this thing but she’s still holding up!! I think her saving grace is that the motors skip steps before anything breaks. Though only this weekend I left my little Festool drill on the table ... .rapid traversed over the top. Bent the drills spindle if you can believe it! Still runs but starting screws requires two hands now.

More to follow .......
Edited 1 time(s). Last edit at 02/04/2019 05:16PM by TheHandsomeDog.
|
Re: another new core xy February 05, 2019 04:04PM |
Registered: 5 years ago Posts: 27 |
Today work. The X assembly
The cunning fixture to hold the T shaped rail
I also used the cut out to accurately measure the 410mm. A well used builders tape doesn't really get that close. I cut the pocket and the trimmed the aluminium until it fitted with a slight press. The result was so good I didn't use any clamps while drilling the holes.


|
Re: another new core xy February 05, 2019 04:14PM |
Registered: 5 years ago Posts: 27 |
|
Re: another new core xy February 24, 2019 03:46PM |
Registered: 5 years ago Posts: 27 |
Well I may be skipping a few steps but here is the latest pics
About 90% done just need to add the back, top, doors and controller enclosure.
All of which should have been done this weekend but. With everything connected I just had to have a play.
I would love to say I just turned it on and started printing but that would be a very large lie.
Ended up having to swap some of the TMC 2208 drivers out. All I had I the box were some old drv8825's but despite their simpleness they worked great compared to the overly clever 2208.
If anyone needs the bottom of a benchy, I'm your man. I go from .02mm to 10mm in .2mm steps.....


|
Re: another new core xy February 24, 2019 04:02PM |
Registered: 5 years ago Posts: 27 |
Depending upon which side one views that rocket, it either came out very well or is a disaster! I do however think I know what the problem is. I think I was a little over zealous with the retraction settings. As it printed I could see the start of each layer under extruding.
Showing promise thou. Especially as this is my first ever "successful" print. I'm sure once the enclosure is completed it will get better too as the abs keeps living off the bed. I started out with slurry on painters tape but it just peeled up the tape instead.
The slurry directly onto the aluminium doesn't seem to bite well enough either. I think I will scuff the bed some emery cloth before the next attempt as I had to abort the rocket at 96% complete after it came loose


Edited 1 time(s). Last edit at 02/24/2019 04:04PM by TheHandsomeDog.
Showing promise thou. Especially as this is my first ever "successful" print. I'm sure once the enclosure is completed it will get better too as the abs keeps living off the bed. I started out with slurry on painters tape but it just peeled up the tape instead.
The slurry directly onto the aluminium doesn't seem to bite well enough either. I think I will scuff the bed some emery cloth before the next attempt as I had to abort the rocket at 96% complete after it came loose


Edited 1 time(s). Last edit at 02/24/2019 04:04PM by TheHandsomeDog.
Sorry, only registered users may post in this forum.

